2021 SUBARU OUTBACK ignition
[x] Cancel search: ignitionPage 120 of 172

Recognizing a Driver
DriverFocus®will scan and recognize you as
soon as you enter the vehicle. The
Combination Meter Display will show a
welcome screen with your user name and
personal icon. The vehicle will also recall your
user settings, such as driver seat and side
mirror positions.
If the system does not automatically recognize
a registered driver, you can repeat the facial
scan by selecting "Settings", then selecting
the "Car" menu. Select "Driver Monitoring
System", then "Repeat Facial Scan".
Deleting a Driver
1. With the ignition on, select “Settings” in the
Center Information Display (CID).
2. In the tabs at the top of the screen, select
“Car”.
3. Select “Driver Monitoring System”.
4. Scroll down and select “Delete User”.
5. Select the driver you want to delete and
select “Yes”.
DRIVERFOCUS DISTRACTION MITIGATION SYSTEM
118
Page 125 of 172

HOW TO OVERVIEW
This “How To” appendix provides detailed, step-by-step instructions to easily connect with
features of your Outback.
If you need some help with these features or want to
learn more, we are here to assist you:
Your Subaru Owner’s Manuals:
Located in the glovebox
Online Subaru Owner’s Resources:
www.subaru.com/owners
Subaru Customer Support:
www.subaru.com/customer-support
1-800-782-2783 (1-800-SUBARU3 )
SETTING THE CLOCK
Clock settings can be adjusted when the ignition is in the “ON” position. You can adjust
the clock manually or set the clock to adjust automatically in the clock setting screen. To
directly access the clock setting screen, you can select the clock on the status bar at the
top of the Center Information Display. Full directions for accessing the clock settings and
adjusting the clock manually or automatically are given below.
For more information, please refer to “Basic Functions” in the STARLINK®Owner’s
Manual.
HOW TO APPENDIX
123
Page 131 of 172
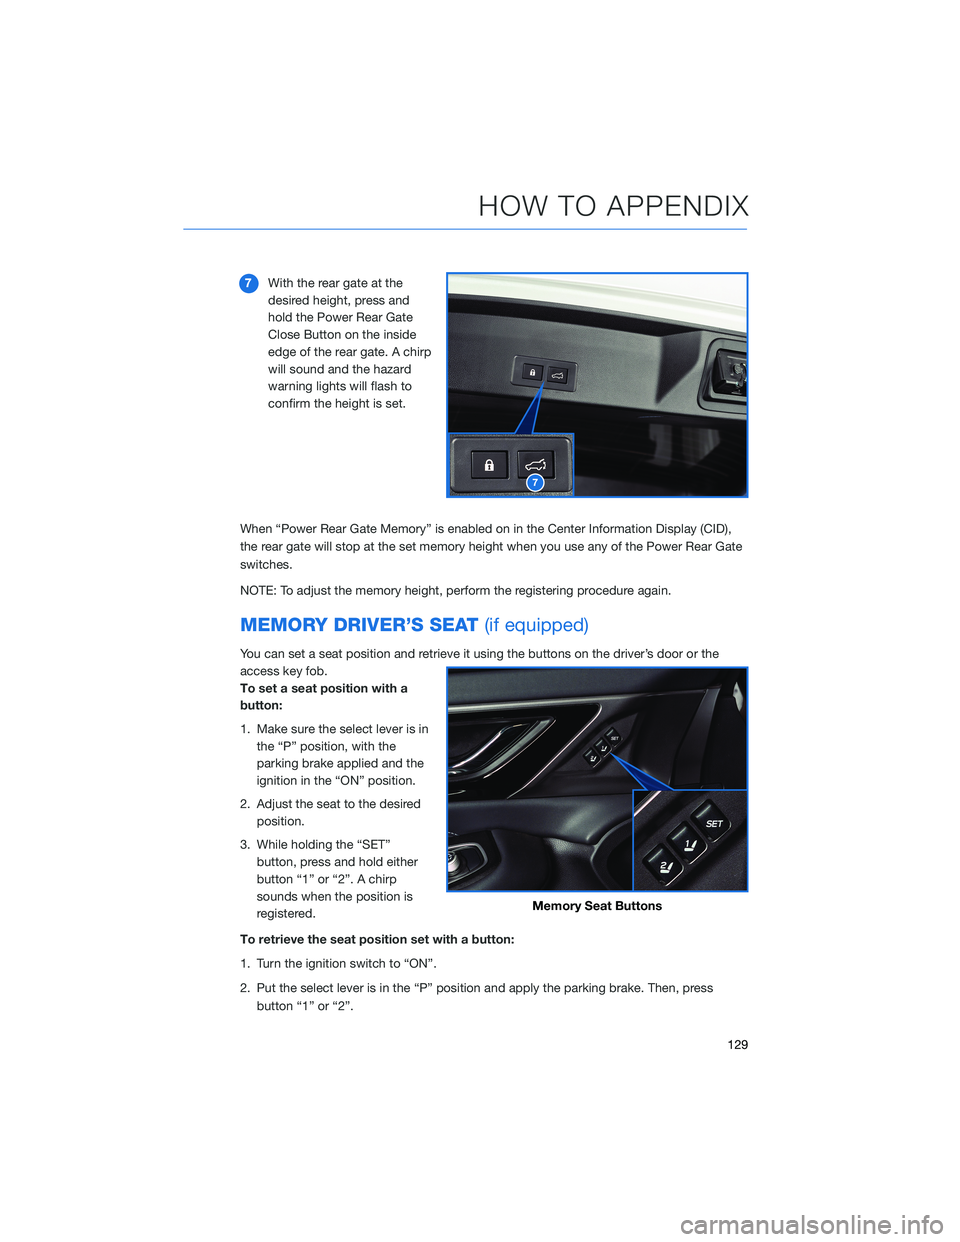
7With the rear gate at the
desired height, press and
hold the Power Rear Gate
Close Button on the inside
edge of the rear gate. A chirp
will sound and the hazard
warning lights will flash to
confirm the height is set.
When “Power Rear Gate Memory” is enabled on in the Center Information Display (CID),
the rear gate will stop at the set memory height when you use any of the Power Rear Gate
switches.
NOTE: To adjust the memory height, perform the registering procedure again.
MEMORY DRIVER’S SEAT(if equipped)
You can set a seat position and retrieve it using the buttons on the driver’s door or the
access key fob.
To set a seat position with a
button:
1. Make sure the select lever is in
the “P” position, with the
parking brake applied and the
ignition in the “ON” position.
2. Adjust the seat to the desired
position.
3. While holding the “SET”
button, press and hold either
button “1” or “2”. A chirp
sounds when the position is
registered.
To retrieve the seat position set with a button:
1. Turn the ignition switch to “ON”.
2. Put the select lever is in the “P” position and apply the parking brake. Then, press
button “1” or “2”.
7
Memory Seat Buttons
HOW TO APPENDIX
129
Page 132 of 172

To set a seat position with the access key fob:
1. Make sure the select lever is in the “P” position with the parking brake applied and the
ignition “OFF”.
2. Adjust the seat to the desired position.
3. While holding the “SET” button, press and hold the unlock button on the access key
fob. A chirp sounds when the position is registered.
To retrieve the seat position set with the access key fob:
1. Hold the access key fob.
2. Unlock and open the driver’s door.
BLUETOOTH®PAIRING
Pairing an Android Device
1To pair an Android device, start by
touching the “Phone” button on the
Home screen.
2If there is no phone connected, it will ask
you, “Do you want to add a device?”.
Select “Yes”. If a device has already been
paired, select “Add Device”.
HOW TO APPENDIX
130
Page 163 of 172
FIRMWARE AND SOFTWARE UPDATES
Software updates provide enhancements to the system, such as new features, added
security, and upgraded functions. You can ask your preferred Subaru retailer to check for
and perform a full update to the system software. Please ask your preferred Subaru retailer
for specific details on update content.
For the 11.6-inch Multimedia Plus and the 11.6-inch Multimedia Navigation systems, some
system software can be updated via a Wi-Fi network. The update process involves
downloading and installing the software update.
NOTE: System functionality will be restricted during installation, and you may need to
reset radio station presets and volume settings after the update process. Set your clock to
“Auto” (see page 126) before updating the software.
To update the software via Wi-Fi:
1. Connect to a Wi-Fi network (see page 139).
2. Display the general setting screen by pressing the “Home” button, then select
“Settings”, and finally “General”.
3. Select “Software Update”, select “Update”, and then select “Check for Updates”
• If “Automatically Check for Updates” is enabled, an update check will be performed
automatically before proceeding to the next step.
• If “Automatically Download Updates” is enabled, available software updates will be
downloaded automatically.
4. Select “Download Now” to begin the download. The download status progress is
displayed in the upper right of the screen. If you need to stop the download and restart
at a later time, select “Cancel” to stop the process.
5. Select “Install Now” to start the installation process. The installation process will take
several minutes to complete.
6. When the installation is complete, select “OK” on the confirmation message to
complete the update process.
7. Turn the ignition to the “LOCK”/“OFF” position and open and close the driver’s door.
After about 5 minutes, restart the engine, and the software installation will be applied.
HOW TO APPENDIX
161
Page 165 of 172
F
FIRMWARE AND SOFTWARE
UPDATES . . . ............ 161
FOLDING THE REAR SEATS....... 51
FRONT VIEW MONITOR . . . . . . . . 112
FUEL . . . . . . . . . ........... 50
FUEL CAPACITY . . ............ 50
FUEL FILLER LID . . . .......... 50
FUNCTIONS . . . . . .......... 101
Advanced Adaptive Cruise Control with
Lane Centering . . ..........104
Conventional Cruise Control . . . . . 106
Lane Departure Prevention . . . . . . 104
Lane Departure Warning.......103
Lane Sway Warning . .........103
Lead Vehicle Start Alert . . . . . . . . 107
Pre-Collision Brake Assist . . . . . . 102
Pre-Collision Braking . ........102
Pre-Collision Throttle Management. . 102
H
HIGH BEAM ASSIST (HBA) . . . . . . . 113
HOME SCREEN ICONS . . . . . . . . . 72
HOOD PROP . . . . ............ 57
HOW TO CREATE A PROFILE . . . . . . 76
Retrieving a Driver Profile.......79
HOW TO OVERVIEW .......... 123
I
IGNITION SWITCH . ........... 42
IMPORTANT SAFETY INFORMATION . . 4
IN CASE OF EMERGENCY . . . . . . . . 6
Subaru Roadside Assistance . . . . . . 6
SUBARU STARLINK
®Safety and
Security . . . . . . . . . .........6
INSTRUMENT PANEL SWITCHES
(LOWER LEFT) . . . . . . . . . . . . . 35
I SWITCH . . . . . . . ........... 36K
KEYLESS ACCESS WITH PUSH BUTTON
START .................. 10
Locking Using Door Handles . . . . . 10
Locking Using the Rear Gate . . . . . 11
Unlocking Using Door Handles . . . . 10
Unlocking Using the Rear Gate....11
KEYLESS ENTRY . ............. 8
Automatic Door Locking/Unlocking . . 9
L
LANE DEPARTURE WARNING AND
PRE-COLLISION BRAKING SYSTEM
OFF................... 110
Lane Departure Warning OFF....110
Pre-Collision Braking OFF ......110
LATCH/ANCHOR . . ........... 53
LIGHT CONTROLS . ........... 37
Daytime Running Lights . .......38
Illumination Brightness . ........37
M
MAKING A CALL . . . .......... 84
MAPS . . . ................ 142
Arrival Distance/Time.........159
Canceling Guidance . . ........159
Creating Home/Work.........142
Finding a Destination By Address . . 146
Finding a Destination By POI . . . . 149
Guidance Screen Icons . .......157
Map Updates .............160
Map View/Perspectives . . . .....158
Map Zoom . . . . . . . . . ......157
Nearest Gas Station ..........159
Route Options . . . . . . . ......152
Saving Destination as a Favorite . . 154
Shortest/Fastest/Economic .....153
Traffic Information . ..........158
MAPS/NAVIGATION . . . ......... 98
Checking for Map Updates......98
INDEX
163
Page 166 of 172
Updating Maps Using Your PC/MAC..99
Updating Over-the-Air . . . . . . . . . 98
MAPS OVERVIEW . . . . . ........ 91
MEDIA................... 82
Aux Input . . . . . . . . . ........82
Bluetooth
®................82
CD ....................82
USB / iPod . . . . . . . .........82
MEMORY DRIVER’S SEAT . . . . . . . 129
MEMORY HEIGHT . . . . . . . . . . . 128
MYSUBARU . . . . . . .......... 90
Service Appointment Scheduler . . . 90
MYSUBARU INTEGRATION ....... 94
N
NEW VEHICLE BREAK-IN........ 60
O
OPERATION . . . . . . . ........ 101
OVERHEAD CONSOLE . . ........ 40
OVERVIEW OF YOUR MULTIMEDIA
SYSTEM . . . . . . . . . . . . . . . . . 65
Screen Layout . . . . . . ........66
Various Systems . . . . . . . . . . . . 65
OWNER’S RESOURCES . . . . . . . . . . 5
P
PAIRING A PHONE . . . . ........ 83
PHONE................... 97
POWER EXTERIOR MIRRORS ..... 21
Power Folding Mirrors .........22
Reverse Tilt Mirror . . . . . ......23
POWER MOONROOF . . . . . ..... 25
Opening/Closing the Moonroof . . . . 25
Tilting the Moonroof . . . . . . . . . . 25
POWER REAR GATE (PRG) ....... 12
From the Rear of the Vehicle.....13
Hands-free Power Rear Gate .....14
Power Rear Gate Button ........12
Power Rear Gate Lock . ........14POWER WINDOWS............ 24
PUSH-BUTTON IGNITION SWITCH . . 42
R
RADIO.................... 80
AM/FM Radio..............80
Satellite Radio . . . . . . . . . . . . . . 81
Setting Presets . . . . . . . ......81
REARRANGING ICONS .......... 73
REAR SEAT REMINDER......... 54
Passenger Occupant Detection and
Seatbelt Reminders ...........54
REAR VIEW MIRROR . . . . . . ..... 23
Auto-dimming Mirror . . . . . . . . . . 23
HomeLink
®5 Accessory Mirror . . . 24
REAR-VISION CAMERA . . . . . . . . . 111
Rear-vision Camera Washer .....111
REAR WINDOW WIPER . . . . . . . . . 39
Rear-vision Camera Washer......39
RECEIVING A CALL ............ 85
REVERSE AUTOMATIC BRAKING
(RAB)................. 114
ROOF RAIL CAPACITY .......... 61
S
SAFETY AND SECURITY OVERVIEW . . 92
SEATING.................. 18
Head Restraint Adjustment . . . . . . 20
Manual Seats . . . . . .........18
Power Driver’s Seat (if equipped) . . . 19
Seatbelt Adjuster . . . . . . . .....20
SETTINGS AND UPDATES OVERVIEW . . 95
Connect to Home Wi-Fi . . . . . . . . 95
Performing Software Updates .....95
SETTING THE CLOCK . . . ...... 123
Automatically . . . . ..........126
Manually................124
SOUND................... 96
SPARE TIRE................ 56
STARTING THE VEHICLE ......... 42
Without Push-button Ignition.....42
INDEX
164
Page 167 of 172
With Push-button Ignition.......42
STEERING RESPONSIVE HEADLIGHTS
(SRH) . . . . . . . ........... 114
STEERING WHEEL CONTROLS..... 69
Advanced Adaptive Cruise Control. . 107
Customizing EyeSight®Settings . . 108
STEREO CAMERA PRECAUTIONS . . 120
SUBARU STARLINK
®IN-VEHICLE
APPS . . . . . . . ........... 87
Android™ Auto . . . ..........87
Apple CarPlay
®.............87
SiriusXM®Travel Link . . . . . . . . . . 88
SUBARU STARLINK®MOBILE APP . . 88
Chimani . . . . . . . ..........89
eBird . . . . . . . . . . . . . . . . . . . 89
Quick Reference Guide........89
SUBARU STARLINK®WI-FI HOTSPOT . . 94
T
TEXT MESSAGES . . . . . ........ 86
TILT AND TELESCOPIC STEERING
COLUMN . . . . . ........... 21
TIRE PRESSURE MONITORING SYSTEM
(TPMS) . . . . . . . . . . ........ 62
TOUCHSCREEN . . . . . . . . . . . . . . 68
TOWING YOUR ALL-WHEEL DRIVE
SUBARU . . . . . . . . . ........ 7
TRAILER TOWING CAPACITY . . . . . . 61
TURNING OFF THE VEHICLE...... 49
Without Push-button Ignition .....49
With Push-button Ignition.......49
TURN SIGNALS . . . . . ......... 38V
VOICE RECOGNITION.......... 70
Common Commands..........71
Tips....................70
W
WARNING AND INDICATOR LIGHTS . . 41
WELCOME . . . . . . . . . ......... 4
WI-FI . . . . ................ 139
Connecting to a Wi-Fi Network . . . 139
Wi-Fi Hotspot Subscription.....140
WINDSHIELD GLASS AND
DASHBOARD . . ........... 120
WINDSHIELD WIPERS . . . ....... 38
X
X-MODE
®.................. 48
Hill Descent Control (HDC) . . .....49
NOTES
165