2021 SUBARU ASCENT power steering
[x] Cancel search: power steeringPage 3 of 140

PURPOSE OF THIS GUIDE
WELCOME................. 4
IMPORTANT SAFETY
INFORMATION.............. 4
OWNER’S RESOURCES....... 4
IN CASE OF EMERGENCY..... 5
TOWING YOUR ALL-WHEEL
DRIVE SUBARU............. 6
ENTRY AND EXIT
KEYLESS ENTRY............ 7
KEYLESS ACCESS WITH PUSH
BUTTON START............. 9
POWER REAR GATE (PRG)....11
INSTRUMENT PANEL........14
GETTING COMFORTABLE
SEATING...................16
TILT AND TELESCOPIC STEERING
COLUMN...................19
POWER EXTERIOR MIRRORS . . 19
REAR VIEW MIRROR.........20
CABIN VIEW MIRROR.........21
POWER WINDOWS..........21
POWER MOONROOF........22
CLIMATE CONTROL..........23
ACCESSORY CONNECTIONS . . 29
CONTROLS
INSTRUMENT PANEL SWITCHES
(LOWER LEFT)..............30AUDIO CONTROLS...........30
ADVANCED ADAPTIVE CRUISE
CONTROL..................31
I/SET SWITCH...............31
VIEW/ENTER Switch..........32
LIGHT CONTROLS...........32
TURN SIGNALS.............34
WINDSHIELD WIPERS........34
REAR WINDOW WIPER.......35
ONE-TOUCH INTERIOR
LIGHTING..................35
OVERHEAD CONSOLE........36
GAUGES AND WARNING
LIGHTS
COMBINATION METER.......37
WARNING AND INDICATOR
LIGHTS....................37
OPERATING THE VEHICLE
IGNITION SWITCH...........38
PUSH-BUTTON IGNITION
SWITCH...................38
STARTING THE VEHICLE......38
DRIVING THE VEHICLE.......39
ELECTRONIC PARKING BRAKE
(EPB).....................40
X-MODE
®..................42
TURNING OFF THE VEHICLE...43
TABLE OF CONTENTS
Page 21 of 140

TILT AND TELESCOPIC STEERING COLUMN
You can adjust both the height
and lengthwise position of the
steering wheel. Pull the lever on
the side of the steering column
down firmly to unlock, then adjust
the position of the steering wheel.
Push the lever firmly back up to
lock the column in place.
POWER EXTERIOR MIRRORS
Turn the knob to “L” (left side) or “R” (right
side) to select a mirror. Push the knob in the
direction you want to move the mirror. Turn the
knob back to the center position when
finished.
Steering Column Unlock
Power Mirror Knob
GETTING COMFORTABLE
19
Page 31 of 140

ACCESSORY CONNECTIONS
1Auxiliary Input Jack
The 3.5mm auxiliary input
jack is located below the
climate control panel. You
can connect a portable
music player to the auxiliary
jack and hear the music
stored on it through your
Subaru’s speakers. Press the
“Source” button located on
the steering wheel or the
“Media” button on the
Touchscreen to select the
auxiliary mode.
For more information, please refer to page 67 or your SUBARU STARLINK®
Owner’s Manual.
2Dual USB Ports
The USB ports are located below the climate control panel, on the rear center
console, and, if equipped, in the third row area. You can connect a variety of
USB-equipped devices to the front ports, such as portable music players or
smartphones, to enjoy your favorite music through your Subaru’s speakers. All ports
provide charging (5V, 2.1A) to devices. The ports in the second and third row are for
charging only.
For more information, please refer to page 67 or your SUBARU STARLINK®
Owner’s Manual.
Power Outlets:
Power outlets (12V) are located in the small storage area below the climate control panel
and in the cargo area behind the 3rd row seats. Electrical power is available for use with
in-vehicle electrical appliances with a maximum power rating of 120W. If equipped, there is
also a 120V AC power outlet located on the back of the center console below the rear
climate control panel.
For more information, please refer to your Owner’s Manual.
Connection Ports
GETTING COMFORTABLE
29
Page 44 of 140

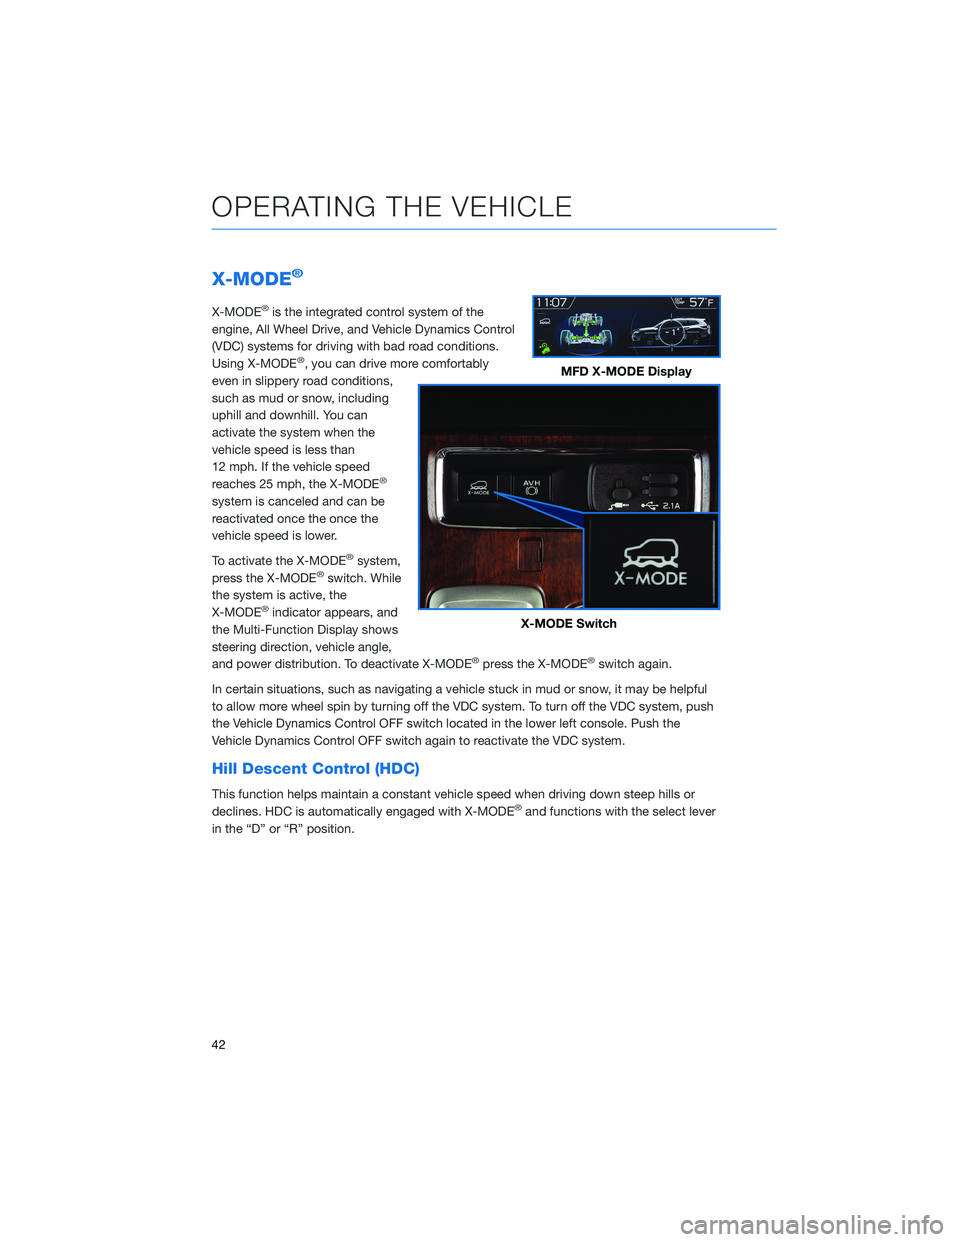
X-MODE®
X-MODE®is the integrated control system of the
engine, All Wheel Drive, and Vehicle Dynamics Control
(VDC) systems for driving with bad road conditions.
Using X-MODE
®, you can drive more comfortably
even in slippery road conditions,
such as mud or snow, including
uphill and downhill. You can
activate the system when the
vehicle speed is less than
12 mph. If the vehicle speed
reaches 25 mph, the X-MODE
®
system is canceled and can be
reactivated once the once the
vehicle speed is lower.
To activate the X-MODE
®system,
press the X-MODE®switch. While
the system is active, the
X-MODE
®indicator appears, and
the Multi-Function Display shows
steering direction, vehicle angle,
and power distribution. To deactivate X-MODE
®press the X-MODE®switch again.
In certain situations, such as navigating a vehicle stuck in mud or snow, it may be helpful
to allow more wheel spin by turning off the VDC system. To turn off the VDC system, push
the Vehicle Dynamics Control OFF switch located in the lower left console. Push the
Vehicle Dynamics Control OFF switch again to reactivate the VDC system.
Hill Descent Control (HDC)
This function helps maintain a constant vehicle speed when driving down steep hills or
declines. HDC is automatically engaged with X-MODE®and functions with the select lever
in the “D” or “R” position.
MFD X-MODE Display
X-MODE Switch
OPERATING THE VEHICLE
42
Page 93 of 140

You can turn the Advanced Adaptive Cruise Control on or off using the Adaptive Cruise
Control On/Off button on the right side of the steering wheel (see page 93). Once the
system is turned on, a white Adaptive Cruise Control icon will be displayed on the
Combination Meter Display (CMD). When all the operational conditions are met, “READY”
appears underneath the Adaptive Cruise Control icon.
To set Advanced Adaptive Cruise Control, push down the “SET/–” switch on the right side
of the steering wheel. The CMD will indicate a target speed and the icon will turn green.
This speed can be adjusted up or down using the “RES/SET” switch (see page 93).
When a vehicle in front of you is identified, a Lead Vehicle icon will be displayed on the
Combination Meter Display (CMD) and/or Multi-Function Display (MFD). You can change
the desired following distance from the lead vehicle by pressing the “Increase Distance” or
“Decrease Distance” buttons (see page 93).
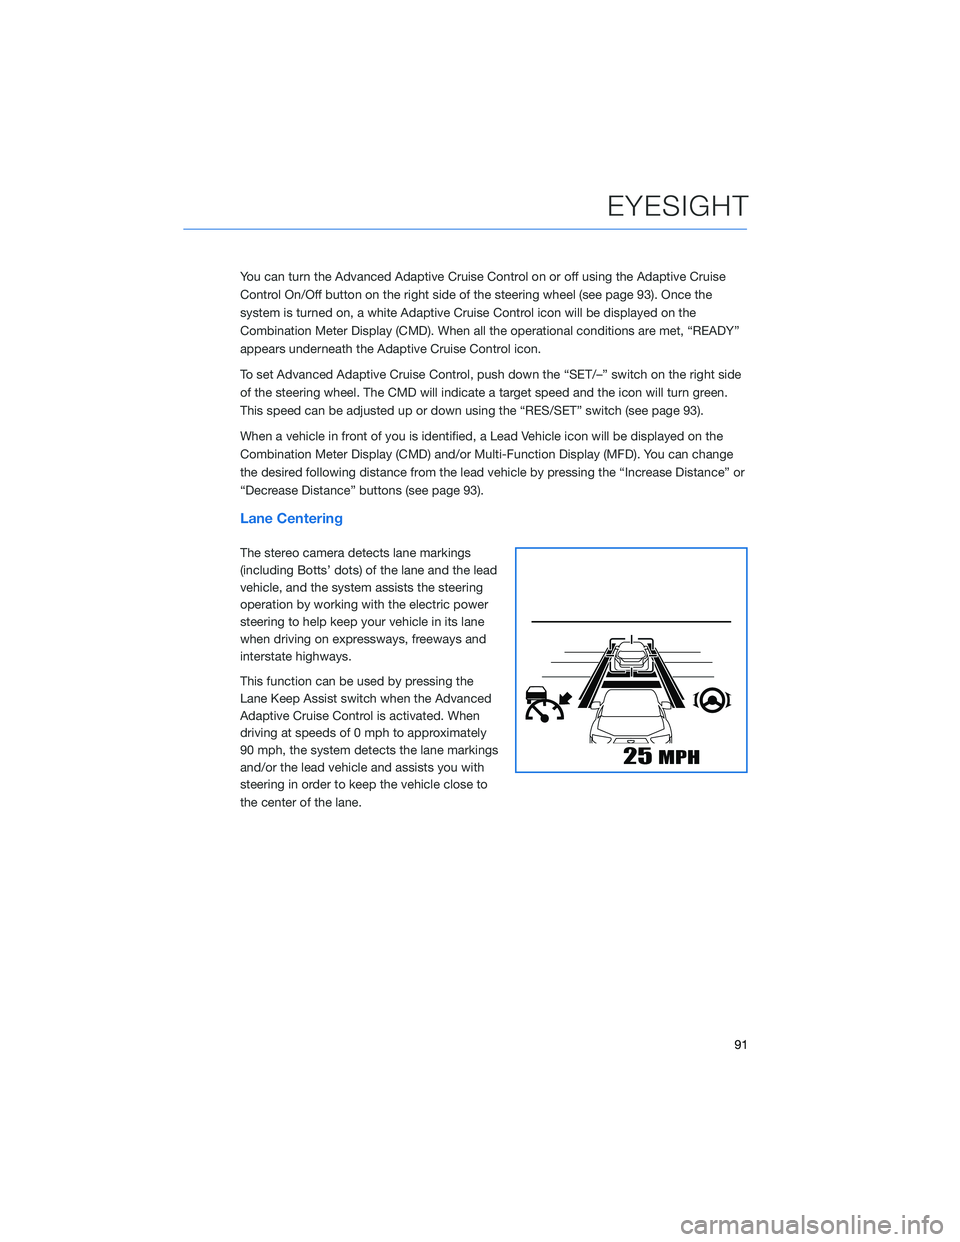
Lane Centering
The stereo camera detects lane markings
(including Botts’ dots) of the lane and the lead
vehicle, and the system assists the steering
operation by working with the electric power
steering to help keep your vehicle in its lane
when driving on expressways, freeways and
interstate highways.
This function can be used by pressing the
Lane Keep Assist switch when the Advanced
Adaptive Cruise Control is activated. When
driving at speeds of 0 mph to approximately
90 mph, the system detects the lane markings
and/or the lead vehicle and assists you with
steering in order to keep the vehicle close to
the center of the lane.
EYESIGHT
91
Page 134 of 140

Updating Maps Over-the-Air .....82
Updating Maps Using Your
PC/MAC . . . . . . . . . . .......83
MAPS OVERVIEW . . . . . ........ 76
MEDIA................... 67
Aux Input . . . . . . . . . ........67
Bluetooth
®................67
CD ....................67
USB / iPod . . . . . . . .........67
MEMORY DRIVER’S SEAT . . . . . . . 106
MEMORY HEIGHT . . . . . . . . . . . 104
MYSUBARU . . . . . . .......... 75
Service Appointment Scheduler . . . 75
MYSUBARU INTEGRATION ....... 78
N
NEW VEHICLE BREAK-IN........ 53
O
ONE-TOUCH INTERIOR LIGHTING . . 35
OPERATION . . . . . . . . . . . . . . . . 87
OVERHEAD CONSOLE . . ........ 36
OVERVIEW OF YOUR MULTIMEDIA
SYSTEM . . . . . . . . . . . . . . . . . 56
Various Systems . . . . . . . . . . . . 56
OWNER’S RESOURCES . . . . . . . . . . 4
P
PAIRING A PHONE . . . . ........ 68
PHONE................... 81
POWER EXTERIOR MIRRORS ..... 19
Power Folding Mirrors .........20
POWER MOONROOF . . . . . ..... 22
Opening/Closing the Sunshade . . . . 22
Sliding the Moonroof . .........22
Tilting the Moonroof . . . . . . . . . . 22
POWER REAR GATE (PRG) ....... 11
From the Rear of the Vehicle.....12
Power Rear Gate Button ........11
Power Rear Gate Lock . ........13POWER WINDOWS............ 21
PUSH-BUTTON IGNITION SWITCH . . 38
R
RADIO.................... 66
AM/FM Radio..............66
Presets..................67
Satellite Radio . . . . . . . . . . . . . . 66
REARRANGING ICONS .......... 62
REAR SEAT REMINDER......... 48
Passenger Occupant Detection and
Seatbelt Reminders ...........49
REAR VIEW MIRROR . . . . . . ..... 20
Auto-dimming Mirror . . . . . . . . . . 20
HomeLink
®5 Accessory Mirror . . . 20
Smart Rearview Mirror . . . . . . . . . 21
REAR-VISION CAMERA . . . . ..... 97
REAR WINDOW WIPER . . . . . . . . . 35
RECEIVING A CALL ............ 69
REVERSE AUTOMATIC BRAKING
(RAB) .................. 99
ROOF RAIL CAPACITY .......... 54
S
SAFETY AND SECURITY OVERVIEW . . 77
SEATING.................. 16
Head Restraint Adjustment . . . . . . 18
Manual Seats . . . . . .........16
Power Driver’s Seat (if equipped) . . . 17
Seatbelt Adjuster . . . . . . . .....18
SETTINGS AND UPDATES
OVERVIEW............... 80
Connect to Home Wi-Fi . . . . . . . . 80
Performing Software Updates .....80
SOUND................... 81
SPARE TIRE................ 50
STARTING THE VEHICLE ......... 38
Without Push-button Ignition.....38
With Push-button Ignition . ......38
STEERING RESPONSIVE HEADLIGHTS
(SRH) . . . . . . . . . . . . . . . . . . 99
INDEX
132