2021 RAM PROMASTER CITY child lock
[x] Cancel search: child lockPage 4 of 280

2
INTRODUCTION
Symbols Key ............................................................ 7
WARNINGS AND CAUTIONS ................................. 7
VAN CONVERSIONS/CAMPERS ............................ 7
VEHICLE MODIFICATIONS/ALTERATIONS .......... 8
Symbol Glossary ..................................................... 8
GETTING TO KNOW YOUR VEHICLE
KEYS ......................................................................10
Key Fob......................................................... 10
SENTRY KEY ..........................................................12
IGNITION SWITCH ................................................12
VEHICLE SECURITY SYSTEM — IF EQUIPPED ...13
To Arm The System ...................................... 13
To Disarm The System................................. 13
Rearming Of The System............................. 13
Security System Manual Override .............. 13
DOORS ..................................................................14
Power Door Locks ....................................... 14
Auto Unlock Doors ....................................... 14
Sliding Side Door ......................................... 14
Double Rear Swing Doors ........................... 16
Child-Protection Door Lock System ............ 17
SEATS ....................................................................17
Manual Adjustment (Front Seats)............... 18
Folding Rear Seat — If Equipped ................ 20
Heated Seats — If Equipped........................ 20 HEAD RESTRAINTS ............................................. 21
Front Adjustment ......................................... 21
Rear Adjustment — If Equipped .................. 22
Front Removal.............................................. 22
Rear Removal — If Equipped....................... 23
STEERING WHEEL ................................................ 23
Tilt/Telescoping Steering Column .............. 23
UCONNECT VOICE RECOGNITION QUICK
TIPS ........................................................................ 24
Introducing Voice Recognition .................... 24
Get Started ................................................... 24
Basic Voice Commands............................... 24
Additional Information ................................. 24
MIRRORS ............................................................. 25
Inside Rearview Mirror ................................ 25
Outside Mirrors ........................................... 25
Vanity Mirror................................................. 26
EXTERIOR LIGHTS ................................................ 27
Multifunction Lever...................................... 27
Headlights ................................................... 27
Daytime Running Lights (DRLs) —
If Equipped .................................................. 27 High/Low Beam Switch ............................... 28
Flash-To-Pass .............................................. 28
Parking Lights ............................................. 28
Follow Me Home/Headlight Delay .............. 28
Fog Lights — If Equipped ............................ 28
Turn Signals ................................................. 28
Lane Change Assist ..................................... 28
INTERIOR LIGHTS ................................................ 29
Courtesy/Interior Lights .............................. 29 WIPERS AND WASHERS .....................................30
Front Wiper Operation ................................. 30
Rear Wiper Operation — If Equipped .......... 31
CLIMATE CONTROLS ...........................................31
Manual Climate Control Descriptions And
Functions ..................................................... 31 Operating Tips.............................................. 33
WINDOWS ............................................................35
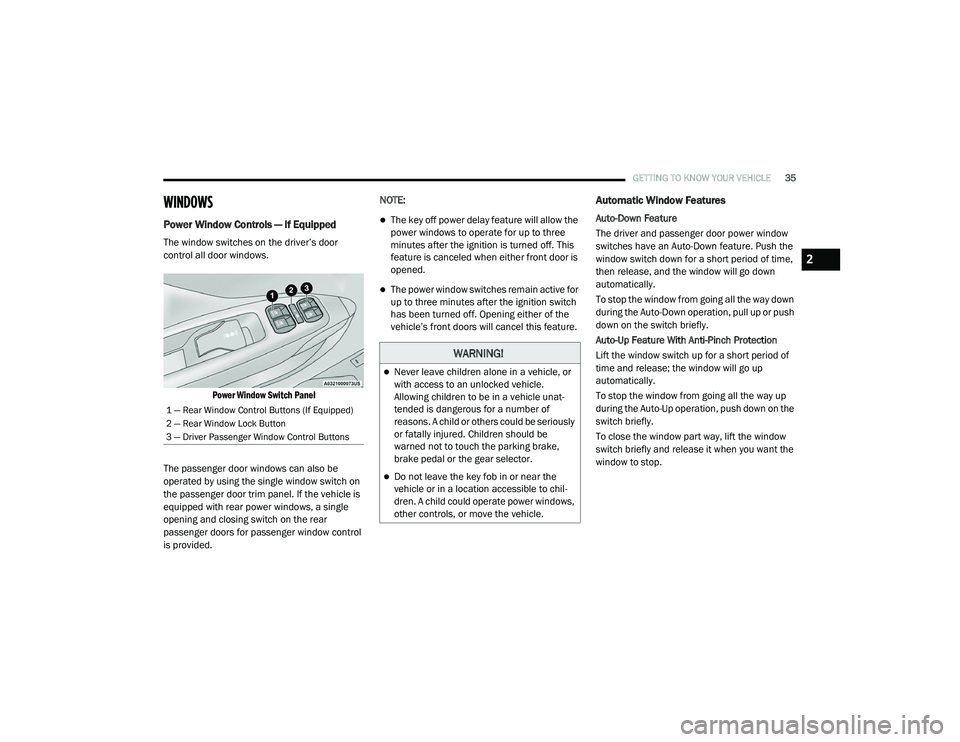
Power Window Controls — If Equipped ...... 35
Automatic Window Features ....................... 35
Power Windows System Initialization......... 36
Window Bar Grates — If Equipped .............. 36
Wind Buffeting ............................................ 36
HOOD .....................................................................37
Opening ........................................................ 37
Closing.......................................................... 37
CARGO AREA FEATURES .....................................38
Rear Cargo Tie-Downs ................................. 38
INTERIOR STORAGE AND EQUIPMENT ..............38
Storage ......................................................... 38
USB Control — If Equipped .......................... 40
Power Outlets .............................................. 40
ROOF RACK — IF EQUIPPED................................41
GETTING TO KNOW YOUR INSTRUMENT PANEL
INSTRUMENT CLUSTER........................................43
Instrument Cluster Descriptions................. 44
21_VM_OM_EN_USC_t.book Page 2
Page 6 of 280

4
MULTIMEDIA
UCONNECT SYSTEMS ..........................................86
CYBERSECURITY ..................................................86
UCONNECT SETTINGS .........................................87 Uconnect 3/3 NAV Settings ........................ 87
UCONNECT INTRODUCTION.................................97
Identifying Your Radio ................................. 97
Safety And General Information ................. 99
UCONNECT MODES ........................................... 100
Radio Mode ................................................100
Media Mode ...............................................107Phone Mode ..............................................109
NAVIGATION MODE — IF EQUIPPED ................ 121
Operating Navigation Mode —
If Equipped .................................................121
STEERING WHEEL AUDIO CONTROLS — IF
EQUIPPED ........................................................... 142
Radio Operation .........................................142
Media Mode ...............................................142
RAM TELEMATICS - IF EQUIPPED .................... 142
Ram Telematics General Information ......143
RADIO OPERATION AND MOBILE PHONES.... 143
Regulatory And Safety Information........... 144
SAFETY
SAFETY FEATURES ............................................ 145 Four-Wheel Anti-Lock Brake
System (ABS) ..............................................145 Electronic Brake Control (EBC) System ...146 AUXILIARY DRIVING SYSTEMS.........................149
Tire Pressure Monitoring
System (TPMS) ........................................... 149
OCCUPANT RESTRAINT SYSTEMS .................. 153
Occupant Restraint Systems .................... 153
Important Safety Precautions ................... 153
Seat Belt Systems ..................................... 154
Supplemental Restraint Systems (SRS)... 161
Child Restraints ......................................... 170
Transporting Pets ...................................... 184
SAFETY TIPS ....................................................... 185
Transporting Passengers .......................... 185Exhaust Gas .............................................. 185
Safety Checks You Should Make Inside
The Vehicle ................................................ 185 Periodic Safety Checks You Should Make
Outside The Vehicle ................................... 187
IN CASE OF EMERGENCY
HAZARD WARNING FLASHERS........................188
FUSES ..................................................................188
General Information .................................. 188Underhood Fuses ...................................... 189
Interior Fuses ............................................. 192
Central Unit Fuse Panel............................. 193 JACKING AND TIRE CHANGING ...................... 194
Jack Location — If Equipped ..................... 194
Removing The Spare Tire — If Equipped .. 194Preparations For Jacking ......................... 196
Jacking Instructions................................... 197
Vehicles With Alloy Wheels ....................... 200Vehicles Equipped With Wheel Covers .... 201
TIRE SERVICE KIT — IF EQUIPPED .................. 202
Tire Service Kit Storage............................. 202
Tire Service Kit Usage ............................... 202
JUMP STARTING ................................................ 204
Preparations For Jump Starting ................ 205
Jump Starting Procedure .......................... 206
IF YOUR ENGINE OVERHEATS ......................... 207
IGNITION KEY REMOVAL OVERRIDE ............... 208
GEAR SELECTOR OVERRIDE ............................ 209
FREEING A STUCK VEHICLE ............................ 209
TOWING A DISABLED VEHICLE ........................ 211
ENHANCED ACCIDENT RESPONSE SYSTEM
(EARS) ................................................................ 212
EVENT DATA RECORDER (EDR) ....................... 212
BULB REPLACEMENT ........................................ 213 Replacement Bulbs ................................... 213
Replacing Exterior Bulbs ........................... 214
Replacing Interior Bulbs ............................ 215
21_VM_OM_EN_USC_t.book Page 4
Page 14 of 280
12GETTING TO KNOW YOUR VEHICLE
(Continued)
SENTRY KEY
The Sentry Key Immobilizer system prevents
unauthorized vehicle operation by disabling the
engine. The system does not need to be armed
or activated. Operation is automatic, regardless
of whether the vehicle is locked or unlocked.
The system uses ignition keys which have an
embedded electronic chip (transponder) to
prevent unauthorized vehicle operation.
Therefore, only keys that are programmed to
the vehicle can be used to start and operate the
vehicle.
If the vehicle security light is on after the key is
placed in the MAR (ACC/ON/RUN) position, it
indicates that there is a problem with the
electronics.
All of the keys provided with your new vehicle
have been programmed to the vehicle
electronics.NOTE:
A key which has not been programmed is also
considered an invalid key, even if it is cut to fit
the ignition switch lock cylinder for that vehicle
Ú
page 265.
IGNITION SWITCH
1. Place the gear selector in PARK.
2. Rotate the key to the STOP (OFF/LOCK)
position.
3. Remove the key from the ignition switch lock cylinder.
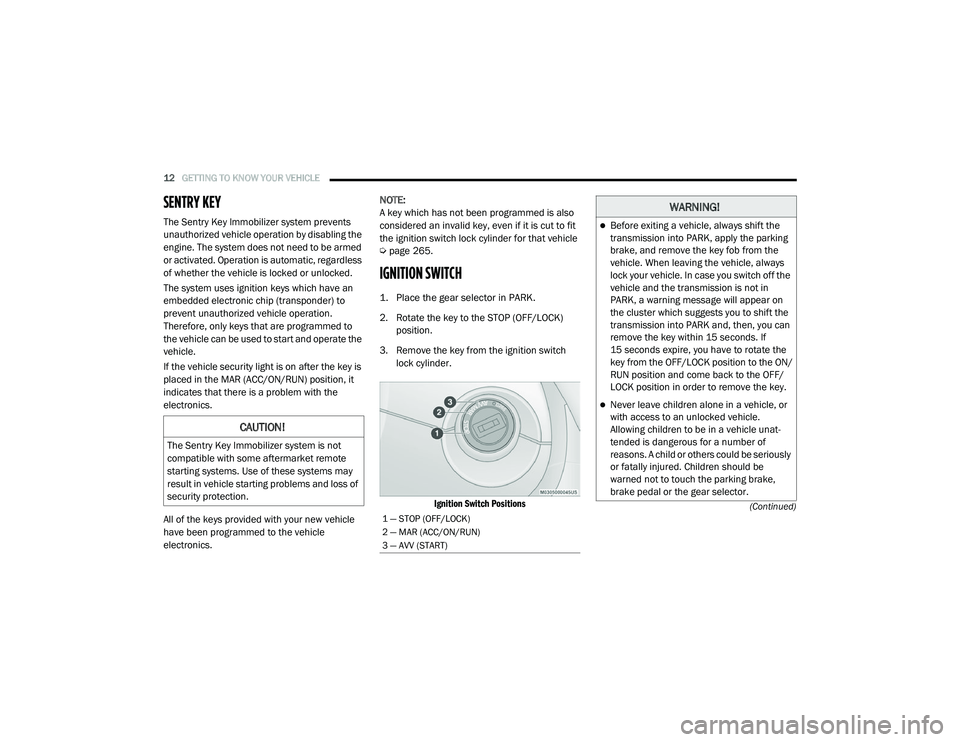
Ignition Switch Positions
CAUTION!
The Sentry Key Immobilizer system is not
compatible with some aftermarket remote
starting systems. Use of these systems may
result in vehicle starting problems and loss of
security protection.
1 — STOP (OFF/LOCK)
2 — MAR (ACC/ON/RUN)
3 — AVV (START)
WARNING!
Before exiting a vehicle, always shift the
transmission into PARK, apply the parking
brake, and remove the key fob from the
vehicle. When leaving the vehicle, always
lock your vehicle. In case you switch off the
vehicle and the transmission is not in
PARK, a warning message will appear on
the cluster which suggests you to shift the
transmission into PARK and, then, you can
remove the key within 15 seconds. If
15 seconds expire, you have to rotate the
key from the OFF/LOCK position to the ON/
RUN position and come back to the OFF/
LOCK position in order to remove the key.
Never leave children alone in a vehicle, or
with access to an unlocked vehicle.
Allowing children to be in a vehicle unat -
tended is dangerous for a number of
reasons. A child or others could be seriously
or fatally injured. Children should be
warned not to touch the parking brake,
brake pedal or the gear selector.
21_VM_OM_EN_USC_t.book Page 12
Page 15 of 280
GETTING TO KNOW YOUR VEHICLE13
NOTE:
When opening the driver’s door with the key in
the ignition and the ignition placed in the STOP
(OFF/LOCK) position, a chime will sound to
remind you to remove the key.
VEHICLE SECURITY SYSTEM — IF EQUIPPED
The Vehicle Security system monitors the
vehicle doors and ignition for unauthorized
operation. When the Vehicle Security system is
activated, interior switches for door locks are
disabled. The system provides both audible and
visible signals. Every intrusion attempt causes
six continuous alarm cycles. Every alarm cycle
lasts for 30 seconds. For 26 seconds, the horn
will sound, and the turn signal lights will flash.
For four seconds, it will pause. After a maximum
of 10 alarm cycles, only the turn signal lights will
flash until the next alarm activation.
To Arm The System
The Vehicle Security system will arm when you
use the key fob to lock the doors. If a door or the
hood is not properly shut, the alarm system will
not be armed.
To Disarm The System
Use the key fob to unlock the door and disarm
the system. The Vehicle Security system will also disarm if a
programmed Sentry Key is inserted into the
ignition switch. To exit the alarm mode, push
the key fob unlock button, or insert a
programmed Sentry Key into the ignition switch.
The Vehicle Security system is designed to
protect your vehicle. However, you can create
conditions where the system will give you a false
alarm. If one of the previously described arming
sequences has occurred, the Vehicle Security
system will arm regardless of whether you are in
the vehicle or not. If you remain in the vehicle
and open a door, the alarm will sound. If this
occurs, disarm the Vehicle Security system.
Rearming Of The System
If the system has not been disabled, the Vehicle
Security system will rearm itself after the
15 additional minutes of turn lamps flashing. If
the condition which initiated the alarm is still
present, the system will ignore that condition
and monitor the remaining doors and ignition.
Security System Manual Override
The Vehicle Security system will not arm if you
lock the doors using the manual door lock.
Do not leave the key fob in or near the
vehicle, or in a location accessible to chil-
dren. A child could operate power windows,
other controls, or move the vehicle.
Do not leave children or animals inside
parked vehicles in hot weather. Interior
heat build-up may cause serious injury or
death.
CAUTION!
An unlocked vehicle is an invitation. Always
remove the key from the ignition and lock all
the doors when leaving the vehicle
unattended.
WARNING!
(Continued)
2
21_VM_OM_EN_USC_t.book Page 13
Page 18 of 280
16GETTING TO KNOW YOUR VEHICLE
The device is released and the doors can be
opened as follows:
If the power is restored:
By remote control.
Opening a front door by inserting the key into
the key cylinder.
If the power is not restored:
Opening the driver side door by mechanical
key and the other doors (passenger's side
and sliding side door) by pulling the inner
handle.
If the child lock was engaged and the previously
described locking procedure was carried out,
operating the internal handle will not open the
door but will only realign the door lock knob. To
open the door, the outside handle must be
pulled. The door lock/unlock button is not
disabled by the engagement of the emergency
lock.
Double Rear Swing Doors
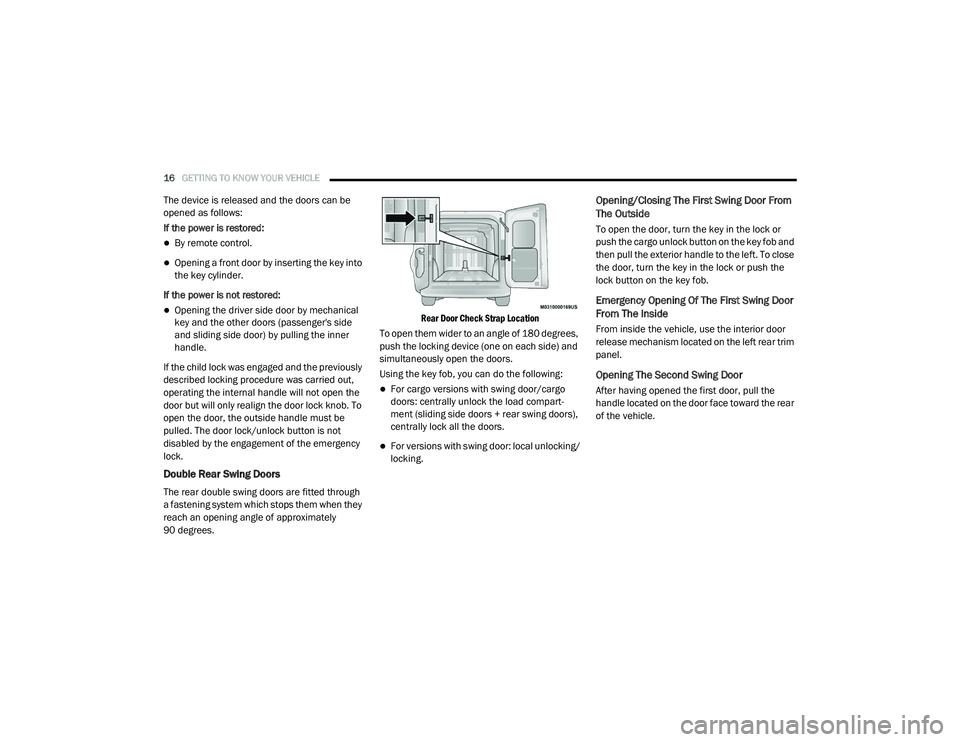
The rear double swing doors are fitted through
a fastening system which stops them when they
reach an opening angle of approximately
90 degrees.
Rear Door Check Strap Location
To open them wider to an angle of 180 degrees,
push the locking device (one on each side) and
simultaneously open the doors.
Using the key fob, you can do the following:
For cargo versions with swing door/cargo
doors: centrally unlock the load compart -
ment (sliding side doors + rear swing doors),
centrally lock all the doors.
For versions with swing door: local unlocking/
locking.
Opening/Closing The First Swing Door From
The Outside
To open the door, turn the key in the lock or
push the cargo unlock button on the key fob and
then pull the exterior handle to the left. To close
the door, turn the key in the lock or push the
lock button on the key fob.
Emergency Opening Of The First Swing Door
From The Inside
From inside the vehicle, use the interior door
release mechanism located on the left rear trim
panel.
Opening The Second Swing Door
After having opened the first door, pull the
handle located on the door face toward the rear
of the vehicle.
21_VM_OM_EN_USC_t.book Page 16
Page 19 of 280
GETTING TO KNOW YOUR VEHICLE17
Child-Protection Door Lock System
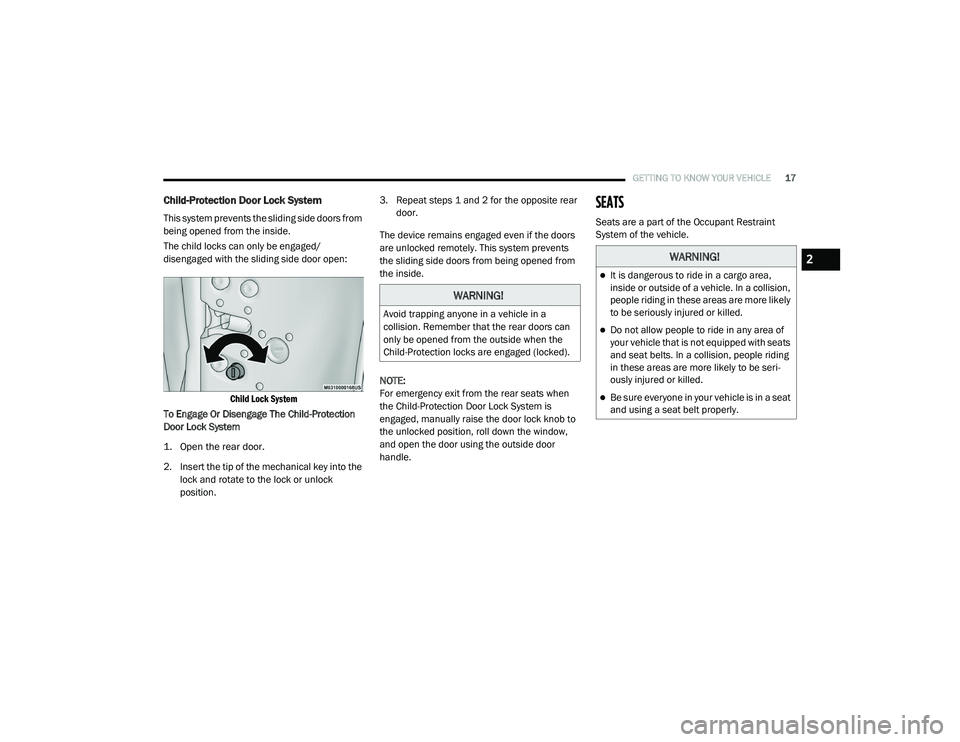
This system prevents the sliding side doors from
being opened from the inside.
The child locks can only be engaged/
disengaged with the sliding side door open:
Child Lock System
To Engage Or Disengage The Child-Protection
Door Lock System
1. Open the rear door.
2. Insert the tip of the mechanical key into the lock and rotate to the lock or unlock
position. 3. Repeat steps 1 and 2 for the opposite rear
door.
The device remains engaged even if the doors
are unlocked remotely. This system prevents
the sliding side doors from being opened from
the inside.
NOTE:
For emergency exit from the rear seats when
the Child-Protection Door Lock System is
engaged, manually raise the door lock knob to
the unlocked position, roll down the window,
and open the door using the outside door
handle.
SEATS
Seats are a part of the Occupant Restraint
System of the vehicle.
WARNING!
Avoid trapping anyone in a vehicle in a
collision. Remember that the rear doors can
only be opened from the outside when the
Child-Protection locks are engaged (locked).
WARNING!
It is dangerous to ride in a cargo area,
inside or outside of a vehicle. In a collision,
people riding in these areas are more likely
to be seriously injured or killed.
Do not allow people to ride in any area of
your vehicle that is not equipped with seats
and seat belts. In a collision, people riding
in these areas are more likely to be seri -
ously injured or killed.
Be sure everyone in your vehicle is in a seat
and using a seat belt properly.
2
21_VM_OM_EN_USC_t.book Page 17
Page 37 of 280
GETTING TO KNOW YOUR VEHICLE35
WINDOWS
Power Window Controls — If Equipped
The window switches on the driver’s door
control all door windows.
Power Window Switch Panel
The passenger door windows can also be
operated by using the single window switch on
the passenger door trim panel. If the vehicle is
equipped with rear power windows, a single
opening and closing switch on the rear
passenger doors for passenger window control
is provided. NOTE:
The key off power delay feature will allow the
power windows to operate for up to three
minutes after the ignition is turned off. This
feature is canceled when either front door is
opened.
The power window switches remain active for
up to three minutes after the ignition switch
has been turned off. Opening either of the
vehicle’s front doors will cancel this feature.
Automatic Window Features
Auto-Down Feature
The driver and passenger door power window
switches have an Auto-Down feature. Push the
window switch down for a short period of time,
then release, and the window will go down
automatically.
To stop the window from going all the way down
during the Auto-Down operation, pull up or push
down on the switch briefly.
Auto-Up Feature With Anti-Pinch Protection
Lift the window switch up for a short period of
time and release; the window will go up
automatically.
To stop the window from going all the way up
during the Auto-Up operation, push down on the
switch briefly.
To close the window part way, lift the window
switch briefly and release it when you want the
window to stop.
1 — Rear Window Control Buttons (If Equipped)
2 — Rear Window Lock Button
3 — Driver Passenger Window Control Buttons
WARNING!
Never leave children alone in a vehicle, or
with access to an unlocked vehicle.
Allowing children to be in a vehicle unat
-
tended is dangerous for a number of
reasons. A child or others could be seriously
or fatally injured. Children should be
warned not to touch the parking brake,
brake pedal or the gear selector.
Do not leave the key fob in or near the
vehicle or in a location accessible to chil -
dren. A child could operate power windows,
other controls, or move the vehicle.
2
21_VM_OM_EN_USC_t.book Page 35
Page 60 of 280

58
STARTING AND OPERATING
STARTING THE ENGINE
Before starting your vehicle, adjust your seat,
adjust both inside and outside mirrors, and
fasten your seat belts.
Automatic Transmission
The gear selector must be in the PARK (P) or
NEUTRAL (N) position before you can start the
engine. Press the brake pedal before shifting to
any driving gear.
NOTE:
You must press the brake pedal before shifting
out of PARK.
Normal Starting
Turn the ignition switch to the AVV (START)
position and release it when the engine starts.
If the engine fails to start within 10 seconds,
turn the ignition switch to the STOP (OFF/LOCK)
position, wait 10 to 15 seconds, then repeat
this procedure.
Cold Weather Operation
To ensure reliable starting at low temperatures,
use of an externally powered electric engine
block heater (available from an authorized
dealer) is recommended.To prevent possible engine damage while
starting at low temperatures, this vehicle will
inhibit engine cranking when the ambient
temperature is less than -31°F (-35° C) and the
oil temperature sensor reading indicates an
engine block heater has not been used. The
message “plug in engine heater” will be
displayed in the instrument cluster when the
ambient temperature is below -25°F (-32° C) at
the time the engine is shut off as a reminder.
Extended Park Starting
NOTE:
Extended Park condition occurs when the
vehicle has not been started or driven for at
least 30 days.
1. Install a battery charger or jumper cables
to the battery to ensure a full battery
charge during the crank cycle.
2. Place the ignition in the AVV (START) position and release it when the engine
starts.
WARNING!
Never leave children alone in a vehicle, or
with access to an unlocked vehicle.
Allowing children to be in a vehicle unat -
tended is dangerous for a number of
reasons. A child or others could be seriously
or fatally injured. Children should be
warned not to touch the parking brake,
brake pedal or the transmission gear
selector.
Do not leave the key fob in or near the
vehicle (or in a location accessible to chil -
dren). A child could operate power
windows, other controls, or move the
vehicle.
21_VM_OM_EN_USC_t.book Page 58