2021 PEUGEOT PARTNER ECU
[x] Cancel search: ECUPage 154 of 260

152
In the event of a breakdown
vest, etc.) according to the legislation in force in
the country of driving.
►
Switch off the ignition.
►
Remove the valve cap from the tyre to be
repaired, and place it in a clean area.
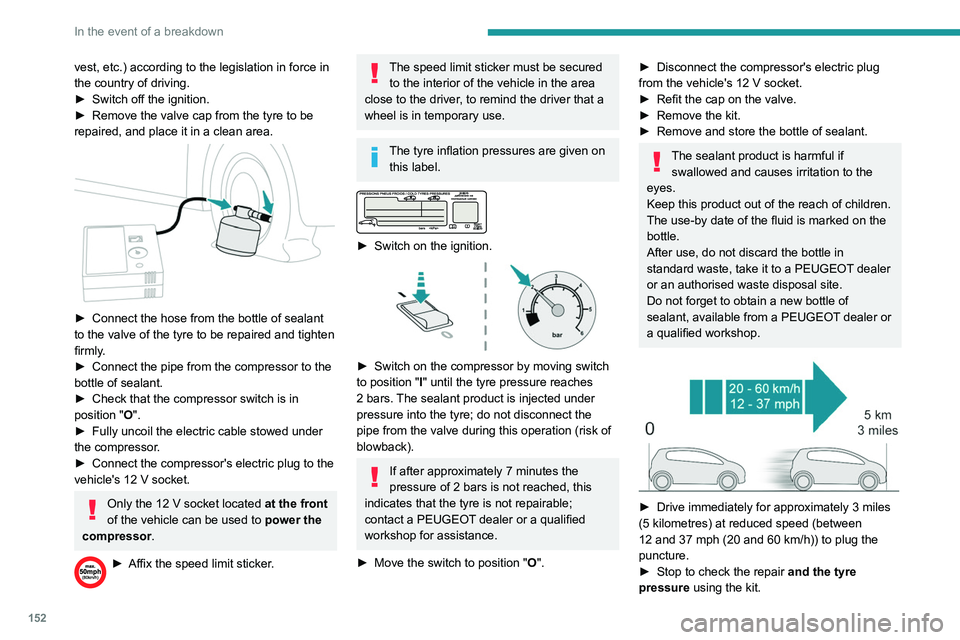
► Connect the hose from the bottle of sealant
to the valve of the tyre to be repaired and tighten
firmly
.
►
Connect the pipe from the compressor to the
bottle of sealant.
►
Check that the compressor switch is in
position
"O".
►
Fully uncoil the electric cable stowed under
the compressor
.
►
Connect the compressor's electric plug to the
vehicle's 12
V socket.
Only the 12 V socket located at the front
of the vehicle can be used to power the
compressor .
► Affix the speed limit sticker .
The speed limit sticker must be secured
to the interior of the vehicle in the area
close to the driver, to remind the driver that a
wheel is in temporary use.
The tyre inflation pressures are given on this label.
► Switch on the ignition.
► Switch on the compressor by moving switch
to position " I" until the tyre pressure reaches
2 bars. The sealant product is injected under
pressure into the tyre; do not disconnect the
pipe from the valve during this operation (risk of
blowback).
If after approximately 7 minutes the
pressure of 2 bars is not reached, this
indicates that the tyre is not repairable;
contact a PEUGEOT dealer or a qualified
workshop for assistance.
►
Move the switch to position " O
".
► Disconnect the compressor's electric plug
from the vehicle's 12 V socket.
►
Refit the cap on the valve.
►
Remove the kit.
►
Remove and store the bottle of sealant.
The sealant product is harmful if swallowed and causes irritation to the
eyes.
Keep this product out of the reach of children.
The use-by date of the fluid is marked on the
bottle.
After use, do not discard the bottle in
standard waste, take it to a PEUGEOT dealer
or an authorised waste disposal site.
Do not forget to obtain a new bottle of
sealant, available from a PEUGEOT dealer or
a qualified workshop.
► Drive immediately for approximately 3 miles
(5 kilometres) at reduced speed (between
12 and 37 mph (20 and 60
km/h)) to plug the
puncture.
►
Stop to check the repair
and the tyre
pressure using the kit.
With a tyre repaired using this type of kit,
do not exceed a speed of 50 mph
(80 km/h) and do not drive more than
125 miles (200 km).
Contact a PEUGEOT dealer or a qualified
workshop to have the tyre changed.
Checking / adjusting tyre
pressures
The compressor can be used, without injecting
sealant, to check and, if necessary, adjust the
tyre pressures.
► Remove the valve cap from the tyre and keep
it in a clean place.
► Uncoil the pipe stowed under the compressor.
► Screw the pipe onto the valve and tighten
firmly.
► Check that the compressor switch is in
position " O".
► Fully uncoil the electric cable stowed under
the compressor.
► Connect the compressor's electric plug to the
vehicle's 12 V socket.
► Switch on the ignition.
Only the 12 V socket located at the front
of the vehicle can be used to power the
compressor .
The tyre inflation pressures are given on
this label.
Page 157 of 260

155
In the event of a breakdown
8► With a steel wheel, remove the wheel trim
using tool 7
.
►
With an alloy wheel, remove the cap from
each of the bolts using tool 7
.
►
If the vehicle is so equipped, fit security bolt
socket
8 to wheelbrace 5 to slacken the security
bolt.
►
Slacken
(without removing) the other wheel
bolts using just wheelbrace 5.
Wheel with wheel trim
When removing the wheel, first remove
the wheel trim by pulling at the valve aperture
using the wheelbrace.
► Place the foot of the jack on the ground and
ensure that it is directly below the A
or B jacking
point provided on the underbody, whichever is
closest to the wheel to be changed.
► Extend jack 6 until its head comes into
contact with jacking point A or B, whichever is
used; the contact surface A or B of the vehicle
must be correctly engaged with the central part
of the head of the jack.
►
Raise the vehicle until there is sufficient
space between the wheel and the ground to
admit the spare (not punctured) wheel easily
.
Risk of injury!
Ensure that the jack is stable. If the
ground is slippery or loose, the jack may slip
or collapse.
Ensure that the jack is positioned strictly at
one of the jacking points A or B under the
vehicle, making sure that the vehicle's contact
surface is correctly centred on the head of the
jack. Otherwise, there is a risk of damage to
the vehicle and/or of the jack collapsing.
► Remove the bolts and store them in a clean
place.
►
Remove the wheel.
Page 158 of 260

156
In the event of a breakdown
Fitting a wheel
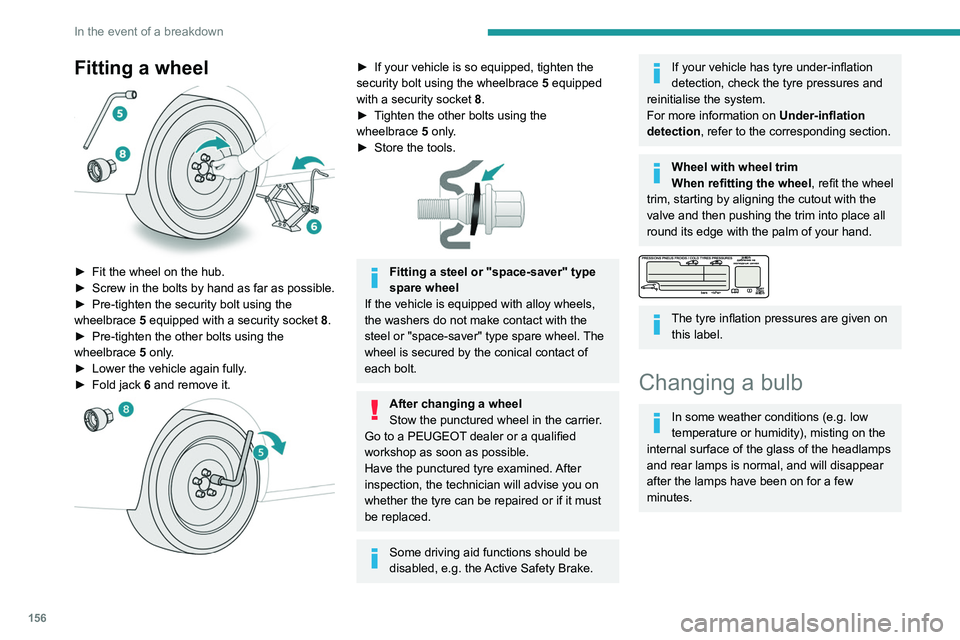
► Fit the wheel on the hub.
► Screw in the bolts by hand as far as possible.
►
Pre-tighten the security bolt using the
wheelbrace
5
equipped with a security socket
8
.
►
Pre-tighten the other bolts using the
wheelbrace
5
only.
►
Lower the vehicle again fully
.
►
Fold jack
6 and remove it.
► If your vehicle is so equipped, tighten the
security bolt using the wheelbrace 5 equipped
with a security socket
8.
►
T
ighten the other bolts using the
wheelbrace
5
only.
►
Store the tools.
Fitting a steel or "space-saver" type
spare wheel
If the vehicle is equipped with alloy wheels,
the washers do not make contact with the
steel or "space-saver" type spare wheel. The
wheel is secured by the conical contact of
each bolt.
After changing a wheel
Stow the punctured wheel in the carrier.
Go to a PEUGEOT dealer or a qualified
workshop as soon as possible.
Have the punctured tyre examined. After
inspection, the technician will advise you on
whether the tyre can be repaired or if it must
be replaced.
Some driving aid functions should be
disabled, e.g. the Active Safety Brake.
If your vehicle has tyre under-inflation
detection, check the tyre pressures and
reinitialise the system.
For more information on Under-inflation
detection, refer to the corresponding section.
Wheel with wheel trim
When refitting the wheel, refit the wheel
trim, starting by aligning the cutout with the
valve and then pushing the trim into place all
round its edge with the palm of your hand.
The tyre inflation pressures are given on this label.
Changing a bulb
In some weather conditions (e.g. low
temperature or humidity), misting on the
internal surface of the glass of the headlamps
and rear lamps is normal, and will disappear
after the lamps have been on for a few
minutes.
The headlamps have polycarbonate lenses with a protective coating:
► do not clean them with a dry or
abrasive cloth, nor with detergent or
solvent products,
► use a sponge and soapy water or a pH
neutral product,
► when using a high-pressure washer on
persistent marks, do not keep the lance
directed towards the lamps or their edges for
too long, so as not to damage their protective
coating and seals.
Changing a bulb must only be done with
the ignition off and after the lamp has
been switched off for several minutes - risk of
serious burns!
Do not touch the bulb directly with your
fingers, use a lint-free cloth.
It is essential only to use anti-ultraviolet
(UV) type bulbs, so as not to damage the
headlamp.
Always replace a failed bulb with a new bulb
of the same type and specification.
Opening the bonnet / Accessing the
bulbs
With the engine warm, proceed with caution -
risk of burns!
Page 163 of 260

161
In the event of a breakdown
8► Unclip the interior trim.
► Disconnect the connector by moving aside
its tab.
►
T
urn the bulb holder a quarter turn
anti-clockwise.
►
Change the bulb.
►
Put the bulb holder back in place and
reconnect the connector
.
►
Put the trim back in place.
With tailgate
► Remove the plastic lens using a screwdriver .
► Change the bulb.
►
Refit the plastic lens and press on it.
Third brake lamp
Type A, W16W - 16W
– Unscrew the two nuts. –
Push the rods.
–
If necessary
, disconnect the connector to
remove the lamp.
–
Replace the bulb.
Changing a fuse
Accessing the tools
The extraction tweezers are located behind the
fusebox cover.
►
Unclip the cover by pulling at the top left, then
right.
►
Remove the cover completely
.
►
T
ake the tweezers from their housing.
Changing a fuse
Before changing a fuse:
► Identify the cause of the fault and fix it.
►
Stop all power consumption.
►
Immobilise the vehicle and switch the ignition
off.
►
Identify the defective fuse using the current
allocation tables and diagrams.
T
o replace a fuse, it is essential to:
►
Use the special tweezers to extract the fuse
from its housing and check the condition of its
filament.
►
Always replace the failed fuse with a fuse of
the same rating (same colour); use of a different
rating may cause malfunctions - risk of fire!
If the fault recurs after replacing a fuse, have
the electrical system checked by a PEUGEOT
dealer or a qualified workshop.
The fuse allocation tables and the corresponding diagrams are available
from a PEUGEOT dealer or from a qualified
workshop.
The replacement of a fuse not shown in the allocation tables may cause a serious
Page 165 of 260

163
In the event of a breakdown
8Fuse No. Rating (A) Functions
F34 5Mirror control.
F36 5 USB socket.
Engine compartment fuses
The fusebox is placed in the engine
compartment near the battery.
Access to the fuses
► Release the two latches A .
► Remove the cover .
►
Change the fuse.
►
When you have finished, close the cover
carefully then engage the two latches A
, to
ensure correct sealing of the fusebox.
Fuse No. Rating (A) Functions
F16 15 Front foglamp.
F18 10 Right-hand
main beam
headlamp.
F19 10 Left-hand
main beam
headlamp.
F29 40 Windscreen
wipers.
12 V battery
Procedure for starting the engine using another
battery or charging a discharged battery.
Lead-acid starter batteries
Batteries contain harmful substances
such as sulphuric acid and lead.
They must be disposed of in accordance
with regulations and must not, in any
circumstances, be discarded with household
waste.
Take used remote control batteries and
vehicle batteries to a special collection point.
Protect your eyes and face before
handling the battery.
All operations on the battery must be carried
out in a well ventilated area and away from
naked flames and sources of sparks, so as to
avoid the risk of explosion or fire.
Wash your hands afterwards.
Versions equipped with Stop & Start are
fitted with a 12 V lead-acid battery with
special technology and specifications.
It should only be replaced by a PEUGEOT
dealer or a qualified workshop.
Access to the battery
The battery is located under the bonnet.
► Open the bonnet using the interior release
lever
, then the exterior safety catch.
►
Secure the bonnet stay
.
Page 214 of 260

212
PEUGEOT Connect Nav
Press "Private mode".
THEN
Activate or deactivate:
– "No sharing (data, vehicle position) ".
– “Only data sharing "
– "Sharing data and vehicle position "
Settings specific to
connected navigation
Press Navigation to display the main
page.
Press the "MENU" button to access the
secondary page.
Select "Settings".
Select the "Map” tab.
Activate or deactivate: – "Allow declaration of danger zones ".
– "Guidance to final destination on foot ".
These settings must be configured for each
profile.
Press “OK” to confirm your selection.
Select the "Alerts” tab.
Activate or deactivate:
– "Advise of car park nearby ".
– "Filling station alert ".
legislation and subscription to the
corresponding service.
Connected navigation
Connected navigation
connection
Depending on version, vehicle trim level and
subscription to online services and options.
Network connection provided by the
vehicle
If you use the Peugeot Connect Packs
solution, the system is automatically
connected to the Internet and connected
services, and does not require the user to
provide a connection via their smartphone.
OR
Network connection provided by the
user
For the list of suitable smartphones, visit
the Brand's national website.
Activate and enter settings for sharing the
smartphone connection.
As processes and standards are constantly changing, we recommend you
update the smartphone operating system
as well as the date and time on the
smartphone and system, to ensure that the
communication process between the
smartphone and the system functions
correctly.
USB connection
Connect the USB cable.
The smartphone charges when connected
by the USB cable.
Bluetooth connection
Activate the Bluetooth function on the telephone and ensure that it is visible to
all (see the "Connect-App" section).
Wi-Fi connection
Select a Wi-Fi network detected by the
system and connect to it.
This function is only available if it has been activated either via the
"Notifications" or via the "Applications" menu.
Press "Notifications".
Select Wi-Fi to activate it.
OR
Press Connect-App to display the main
page.
Press the "OPTIONS " button to access the
secondary page.
Select "Wi-Fi network connection ".
Select the "Secured", "Not secured" or
"Stored” tab.
Select a network.
Using the virtual keypad, enter the Wi-Fi
network "Key” and "Password".
Press "OK" to establish a connection
between the smartphone and the
vehicle’s system.
Usage restrictions:
– With CarPlay®, connection sharing is
only available with a Wi-Fi connection.
–
With MirrorLinkTM, connection sharing is
only available with a USB connection.
The quality of services depends on the quality
of the network connection.
Authorize sending information
Press Settings to display the main page.
Press the "OPTIONS " button to access the
secondary page.
Select "System configuration".
Select the "Private mode” tab.
OR
Press "Notifications".
Page 218 of 260

216
PEUGEOT Connect Nav
Wi-Fi connection sharing
Creation of a local Wi-Fi network by the system.Press Connect-App to display the main
page.
Press the "OPTIONS " button to access the
secondary page.
Select "Share Wi-Fi connection ".
Select the "Activation" tab to activate or
deactivate Wi-Fi connection sharing.
And/or
Select the "Settings" tab to change the system’s
network name and password.
Press "OK" to confirm.
To protect against unauthorised access and to make all systems as secure as
possible, the use of a security code or a
complex password is recommended.
Managing connections
Press Connect-App to display the main
page.
Press the "OPTIONS " button to access the
secondary page.
Select "Manage connection".
With this function, you can view the access to
connected services, the availability of connected
services and modify the connection mode.
Internet Browser
Press Applications to display the main
page.
Press "Connectivity" to access the "Connected
Apps” function.
Press "Connected Apps" to display the browser
home page.
Select the country of residence.
Press "OK" to save and start the browser.
Connection to the internet is via one of
the network connections provided by the
vehicle or the user.
Bluetooth connection®
The services available depend on the network, the SIM card and the
compatibility of the Bluetooth devices used.
Consult the smartphone user guide and the
service provider to check which services are
available.
The Bluetooth function must be activated and the smartphone configured as
"Visible to all".
To complete the pairing, whichever procedure is
used (from the smartphone or from the system),
ensure that the code is the same in the system
and in the smartphone.
If the pairing procedure fails, we
recommend deactivating and then
reactivating the Bluetooth function on the
smartphone.
Procedure from the smartphone
Select the name of the system in the list
of detected devices.
In the system, accept the connection request
from the smartphone.
Procedure from the system
Press Connect-App to display the main
page.
Press the "OPTIONS " button to access the
secondary page.
Press "Bluetooth connection ".
Select "Search".
The list of detected smartphones is
displayed.
Select the name of the chosen
smartphone in the list.
Depending on the type of smartphone,
you may by prompted to accept the
transfer of contacts and messages.
Connection sharing
The system offers to connect the smartphone
with 3 profiles:
–
"Telephone" (hands-free kit, telephone only),
– “Streaming" (streaming: wireless playing of
audio files on the smartphone),
–
"Mobile internet data ".
The "Mobile internet data " profile must
be activated for connected navigation (if
the vehicle does not have "Emergency and
assistance call" services), after first activating
smartphone connection sharing.
Select one or more profiles.
Press "OK" to confirm.
Wi-Fi connection
Network connection via the smartphone's Wi-Fi.Press Connect-App to display the main
page.
Press the "OPTIONS " button to access the
secondary page.
Select "Wi-Fi network connection ".
Select the "Secured", "Not secured" or
"Stored” tab.
Select a network.
Using the virtual keypad , enter the Wi-Fi
network "Key" and "Password".
Press "OK" to establish the connection.
The Wi-Fi connection and Wi-Fi
connection sharing are exclusive.
Page 219 of 260

217
PEUGEOT Connect Nav
12Wi-Fi connection sharing
Creation of a local Wi-Fi network by the system.Press Connect-App to display the main
page.
Press the "OPTIONS " button to access the
secondary page.
Select "Share Wi-Fi connection ".
Select the "Activation" tab to activate or
deactivate Wi-Fi connection sharing.
And/or
Select the "Settings" tab to change the system’s
network name and password.
Press "OK" to confirm.
To protect against unauthorised access and to make all systems as secure as
possible, the use of a security code or a
complex password is recommended.
Managing connections
Press Connect-App to display the main
page.
Press the "OPTIONS " button to access the
secondary page.
Select "Manage connection".
With this function, you can view the access to
connected services, the availability of connected
services and modify the connection mode.
Radio
Selecting a station
Press Radio Media to display the main
page.
Press "Frequency".
Press one of the buttons to perform an
automatic search for radio stations.
Or
Move the slider to manually search for
frequencies up or down.
Or
Press Radio Media to display the main
page.
Press the "OPTIONS " button to access the
secondary page.
Select "Radio stations" on the secondary
page.
Press "Frequency".
Enter the values using the virtual keypad.
First enter the units then click on the
decimals field to enter the figures after the
decimal point.
Press "OK" to confirm.
Radio reception may be affected by the
use of electrical equipment not approved
by the Brand, such as a USB charger
connected to the 12 V socket.
The exterior environment (hills, buildings,
tunnels, basement car parks, etc.) may
block reception, including in RDS mode.
This phenomenon is perfectly normal in the
context of radio wave transmission, and
in no way indicative of an audio system
malfunction.
Presetting a station
Select a radio station or frequency.
(refer to the corresponding section)
Press "Presets ".
Make a long press on one of the buttons
to preset the station.
Changing the waveband
Press Radio Media to display the main
page.
To change the waveband, press "Band…",
displayed at the top right of the screen.
Activating/Deactivating RDS
RDS, if activated, allows you to continue
listening to the same station by automatic
retuning to alternative frequencies.
Press Radio Media to display the main
page.
Press the "OPTIONS " button to access the
secondary page.
Select "Radio settings".
Select "General".
Activate/deactivate "Station follow ".