2021 Peugeot Landtrek glove box
[x] Cancel search: glove boxPage 6 of 176

4
Overview
Instruments and controls
These illustrations and descriptions are intended
as a guide. The presence and location of some
elements vary depending on the version or trim
level.
1.Electric windows
Central locking/unlocking
2. Side switch panel
3. Horn
Driver front airbag
4. Instrument panel
5. Front courtesy/map reading lamps
6. Glasses holder
7. Interior rear view mirror
8. Monochrome screen or touch screen
9. Heating/air conditioning controls
10. Central switch panel (lower and upper)
11 . Audio USB socket/Charger USB socket
12. Key ignition switch or button START/STOP 13.
2H, 4H and 4L transmission mode selector
14. Gearbox
15. Sport/Eco button
16. Parking brake
Cigarette lighter/12 V (120 W) accessory
socket
17. Front passenger airbag
18. Glove box
19. Deactivate front passenger airbag (on the
side of the dashboard)
Steering-mounted controls
Depending on the vehicle’s equipment, the
function and location of the controls may vary.
1.External lighting/Direction indicator controls
2. Wiper/Screenwash controls
3.Audio system settings
4. Speed limiter/Cruise control A.
Speed limiter/Cruise control pause
B. Activate Cruise control
C. Decrease/Increase Speed limiter/Cruise
control speed setting
Memorising speeds function (SET) or
reactivation of the programmed speed
function (RES)
D. V
oice recognition/Media
E. Activate Speed limiter
F. Select menus on the instrument panel and
validate
G.
Decrease/Increase volume
H. Select the instrument panel display mode
and navigate in the menus
I. Access the
Telephone menu /Answer a call
Select next media
J. Access the Telephone menu / End a call
Select previous media
Side control bar
1. Door mirror controls
Page 37 of 176

35
Ease of use and comfort
3Front demisting
- defrosting
With heating or manual air
conditioning
► Adjust the temperature to maximum (red).
► Adjust the air flow to maximum.
► Press this button to activate the air
distribution to the "Windscreen" position;
its indicator lamp comes on.
►
Check that the recirculation of interior air is
deactivated; its indicator lamp must be off.
►
Depending on version, switch on the air
conditioning by pressing the " A/C
" button; its
indicator lamp comes on.
With automatic dual-zone
air conditioning
Automatic Visibility programme
This mode allows the windscreen and side
windows to be demisted or defrosted as quickly
as possible.
► Press this button to activate/deactivate
the mode (confirmed by the illumination/
extinction of the
indicator lamp).
The programme automatically manages the air
conditioning (depending on version), air flow
and air intake, and provides optimum distribution
towards the windscreen and side windows.
It is possible to manually change the air flow
without deactivating the automatic Visibility
programme.
In wintry conditions, remove all snow or
ice on the windscreen near the sensor
before moving off.
Otherwise, the operation of the equipment
associated with the sensor may be affected.
Rear screen demisting/ defrosting
Demisting/defrosting only operates with the
engine running.
Depending on version, this also applies to the
door mirrors.
► Press this button to activate/deactivate
the function (confirmed by the
illumination/extinction of the indicator lamp).
Demisting/defrosting switches off automatically
to prevent an excessive consumption of
electrical current.
Switch off demisting/defrosting when
you no longer need it; reducing
electrical consumption in turn decreases
energy consumption.
Front fittings
1. Grab handle
2. Sun visor
3. Boarding assistance handle
4. Glasses holder
5. Illuminated glove box with refrigeration
(depending on version)
6. Door pockets
7. Retractable cup holder (press down to take
it out)
8. USB socket and USB charger socket
9. Cigarette lighter/12
V (120 W) accessory
socket
10. Storage compartment
11 . Card holder
12. Cup holder and storage compartment
13. Front armrest with storage (depending on
version)
Page 38 of 176

36
Ease of use and comfort
Opening
► To access the closed storage compartment,
lift the lever to open the lid.
This storage compartment can be used to house portable devices (mobile phone,
MP3 player, etc.) which can be connected to
the USB/Jack sockets or charged from the 12
V accessories socket in the centre console.
Closing
► Close the cover until it locks.
Sun visor
► With the ignition on, raise the concealing
flap; depending on the version, the mirror is
illuminated automatically.
Glove box
► To open the glove box, raise the handle.
With the ignition on, the glove box is lit when
open.
Depending on version, it contains an adjustable
ventilation nozzle, distributing the same
conditioned air as the vents in the passenger
compartment.
Never drive with the glove box open
when a passenger is at the front. It may
cause injury during sharp deceleration!
Cigarette lighter/12 V
accessory socket(s)
► To use the cigarette lighter, press it in and
wait a few seconds until it pops out automatically.
► To use a 12 V accessory (max. power:
120 W), remove the cigarette lighter and connect
a suitable adaptor.
You can use this socket to connect a telephone
charger, a bottle warmer, etc.
After use, put the cigarette lighter back into place
straight away.
The connection of an electrical device not approved by PEUGEOT, such as a
USB charger, may adversely affect the
operation of vehicle electrical systems,
causing faults such as poor radio reception or
interference with displays in the screens.
USB socket(s)
Sockets 1, 2 and 3 (depending on version) can
be used to charge a portable device.
Socket
1 also enables audio files sent to your
audio system to be played via the vehicle's
speakers.
These files can be managed using the steering
mounted controls or those on the touch screen.
Depending on version,
socket 1 also allows a
smartphone to be connected by MirrorLink
TM,
Android Auto® or CarPlay®, enabling certain
smartphone applications to be used on the touch
screen.
For best results, use a cable made or approved
by the device manufacturer.
These applications can be managed using the
steering-mounted controls or the audio system
controls.
When the USB port is used, the portable
device charges automatically.
A message is displayed if the power drawn
by the portable device exceeds the current
supplied by the vehicle.
For more information on how to use this
equipment, refer to the Audio equipment
and telematics section .
Front armrest
(Depending on version)
It includes a storage space.
Page 57 of 176

55
Safety
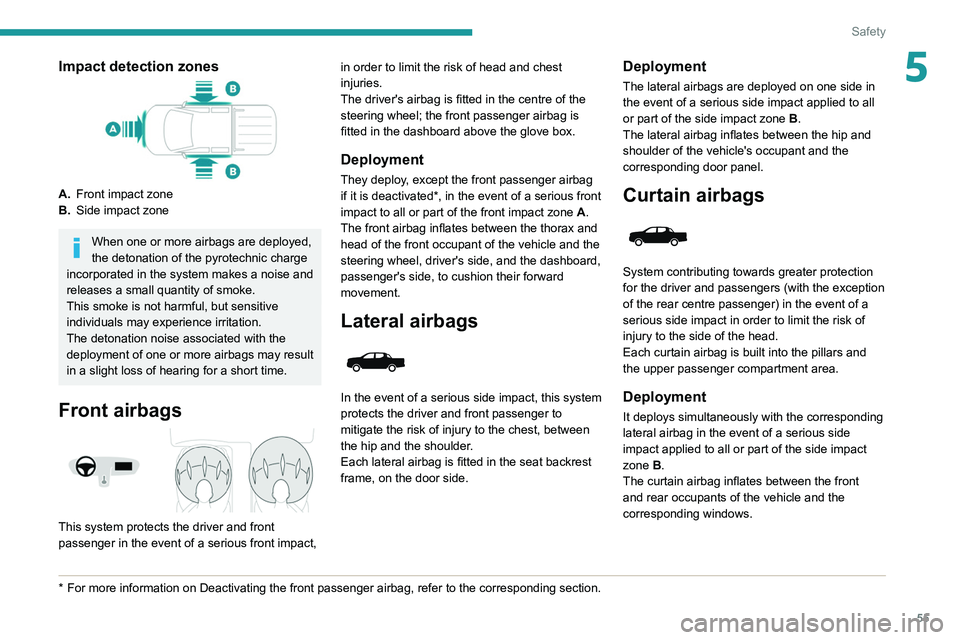
5Impact detection zones
A.Front impact zone
B. Side impact zone
When one or more airbags are deployed,
the detonation of the pyrotechnic charge
incorporated in the system makes a noise and
releases a small quantity of smoke.
This smoke is not harmful, but sensitive
individuals may experience irritation.
The detonation noise associated with the
deployment of one or more airbags may result
in a slight loss of hearing for a short time.
Front airbags
This system protects the driver and front
passenger in the event of a serious front impact,
* For more information on Deactivating the front passenger airbag, refer t\
o the corresponding section. in order to limit the risk of head and chest
injuries.
The driver's airbag is fitted in the centre of the
steering wheel; the front passenger airbag is
fitted in the dashboard above the glove box.
Deployment
They deploy, except the front passenger airbag
if it is deactivated*, in the event of a serious front
impact to all or part of the front impact zone A.
The front airbag inflates between the thorax and
head of the front occupant of the vehicle and the
steering wheel, driver's side, and the dashboard,
passenger's side, to cushion their forward
movement.
Lateral airbags
In the event of a serious side impact, this system
protects the driver and front passenger to
mitigate the risk of injury to the chest, between
the hip and the shoulder.
Each lateral airbag is fitted in the seat backrest
frame, on the door side.
Deployment
The lateral airbags are deployed on one side in
the event of a serious side impact applied to all
or part of the side impact zone B.
The lateral airbag inflates between the hip and
shoulder of the vehicle's occupant and the
corresponding door panel.
Curtain airbags
System contributing towards greater protection
for the driver and passengers (with the exception
of the rear centre passenger) in the event of a
serious side impact in order to limit the risk of
injury to the side of the head.
Each curtain airbag is built into the pillars and
the upper passenger compartment area.
Deployment
It deploys simultaneously with the corresponding
lateral airbag in the event of a serious side
impact applied to all or part of the side impact
zone B.
The curtain airbag inflates between the front
and rear occupants of the vehicle and the
corresponding windows.
Page 60 of 176

58
Safety
child seat itself do not touch the vehicle's front
seat.
►
Check that the backrest of the forward-facing
child seat is as close as possible to the backrest
of the vehicle's rear seat, and ideally in contact
with it.
Centre rear seat
A child seat with a support leg must never be
installed on the centre rear passenger seat .
Child seat at the front
► Adjust the front passenger seat to the
highest and fully back longitudinal position ,
with the backrest straightened.
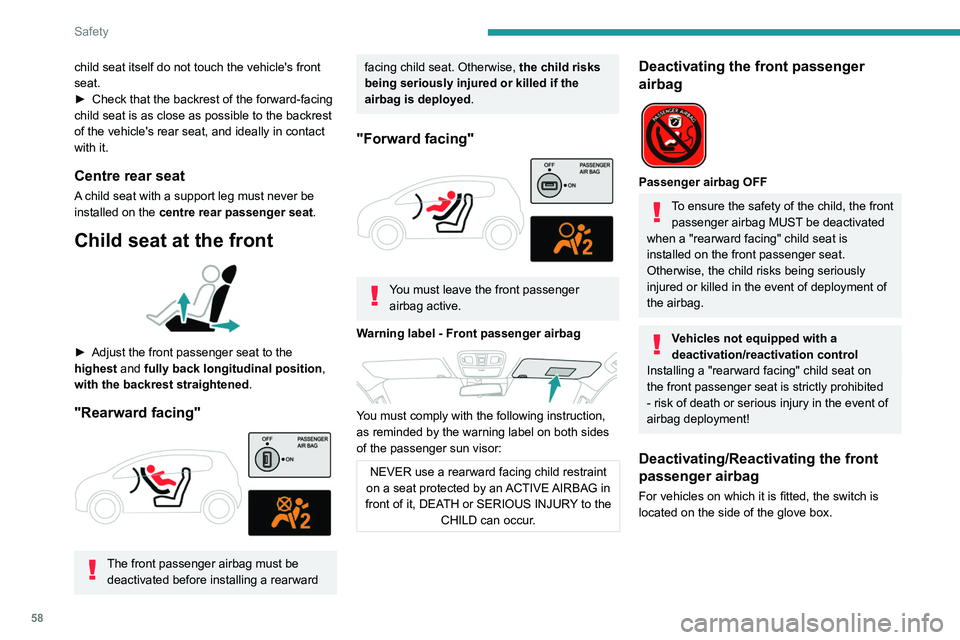
"Rearward facing"
The front passenger airbag must be deactivated before installing a rearward
facing child seat. Otherwise, the child risks
being seriously injured or killed if the
airbag is deployed .
"Forward facing"
You must leave the front passenger
airbag active.
Warning label - Front passenger airbag
You must comply with the following instruction,
as reminded by the warning label on both sides
of the passenger sun visor:
NEVER use a rearward facing child restraint
on a seat protected by an ACTIVE AIRBAG in
front of it, DEATH or SERIOUS INJURY to the CHILD can occur.
Deactivating the front passenger
airbag
Passenger airbag OFF
To ensure the safety of the child, the front passenger airbag MUST be deactivated
when a "rearward facing" child seat is
installed on the front passenger seat.
Otherwise, the child risks being seriously
injured or killed in the event of deployment of
the
airbag.
Vehicles not equipped with a
deactivation/reactivation control
Installing a "rearward
facing" child seat on
the front passenger seat is strictly prohibited
- risk of death or serious injury in the event of
airbag deployment!
Deactivating/Reactivating the front
passenger airbag
For vehicles on which it is fitted, the switch is
located on the side of the glove box.
With the ignition off:
► To deactivate the airbag, turn the key in the
switch to the "OFF " position.
► To reactivate it, turn the key to the "ON"
position.
When the ignition is switched on:
This warning lamp comes on and remains lit to signal deactivation.
Or
This warning lamp comes on for about 1 minute to signal activation.
“ISOFIX" mountings
The seats shown below are fitted with ISOFIX
compliant mountings:
Page 100 of 176

98
Practical information
Electrical system
Never:
–
disconnect the battery cables or the
electrical wiring harness connectors when the
engine is running.
–
reverse the polarities when reconnecting
the battery (risk of damage to electronic
components).
–
pierce the insulation of the electrical wires
during an electrical check or diagnosis.
Changing the 12 V battery
Petrol engine
Diesel engine
► Switch off the engine and the ignition.
In the engine compartment :
►
Loosen and disconnect the cable from the
negative terminal
1.
►
Lift the protective cover
, then loosen and
disconnect the cable from the positive terminal
2.
►
Loosen and remove the retaining clamp 3
.
►
Remove and change the battery
.
For more information on the 12 V battery
and in particular the precautionary measures
to be taken before any work, refer to the
corresponding section.
To reassemble, perform the operations in the reverse order to those for removal.
When connecting cables, always start with
the positive terminal.
Changing the passenger
compartment filter
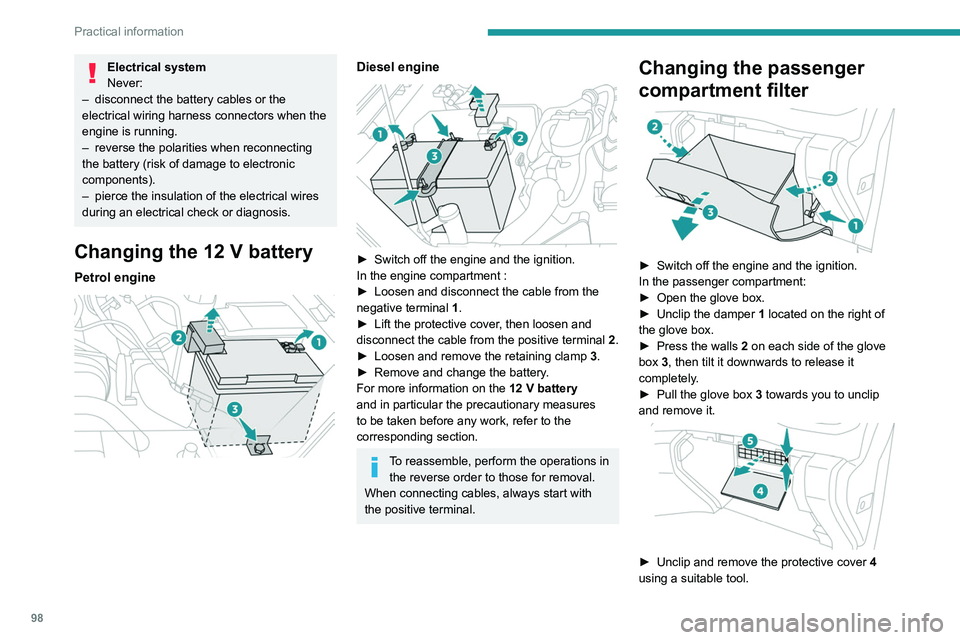
► Switch off the engine and the ignition.
In the passenger compartment:
►
Open the glove box.
►
Unclip the damper 1
located on the right of
the glove box.
►
Press the walls
2 on each side of the glove
box 3, then tilt it downwards to release it
completely.
►
Pull the glove box 3
towards you to unclip
and remove it.
► Unclip and remove the protective cover 4
using a suitable tool.
Page 116 of 176

11 4
In the event of a breakdown
PEUGEOT accepts no responsibility for
the cost incurred in repairing the vehicle
or for rectifying malfunctions resulting from
the installation of accessories not supplied or
not recommended by PEUGEOT and not
installed in accordance with its recommendations, in particular when the
combined power consumption of all of the
additional equipment connected exceeds 10
milliamperes.Fuses in the dashboard
The fusebox is located in the lower dashboard
(left-hand side).
To access the fuses, follow the same procedure
as described for accessing the fuse replacement
tools.
Table of fuses
Fuse N° Rating
(Amps) Functions
F6 30 ARear screen defrosting.
F9 20 AFolding door mirrors.
F17 10 AGlove box lighting.
F21 15 AElectric passenger seat.
F22 15 AAlarm (retrofit).
F25 or F45 25 A or 10 AReversing lamps.
F26 10 AElectric driver’s seat.
F31 10 ACigarette lighter/12
V socket.
F34 15 ARain sensor (automatic wipers).
F36 10 AReversing radar (parking sensors).
F39 7.5 ABrake lamps.
F41 7.5 ADoor mirror defrosting.
F42 20 A12
V socket (in the loading bay).
F43/F44 10 AFront/Rear sidelamps.
Engine compartment fuses
The fusebox is placed in the engine
compartment near the battery.
Accessing the fuses
Petrol engine
Table of fuses
Diesel engine box
Fuse N° Rating
(Amps) Functions
F3 25 AHeating and ventilation.
F38 30 AElectric windows.
F46 25 AWipers.
F52/F53 10 ARight-hand/Left-hand sidelamps.
F54/F55 10 ARight-hand/Left-hand front foglamp.
F56/F57 10 ARight-hand/Left-hand dipped beam headlamp.
Page 141 of 176

139
Alphabetical index
Courtesy lamp, rear 38
Courtesy lamps
38
Cruise control
76–78
Cup holder
36
D
Date (setting) 13, 136
Daytime running lamps
43, 110
Deactivating the passenger airbag
55, 58
Defrosting
35
Defrosting, front
35
Demisting
35
Demisting, front
35
Demisting, rear
35
Demisting, rear screen
35
Dials and gauges
7
Dimensions
125
Dipstick
92
Direction indicators
43–44, 110–112
Display screen, instrument panel
7
Door pockets
36
Doors
21
Driving
61–62
Driving aids camera (warnings)
74
Driving aids (recommendations)
74
Driving economically
6
Dynamic stability control (DSC)
49–50
E
EBFD 49
Eco-driving (advice)
6
ECO mode
71
Electric windows
24
Electronic brake force distribution (EBFD)
49
Emergency braking assistance (EBA)
49
Emergency switching off
66
Emergency warning lamps
48, 104
Engine
96
Engine compartment
91
Engine, Diesel
88, 91, 105, 124
Engine, petrol
91, 123
Engines
122–124
Environment
6, 21
ESC (electronic stability control)
49
Extinguisher
104
F
Filling the fuel tank 88
Filter, air
94, 99
Filter, Diesel fuel
100
Filter, oil
94, 100
Filter, particle
95
Filter, passenger compartment
31, 94, 98
Fitting a wheel
107, 109
Fitting roof bars
90
Fittings, front
36
Fittings, interior
36–37
Fittings, rear 38–39
Flap, fuel filler
88
Flashing indicators
43–44, 111
Floor storage compartment
30
Fluid, brake
93
Fluid, engine coolant
93
Fluid, power steering
93
Foglamps, front
42–43, 110
Foglamps, rear
42
Folding bench seat
30
Folding the rear seat backrest
27
Folding the rear seats
29–30
Front map reading lights
38
Fuel
6, 88
Fuel consumption
6
Fuel tank
88
Fusebox, dashboard
11 3
Fusebox, engine compartment
113, 115
Fuses
113–115
G
Gauge, fuel 88
Gearbox, automatic
69, 72, 95, 118
Gearbox, manual
69, 72, 95
Gear lever, manual gearbox
69
Gear shift indicator ~ Gear efficiency
indicator
73
Glove box
36
Grab handles
36