2021 PEUGEOT BOXER instrument panel
[x] Cancel search: instrument panelPage 4 of 212

2
Contents
■
Overview
■
Eco-driving
1InstrumentsInstrument panel 8
Warning and indicator lamps 9
Indicators 13
Vehicle configuration (MODE) 15
Touch screen audio and multimedia system 21
Setting the date and time 21
Trip computer 22
Trip computer 22
2AccessKey 23
Remote control 23
Front doors 26
Sliding side door 26
Rear doors 27
Alarm 27
Electric windows 28
3Ease of use and comfortFront seats 30
Front bench seat 31
Rear seats 32
Rear bench seat 32
Steering wheel adjustment 33
Mirrors 34
Heating and Ventilation 35
Heating/Manual air conditioning 35
Automatic air conditioning 36
Heating (Electric) 37
Additional heating systems 39
Rear heating/air conditioning 39
Additional programmable heating 40
Front demist - defrost 42
Rear screen de-icing 42
Cab layout 43
Rear fittings 47
Exterior fittings 49
4Lighting and visibilityLighting control stalk 51
Direction indicators 51
LED daytime running lamps 51
Automatic headlamp dipping 52
Headlamp beam height adjustment 54
Wiper control stalk 54
Changing a wiper blade 55
5SafetyGeneral safety recommendations 56
Hazard warning lamps 56
Horn 56
Pedestrian horn (Electric) 57
Electronic stability control (ESC) 57
Seat belts 60
Airbags 62
Child seats 63
Deactivating the front passenger airbag 65
ISOFIX seats 66
Child lock 68
6DrivingDriving recommendations 69
Starting-switching off the engine 72
Battery standby system 73
Parking brake 74
Gearbox 74
Drive selector (Electric) 75
Gear shift indicator 75
Stop & Start 76
Hill start assist 77
Tyre under-inflation detection 78
Pneumatic suspension 79
Driving and manoeuvring aids - General
recommendations
80
Road signs recognition 82
Speed limiter 83
Cruise control - Specific recommendations 85
Cruise control 85
Lane departure warning system 86
Blind spot monitoring with trailer detection 89
Active Safety Brake with Collision Risk Alert and
Intelligent emergency braking assistance
90
Rear parking sensors 93
Reversing camera 94
7Practical informationFuel 96
Compatibility of fuels 97
Charging system (Electric) 97
Charging the traction battery (Electric) 101
Snow chains 103
Towing a trailer 104
Towbar with quickly detachable towball 104
Roof-mounted carrying system 107
Bonnet 107
Page 6 of 212

4
Overview
Presentation
These illustrations and descriptions are intended
as a guide. The presence and location of certain
elements may vary, depending on the version or
trim level.
Instruments and controls
1. Instrument panel with display screen
2. Lighting control and direction indicator stalk
3. Wiper/Screenwash
control stalk
Trip computer (Diesel)
4. Vehicle configuration/Headlamps beam
height/Front/rear foglamps 5.
Steering mounted controls for the audio
system
6. Driver's front airbag/Horn
7. Ignition switch
8. Additional programmable heating (Diesel)
Heating (Electric)
9. Fusebox
10. Cruise control/speed limiter controls (Diesel)
11 . Pneumatic suspension/Reading spotlamps/
Additional rear ventilation (Diesel)
Centre console
1. Audio system/Navigation
2. Heating/Air conditioning
3. Storage compartment/Removable ashtray
4. 12 volt accessory socket (180
W max)
5. USB socket/Cigarette lighter
6. Dynamic stability control (DSC/ASR)
Intelligent traction control (Diesel)
7. Hill Assist Descent Control
8. Lane departure warning system
9. Hazard warning lamps
10. Central locking
11 . De-icing/Demisting
12. Gear lever (Diesel)
Drive selector (Electric)
Page 8 of 212

6
Eco-driving
Eco-driving
Eco-driving refers to a range of everyday
practices that allow the motorist to optimise
the vehicle's energy consumption (fuel and/or
electricity) and CO
2 emissions.
Optimise your use of the gearbox
With a manual gearbox, move off gently and
change up promptly. While accelerating, change
up early.
The gear shift indicator prompts you to engage
the most suitable gear. Whenever this indication
is displayed on the instrument panel, follow it
straight away.
Drive smoothly
Maintain a safe distance between vehicles, use
engine braking rather than the brake pedal and
press the accelerator gradually. These practices
help to save on energy consumption, reduce
CO
2 emissions and decrease general traffic
noise.
If the vehicle has the steering-mounted
"CRUISE" control, use cruise control at speeds
above 19 mph (30
km/h) when the traffic is
flowing smoothly.
Control the use of electrical equipment
Before moving off, if the passenger compartment
is too warm, ventilate it by opening the windows
and air vents before using the air conditioning.
At speeds above 31
mph (50 km/h), close the
windows and leave the air vents open. Consider using equipment that can help keep
the temperature in the passenger compartment
down.
Unless automatically regulated, switch off the air
conditioning as soon as the desired temperature
has been reached.
Switch off the demisting and defrosting functions,
if they are not managed automatically.
Switch off the heated seat as soon as possible.
Adapt your use of the headlamps and/or
foglamps to the level of visibility, in accordance
with current legislation in the country in which
you are driving.
Avoid running the engine before moving off,
particularly in winter (other than in severe wintry
conditions: temperature below -23°C). The
vehicle will warm up much faster while driving.
As a passenger, avoid connecting your
multimedia devices (e.g.
film, music, video
game) to help reduce the consumption of energy.
Disconnect all portable devices before leaving
the vehicle.
Limit the causes of excess consumption
Spread loads throughout the vehicle.
Limit the loads carried in the vehicle and
minimise wind resistance (e.g.
roof bars, roof
rack, bicycle carrier, trailer). Preferably, use a
roof box.
Remove roof bars and roof racks after use.
At the end of winter, remove snow tyres and refit
summer tyres.
Comply with the servicing instructions
Check tyre pressures regularly, with the tyres
cold, referring to the label in the door aperture on
the driver's side.
Carry out this check in particular:
–
before a long journey
.
–
at each change of season.
–
after a long period out of use.
Do not forget the spare wheel and, where
applicable, the tyres on your trailer or caravan.
Have your vehicle serviced regularly (e.g.
engine
oil, oil filter, air filter, passenger compartment
filter, etc.). Observe the schedule of operations in
the manufacturer's service schedule.
With a BlueHDi Diesel engine, if the SCR system
has a fault, your vehicle will emit pollution. Visit
a PEUGEOT dealer or a qualified workshop
as soon as possible to restore your vehicle's
nitrogen oxide emissions to legal levels.
When filling the fuel tank, do not continue after
the third cut-out of the nozzle, to avoid overflow.
You will only see the fuel consumption of your
new vehicle settle down to a consistent average
after the first 1,900 miles (3,000 kilometres).
Optimising the driving range (Electric)
The vehicle’s electrical consumption depends
heavily on the route, the vehicle speed and your
driving style.
Drive smoothly and maintain a steady speed.
Anticipate the need to slow down and brake
smoothly, whenever possible using engine
braking.
Page 10 of 212

8
Instruments
Instrument panel
1.Speedometer (mph or km/h)
2. Display screen
3. Fuel gauge (Diesel)
4. Coolant temperature (Diesel)
5. Rev counter (rpm x 1,000) (Diesel)
Electric vehicles
The fuel gauge, coolant temperature
gauge and rev counter are inactive.
Level 1 display screen
In the lower part:
– Time.
–
Outside temperature.
–
Miles/Kilometres travelled. –
T
rip computer (range, consumption, etc.)
(Diesel).
–
Headlamp beam height.
–
Programmable overspeed alert.
–
Speed limiter or cruise control (Diesel).
–
Gear shift indicator (Diesel).
–
Stop & Start (Diesel).
In the upper part:
–
Date.
–
Service indicator
.
–
Alert messages.
–
Function status messages.
–
V
ehicle configuration.
Level 2 display screen
In the left-hand part:
–
Time.
–
Outside temperature,
–
W
arning or status lamps.
–
Speed limiter or cruise control (Diesel).
In the right-hand part:
–
Date.
–
Service indicator
.
–
T
rip computer (range, consumption, etc.)
(Diesel). –
Alert messages.
–
Function status messages.
–
V
ehicle configuration.
–
Headlamp beam height.
–
Miles/Kilometres travelled.
Brightness of the
instruments and controls
The brightness of the instruments and
controls can be adjusted using the MODE
button, with the sidelamps on.
For more information on Vehicle configuration
(MODE), refer to the corresponding section.
Display integrated into the
rear view mirror (Electric)
The interior rear view mirror contains a
dedicated display showing information about the
electrical system. It comes on when the ignition
is switched on and when the vehicle is being
charged.
Page 12 of 212

10
Instruments
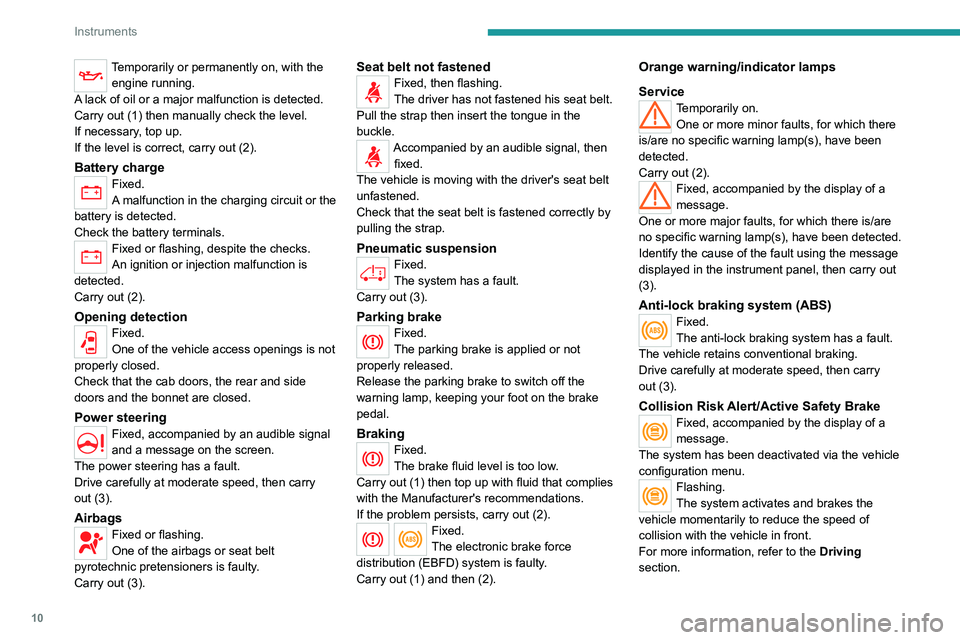
Temporarily or permanently on, with the engine running.
A lack of oil or a major malfunction is detected.
Carry out (1) then manually check the level.
If necessary, top up.
If the level is correct, carry out (2).
Battery chargeFixed.
A malfunction in the charging circuit or the
battery is detected.
Check the battery terminals.
Fixed or flashing, despite the checks.
An ignition or injection malfunction is
detected.
Carry out (2).
Opening detectionFixed.
One of the vehicle access openings is not
properly closed.
Check that the cab doors, the rear and side
doors and the bonnet are closed.
Power steering
Fixed, accompanied by an audible signal
and a message on the screen.
The power steering has a fault.
Drive carefully at moderate speed, then carry
out (3).
AirbagsFixed or flashing.
One of the airbags or seat belt
pyrotechnic pretensioners is faulty.
Carry out (3).
Seat belt not fastenedFixed, then flashing.
The driver has not fastened his seat belt.
Pull the strap then insert the tongue in the
buckle.
Accompanied by an audible signal, then fixed.
The vehicle is moving with the driver's seat belt
unfastened.
Check that the seat belt is fastened correctly by
pulling the strap.
Pneumatic suspensionFixed.
The system has a fault.
Carry out (3).
Parking brakeFixed.
The parking brake is applied or not
properly released.
Release the parking brake to switch off the
warning lamp, keeping your foot on the brake
pedal.
BrakingFixed.
The brake fluid level is too low.
Carry out (1) then top up with fluid that complies
with the Manufacturer's recommendations.
If the problem persists, carry out (2).
Fixed.
The electronic brake force
distribution
(EBFD) system is faulty.
Carry out (1) and then (2).
Orange warning/indicator lamps
Service
Temporarily on. One or more minor faults, for which there
is/are no specific warning lamp(s), have been
detected.
Carry out (2).
Fixed, accompanied by the display of a
message.
One or more major faults, for which there is/are
no specific warning lamp(s), have been detected.
Identify the cause of the fault using the message
displayed in the instrument panel, then carry out
(3).
Anti-lock braking system (ABS)Fixed.
The anti-lock braking system has a fault.
The vehicle retains conventional braking.
Drive carefully at moderate speed, then carry
out (3).
Collision Risk Alert/Active Safety BrakeFixed, accompanied by the display of a
message.
The system has been deactivated via the vehicle
configuration menu.
Flashing.
The system activates and brakes the
vehicle momentarily to reduce the speed of
collision with the vehicle in front.
For more information, refer to the Driving
section.
Page 14 of 212

12
Instruments
Flashing.
The system has a fault.
Carry out (2).
Diesel pre-heaterFixed.
The climatic conditions mean that pre-
heating is necessary.
Wait until the indicator lamp goes off before
starting the engine.
Rear foglampsFixed.
The button on the MODE control panel is
switched on.
The lamps only operate when the dipped beam
headlamps are on.
Under normal visibility conditions, switch them
off.
Green warning/indicator lamps
Direction indicators
Direction indicators with audible signal.
The direction indicators are on.
Front foglampsFixed.
The button on the MODE control panel is
switched on.
The lamps only operate when the dipped beam
headlamps are on.
Dipped beam headlampsFixed.
The lamps are on.
Cruise controlFixed.
Cruise control is selected.
Manual selection.
Blue warning/indicator lamps
Main beam headlamps
Fixed.
The lamps are on.
Automatic headlamp dippingFixed.
The function has been activated via the
"MODE" menu.
Turning the main beam headlamps on and off is
automatically controlled according to traffic and
driving conditions.
Black/white warning lamps
Temperature / Black ice
Fixed, accompanied by a message
in the display.
Climatic conditions can lead to black ice on the
road.
Be extra vigilant and avoid sudden braking.
Date / TimeFixed.
It is set via the “MODE” menu.
Beam heightFixed.
The headlamps are adjusted from position
0 to 3 depending on the load transported. Adjust with the buttons on the MODE control
module.
Service spannerFixed.
Service is due.
Refer to the list of checks in the manufacturer's
service schedule then have the service carried
out.
Stop & StartFixed.
With the vehicle stationary (traffic lights,
stop sign, congestion, etc.), the Stop & Start
system puts the engine in STOP mode.
The indicator lamp goes off and the engine
restarts automatically in START mode, as soon
as you move off.
Flashing for a few seconds, then goes off.
STOP mode is temporarily unavailable.
Gear shift indicatorFixed.
The next higher gear may be engaged.
Speed limiter
Fixed.
The limiter is activated.
Fixed with "OFF".
The limiter is selected and not active.
Page 15 of 212

13
Instruments
1Indicators
Service information
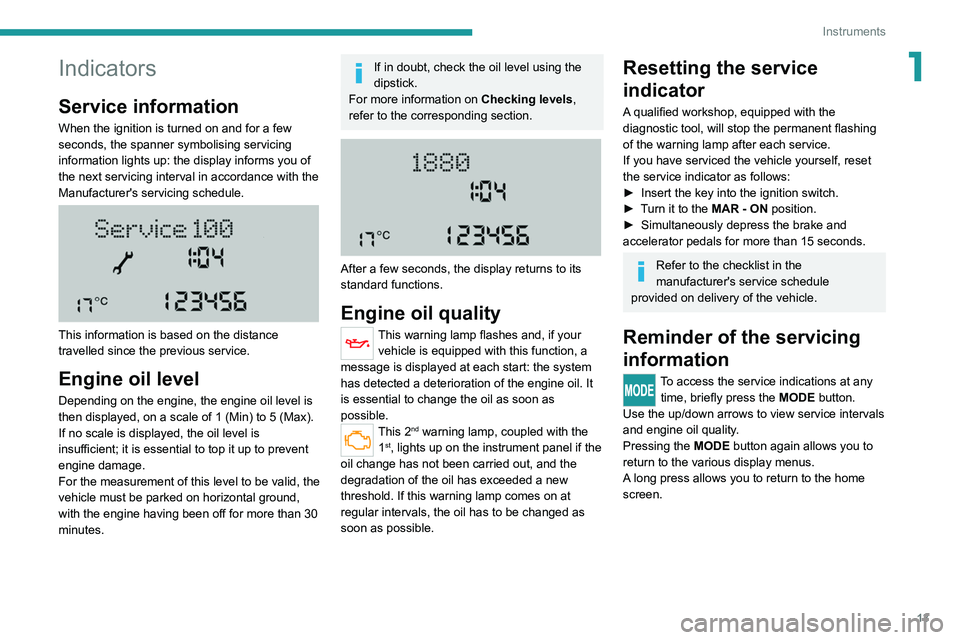
When the ignition is turned on and for a few
seconds, the spanner symbolising servicing
information lights up: the display informs you of
the next servicing interval in accordance with the
Manufacturer's servicing schedule.
This information is based on the distance
travelled since the previous service.
Engine oil level
Depending on the engine, the engine oil level is
then displayed, on a scale of 1 (Min) to 5 (Max).
If no scale is displayed, the oil level is
insufficient; it is essential to top it up to prevent
engine damage.
For the measurement of this level to be valid, the
vehicle must be parked on horizontal ground,
with the engine having been off for more than 30
minutes.
If in doubt, check the oil level using the
dipstick.
For more information on Checking levels,
refer to the corresponding section.
After a few seconds, the display returns to its
standard functions.
Engine oil quality
This warning lamp flashes and, if your vehicle is equipped with this function, a
message is displayed at each start: the system
has detected a deterioration of the engine oil. It
is essential to change the oil as soon as
possible.
This 2nd warning lamp, coupled with the
1st, lights up on the instrument panel if the
oil change has not been carried out, and the
degradation of the oil has exceeded a new
threshold. If this warning lamp comes on at
regular intervals, the oil has to be changed as
soon as possible.
Resetting the service
indicator
A qualified workshop, equipped with the
diagnostic tool, will stop the permanent flashing
of the warning lamp after each service.
If you have serviced the vehicle yourself, reset
the service indicator as follows:
►
Insert the key into the ignition switch.
►
T
urn it to the MAR - ON position.
►
Simultaneously depress the brake and
accelerator pedals for more than 15 seconds.
Refer to the checklist in the
manufacturer's service schedule
provided on delivery of the vehicle.
Reminder of the servicing
information
To access the service indications at any time, briefly press the MODE button.
Use the up/down arrows to view service intervals
and engine oil quality.
Pressing the MODE
button again allows you to
return to the various display menus.
A long press allows you to return to the home
screen.
Page 16 of 212

14
Instruments
Menu... Select... Allows you to...
Service Service (miles/
km before
service) Display the
remaining
miles/
kilometres to
be travelled
before the
next service.
Oil change
(miles/km
before oil
change) Display the
remaining
miles/
kilometres to
be travelled
before the
next oil
change.
For more information on
Vehicle
configuration (MODE) , refer to the
corresponding section.
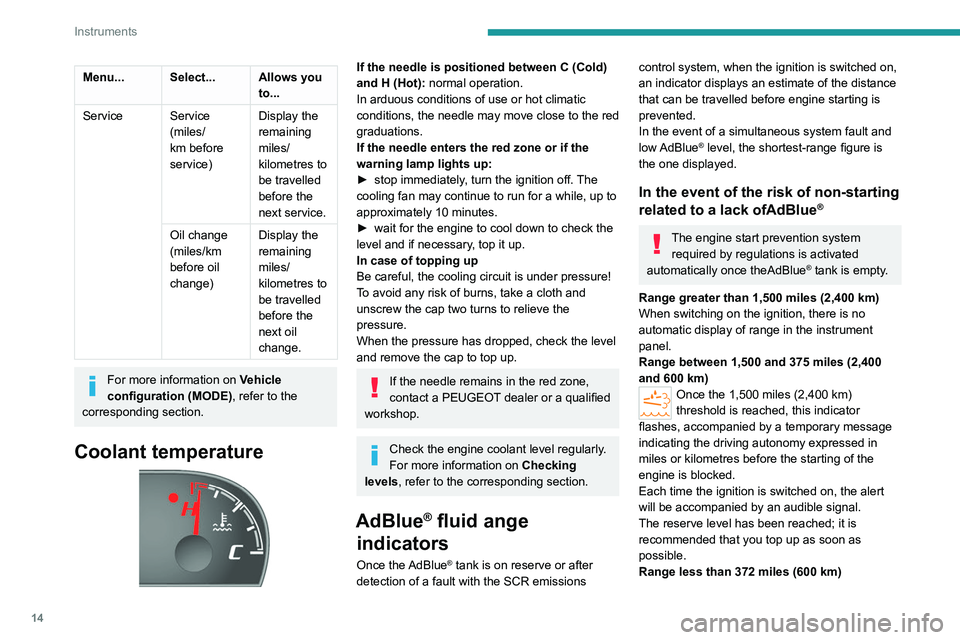
Coolant temperature
If the needle is positioned between C (Cold)
and H (Hot): normal operation.
In arduous conditions of use or hot climatic
conditions, the needle may move close to the red
graduations.
If the needle enters the red zone or if the
warning lamp lights up:
►
stop immediately
, turn the ignition off. The
cooling fan may continue to run for a while, up to
approximately 10 minutes.
►
wait for the engine to cool down to check the
level and if necessary
, top it up.
In case of topping up
Be careful, the cooling circuit is under pressure!
To avoid any risk of burns, take a cloth and
unscrew the cap two turns to relieve the
pressure.
When the pressure has dropped, check the level
and remove the cap to top up.
If the needle remains in the red zone,
contact a PEUGEOT dealer or a qualified
workshop.
Check the engine coolant level regularly.
For more information on Checking
levels, refer to the corresponding section.
AdBlue® fluid ange
indicators
Once the AdBlue® tank is on reserve or after
detection of a fault with the SCR emissions
control system, when the ignition is switched on,
an indicator displays an estimate of the distance
that can be travelled before engine starting is
prevented.
In the event of a simultaneous system fault and
low AdBlue
® level, the shortest-range figure is
the one displayed.
In the event of the risk of non-starting
related to a lack ofAdBlue®
The engine start prevention system required by regulations is activated
automatically once theAdBlue
® tank is empty.
Range greater than 1,500 miles (2,400 km)
When switching on the ignition, there is no
automatic display of range in the instrument
panel.
Range between 1,500 and 375 miles (2,400
and 600 km)
Once the 1,500 miles (2,400 km)
threshold is reached, this indicator
flashes, accompanied by a temporary message
indicating the driving autonomy expressed in
miles or kilometres before the starting of the
engine is blocked.
Each time the ignition is switched on, the alert
will be accompanied by an audible signal.
The reserve level has been reached; it is
recommended that you top up as soon as
possible.
Range less than 372 miles (600 km)