2021 PEUGEOT BOXER turn signal
[x] Cancel search: turn signalPage 62 of 212
60
Safety
If the speed exceeds 19 mph (30 km/h), the
system is automatically deactivated but the
button indicator lamp remains on.
The system is automatically reactivated as soon
as the speed returns below 19 mph (30 km/h).
You can depress the accelerator or brake pedal again at any time.
For the system to activate, the slope
must be greater than 8%.
Do not use the system with the gearbox in
neutral.
Engage a gear corresponding to the speed to
prevent the engine stalling.
►
T
o manually deactivate the system, press the
button; the indicator lamp goes out.
The function may be unavailable if the brakes overheat. Wait a few minutes for
them to cool down before trying again.
Malfunction
In the event of a Hill Assist Descent
Control malfunction, this warning lamp
comes on.
Have it checked by a PEUGEOT dealer or a
qualified workshop.
Seat belts
Inertia reel
The seat belts are equipped with an inertia
reel which allows the strap length to adjust
automatically to the shape of the user. The seat
belt returns to its storage automatically when it
is not used.
The inertia reels are fitted with a device which
automatically locks the strap in the event of a
collision, emergency braking or if the vehicle rolls
over. It can be released by pulling the strap firmly
and then releasing it so that it reels in slightly.
Pyrotechnic pretensioning
This system improves safety in the event of a
frontal or side impact.
Depending on the severity of the impact, the
pyrotechnic pretensioning system instantly
tightens the seat belts against the body of the
occupants.
The pyrotechnic pretensioning seat belts are
enabled when the ignition is on.
Force limiting system
This system reduces the pressure of the seat
belt on the chest of the occupant, thus improving
their protection.
In the event of an impact
Depending on the nature and
seriousness of the impacts, the pyrotechnic
device may trigger before and independently
of airbag deployment. Deployment of the
pretensioners is accompanied by a slight
discharge of harmless smoke and a noise,
due to the activation of the pyrotechnic
cartridge incorporated in the system.
In all cases, the airbag warning lamp comes
on.
Following an impact, have the seat belt
system checked, and if necessary replaced,
by a PEUGEOT dealer or a qualified
workshop.
Front seat belts
The driver's seat is fitted with a pyrotechnic
pretensioner and a force limiter.
On versions with a front passenger airbag, the
passenger's seat is also fitted with a pyrotechnic
pretensioner and a force limiter.
The front bench seat is fitted with two seat belts.
If you install a front bench seat as an
accessory, it must be fitted with approved
seat belts.
Seat belts not fastened warning lamp
When the vehicle is started, this warning
lamp comes on, accompanied by an
increasing audible signal, if the driver and/or the
front passenger has not fastened their seat belt.
This alert works equally well for versions with an
individual passenger front seat as for versions
with a two-seat front bench seat.
Page 63 of 212
61
Safety
5Height adjustment
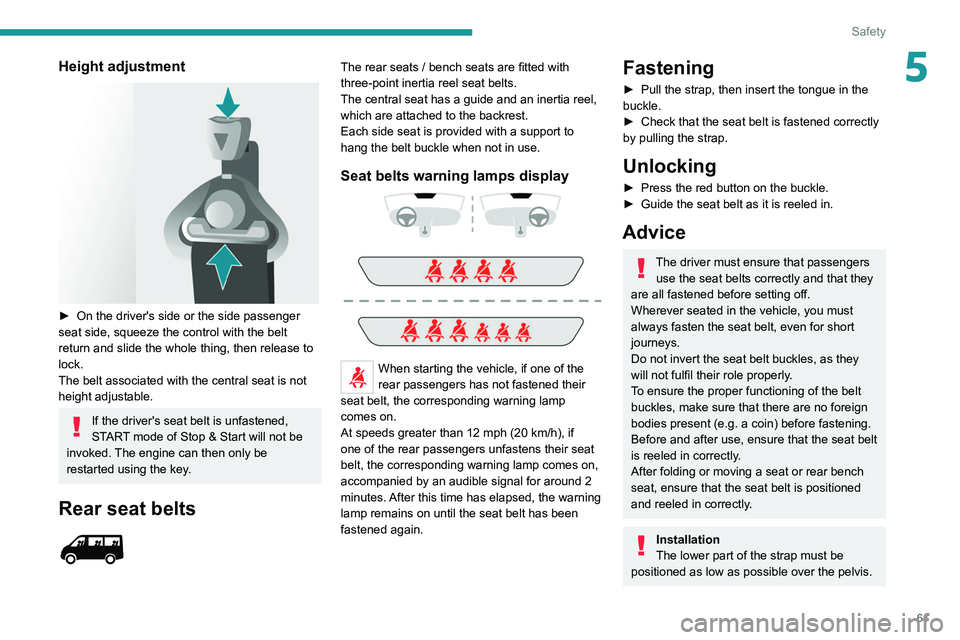
► On the driver's side or the side passenger
seat side, squeeze the control with the belt
return and slide the whole thing, then release to
lock.
The belt associated with the central seat is not
height adjustable.
If the driver's seat belt is unfastened,
START mode of Stop & Start will not be
invoked. The engine can then only be
restarted using the key.
Rear seat belts
The rear seats / bench seats are fitted with
three-point inertia reel seat belts.
The central seat has a guide and an inertia reel,
which are attached to the backrest.
Each side seat is provided with a support to
hang the belt buckle when not in use.
Seat belts warning lamps display
When starting the vehicle, if one of the
rear passengers has not fastened their
seat belt, the corresponding warning lamp
comes on.
At speeds greater than 12 mph (20
km/h), if
one of the rear passengers unfastens their seat
belt, the corresponding warning lamp comes on,
accompanied by an audible signal for around 2
minutes. After this time has elapsed, the warning
lamp remains on until the seat belt has been
fastened again.
Fastening
► Pull the strap, then insert the tongue in the
buckle.
►
Check that the seat belt is fastened correctly
by pulling the strap.
Unlocking
► Press the red button on the buckle.
► Guide the seat belt as it is reeled in.
Advice
The driver must ensure that passengers use the seat belts correctly and that they
are all fastened before setting off.
Wherever seated in the vehicle, you must
always fasten the seat belt, even for short
journeys.
Do not invert the seat belt buckles, as they
will not fulfil their role properly.
To ensure the proper functioning of the belt
buckles, make sure that there are no foreign
bodies present (e.g.
a coin) before fastening.
Before and after use, ensure that the seat belt
is reeled in correctly.
After folding or moving a seat or rear bench
seat, ensure that the seat belt is positioned
and reeled in correctly.
Installation
The lower part of the strap must be
positioned as low as possible over the pelvis.
Page 73 of 212

71
Driving
6If the outside temperature is high, let the
engine idle for 1 to 2 minutes after the
vehicle comes to a stop, to help it to cool.
Before setting off
Nose weight
► Distribute the load in the trailer so that the
heaviest items are located as close as possible
to the axle, and the nose weight (at the point
where it joins your vehicle) approaches the
maximum permitted, without exceeding it.
Tyres
► Check the tyre pressures of the towing
vehicle and of the trailer , observing the
recommended pressures.
Lighting
► Check the electrical signalling on the trailer
and the headlamp beam height of your vehicle.
If a genuine PEUGEOT towing device is
used, the rear parking sensors will be
deactivated automatically to avoid activating
the audible signal.
When driving
Cooling
Towing a trailer uphill causes the coolant
temperature to increase. The maximum towable
load depends on the gradient and the exterior temperature. The fan’s cooling capacity does not
increase with engine speed.
►
Reduce speed and lower the engine speed to
limit the amount of heating produced.
►
Pay constant attention to the coolant
temperature.
If this warning lamp and the STOP
warning lamp come on, stop the vehicle
and switch off the engine as soon as possible.
Brakes
Using the engine brake is recommended to limit
the overheating of the brakes. Braking distances
are increased when towing a trailer.
Side wind
Bear in mind that the vehicle will be more
susceptible to wind when towing.
Anti-theft protection
Electronic immobiliser
The keys contain an electronic immobiliser
device.
This device locks the engine supply system. It
activates automatically when the key is removed
from the ignition.
When the ignition switch is turned on, a dialogue
is set up between the key and the electronic
immobiliser.
This warning lamp goes off after the key has been recognised, the ignition is
switched on and the engine can be started.
If the key is not recognised, the engine
cannot be started. Use another key and
have the faulty key checked by a PEUGEOT
dealer.
Carefully note the key number. In case of
loss, the intervention of a PEUGEOT
dealer will be faster and more efficient if you
provide this number and the confidential card.
Do not make any modifications to the
electronic immobiliser system.
Operating the remote control, even in your
pocket, may cause the doors to be unlocked
accidentally.
The simultaneous use of other high-frequency
devices (mobile phones, home alarms, etc.),
may temporarily disturb the operation of the
remote control.
Except for reinitialisation, the remote control
cannot operate while the key is in the ignition
switch, even when the ignition is off.
Driving with the doors locked could make
it more difficult for the emergency
services to enter the vehicle in an emergency.
As a safety precaution (with children on
board), remove the key from the ignition when
leaving the vehicle, even for a short time.
Page 75 of 212
73
Driving
6Starting/Switching off the
motor (Electric)
Starting
► With the parking brake applied, turn the key
to the AV V position and then release it so it
returns to the MAR position.
The message "Go green" appears in the display
integrated into the rear view mirror.
►
Depress the brake pedal fully
, then press
button D (Drive) or R (Reverse) on the drive
selector.
The pedestrian horn comes on.
►
Release the parking brake.
If the electric motor does not start first time, turn
the key to the
STOP position and repeat the
procedure.
Do not depress the accelerator pedal
when switching on the ignition.
Switching off
► Press button N (Neutral) on the drive selector
and then apply the parking brake.
►
Move the key back to the
STOP position.
The parking brake must be applied each time the ignition is switched off.
If the parking brake is not applied, the
message "ENGAGE HANDBRAKE " appears
in the rear view mirror accompanied by an
audible signal lasting 10 seconds.
If the driver's door is opened with mode
D or R selected, the drive selector
automatically switches to mode N. The
message "DRIVE ACTIVE" is displayed in the
rear view mirror accompanied by an audible
signal.
Always remove the key from the ignition switch when the vehicle is parked in
order to avoid discharging the 12
V accessory
battery.
Battery standby system
If your vehicle is to be out of use for an extended
period of time, such as during winter storage for
example, it is strongly recommended to put the
battery in standby mode in order to protect it and
optimise its life.
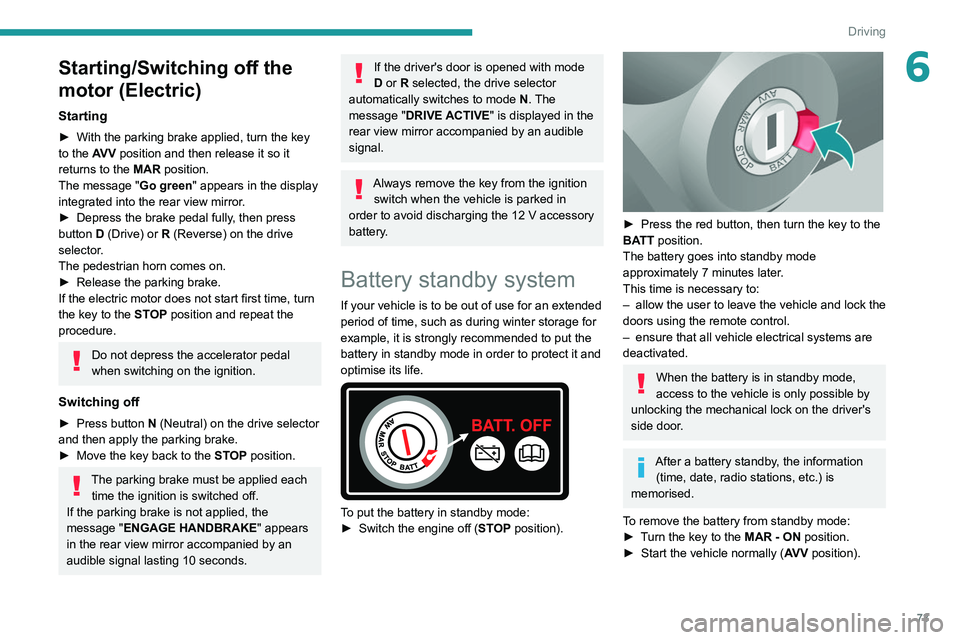
To put the battery in standby mode:
► Switch the engine off ( ST
OP position).
► Press the red button, then turn the key to the
BA TT position.
The battery goes into standby mode
approximately 7 minutes later.
This time is necessary to:
–
allow the user to leave the vehicle and lock the
doors using the remote control.
–
ensure that all vehicle electrical systems are
deactivated.
When the battery is in standby mode,
access to the vehicle is only possible by
unlocking the mechanical lock on the driver's
side door.
After a battery standby, the information (time, date, radio stations, etc.) is
memorised.
To remove the battery from standby mode:
►
T
urn the key to the MAR - ON position.
►
Start the vehicle normally ( AV
V position).
Page 76 of 212

74
Driving
Parking brake
Application
► Apply the parking brake to immobilise the
vehicle.
►
Check that the parking brake is correctly
applied before leaving the vehicle.
Apply the parking brake only when the
vehicle is stationary.
When parking on a slope, turn your
wheels towards the kerb and pull the
parking brake lever up.
There is no advantage in engaging a gear
after parking the vehicle, particularly if the
vehicle is loaded.
In the event of a failure of the
hydraulic braking system
While driving , to avoid any accidental
movement of the vehicle, use the parking
brake while depressing the brake pedal.
In this exceptional circumstance, it is
advisable to pull the parking brake up gently
so as not to block the rear wheels - risk of
skidding!
Release
► Pull the lever up gently and press the button
to release the parking brake.
When the vehicle is being driven, this
warning lamp coming on indicates that
the parking brake is still applied or has not been
fully released.
Manual gearbox
To change gear easily, always fully depress the
clutch pedal.
To prevent the mat from becoming caught under
the pedal:
–
ensure that the mat is positioned correctly
,
–
never fit one mat on top of another
.
Avoid leaving your hand on the gear knob as
the force exerted, even if slight, may wear the
internal components of the gearbox over time.
Engaging reverse gear
► Lift the ring under the knob to engage reverse
gear .
Never engage it until the vehicle has
come to a complete stop.
The movement must be done slowly to reduce
the noise when engaging reverse gear.
If fitted to the vehicle, the parking
sensors are activated when reverse gear
is engaged; an audible signal sounds.
For more information on the Parking
sensors, refer to the corresponding section.
Page 95 of 212

93
Driving
6This warning lamp flashes (for approximately 10 seconds) as soon as
the function applies the vehicle’s brakes.
With a manual gearbox, in the event of automatic
emergency braking bringing the vehicle to a
complete stop, the engine may stall.
The driver can maintain control of the vehicle at any time by firmly turning the
steering wheel and/or firmly depressing the
accelerator pedal.
The brake pedal may vibrate slightly while the function is operating.
If the vehicle comes to a complete stop,
automatic braking is maintained for 1 to 2
seconds.
Malfunction
In the event of a system malfunction, this
warning lamp comes on on the instrument
panel, accompanied by an onscreen message
and an audible signal.
Contact a PEUGEOT dealer or a qualified
workshop to have the system checked.
If these warning lamps come on
after the engine has been switched
off and then restarted, contact a PEUGEOT
dealer or a qualified workshop to have the
system checked.
Audible rear parking sensors
For more information, refer to the
General recommendations on the use
of driving and manoeuvring aids .
If fitted to your vehicle, the system consists of 4
proximity sensors installed in the rear bumper.
They detect any obstacle, e.g. person, vehicle,
tree, barrier, which is behind the vehicle while
manoeuvring.
Certain types of obstacle detected at the
beginning of the manoeuvre will no longer be
detected at the end of manoeuvre if they are
located in the blind spots between and under the
sensors. Examples: stake, roadworks cone or
pavement post.
The rear parking sensors may be associated
with the reversing camera.
Switching on
► Engage reverse gear with the gear lever .
The proximity information is indicated by an
audible signal which becomes more rapid as the
vehicle approaches the obstacle.
When the distance between the rear of
the vehicle and the obstacle is less than
approximately 30 centimetres, the audible signal
becomes continuous.
Switching off
► Disengage reverse gear and shift to neutral.
Malfunction
In the event of a malfunction, this warning
lamp lights up on the instrument panel.
Consult a PEUGEOT dealer or a qualified
workshop.
Page 165 of 212
163
Audio system
11Media, toggle up or down: select next/previous
track.
Media, toggle up or down continuously: fast
forward/rewind until you release the button.
Refuse an incoming call.
End the call in progress.
Radio
Selecting a station
The exterior environment (hills, buildings, tunnels, car parks, underground location,
etc.) may block reception, including in RDS
mode.
This behaviour is normal in the propagation of
radio waves and does not indicate any fault
with the audio system.
Press the "RADIO" button to select the
FM or AM waveband.
Briefly press one of the buttons to
automatically search for a lower/
higher frequency.
Turn the knob to manually search for a lower/higher frequency.
Press the knob to display the list of
stations received locally.
Turn the knob to select a station and press to
select it.
Memorising a station
Press the "RADIO" button to select the
FM or AM waveband.
Press the "A-B-C" button to select one of
the three memorised station levels.
Press and hold a button to memorise the
station being listened to.
The name of the station is displayed and an
audible signal confirms the memorisation.
Press "INFO" to display the information of
the station being listened to.
RDS
RDS, if displayed, allows you to continue
listening to the same station by
automatically retuning to alternative
frequencies. However, in certain conditions,
following this RDS station is not guaranteed
over the whole country, because radio
stations do not cover 100% of the area. When
the reception is weak, the frequency switches
to a regional station.
Press the "MENU" button.
Select "Regional" then press to activate
or deactivate RDS.
Alternative frequency (AF)
Select "Alternative frequency (AF)" then
press to activate or deactivate the
frequency.
When the "Regional” function is
activated, the system is therefore able to
search at any time
for the best available
frequency.
Playing TA messages
The TA (Traffic Announcement) function gives priority to TA alert messages. To
operate, this function needs good reception of
a radio station that carries this type of
message. While traffic information is being
broadcast, the current media is automatically
interrupted so that the TA message can be
heard. Normal play of the previously playing
media resumes at the end of the message.
Press the "MENU" button.
Select "Traffic announcement (TA)" then
press to activate or deactivate the
reception of traffic announcements.
Media
USB socket
Insert the USB memory stick or connect
the device to the USB socket in the
central storage space , provided for transferring
data to the system, using a suitable cable (not
supplied).
Page 181 of 212
179
Touch screen audio and telematics system
12Press the "Contacts" button or the
"Recent calls" button.
Select the desired contact from the list offered to
start the call.
Vehicle information
Press "MORE" to display the vehicle
information menus:
Exterior temp.
Display the exterior temperature.
Clock
Display
the clock.
Compass
Display
the direction that you are travelling in.
Trip
–
Current info., T
rip A, Trip B.
Display the trip computer.
Press and hold the "Trip A" or "Trip B" button to
reset the trip concerned.
Settings
Press this button to display the settings
menus:
Display
–
Brightness
.
–
Set the brightness of the screen.
–
Display mode
.
–
Set the display mode.
–
Language
.
–
Choose the desired language.
–
Unit of measurement
. –
Set the display units for consumption,
distance
and temperature.
–
T
ouch screen beep.
–
Activate or deactivate the audible signal when
touching a button on the screen.
–
Display T
rip B.
–
Display
Trip B on the driver's screen.
Voice commands
–
V
oice response time.
–
Set the length of the voice system response.
–
Display list of commands
.
–
Display suggestions with the different options
during a voice session.
Clock and Date
–
T
ime setting and format.
–
Setting the time.
–
Display time mode
.
–
Activate or deactivate the display of the digital
clock on the status bar
.
–
Synchro time
.
–
Activate or deactivate the automatic time
display
.
– Date setting .
– Set the date.
Safety/Assistance
–
Reversing camera.
–
Display the reversing camera in reverse.
–
Camera delay.
–
Maintain the on-screen display of the
reversing camera for a maximum of 10 seconds
or up to 1
1 mph (18 km/h).
Lighting
–
Daytime running lamps
.–
Activate or deactivate the automatic
illumination of the headlamps when starting.
Doors & locking
–
Autoclose
.
–
Activate or deactivate the automatic locking of
the doors
when the vehicle is moving.
Audio
–
Equalizer
.
–
Adjust the bass, medium and treble.
–
Balance/Fade
.
–
Adjust the balance of the front and rear
speakers, left and right.
–
Press the button in the centre of the arrows to
balance the settings.
–
V
olume/Speed.
–
Select the desired parameter; the option is
highlighted.
–
Loudness
.
–
Optimise the quality of low volume audio.
–
Automatic radio
.
–
Set the radio when starting up or recover the
active state when the ignition key was last turned
to ST
OP.
– Radio switch-off delay.
–
Set the parameter
.
–
AUX vol. setting.
–
Set the parameters.
T
elephone/Bluetooth
®
– Connected tels.
– Start the Bluetooth® connection of the selected
mobile device.
–
Delete the selected mobile device.