2021 PEUGEOT BOXER parking brake
[x] Cancel search: parking brakePage 80 of 212

78
Driving
Operation
With the brake pedal and clutch pedal pressed,
from the time you release the brake pedal,
without using the parking brake, you have
approximately 2 seconds to move off before the
vehicle starts to roll back.
During the moving off phase, the function is
deactivated automatically, gradually releasing
the braking pressure. During this phase, you
may hear the typical mechanical brake release
noise, signalling the imminent movement of the
vehicle.
Do not leave the vehicle while it is being
held temporarily by hill start assist.
If you need to get out of the vehicle with
the engine running, apply the parking brake
manually then ensure that the parking brake
indicator lamp is on. Hill start assist is deactivated in the following
situations:
–
when the clutch pedal is released,
–
when the parking brake is applied,
–
when the engine is switched off,
–
if the engine stalls.
Malfunction
In the event of a malfunction, this warning
lamp lights up on the instrument panel,
accompanied by the display of a message and
an audible signal.
Have it checked by a PEUGEOT dealer or a
qualified workshop.
Tyre under-inflation detection
System which automatically checks the
pressures of the tyres while driving.
The system continuously monitors the pressures
of the four tyres, as soon as the vehicle is
moving.
A pressure sensor is located in the valve of each
tyre (except the spare wheel).
The system triggers an alert as soon as it
detects a drop in the inflation pressure of one or
more tyres.
The under-inflation detection system
does not replace the need for vigilance
on the part of the driver.
This system does not avoid the need to
regularly check the tyre pressures (including
the spare wheel) as well as before a long
journey.
Driving with under-inflated tyres, particularly
in adverse conditions (heavy load, high
speed, long journey):
–
worsens road-holding,
–
lengthens braking distances,
–
causes premature wear of the tyres,
–
increases energy consumption.
The inflation pressures defined for the vehicle can be found on the tyre pressure
label.
Tyre pressures should be checked when the
tyres are "cold" (vehicle stopped for 1 hour or
after a journey of less than 6 miles (10 km) at
moderate speeds). Otherwise, add 0.3 bar to
the pressures shown on the label.
For more information on Identification
markings, including the tyre pressure label,
refer to the corresponding section.
The tyre pressure measurement unit can be configured via the MODE button: in the
"Tyre pressure" menu, select "psi/bar/kPa".
For more information on Vehicle configuration
(MODE), refer to the corresponding section.
Page 95 of 212

93
Driving
6This warning lamp flashes (for approximately 10 seconds) as soon as
the function applies the vehicle’s brakes.
With a manual gearbox, in the event of automatic
emergency braking bringing the vehicle to a
complete stop, the engine may stall.
The driver can maintain control of the vehicle at any time by firmly turning the
steering wheel and/or firmly depressing the
accelerator pedal.
The brake pedal may vibrate slightly while the function is operating.
If the vehicle comes to a complete stop,
automatic braking is maintained for 1 to 2
seconds.
Malfunction
In the event of a system malfunction, this
warning lamp comes on on the instrument
panel, accompanied by an onscreen message
and an audible signal.
Contact a PEUGEOT dealer or a qualified
workshop to have the system checked.
If these warning lamps come on
after the engine has been switched
off and then restarted, contact a PEUGEOT
dealer or a qualified workshop to have the
system checked.
Audible rear parking sensors
For more information, refer to the
General recommendations on the use
of driving and manoeuvring aids .
If fitted to your vehicle, the system consists of 4
proximity sensors installed in the rear bumper.
They detect any obstacle, e.g. person, vehicle,
tree, barrier, which is behind the vehicle while
manoeuvring.
Certain types of obstacle detected at the
beginning of the manoeuvre will no longer be
detected at the end of manoeuvre if they are
located in the blind spots between and under the
sensors. Examples: stake, roadworks cone or
pavement post.
The rear parking sensors may be associated
with the reversing camera.
Switching on
► Engage reverse gear with the gear lever .
The proximity information is indicated by an
audible signal which becomes more rapid as the
vehicle approaches the obstacle.
When the distance between the rear of
the vehicle and the obstacle is less than
approximately 30 centimetres, the audible signal
becomes continuous.
Switching off
► Disengage reverse gear and shift to neutral.
Malfunction
In the event of a malfunction, this warning
lamp lights up on the instrument panel.
Consult a PEUGEOT dealer or a qualified
workshop.
Page 96 of 212

94
Driving
Reversing camera
For more information, refer to the
General recommendations on the use
of driving and manoeuvring aids .
If fitted to the vehicle, the camera is located at
the rear by the third brake lamp.
It transmits views to the screen installed in the
cab.
It can be activated or deactivated via the settings
menu of the touch screen audio and telematics
system.
This rear vision system is a driving aid. The
reversing camera may be associated with the
rear parking sensors.
Switching on
The camera comes into operation when reverse
gear is engaged and remains active up to
approximately 9 mph (15 km/h). It is deactivated
above 11 mph (18 km/h).
The camera also comes on with the vehicle
stationary, when the rear doors are opened.
Switching off
When engaging forward gear, the last image
remains displayed for approximately 5 seconds,
then goes out.
The last image also remains displayed in the
same way, with the vehicle stationary, when
closing the rear doors.
With optimum vehicle conditions (position
on the road, loading level) the maximum
area of visibility covered by the camera has a
field depth approximately 3 m long and 5.5 m
wide.
The area of visibility may vary depending on
the external weather conditions (brightness,
rain, snow, fog, etc.), the load in the vehicle
and the position of the vehicle on the road.
When cleaning the camera and the screen,
avoid using a detergent or a tool which may
scratch the glass.
Use a non-abrasive cloth or a small brush.
Page 106 of 212

104
Practical information
Installation tips
► To fit the snow chains during a journey, stop
the vehicle on a flat surface at the side of the
road.
►
Apply the parking brake and position any
wheel chocks under the wheels to prevent
movement of the vehicle.
►
Fit the snow chains following the instructions
provided by the manufacturer
.
►
Move off gently and drive for a few moments,
without exceeding 31
mph (50 km/h).
►
Stop the vehicle and check that the snow
chains are correctly tightened.
It is strongly recommended that you
practise fitting the snow chains on a level
and dry surface before setting off.
Avoid driving with snow chains on roads that have been cleared of snow to avoid
damaging the vehicle's tyres and the road
surface. If the vehicle is fitted with alloy
wheels, check that no part of the chain or its
fixings is in contact with the wheel rim.
Towing a trailer
The type-approved towable weights are entered
in your vehicle's registration certificate, as well
as on the manufacturer's plate.
For more information on the Technical
characteristics of the vehicle and
particularly on weights and towable loads,
refer to the corresponding section.
You will then have information on your vehicle's
ability to tow a trailer, a caravan, a boat, etc.
These values are also given in the sales
brochures.
We recommend using genuine
PEUGEOT towbars and their harnesses
that have been tested and approved from the
design stage of your vehicle, and having a
PEUGEOT dealer fit the towbar.
These genuine towbars are compatible with
the operation of the rear parking sensors and
the reversing camera, if your vehicle is so
equipped.
If the towbar is not fitted by a PEUGEOT
dealer, it must still be fitted in accordance with
the vehicle manufacturer's instructions.
Electric motor
An electric vehicle cannot under any
circumstances be fitted with a towing device.
It is therefore not possible to tow a trailer or
caravan.
Towbar with quickly detachable towball
Presentation
This genuine towball can be easily and quickly
fitted or removed. These operations do not
require any tools.
Page 115 of 212

11 3
Practical information
7Manual gearbox
The gearbox does not require any maintenance (no oil change).
Brake pads
Brake wear depends on the style of
driving, particularly in the case of vehicles
used in town, over short distances. It may be
necessary to have the condition of the brakes
checked, even between vehicle services.
Unless there is a leak in the circuit, a drop in the
brake fluid level indicates that the brake pads
are worn.
If this warning lamp comes on, have the
brake pads checked by a PEUGEOT
dealer or a qualified workshop.
After washing the vehicle, moisture, or in wintry conditions, ice can form on the
brake discs and pads: braking efficiency may
be reduced. Gently dab the brakes to dry and
defrost them.
Brake disc wear
For information on checking brake disc
wear, contact a PEUGEOT dealer or a
qualified workshop.
Manual parking brake
If you notice excessive brake lever travel
or decreased effectiveness, the parking brake must be adjusted, even between two
services.
This system must be checked by a PEUGEOT
dealer or a qualified workshop.
Diesel fuel filter
The Diesel fuel filter is located in the engine
compartment near the brake fluid reservoir.
If this warning lamp comes on, bleed the
filter.
You can also bleed it regularly at each engine oil
change.
Bleeding the water in the filter
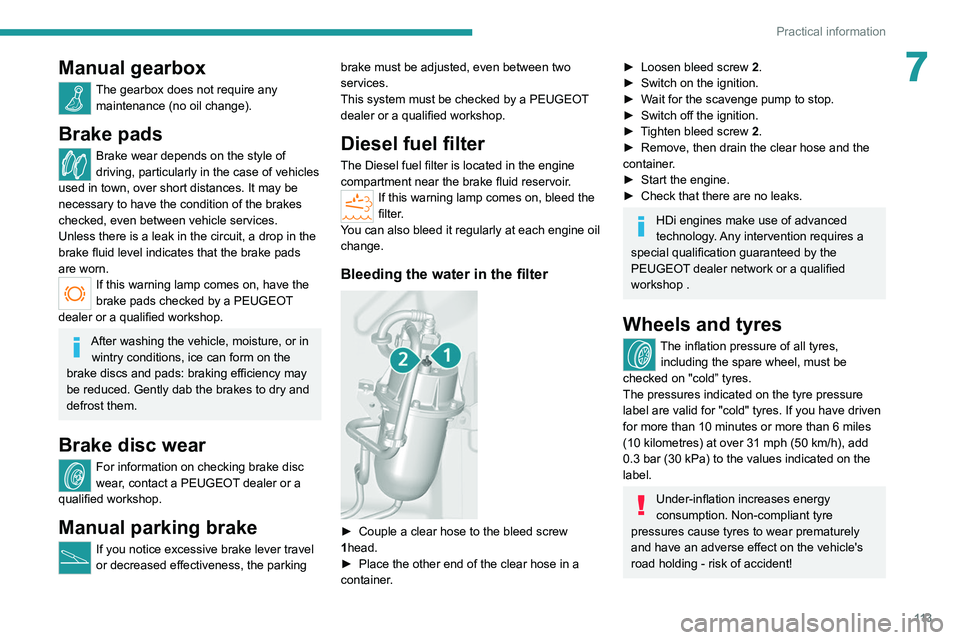
► Couple a clear hose to the bleed screw
1 head.
►
Place the other end of the clear hose in a
container
.
► Loosen bleed screw 2 .
► Switch on the ignition.
►
W
ait for the scavenge pump to stop.
►
Switch off the ignition.
►
T
ighten bleed screw 2.
►
Remove, then drain the clear hose and the
container
.
►
Start the engine.
►
Check that there are no leaks.
HDi engines make use of advanced
technology. Any intervention requires a
special qualification guaranteed by the
PEUGEOT
dealer network or a qualified
workshop .
Wheels and tyres
The inflation pressure of all tyres, including the spare wheel, must be
checked on "cold” tyres.
The pressures indicated on the tyre pressure
label are valid for "cold" tyres. If you have driven
for more than 10 minutes or more than 6 miles
(10 kilometres) at over 31 mph (50
km/h), add
0.3 bar (30 kPa) to the values indicated on the
label.
Under-inflation increases energy
consumption. Non-compliant tyre
pressures cause tyres to wear prematurely
and have an adverse effect on the vehicle's
road holding - risk of accident!
Page 120 of 212

11 8
In the event of a breakdown
Temporary puncture repair kit
This temporary puncture repair kit is stored in a
bag, placed in one of the front doors.
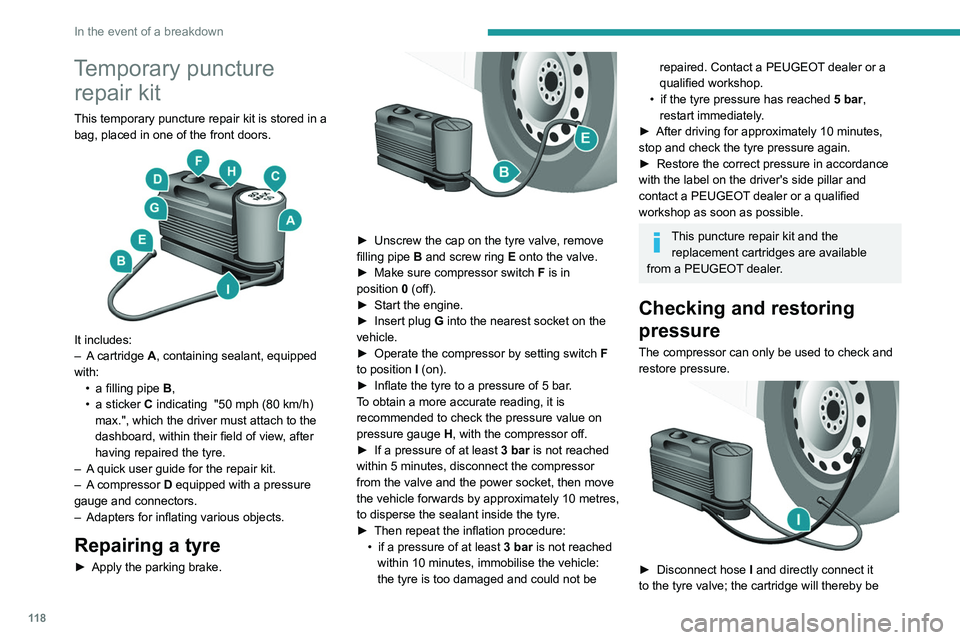
It includes:
–
A cartridge A, containing sealant, equipped
with: •
a filling pipe B
,
•
a sticker
C indicating "50 mph (80 km/h)
max.", which the driver must attach to the
dashboard, within their field of view, after
having repaired the tyre.
–
A
quick user guide for the repair kit.
–
A
compressor D equipped with a pressure
gauge and connectors.
–
Adapters for inflating various objects.
Repairing a tyre
► Apply the parking brake.
► Unscrew the cap on the tyre valve, remove
filling pipe B and screw ring E onto the valve.
►
Make sure compressor switch F
is in
position
0
(off).
►
Start the engine.
►
Insert plug
G into the nearest socket on the
vehicle.
►
Operate the compressor by setting switch F
to position I (on).
►
Inflate the tyre to a pressure of 5 bar
.
To obtain a more accurate reading, it is
recommended to check the pressure value on
pressure gauge H, with the compressor off.
►
If a pressure
of at least 3 bar is not reached
within 5 minutes, disconnect the compressor
from the valve and the power socket, then move
the vehicle forwards by approximately 10 metres,
to disperse the sealant inside the tyre.
►
Then repeat the inflation procedure:
•
if a pressure of at least
3 bar is not reached
within 10 minutes, immobilise the vehicle:
the tyre is too damaged and could not be
repaired. Contact a PEUGEOT dealer or a
qualified workshop.
•
if the tyre pressure has reached 5 bar
,
restart immediately.
►
After driving for approximately 10 minutes,
stop and check the tyre pressure again.
►
Restore the correct pressure in accordance
with the label on the driver's side pillar and
contact a PEUGEOT
dealer or a qualified
workshop as soon as possible.
This puncture repair kit and the replacement cartridges are available
from a PEUGEOT dealer.
Checking and restoring
pressure
The compressor can only be used to check and
restore pressure.
► Disconnect hose I and directly connect it
to the tyre valve; the cartridge will thereby be
Page 121 of 212

11 9
In the event of a breakdown
8connected to the compressor and the sealant will
not be injected.
If the tyre needs to be deflated, connect hose
I to the tyre valve and press the yellow button
located in the centre of the compressor switch.
Replacing the cartridge
To replace the sealant cartridge, proceed as
follows:
►
Disconnect the hose
I
.
►
T
urn the cartridge to be replaced anti-
clockwise and lift it.
►
Insert the new cartridge and turn it clockwise,
►
Reconnect the hose
I
and connect pipe B to
its location.
The cartridge contains ethylene glycol, which is harmful if swallowed and irritates
the eyes.
It must be kept out of the reach of children.
After use, do not discard the cartridge in standard waste, take it to a
PEUGEOT dealer or an authorised waste
disposal site.
Spare wheel
Parking
► Immobilise the vehicle where it does not
obstruct traffic: the ground must be level, stable
and non-slippery
.
►
In case of sloping or deformed road, place an
object under the wheels to act as a chock.
►
With a manual gearbox, engage first gear
then switch off the ignition to lock the wheels.
►
Apply the parking brake and check that the
indicator lamp lights up on the instrument panel.
►
Y
ou must ensure that the occupants have
exited the vehicle and have moved to a safe
place.
►
Put on your safety vest and indicate that
the vehicle is immobilised using the measures
required by law in the country where you are
driving (warning triangle, hazard warning lamps,
etc.).
►
T
ake out the tools.
Special feature with pneumatic
suspension
If fitted to the vehicle, activate the vehicle lifting
mode before lifting the vehicle with a jack.
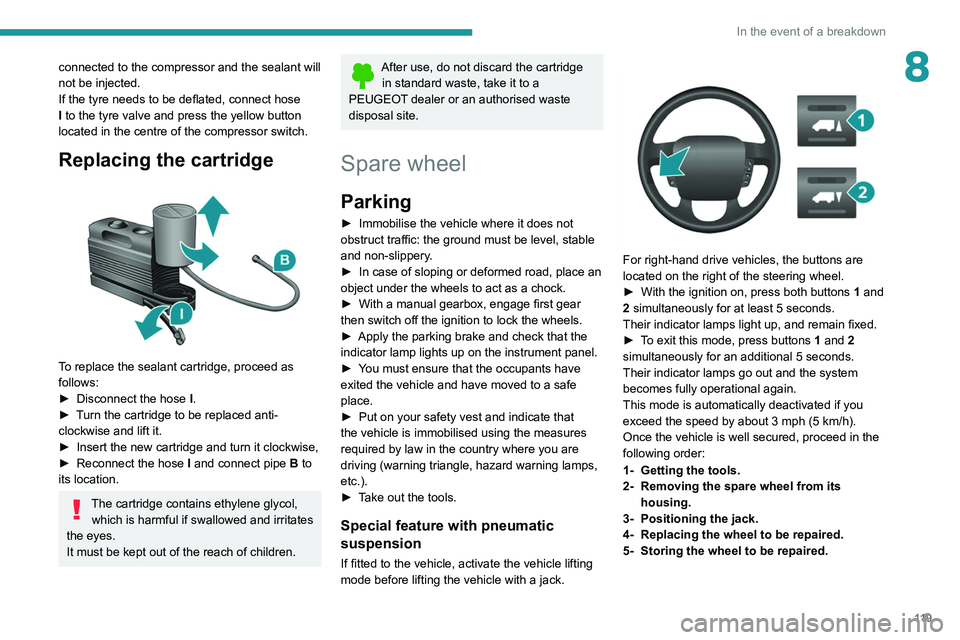
For right-hand drive vehicles, the buttons are
located on the right of the steering wheel.
►
With the ignition on, press both buttons 1
and
2 simultaneously for at least 5 seconds.
Their indicator lamps light up, and remain fixed.
►
T
o exit this mode, press buttons 1 and 2
simultaneously for an additional 5 seconds.
Their indicator lamps go out and the system
becomes fully operational again.
This mode is automatically deactivated if you
exceed the speed by about 3 mph (5 km/h).
Once the vehicle is well secured, proceed in the
following order:
1- Getting the tools.
2- Removing the spare wheel from its housing.
3- Positioning the jack.
4- Replacing the wheel to be repaired.
5- Storing the wheel to be repaired.
Page 135 of 212

133
In the event of a breakdown
8Ensure that the weight of the towing vehicle is
higher than that of the towed vehicle.
The driver must remain at the wheel of the
towed vehicle and must have a valid driving
licence.
When towing a vehicle with all four wheels on
the ground, always use an approved towing
arm; rope and straps are prohibited.
The towing vehicle must move off gently.
When the vehicle is towed with its engine
off, there is no longer braking and steering
assistance.A professional towing service must be
called if:
–
Broken down on a motorway or main road.
–
Not possible to put
the gearbox into neutral,
unlock the steering, or release the parking
brake.
–
Not possible to tow a vehicle with an
automatic gearbox, with the engine running.
–
T
owing with only two wheels on the ground.
–
Four-wheel drive vehicle.
–
No approved towbar available.
Before towing the vehicle, it is essential
to put the vehicle in free-wheeling mode.
Electric motor
An electric vehicle cannot under any
circumstances be used to tow another
vehicle.
However, it may be used, for example, to exit
a rut.
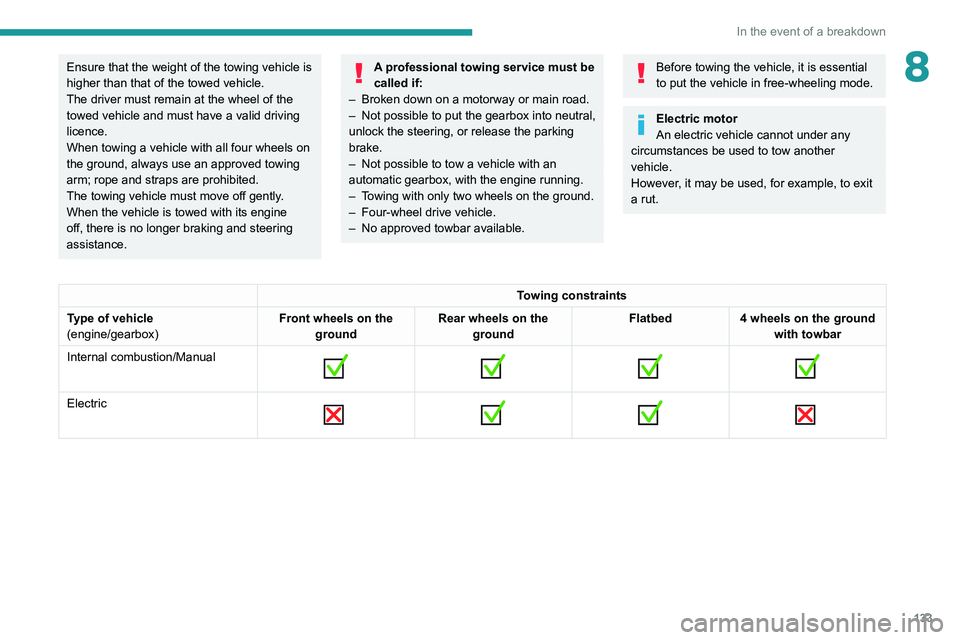
Towing constraints
Type of vehicle
(engine/gearbox) Front wheels on the
ground Rear wheels on the
ground Flatbed
4 wheels on the ground
with towbar
Internal combustion/Manual
Electric