2021 PEUGEOT BOXER maintenance
[x] Cancel search: maintenancePage 115 of 212
11 3
Practical information
7Manual gearbox
The gearbox does not require any maintenance (no oil change).
Brake pads
Brake wear depends on the style of
driving, particularly in the case of vehicles
used in town, over short distances. It may be
necessary to have the condition of the brakes
checked, even between vehicle services.
Unless there is a leak in the circuit, a drop in the
brake fluid level indicates that the brake pads
are worn.
If this warning lamp comes on, have the
brake pads checked by a PEUGEOT
dealer or a qualified workshop.
After washing the vehicle, moisture, or in wintry conditions, ice can form on the
brake discs and pads: braking efficiency may
be reduced. Gently dab the brakes to dry and
defrost them.
Brake disc wear
For information on checking brake disc
wear, contact a PEUGEOT dealer or a
qualified workshop.
Manual parking brake
If you notice excessive brake lever travel
or decreased effectiveness, the parking brake must be adjusted, even between two
services.
This system must be checked by a PEUGEOT
dealer or a qualified workshop.
Diesel fuel filter
The Diesel fuel filter is located in the engine
compartment near the brake fluid reservoir.
If this warning lamp comes on, bleed the
filter.
You can also bleed it regularly at each engine oil
change.
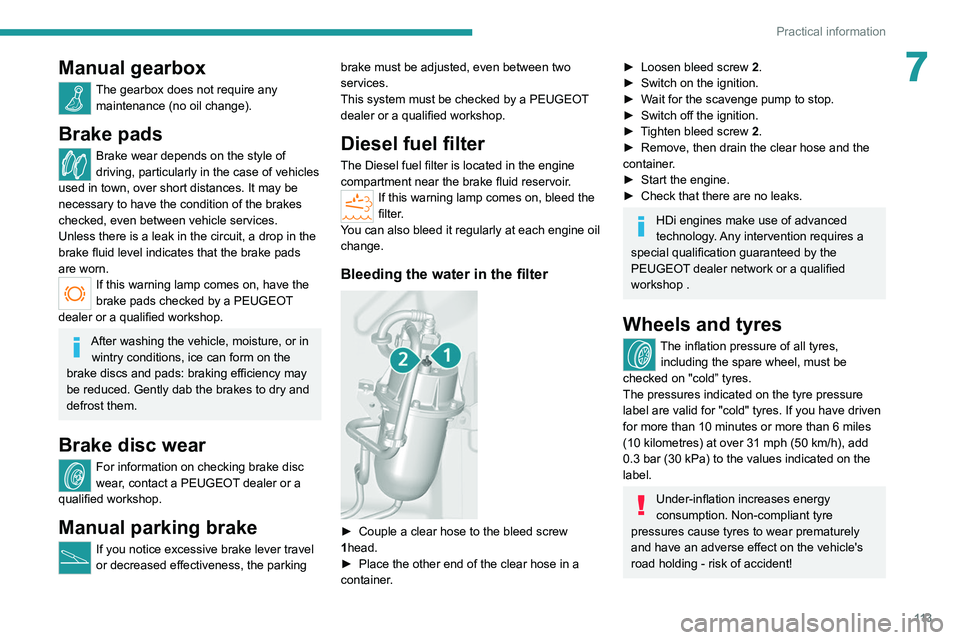
Bleeding the water in the filter
► Couple a clear hose to the bleed screw
1 head.
►
Place the other end of the clear hose in a
container
.
► Loosen bleed screw 2 .
► Switch on the ignition.
►
W
ait for the scavenge pump to stop.
►
Switch off the ignition.
►
T
ighten bleed screw 2.
►
Remove, then drain the clear hose and the
container
.
►
Start the engine.
►
Check that there are no leaks.
HDi engines make use of advanced
technology. Any intervention requires a
special qualification guaranteed by the
PEUGEOT
dealer network or a qualified
workshop .
Wheels and tyres
The inflation pressure of all tyres, including the spare wheel, must be
checked on "cold” tyres.
The pressures indicated on the tyre pressure
label are valid for "cold" tyres. If you have driven
for more than 10 minutes or more than 6 miles
(10 kilometres) at over 31 mph (50
km/h), add
0.3 bar (30 kPa) to the values indicated on the
label.
Under-inflation increases energy
consumption. Non-compliant tyre
pressures cause tyres to wear prematurely
and have an adverse effect on the vehicle's
road holding - risk of accident!
Page 118 of 212
11 6
Practical information
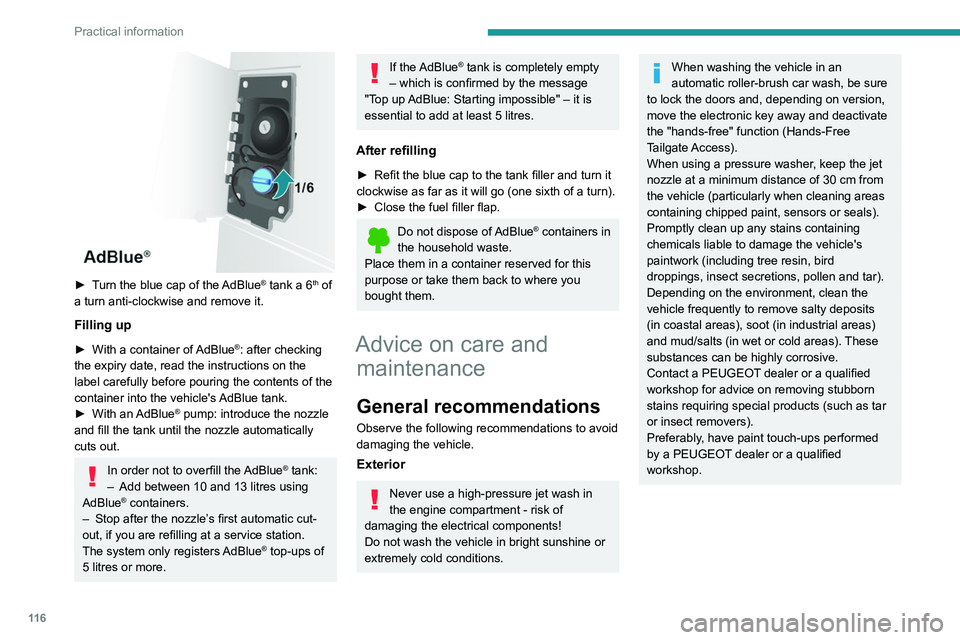
► Turn the blue cap of the AdBlue® tank a 6th of
a turn anti-clockwise and remove it.
Filling up
► With a container of AdBlue®: after checking
the expiry date, read the instructions on the
label carefully before pouring the contents of the
container
into the vehicle's AdBlue tank.
►
With an
AdBlue® pump: introduce the nozzle
and fill the tank until the nozzle automatically
cuts out.
In order not to overfill the AdBlue® tank:
–
Add between 10 and 13 litres using
AdBlue® containers.
–
Stop after the nozzle’ s first automatic cut-
out, if you are refilling at a service station.
The system only registers AdBlue
® top-ups of
5
litres or more.
If the AdBlue® tank is completely empty
– which is confirmed by the message
"Top up
AdBlue: Starting impossible" – it is
essential to add at least 5 litres.
After refilling
► Refit the blue cap to the tank filler and turn it
clockwise as far as it will go (one sixth of a turn).
►
Close the fuel filler flap.
Do not dispose of AdBlue® containers in
the household waste.
Place them in a container reserved for this
purpose or take them back to where you
bought them.
Advice on care and maintenance
General recommendations
Observe the following recommendations to avoid
damaging the vehicle.
Exterior
Never use a high-pressure jet wash in
the engine compartment - risk of
damaging the electrical components!
Do not wash the vehicle in bright sunshine or
extremely cold conditions.
When washing the vehicle in an
automatic roller-brush car wash, be sure
to lock the doors and, depending on version,
move the electronic key away and deactivate
the "hands-free" function (Hands-Free
Tailgate Access).
When using a pressure washer, keep the jet
nozzle at a minimum distance of 30 cm from
the vehicle (particularly when cleaning areas
containing chipped paint, sensors or seals).
Promptly clean up any stains containing
chemicals liable to damage the vehicle's
paintwork (including tree resin, bird
droppings, insect secretions, pollen and tar).
Depending on the environment, clean the
vehicle frequently to remove salty deposits
(in coastal areas), soot (in industrial areas)
and mud/salts (in wet or cold areas). These
substances can be highly corrosive.
Contact a PEUGEOT dealer or a qualified
workshop for advice on removing stubborn
stains requiring special products (such as tar
or insect removers).
Preferably, have paint touch-ups performed
by a PEUGEOT dealer or a qualified
workshop.
Page 124 of 212
122
In the event of a breakdown
Never go underneath a vehicle raised
using a jack (use an axle stand).
Do not use:
–
The jack for any other purpose than lifting
the vehicle.
–
A
jack other than the one supplied by the
manufacturer.
The jack must only be used to change a wheel with a damaged or punctured tyre.
The jack does not require any maintenance.
The jack meets European standards, as
defined in the Machinery Directive 2006/42/
CE.
Certain parts of the jack such as the
screw thread or the joints could cause
injury: avoid touching them.
Carefully remove all traces of lubrication
grease.
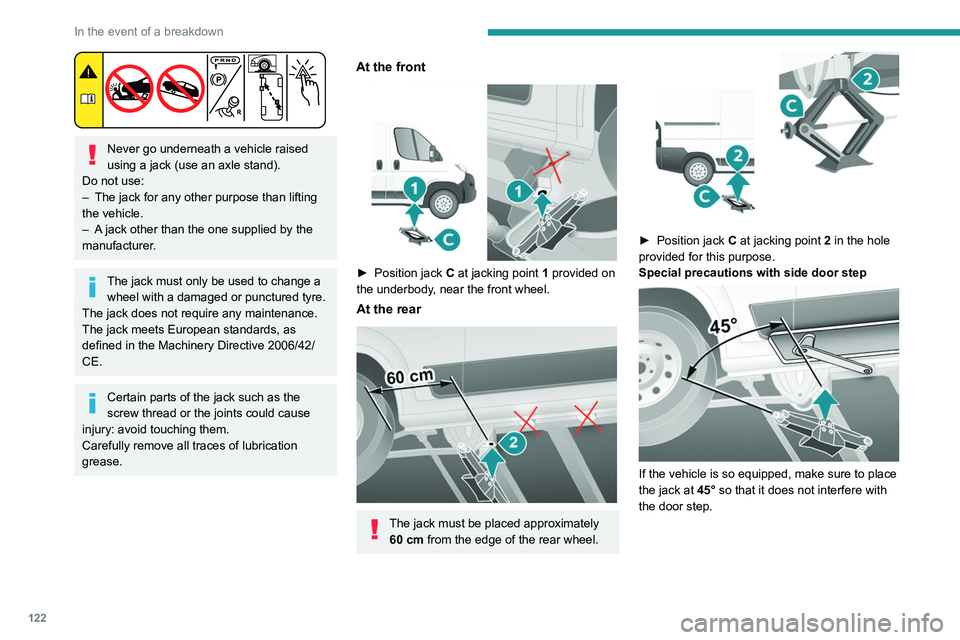
At the front
► Position jack C at jacking point 1 provided on
the underbody, near the front wheel.
At the rear
The jack must be placed approximately 60 cm from the edge of the rear wheel.
► Position jack C at jacking point 2 in the hole
provided for this purpose.
Special precautions with side door step
If the vehicle is so equipped, make sure to place
the jack at 45° so that it does not interfere with
the door step.
Page 148 of 212

146
Technical data
Glossary of labels
This section contains all of the text written on the
labels present in the vehicle.
For the Identification markings, refer to
the corresponding section.
In the engine compartment
A
Original paintwork
Colour
Code
Varnish
B
FOR TROUBLESHOOTING ONLY.
C
DANGER
AUTOMATIC ENGINE STARTING. REMOVE
THE IGNITION KEY WHEN THE BONNET IS
OPEN. D
1 - WARNING
GENUINE LUBRICANTS AND FLUIDS
Engine oil
Transmission
Radiator Brakes
Screenwash Power steering
CONSULT THE
MAINTENANCE
AND WARRANTY
GUIDE. PROTECT YOUR
EYES.
2 - SAFETY
The use of genuine replacement parts, fluids
and lubricants, as well as observing the servicing
schedules, guarantees the reliability and safety
of your vehicle over time, so maintaining it in its
original condition. 3 - DANGER
KEEP OUT
OF THE
REACH OF
CHILDREN.
DO NOT
APPROACH
FLAMES.
DO NOT
TOUCH.
DO NOT
REMOVE
THE CAP
WHEN THE
ENGINE IS
HOT. EXPLOSION. CORROSIVE
LIQUID.
MAY START
AUTOMATICALLY EVEN
WITH THE ENGINE
SWITCHED OFF. DO NOT
OPEN GAS
UNDER HIGH
PRESSURE.
AUTOMATIC ENGINE
STARTING. REMOVE THE
IGNITION KEY WHEN THE
BONNET IS OPEN. HIGH
VOLTAGE
Page 161 of 212
159
Special features
10Dimensions
This adaptation is available only on L2 single
cab; refer to the table below for the specifications
of the tipper truck.
Tipper truck (in mm)
Useable length3,200
Overall length 3,248
Useable width 2,000
Overall width 2,100
Height of boards 350
Weight of the conversion (in
kg) 550
For the L2 chassis cab specifications,
refer to the Dimensions section of the
platform version.
Weights and towed loads
(kg)
To have a towing device fitted, contact a PEUGEOT dealer or qualified workshop.
The braked trailer weight with load transfer can
be increased, provided that the equivalent of this
load is removed from the vehicle so as not to
exceed the GTW. Warning! Towing using a lightly
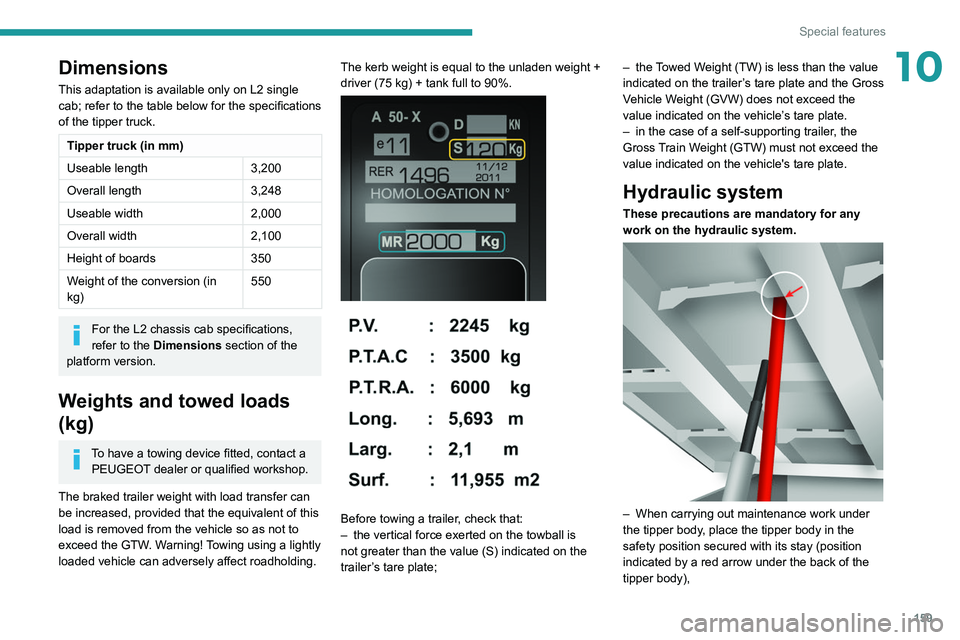
loaded vehicle can adversely affect roadholding. The kerb weight is equal to the unladen weight +
driver (75 kg) + tank full to 90%.
Before towing a trailer, check that:
–
the vertical force exerted on the towball is
not greater than the value (S) indicated on the
trailer
’s tare plate; –
the
Towed Weight (TW) is less than the value
indicated on the trailer’s tare plate and the Gross
Vehicle Weight (GVW) does not exceed the
value indicated on the vehicle’s tare plate.
–
in the case of a self-supporting trailer
, the
Gross Train Weight (GTW) must not exceed the
value indicated on the vehicle's tare plate.
Hydraulic system
These precautions are mandatory for any
work on the hydraulic system.
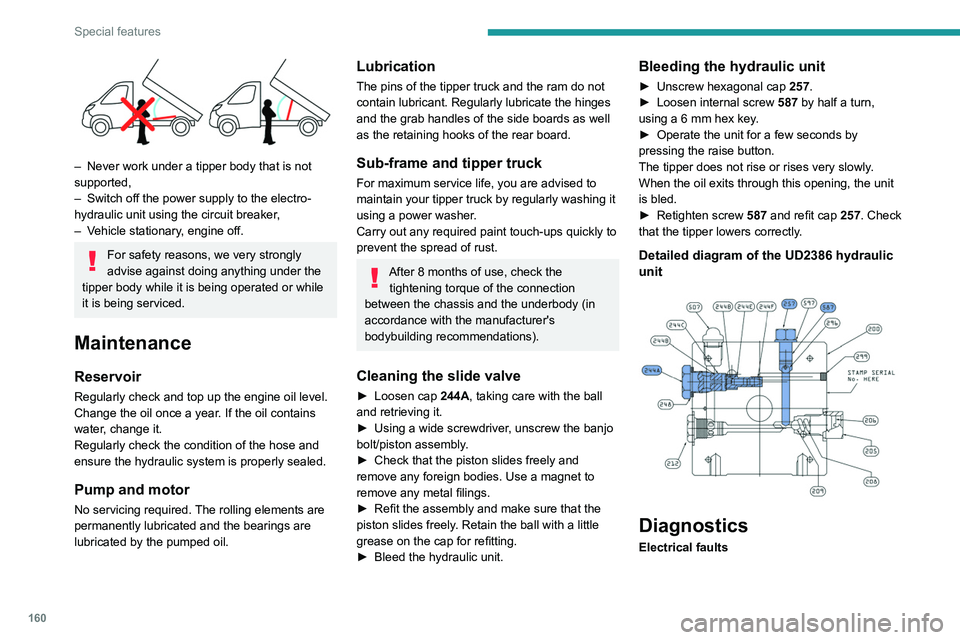
– When carrying out maintenance work under
the tipper body , place the tipper body in the
safety position secured with its stay (position
indicated by a red arrow under the back of the
tipper body),
Page 162 of 212
160
Special features
– Never work under a tipper body that is not
supported,
–
Switch off the power supply to the electro-
hydraulic unit using the circuit breaker
,
–
V
ehicle stationary, engine off.
For safety reasons, we very strongly
advise against doing anything under the
tipper body while it is being operated or while
it is being serviced.
Maintenance
Reservoir
Regularly check and top up the engine oil level.
Change the oil once a year. If the oil contains
water, change it.
Regularly check the condition of the hose and
ensure the hydraulic system is properly sealed.
Pump and motor
No servicing required. The rolling elements are
permanently lubricated and the bearings are
lubricated by the pumped oil.
Lubrication
The pins of the tipper truck and the ram do not
contain lubricant. Regularly lubricate the hinges
and the grab handles of the side boards as well
as the retaining hooks of the rear board.
Sub-frame and tipper truck
For maximum service life, you are advised to
maintain your tipper truck by regularly washing it
using a power washer.
Carry out any required paint touch-ups quickly to
prevent the spread of rust.
After 8 months of use, check the tightening torque of the connection
between the chassis and the underbody (in
accordance with the manufacturer's
bodybuilding recommendations).
Cleaning the slide valve
► Loosen cap 244A, taking care with the ball
and retrieving it.
►
Using a wide screwdriver
, unscrew the banjo
bolt/piston assembly.
►
Check that the piston slides freely and
remove any foreign bodies. Use a magnet to
remove any metal filings.
►
Refit the assembly and make sure that the
piston slides freely
. Retain the ball with a little
grease on the cap for refitting.
►
Bleed the hydraulic unit.
Bleeding the hydraulic unit
► Unscrew hexagonal cap 257 .
► Loosen internal screw 587
by half a turn,
using a 6 mm hex key.
►
Operate the unit for a few seconds by
pressing the raise button.
The tipper does not rise or rises very slowly
.
When the oil exits through this opening, the unit
is bled.
►
Retighten screw 587
and refit cap 257. Check
that the tipper lowers correctly.
Detailed diagram of the UD2386 hydraulic
unit
Diagnostics
Electrical faults
Page 163 of 212

161
Special features
10SymptomsVerification/Check
The hydraulic
unit does not
work. Power harness and unit
relay.
Control harness (control
unit).
Circuit-breaker.
The ram does
not lower. No, check the coil and the
electrical connections of
the valve.
The control unit
does not work. Check the connection and
contacts.
The fuse blows
while lowering. Replace the lowering coil.
Hydraulic faults
Symptoms Verification/Check
Very noisy unit,
rises slowly. Suction strainer clogged
or crushed at the bottom
of the tank.
Very noisy
new unit, rises
quickly. Pump alignment, change
the unit.
The ram lowers
by itself. Lowering valve crushed or
blocked.
Symptoms
Verification/Check
The ram does
not lower. Yes, check the slide valve
and bleed.
Refer to the
"Maintenance" section.
No, replace the solenoid
valve.
No, check the alignment
of the ram.
The unit works
but its pressure
does not
increase. Slide valve jammed if no
solenoid valve on the unit.
Refer to the
"Maintenance" section.
Pressure relief device,
setting, dirt.
Pump seal out of service.
Motor/pump coupling.
Pump loose from its
support.
The hydraulic
unit does not
work. Solenoid valve stuck,
replace it or retighten the
nut behind the strainer.
Emulsion in the
tank. Incorrectly positioned
return pipe.
Insufficient oil level.Symptoms
Verification/Check
The oil flows
back through
the oil breather
pipe. Oil level too high.
Tolerance of the oil
breather pipe membrane
too high, to be replaced.
Valid only for UD2386
units.
Page 189 of 212

187
Event data recorders
14Recording event data
Electronic control units are installed in your
vehicle. These control units process data
received from the vehicle's sensors, for example,
or data they generate themselves or exchange
with each other. Some of these control units are
required for the correct operation of your vehicle,
some others assist you while driving (driving or
manoeuvring aids), while others provide comfort
or infotainment functions.
The following contains general information about
how data is processed within the vehicle.
You will find additional information about the
specific data which is downloaded, stored
and transmitted to third parties and what it is
used for in your vehicle under the keyword
"Data protection". This information is directly
associated with the references for the functions
in question contained in the corresponding
vehicle handbook, or in the general terms and
conditions of sale.
This information is also available online.
Vehicle operating data
The control units process the data used for the
operation of the vehicle.
This data includes, for example:
–
Information about the state of the vehicle
(e.g.
speed, travel time, lateral acceleration,
wheel rotation rate, fastened seat belts display).
–
Environmental conditions (e.g.
temperature,
rain sensor, distance sensor). As a general rule, this data is temporary, is
not stored for longer than one operating cycle
and is only used within the vehicle itself. The
control units often record this data (including the
vehicle's key). This function allows either the
temporary or permanent storage of information
about the state of the vehicle, stresses on
components, servicing requirements, as well as
events and technical errors.
Depending on the vehicle's equipment level, the
data stored is as follows:
–
Operating state of system components
(e.g.
filling level, tyre pressures, battery charge
status).
–
Faults and malfunctions in important system
components (e.g.
lamps, brakes).
–
System reactions in specific driving situations
(e.g.
deployment of an airbag, triggering of
stability control and braking systems).
–
Information about events which have
damaged the vehicle.
–
For electric and rechargeable hybrid vehicles,
the traction battery charge level and the
estimated driving range.
In particular circumstances (e.g.
if the vehicle
has detected a malfunction), it may be necessary
to record data which would otherwise simply not
be stored.
When taking your vehicle in for servicing
(e.g.
repairs, maintenance), the stored operating
data may be read along with the vehicle's
identification number and used if necessary.
The personnel working for the servicing network (e.g.
garages, manufacturers) or third parties
(e.g. roadside assistance agents) may read
the vehicle's data. This also applies to work
carried out under warranty and quality assurance
measures.
This data is generally read via the OBD
(On-Board Diagnostics) port fitted by law to
the vehicle. It is used to report on the technical
state of the vehicle or its components and
facilitates the diagnosis of malfunctions, in
compliance with warranty obligations and for
quality improvement. This data, in particular the
information relating to stress on components,
technical events, operator errors and other
malfunctions, is sent to the Manufacturer, if
necessary, along with the vehicle's identification
number. The Manufacturer's liability may also be
engaged. The Manufacturer may also use the
operating data taken from the vehicle for product
recalls. This data may also be used to check the
customer's warranty and any claims made under
warranty.
Any malfunctions stored in the vehicle may be
reset by an after-sales service company during
servicing or repair work, or at your request.
Comfort and infotainment
functions
Comfort settings and personalised settings
may be saved in the vehicle and modified or
reinitialised at any time.