2021 PEUGEOT 5008 check engine
[x] Cancel search: check enginePage 186 of 292

184
Practical information
checked by a PEUGEOT dealer or a qualified
workshop.
For more information on the Electric
parking brake, refer to the
corresponding section.
Brake pads
Brake wear depends on the style of
driving, particularly in the case of vehicles
used in town, over short distances. It may be
necessary to have the condition of the brakes
checked, even between vehicle services.
Unless there is a leak in the circuit, a drop in the
brake fluid level indicates that the brake pads
are worn.
After washing the vehicle, moisture, or in wintry conditions, ice can form on the
brake discs and pads: braking efficiency may
be reduced. Gently dab the brakes to dry and
defrost them.
Brake disc wear
For information on checking brake disc
wear, contact a PEUGEOT dealer or a
qualified workshop.
Wheels and tyres
The inflation pressure of all tyres, including the spare wheel, must be
checked on "cold” tyres.
The pressures indicated on the tyre pressure
label are valid for "cold" tyres. If you have driven
for more than 10 minutes or more than 6 miles
(10 kilometres) at over 31 mph (50
km/h), add
0.3 bar (30 kPa) to the values indicated on the
label.
Under-inflation increases energy
consumption. Non-compliant tyre
pressures cause tyres to wear prematurely
and have an adverse effect on the vehicle's
road holding - risk of accident!
Driving with worn or damaged tyres reduces the
braking and road holding performance of the
vehicle. Regularly check the condition of the
tyres (tread and sidewalls) and rims as well as
the presence of the valve caps.
When the wear indicators no longer appear set
back from the tread, the depth of the grooves is
less than 1.6 mm; replace the tyres as soon as
possible.
Using different size wheels and tyres from those
specified can affect the lifetime of tyres, wheel
rotation, ground clearance, the speedometer
reading and have an adverse effect on road
holding.
Fitting different tyres on the front and rear axles
can cause the ESC to mistime.
Always mark the direction of rotation on the tyres
that will be stored when fitting winter or summer
tyres. Store them in a cool, dry place and away
from direct exposure to the sun's rays.
Winter or 4-seasons tyres can be
identified by this symbol on their
sidewalls.
Shock absorbers
It is not easy for drivers to detect when
shock absorbers are worn. Nevertheless,
the shock absorbers have a major impact on
road holding and braking performance.
For your safety and driving comfort, it is
important to have them regularly checked by a
PEUGEOT dealer or a qualified workshop.
Timing and accessory kits
The timing and accessory kits are used
from the time the engine is started until it
is switched off. It is normal for them to wear over
time.
A
faulty timing or accessory kit can damage
the engine, rendering it unusable. Observe the
recommended replacement frequency, stated in
distance travelled or time elapsed, whichever is
reached first.
AdBlue® (BlueHDi)
To respect the environment and ensure compliance with the Euro 6 standard, without
adversely affecting the performance or fuel
consumption of its Diesel engines, PEUGEOT
has taken the decision to equip its vehicles with
a system that combines SCR (Selective Catalytic
Reduction) with a Diesel Particle Filter (DPF) for
the treatment of exhaust gases.
SCR system
Using a liquid called AdBlue® that contains
urea, a catalytic converter turns up to 85% of
the nitrogen oxides (NOx) into nitrogen and
water, which are harmless to health and the
environment.
The AdBlue® is contained in a special
tank holding about 17 litres.
Its capacity allows a driving range of
approximately 4,000 miles (6,500 km), which
may vary considerably depending on your
driving style.
An alert system is triggered once the reserve
level is reached: it is then possible to drive for a
further 1,500 miles (2,400 km) before the tank is
empty and the vehicle is immobilised.
For more information on the Warning
and indicator lamps and the associated
alerts, or the Indicators, please refer to the
corresponding sections.
Once the AdBlue® tank is empty, a device
required by law prevents the engine from
being restarted.
If the SCR system is faulty, the level of
emissions from the vehicle will no longer meet
the Euro 6 standard and the vehicle starts
polluting the environment.
Page 188 of 292
186
Practical information
Store AdBlue® out of the reach of
children, in its original container.
Procedure
Before starting the top-up procedure, ensure that
the vehicle is parked on a flat and level surface.
In wintry conditions, ensure that the temperature
of the vehicle is above -11°C. Otherwise the
AdBlue
® may be frozen and so cannot be poured
into the tank. Park the vehicle in a warmer area
for a few hours to allow the top-up to be carried
out.
Never pour the AdBlue® into the Diesel
fuel tank.
If any AdBlue® is splashed, or if there are
any spillages on the bodywork, rinse
immediately with cold water or wipe with a
damp cloth.
If the fluid has crystallised, clean it off using a
sponge and hot water.
Important: in the event of a top-up after
an AdBlue breakdown, you must wait
about 5
minutes before switching on the
ignition, without opening the driver's door,
unlocking the vehicle or bringing the
electronic key into the passenger
compartment.
Switch on the ignition, then wait for 10
seconds before starting the engine. ►
Press the "
START/STOP" button to switch off
the engine.
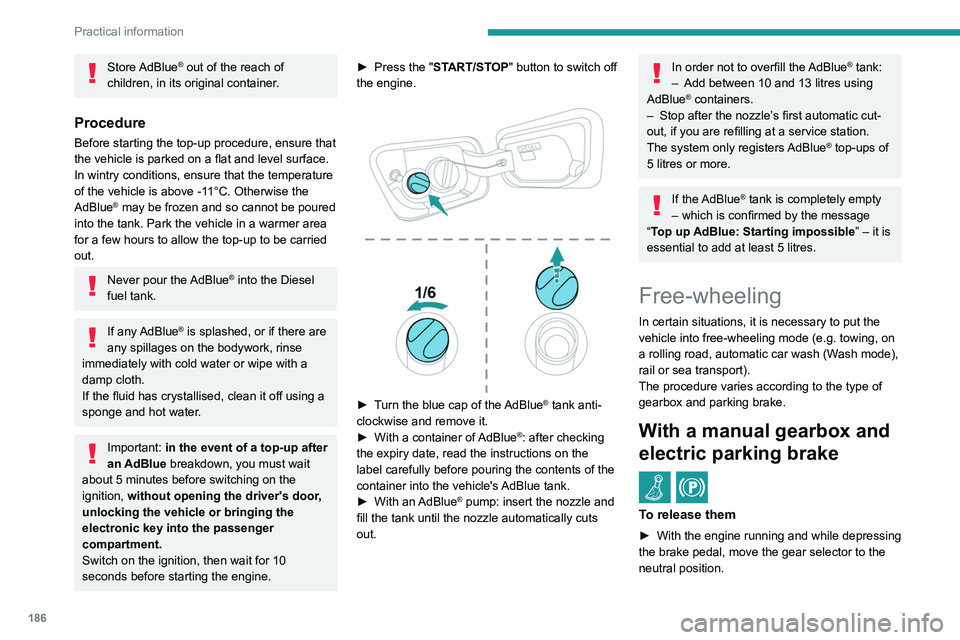
► Turn the blue cap of the AdBlue® tank anti-
clockwise and remove it.
►
With a container of
AdBlue
®: after checking
the expiry date, read the instructions on the
label carefully before pouring the contents of the
container into the vehicle's AdBlue tank.
►
With an
AdBlue® pump: insert the nozzle and
fill the tank until the nozzle automatically cuts
out.
In order not to overfill the AdBlue® tank:
–
Add between 10 and 13 litres using
AdBlue® containers.
–
Stop after the nozzle’ s first automatic cut-
out, if you are refilling at a service station.
The system only registers AdBlue
® top-ups of
5
litres or more.
If the AdBlue® tank is completely empty
– which is confirmed by the message
“Top up
AdBlue: Starting impossible ” – it is
essential to add at least 5 litres.
Free-wheeling
In certain situations, it is necessary to put the
vehicle into free-wheeling mode (e.g. towing, on
a rolling road, automatic car wash (Wash mode),
rail or sea transport).
The procedure varies according to the type of
gearbox and parking brake.
With a manual gearbox and
electric parking brake
/
To release them
► With the engine running and while depressing
the brake pedal, move the gear selector to the
neutral position.
► While depressing the brake pedal, switch off
the ignition.
► Release the brake pedal, then switch on the
ignition again.
► While depressing the brake pedal, press the
control lever to release the parking brake.
► Release the brake pedal, then switch off the
ignition.
Reverting to normal operation
► While depressing the brake pedal, restart the
engine.
With an automatic gearbox
and electric parking brake
/
Release procedure
► With the vehicle stationary and the engine
running, select mode N and switch off the
ignition.
Within 5 seconds:
► Switch on the ignition again.
► While depressing the brake pedal, move the
push selector forwards or backwards to confirm
mode N.
► While depressing the brake pedal, press the
control lever to release the parking brake.
► Release the brake pedal, switch off the
ignition.
Page 208 of 292
206
In the event of a breakdown
Version 2 (Eco)
Fuse N°Rating (A)Functions
F18 10 ARight-hand main beam headlamp
F19 10 ALeft-hand main beam headlamp
12 V battery
Procedure for starting the engine using another
battery or for charging a discharged battery.
Lead-acid starter batteries
These batteries contain harmful
substances (sulphuric acid and lead).
They must be disposed of in accordance
with regulations and must never under any
circumstances be discarded with household
waste.
Take used remote control batteries and
vehicle batteries to a special collection point.
Protect your eyes and face before
handling the battery.
All operations on the battery must be carried
out in a well ventilated area and away from
naked flames and sources of sparks, to avoid
any risk of explosion or fire.
Wash your hands afterwards.
Accessing the battery
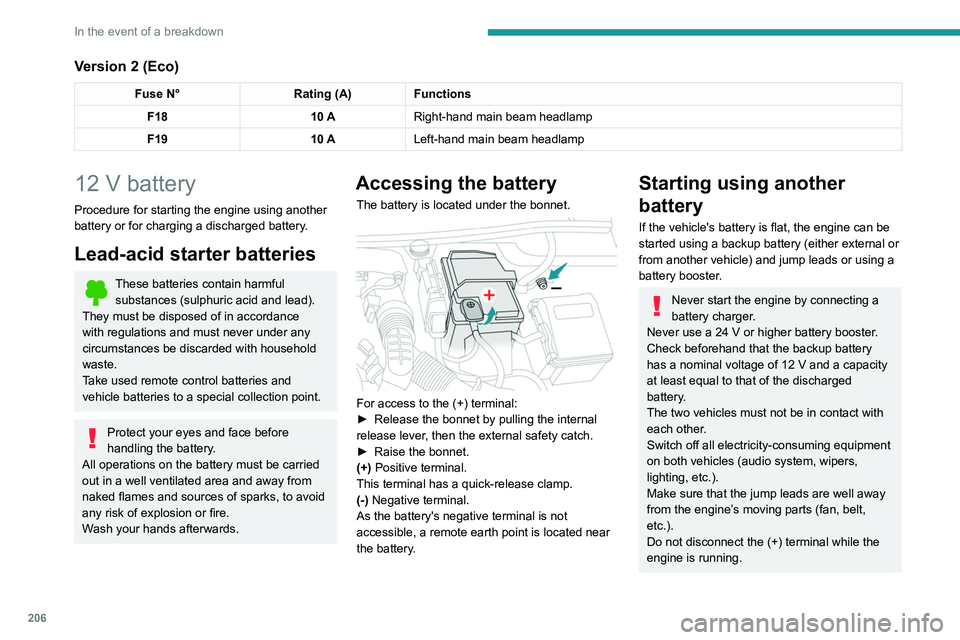
The battery is located under the bonnet.
For access to the (+) terminal:
► Release the bonnet by pulling the internal
release lever
, then the external safety catch.
►
Raise the bonnet.
(+)
Positive terminal.
This terminal has a quick-release clamp.
(-) Negative terminal.
As the battery's negative terminal is not
accessible, a remote earth point is located near
the battery.
Starting using another
battery
If the vehicle's battery is flat, the engine can be
started using a backup battery (either external or
from another vehicle) and jump leads or using a
battery booster.
Never start the engine by connecting a
battery charger.
Never use a 24
V or higher battery booster.
Check beforehand that the backup battery
has a nominal voltage of 12
V and a capacity
at least equal to that of the discharged
battery.
The two vehicles must not be in contact with
each other.
Switch off all electricity-consuming equipment
on both vehicles (audio system, wipers,
lighting, etc.).
Make sure that the jump leads are well away
from the engine’s moving parts (fan, belt,
etc.).
Do not disconnect the (+) terminal while the
engine is running.
Page 210 of 292
208
In the event of a breakdown
approximately 15 minutes before starting the
engine.
If minor problems nevertheless persist following
this operation, contact a PEUGEOT dealer or a
qualified workshop.
Referring to the relevant section, reinitialise
certain equipment:
– Remote control key or electronic key
(depending on version).
– Sunroof and electric blind.
– Electric windows.
– Date and time.
– Preset radio stations.
After reconnecting the battery, the
message "Collision risk detection
system fault" is displayed on the instrument
panel when the ignition is switched on. This
operation is perfectly normal. The message
will disappear while driving.
The Stop & Start system may not be operational during the trip following the
first engine start.
In this case, the system will only be available
again after a continuous period with the
vehicle immobilised, the duration of which
depends on the exterior temperature and the
state of charge of the battery (up to about 8
hours).
► At the end of the charging operation, switch
off charger B
before disconnecting the cables
from battery A.
If this label is present, use only a 12 V
charger to avoid causing irreversible
damage to the electrical components.
24V
12V
Never try to charge a frozen battery - risk
of explosion!
If the battery has frozen, have it checked by a
PEUGEOT dealer or by a qualified workshop
who will verify that the internal components
have not been damaged and that the case
has not cracked, which would mean a risk of
toxic and corrosive acid leaking.
Some functions, including Stop & Start,
are not available if the battery is not
sufficiently charged.
Disconnecting the battery
In order to maintain an adequate state of
charge for starting the engine, we recommend
disconnecting the battery if the vehicle is to be
unused for an extended period. Before disconnecting the battery:
►
Close all openings (doors, boot, windows,
roof).
►
Switch off all electricity-consuming devices
(audio system, wipers, lamps, etc.).
►
Switch off the ignition and wait for 4
minutes.
After accessing the battery, it is only necessary
to disconnect the (+) terminal.
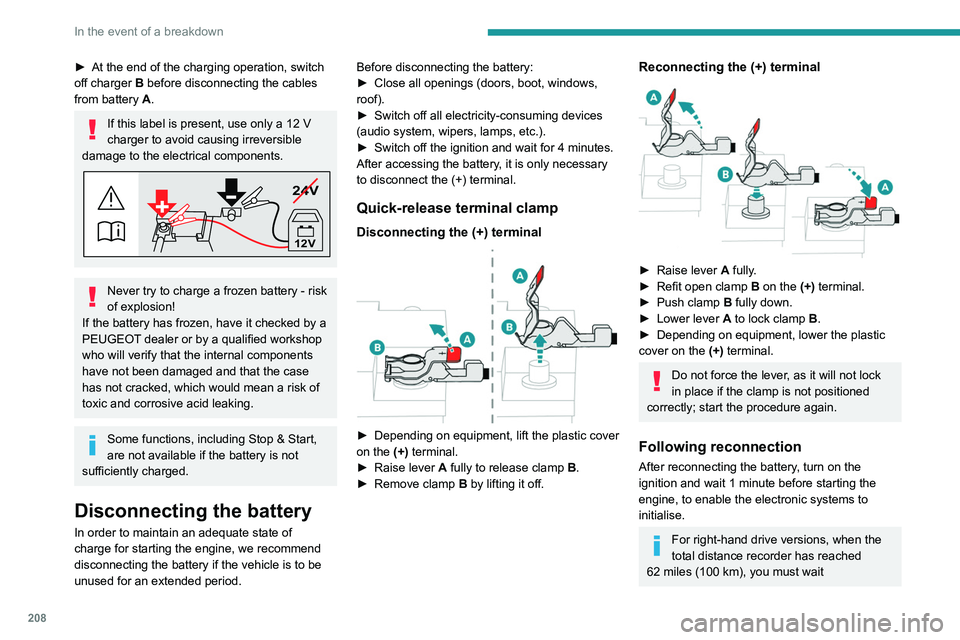
Quick-release terminal clamp
Disconnecting the (+) terminal
► Depending on equipment, lift the plastic cover
on the (+) terminal.
►
Raise lever
A
fully to release clamp
B
.
►
Remove clamp
B
by lifting it off.
Reconnecting the (+) terminal
► Raise lever A fully.
► Refit open clamp B on the (+) terminal.
►
Push clamp
B fully down.
►
Lower lever
A
to lock clamp B.
►
Depending on equipment, lower the plastic
cover on the
(+) terminal.
Do not force the lever, as it will not lock
in place if the clamp is not positioned
correctly; start the procedure again.
Following reconnection
After reconnecting the battery, turn on the
ignition and wait 1 minute before starting the
engine, to enable the electronic systems to
initialise.
For right-hand drive versions, when the
total distance recorder has reached
62
miles (100 km), you must wait
Page 214 of 292
212
In the event of a breakdown
Accessing the tools
General recommendations
Observe the legislation in force in the country where you are driving.
Check that the towing vehicle is heavier than the towed vehicle.
The driver must remain at the wheel of the towed vehicle and must have a\
valid driving licence.
When towing a vehicle with all four wheels on the ground, always use an \
approved towbar; ropes and straps are prohibited.
The towing vehicle must move off gently.
When the vehicle is towed with its engine off, there is no longer braking and steering assistance.
A professional recovery service must be called in the following cases:
– broken down on a motorway or main road;
–
not possible to put the gearbox into neutral, unlock the steering, or re\
lease the parking brake;
–
not possible to tow a vehicle with an automatic gearbox, with the engine\
running;
–
towing with only two wheels on the ground;
–
four-wheel drive vehicle;
–
no approved towbar available.
Rechargeable hybrid vehicles
Before any intervention, with the ignition
on, depress the brake pedal and select mode N, then switch off the hybrid system (READY
indicator lamp off).
Always call on professionals for recovery of
the vehicle on a flatbed lorry or trailer.Use the towing eye only to free the vehicle
if it is stuck, or to secure it for recovery on a
flatbed lorry or trailer.
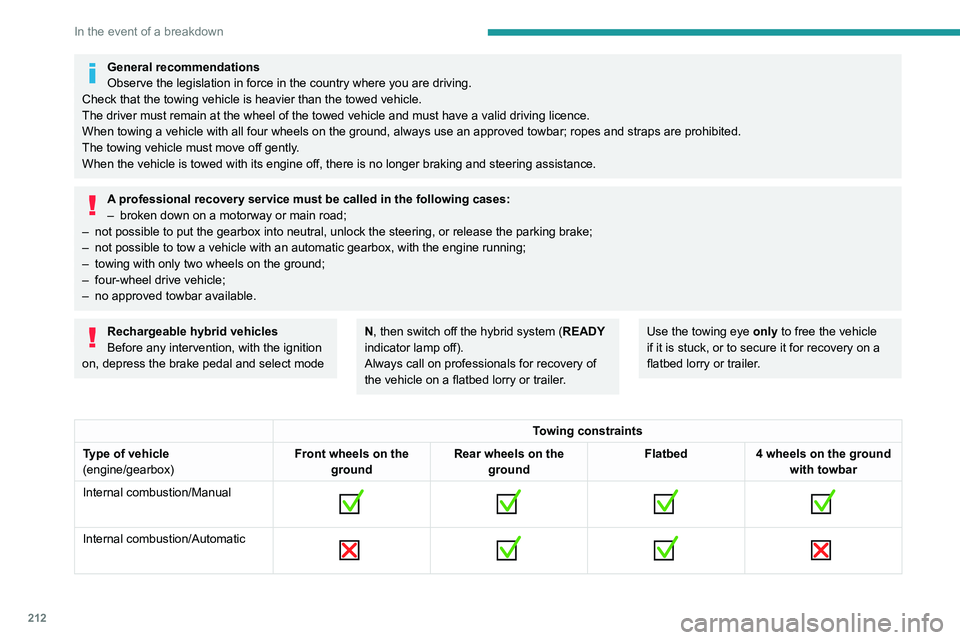
Towing constraints
Type of vehicle
(engine/gearbox) Front wheels on the
ground Rear wheels on the
ground Flatbed
4 wheels on the ground
with towbar
Internal combustion/Manual
Internal combustion/Automatic
Page 237 of 292
235
PEUGEOT Connect Radio
10► Delete the files supplied with the memory
stick and limit the number of sub-folders in the
file structure on the memory stick.
Some characters in information about the
currently playing media are not displayed
correctly
.
The audio system is unable to process certain
types of character.
►
Use standard characters to name tracks and
folders.
Playback of streaming files does not start.
The connected device does not automatically
launch playback.
►
Start playback from the device.
T
rack names and playing times are not
displayed on the audio streaming screen.
The Bluetooth profile does not allow the transfer
of this information.
Telephone
I cannot connect my Bluetooth telephone.
The telephone's Bluetooth function may be
switched off or the device may not be visible.
►
Check that the telephone has Bluetooth
switched on.
►
Check in the telephone settings that it is
"visible to all".
The Bluetooth telephone is not compatible with
the system.
►
Check the compatibility of the telephone on
the Brand's website (services).
Android
Auto and/or CarPlay do not work. Android Auto and CarPlay may not activate if the
USB cables are of poor quality.
►
Use genuine USB cables to ensure
compatibility
.
Android Auto and/or CarPlay do not work.
Android Auto and CarPlay are not available in all
countries.
►
Check the Google
Android Auto or Apple
website to see which countries are supported.
The volume of the telephone connected in
Bluetooth mode is inaudible.
The volume depends on both the system and the
telephone.
►
Increase the volume of the audio system, to
maximum if required, and increase the volume of
the telephone if necessary
.
Ambient noise affects the quality of the
telephone call.
►
Reduce ambient noise (close windows, turn
down ventilation, slow down, etc.).
The contacts are not listed in alphabetical
order
.
Some telephones offer display options.
Depending on the settings chosen, contacts can
be transferred in a specific order.
►
Modify the telephone directory display
settings.
Settings
When the treble and bass settings are
changed, the ambience is deselected.
When the ambience is changed, the treble
and bass settings are reset. Selecting an ambience imposes the treble and
bass settings, and vice versa.
►
Modify the treble and bass or ambience
settings to obtain the desired musical ambience.
When the balance settings are changed, the
distribution is deselected.
When the distribution setting is changed, the
balance settings are deselected.
Selecting a distribution setting imposes the
balance settings, and vice versa.
►
Modify the balance setting or the distribution
setting to obtain the desired sound quality
.
There is a difference in sound quality
between audio sources.
To allow for optimal listening quality, the sound
settings can be tailored to different audio
sources, which can generate audible differences
when changing source.
►
Check that the sound settings are appropriate
to the sources listened to.
Adjust the sound
functions to the middle position.
When the engine is off, the system switches
off after several minutes of use.
When the engine is switched off, the system's
operating time depends on the state of charge of
the battery.
The switch-off is normal: the system
automatically goes into energy economy mode
and switches off to maintain an adequate charge
in the battery.
► Start the vehicle’ s engine to increase the
charge of the battery.
Page 262 of 292
260
PEUGEOT Connect Nav
sources, which can generate audible differences
when changing source.
►
Check that the sound settings are appropriate
to the sources listened to. W
e recommend
setting the sound functions (Bass:, Treble:,
Balance) to the middle position, setting the
musical ambience to "None", setting loudness
correction to "Active" in USB mode and "Inactive"
in Radio mode.
►
In all cases, after applying sound settings,
adjust the volume level on the portable device (to
a high level) first.
Then adjust the volume level
on the audio system.
When the engine is off, the system switches
off after several minutes of use.
When the engine is switched off, the system's
operating time depends on the state of charge of
the battery.
The switch-off is normal: the system
automatically goes into energy economy mode
and switches off to maintain an adequate charge
in the battery.
►
Start the vehicle’
s engine to increase the
charge of the battery.
The date and time cannot be set.
Setting of the date and time is only available
if the synchronisation with the satellites is
deactivated.
►
Settings menu / Options /
Time-Date setting.
Select the "Time" tab and deactivate the "GPS
synchronisation" (UTC).
Page 264 of 292
262
Alphabetical index
Charger, induction 64
Charger, wireless
64
Charging cable
168
Charging cable (Rechargeable
hybrid)
166, 172
Charging connector (Rechargeable
hybrid)
166, 171–172
Charging flap (Rechargeable
hybrid)
166, 171–172
Charging the traction battery
(Rechargeable hybrid)
20, 165, 171–172
CHECK
21
Checking the engine oil level
17
Checking the levels
181–182
Checking tyre pressures (using the kit)
192, 195
Checks
181, 183–184
Checks, routine
183–184
Child lock
108–109
Children
94, 101–102, 105–106, 107
Children (safety)
108
Child seats
94, 97–98, 100–101, 107
Child seats, conventional
100–101
Child seats, i-Size
107
Child seats, ISOFIX
102, 104–105
Cleaning (advice)
165, 187–188
Closing the boot
29, 32
Closing the doors
29, 32
Collision Risk Alert
147–148
Configurations, seats
55
Configuration, vehicle
23, 25
Connected applications
248Connection, Bluetooth 231–232, 248–249,
253–254
Connection, Wi-Fi network
249
Connectivity
247
Consumption figures
24
Container, AdBlue®
185
Control, emergency boot release
33
Control, emergency door
30–31
Control, heated seats
46
Controls, steering mounted
116–118
Control stalk, lighting
74–75
Control stalk, wipers
80–82
Control unit
166, 168, 172
Courtesy lamps
66–67
Cover, load space
69
Cruise control
128, 130–131, 133–135
Cruise control, adaptive
135–136
Cruise control by speed limit
recognition
130–131
Cruise control, dynamic with Stop
function
130–131
Cup holder
62
D
DAB (Digital Audio Broadcasting) -
Digital radio
228, 251
Date (setting)
234, 256
Daytime running lamps
75, 200–201
Deactivating the passenger airbag
96, 99
Deadlocking
27, 29
Deferred charging 24–25, 173
Deferred charging (Rechargeable
hybrid)
24–25, 166, 171
Defrosting
47, 60
Defrosting, front
60
Demisting
47, 60
Demisting, front
60
Demisting, rear
61
Demisting, rear screen
61
Dials and gauges
9
Digital instrument panel
9–10
Dimensions
221
Dipstick
17, 181
Direction indicators
75, 200–201
Domestic charging
168
Domestic charging (Rechargeable hybrid)
172
Door pockets
62
Doors
32
Drive Assist Plus
135
Driver’s attention warning
150
Driving
42–43, 110
Driving aids camera (warnings)
127
Driving aids (recommendations)
126
Driving economically
7
Driving modes
89–90, 121–122
Driving positions (storing)
45–46
Dynamic stability control (DSC)
88, 90
E
EBFD 87