2021 PEUGEOT 5008 ESP
[x] Cancel search: ESPPage 45 of 292
43
Ease of use and comfort
3When driving
Maintain a good driving position and hold the
steering wheel with both hands at the 'quarter to
three' position, so that you can easily and quickly
reach the controls behind and near the steering
wheel.
Never adjust the seats or steering wheel
when driving.
Always keep your feet on the floor.
Front seats
Before moving the seat backwards,
ensure that there is no person or object
that might prevent the full travel of the seat.
There is a risk of trapping or pinching
passengers if present in the rear seats or of
jamming the seat if large objects are placed
on the floor behind the seat.
Manually-adjusted seats
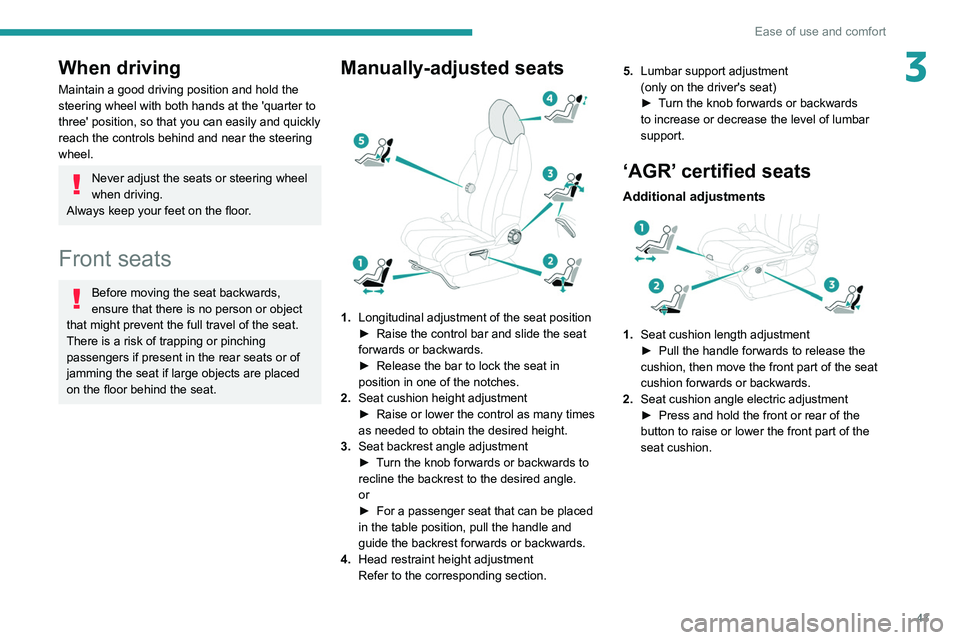
1. Longitudinal adjustment of the seat position
►
Raise the control bar and slide the seat
forwards or backwards.
►
Release the bar to lock the seat in
position in one of the notches.
2. Seat cushion height adjustment
►
Raise or lower the control as many times
as needed to obtain the desired height.
3. Seat backrest angle adjustment
►
T
urn the knob forwards or backwards to
recline the backrest to the desired angle.
or
►
For a passenger seat that can be placed
in the table position, pull the handle and
guide the backrest forwards or backwards.
4. Head restraint height adjustment
Refer to the corresponding section. 5.
Lumbar support adjustment
(only on the driver's seat)
►
T
urn the knob forwards or backwards
to increase or decrease the level of lumbar
support.
‘AGR’ certified seats
Additional adjustments
1. Seat cushion length adjustment
►
Pull the handle forwards to release the
cushion, then move the front part of the seat
cushion forwards or backwards.
2. Seat cushion angle electric adjustment
►
Press and hold the front or rear of the
button to raise or lower the front part of the
seat cushion.
Page 46 of 292
44
Ease of use and comfort
3.Lumbar support electric adjustment
The control allows independent adjustment of
the depth and vertical position of the lumbar
support.
►
Press and hold the front or rear of the
control to increase or reduce the lumbar
support.
►
Press and hold the top or bottom of the
control to raise or lower the lumbar support
area.
Placing the passenger seat
in the table position
The backrest of the passenger seat can be fully
folded forwards and secured in this position.
This function, when associated with folding
of the backrest of the rear seats, helps with
transporting long and bulky objects.
First steps:
►
Lower the head restraint.
►
Fold up the “aircraft” type table (depending
on version).
►
Move the seat backwards to allow space for
the head restraint.
►
Adjust the seat to the lowest position.
►
Check that there is nothing that might
interfere with folding of the backrest (seat belt,
child seat, items of clothing, bags, etc.).
Deactivation of the front passenger
airbag is recommended.
Folding the backrest
► Pull the control fully upwards to release the
backrest.
►
T
ip the backrest fully forwards.
In this position, the backrest can support
a maximum load of 30
kg.
When sharp deceleration occurs, objects
placed on the folded backrest can turn into
projectiles.
Returning the backrest into position
► Pull the control fully upwards to release the
backrest.
►
Raise the backrest and guide it backwards
until it latches into place.
►
Check that the backrest is correctly latched
into place.
Front head restraints
Adjusting the height
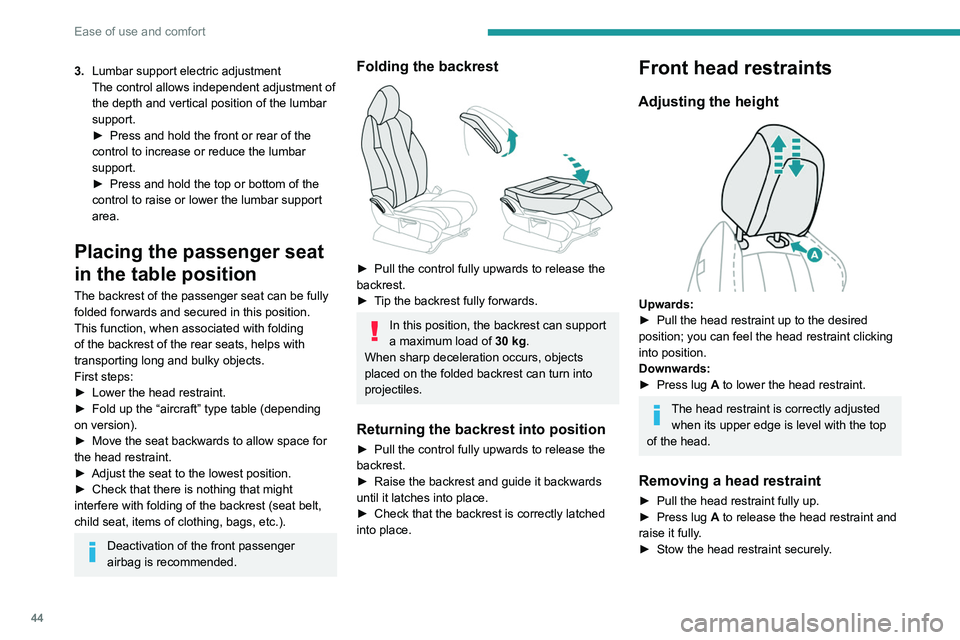
Upwards:
► Pull the head restraint up to the desired
position; you can feel the head restraint clicking
into position.
Downwards:
►
Press lug
A to lower the head restraint.
The head restraint is correctly adjusted when its upper edge is level with the top
of the head.
Removing a head restraint
► Pull the head restraint fully up.
► Press lug A to release the head restraint and
raise it fully.
►
Stow the head restraint securely
.
Refitting a head restraint
► Insert the head restraint rods into the guides
in the corresponding seat backrest.
► Push the head restraint fully down.
► Press the lug A to release the head restraint
and push it down.
► Adjust the height of the head restraint.
Never drive with the head restraints
removed; they should be in place and
adjusted for the occupant of the seat.
Electrically-adjusted driver's
seat
To carry out these electric adjustments, switch on the ignition or start the engine
if the vehicle has gone into energy economy
mode.
These electric adjustments are accessible
about 1 minute after opening the driver's door.
They are deactivated about 1 minute after
switching the ignition off.
Page 47 of 292
45
Ease of use and comfort
3Refitting a head restraint
► Insert the head restraint rods into the guides
in the corresponding seat backrest.
►
Push the head restraint fully down.
►
Press the lug
A to release the head restraint
and push it down.
►
Adjust the height of the head restraint.
Never drive with the head restraints
removed; they should be in place and
adjusted for the occupant of the seat.
Electrically-adjusted driver's
seat
To carry out these electric adjustments, switch on the ignition or start the engine
if the vehicle has gone into energy economy
mode.
These electric adjustments are accessible
about 1 minute after opening the driver's door.
They are deactivated about 1 minute after
switching the ignition off.
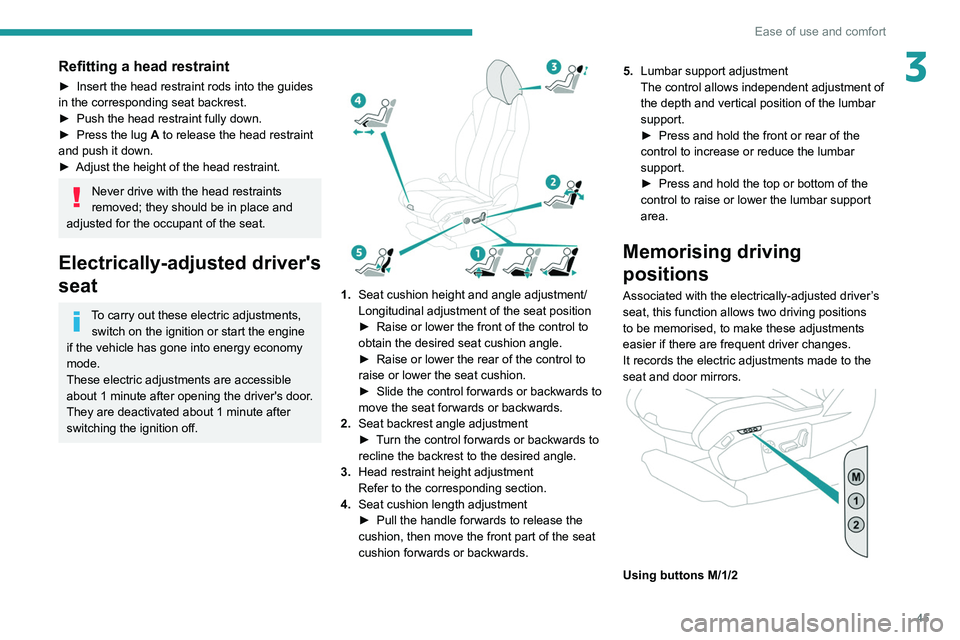
1. Seat cushion height and angle adjustment/
Longitudinal adjustment of the seat position
►
Raise or lower the front of the control to
obtain the desired seat cushion angle.
►
Raise or lower the rear of the control to
raise or lower the seat cushion.
►
Slide the control forwards or backwards to
move the seat forwards or backwards.
2. Seat backrest angle adjustment
►
T
urn the control forwards or backwards to
recline the backrest to the desired angle.
3. Head restraint height adjustment
Refer to the corresponding section.
4. Seat cushion length adjustment
►
Pull the handle forwards to release the
cushion, then move the front part of the seat
cushion forwards or backwards. 5.
Lumbar support adjustment
The control allows independent adjustment of
the depth and vertical position of the lumbar
support.
►
Press and hold the front or rear of the
control to increase or reduce the lumbar
support.
►
Press and hold the top or bottom of the
control to raise or lower the lumbar support
area.
Memorising driving
positions
Associated with the electrically-adjusted driver’s
seat, this function allows two driving positions
to be memorised, to make these adjustments
easier if there are frequent driver changes.
It records the electric adjustments made to the
seat and door mirrors.
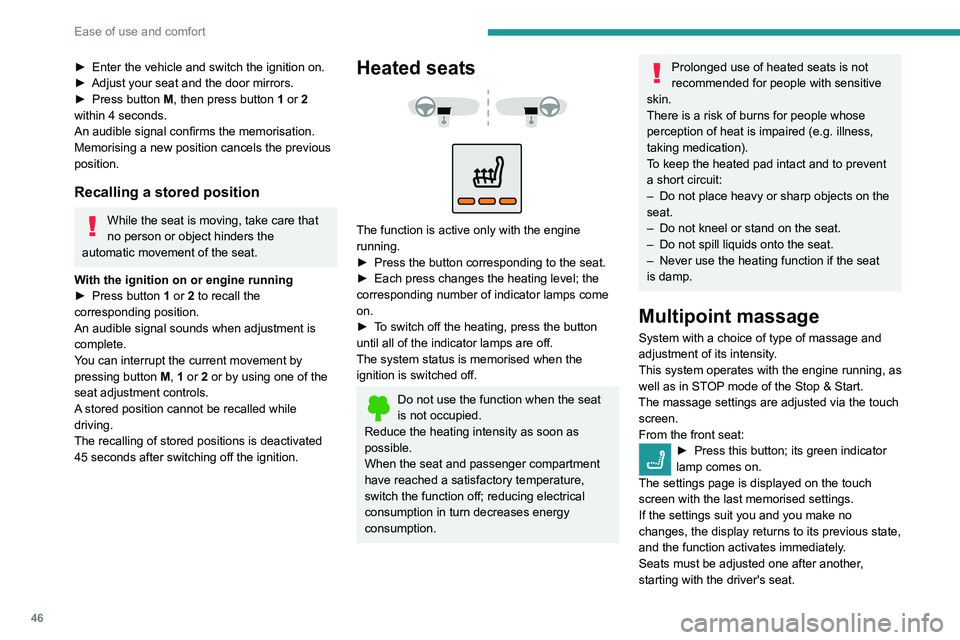
Using buttons M/1/2
Page 48 of 292
46
Ease of use and comfort
► Enter the vehicle and switch the ignition on.
► Adjust your seat and the door mirrors.
►
Press button
M, then press button 1 or 2
within 4 seconds.
An audible signal confirms the memorisation.
Memorising a new position cancels the previous
position.
Recalling a stored position
While the seat is moving, take care that
no person or object hinders the
automatic movement of the seat.
With the ignition on or engine running
►
Press button
1 or 2 to recall the
corresponding position.
An audible signal sounds when adjustment is
complete.
You can interrupt the current movement by
pressing button M, 1 or 2 or by using one of the
seat adjustment controls.
A stored position cannot be recalled while
driving.
The recalling of stored positions is deactivated
45 seconds after switching off the ignition.
Heated seats
The function is active only with the engine
running.
►
Press the button corresponding to the seat.
►
Each press changes the heating level; the
corresponding number of indicator lamps come
on.
►
T
o switch off the heating, press the button
until all of the indicator lamps are off.
The system status is memorised when the
ignition is switched off.
Do not use the function when the seat
is not occupied.
Reduce the heating intensity as soon as
possible.
When the seat and passenger compartment
have reached a satisfactory temperature,
switch the function off; reducing electrical
consumption in turn decreases energy
consumption.
Prolonged use of heated seats is not
recommended for people with sensitive
skin.
There is a risk of burns for people whose
perception of heat is impaired (e.g.
illness,
taking medication).
To keep the heated pad intact and to prevent
a short circuit:
–
Do not place heavy or sharp objects on the
seat.
–
Do not kneel or stand on the seat.
–
Do not spill liquids onto the seat.
–
Never use the heating function if the seat
is damp.
Multipoint massage
System with a choice of type of massage and
adjustment of its intensity.
This system operates with the engine running, as
well as in STOP mode of the
Stop & Start.
The massage settings are adjusted via the touch screen.
From the front seat:
► Press this button; its green indicator
lamp comes on.
The settings page is displayed on the touch
screen with the last memorised settings.
If the settings suit you and you make no
changes, the display returns to its previous state,
and the function activates immediately
.
Seats must be adjusted one after another,
starting with the driver's seat.
To modify the settings:
► Begin with the driver’s seat.
► Select a massage intensity from the three
levels offered: " 1" (Low), "2" (Normal) or "3"
(High).
► Select another type of massage from those
offered.
► Wait for the driver's seat settings page to
disappear.
► Next, proceed with the passenger's seat in
the same way.
The changes are applied immediately.
Once activated, the system starts a one hour
massage cycle, made up of sequences of 6
minutes of massage followed by 3 minutes at
rest.
The system automatically stops at the end of the
cycle; the indicator lamp for the button goes off.
Steering wheel
adjustment
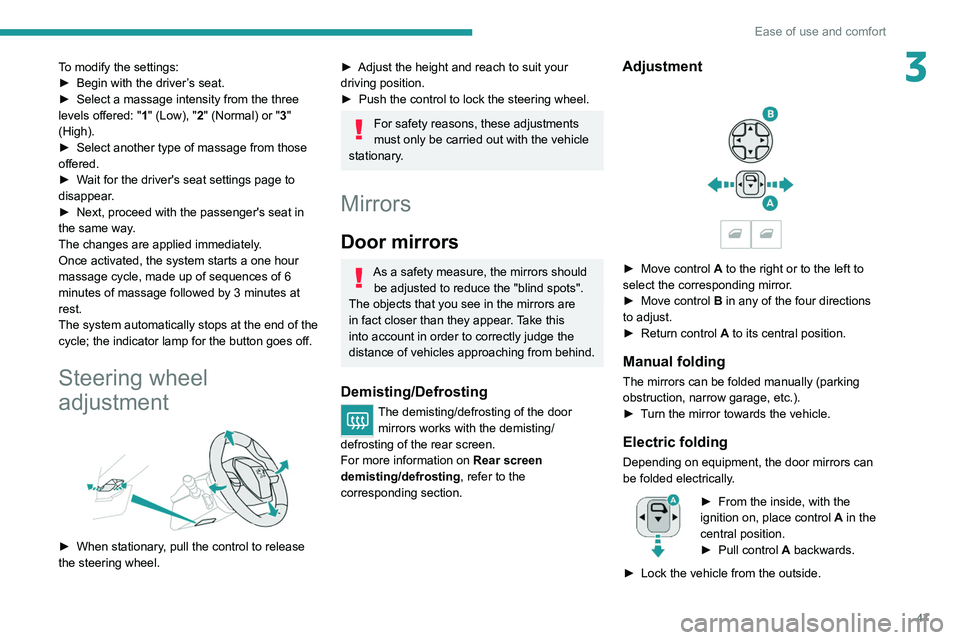
► When stationary, pull the control to release
the steering wheel.
Page 49 of 292
47
Ease of use and comfort
3To modify the settings:
► Begin with the driver ’s seat.
►
Select a massage intensity from the three
levels offered: " 1
" (Low), "2" (Normal) or "3"
(High).
►
Select another type of massage from those
offered.
►
W
ait for the driver's seat settings page to
disappear.
►
Next, proceed with the passenger's seat in
the same way
.
The changes are applied immediately.
Once activated, the system starts a one hour
massage cycle, made up of sequences of 6
minutes of massage followed by 3 minutes at
rest.
The system automatically stops at the end of the
cycle; the indicator lamp for the button goes off.
Steering wheel
adjustment
► When stationary , pull the control to release
the steering wheel.
► Adjust the height and reach to suit your
driving position.
►
Push the control to lock the steering wheel.
For safety reasons, these adjustments
must only be carried out with the vehicle
stationary.
Mirrors
Door mirrors
As a safety measure, the mirrors should be adjusted to reduce the "blind spots".
The objects that you see in the mirrors are
in fact closer than they appear. Take this
into account in order to correctly judge the
distance of vehicles approaching from behind.
Demisting/Defrosting
The demisting/defrosting of the door mirrors works with the demisting/
defrosting of the rear screen.
For more information on Rear screen
demisting/defrosting , refer to the
corresponding section.
Adjustment
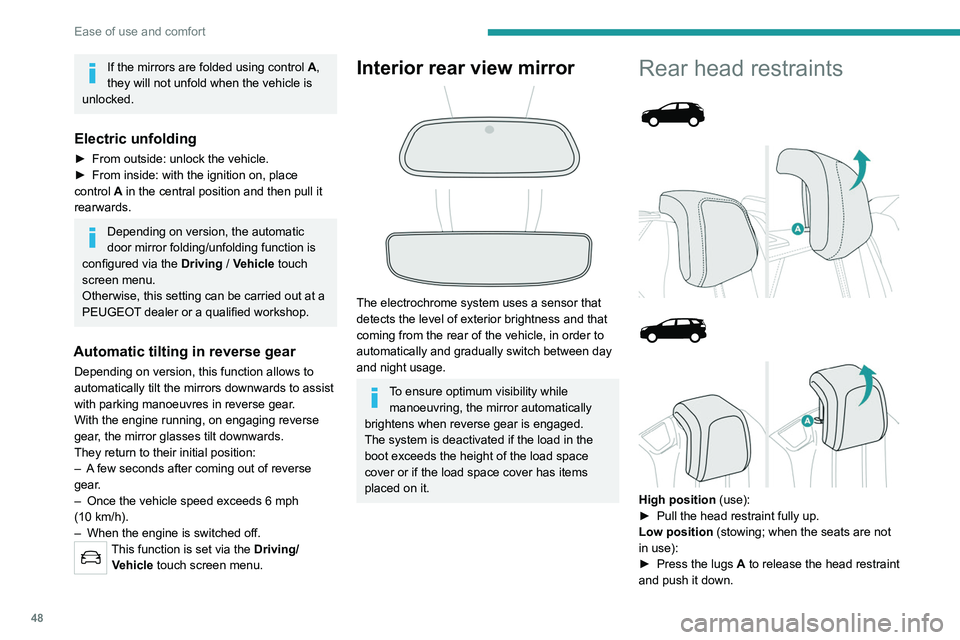
► Move control A to the right or to the left to
select the corresponding mirror.
►
Move control
B in any of the four directions
to adjust.
►
Return control A
to its central position.
Manual folding
The mirrors can be folded manually (parking
obstruction, narrow garage, etc.).
►
T
urn the mirror towards the vehicle.
Electric folding
Depending on equipment, the door mirrors can
be folded electrically.
► From the inside, with the
ignition on, place control A
in the
central position.
►
Pull control A
backwards.
►
Lock the vehicle from the outside.
Page 50 of 292
48
Ease of use and comfort
If the mirrors are folded using control A,
they will not unfold when the vehicle is
unlocked.
Electric unfolding
► From outside: unlock the vehicle.
► From inside: with the ignition on, place
control
A in the central position and then pull it
rearwards.
Depending on version, the automatic
door mirror folding/unfolding function is
configured via the Driving
/ Vehicle touch
screen menu.
Otherwise, this setting can be carried out at a
PEUGEOT dealer or a qualified workshop.
Automatic tilting in reverse gear
Depending on version, this function allows to
automatically tilt the mirrors downwards to assist
with parking manoeuvres in reverse gear.
With the engine running, on engaging reverse
gear, the mirror glasses tilt downwards.
They return to their initial position:
–
A
few seconds after coming out of reverse
gear.
–
Once the vehicle speed exceeds 6 mph
(10
km/h).
–
When the engine is switched off.
This function is set via the Driving/Vehicle touch screen menu.
Interior rear view mirror
The electrochrome system uses a sensor that
detects the level of exterior brightness and that
coming from the rear of the vehicle, in order to
automatically and gradually switch between day
and night usage.
To ensure optimum visibility while manoeuvring, the mirror automatically
brightens when reverse gear is engaged.
The system is deactivated if the load in the
boot exceeds the height of the load space
cover or if the load space cover has items
placed on it.
Rear head restraints
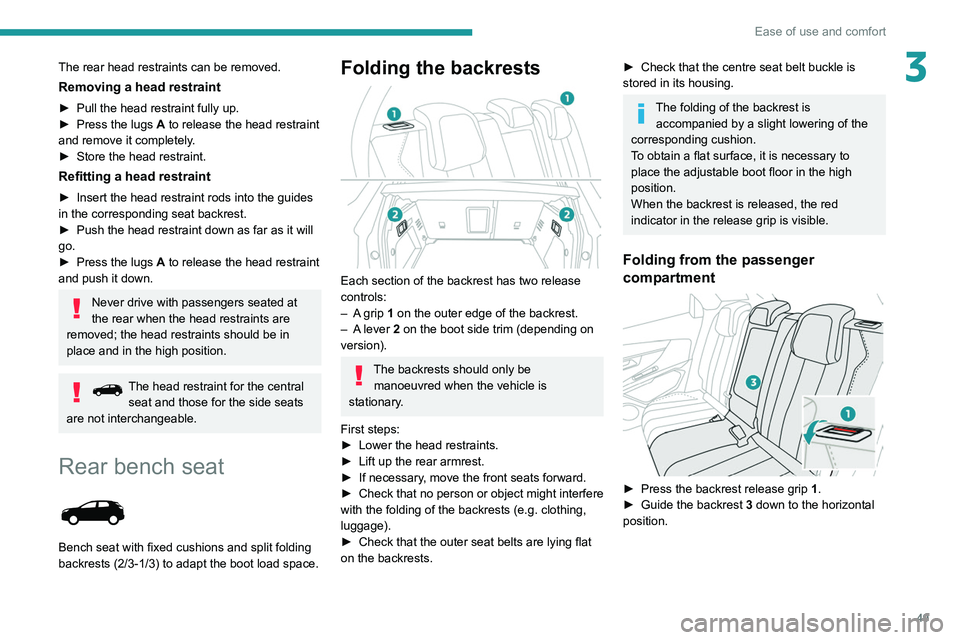
High position (use):
► Pull the head restraint fully up.
Low position (stowing; when the seats are not
in use):
►
Press the lugs
A to release the head restraint
and push it down.
The rear head restraints can be removed.
Removing a head restraint
► Pull the head restraint fully up.
► Press the lugs A to release the head restraint
and remove it completely.
► Store the head restraint.
Refitting a head restraint
► Insert the head restraint rods into the guides
in the corresponding seat backrest.
► Push the head restraint down as far as it will
go.
► Press the lugs A to release the head restraint
and push it down.
Never drive with passengers seated at
the rear when the head restraints are
removed; the head restraints should be in
place and in the high position.
The head restraint for the central seat and those for the side seats
are not interchangeable.
Rear bench seat
Bench seat with fixed cushions and split folding
backrests (2/3-1/3) to adapt the boot load space.
Page 51 of 292
49
Ease of use and comfort
3The rear head restraints can be removed.
Removing a head restraint
► Pull the head restraint fully up.
► Press the lugs A to release the head restraint
and remove it completely.
►
Store the head restraint.
Refitting a head restraint
► Insert the head restraint rods into the guides
in the corresponding seat backrest.
►
Push the head restraint down as far as it will
go.
►
Press the lugs
A to release the head restraint
and push it down.
Never drive with passengers seated at
the rear when the head restraints are
removed; the head restraints should be in
place and in the high position.
The head restraint for the central seat and those for the side seats
are not interchangeable.
Rear bench seat
Bench seat with fixed cushions and split folding
backrests (2/3-1/3) to adapt the boot load space.
Folding the backrests
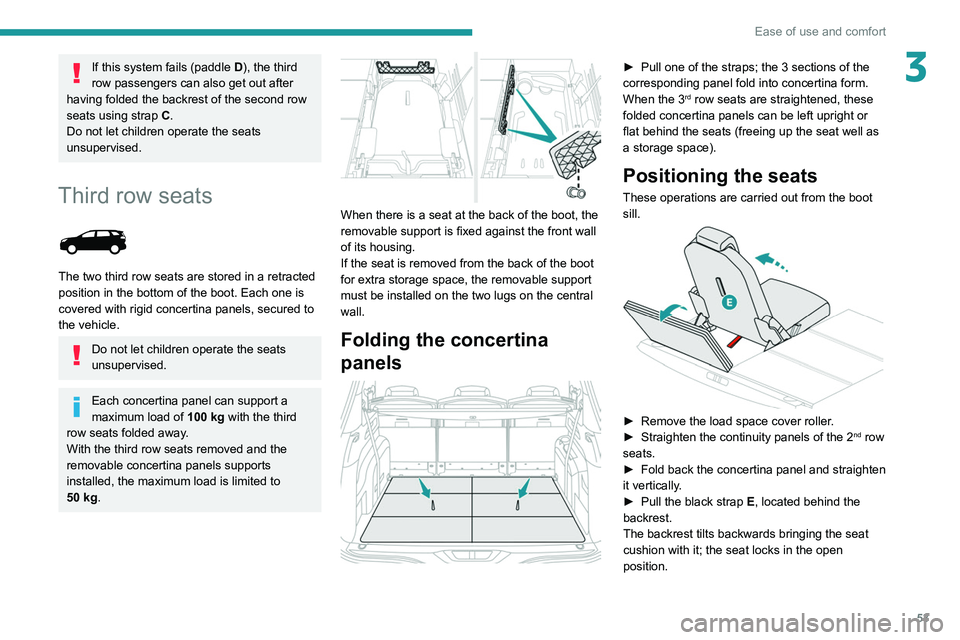
Each section of the backrest has two release
controls:
–
A
grip 1 on the outer edge of the backrest.
–
A
lever 2 on the boot side trim (depending on
version).
The backrests should only be manoeuvred when the vehicle is
stationary.
First steps:
►
Lower the head restraints.
►
Lift up the rear armrest.
►
If necessary
, move the front seats forward.
►
Check
that no person or object might interfere
with the folding of the backrests (e.g.
clothing,
luggage).
►
Check that the outer seat belts are lying flat
on the backrests.
► Check that the centre seat belt buckle is
stored in its housing.
The folding of the backrest is accompanied by a slight lowering of the
corresponding cushion.
To obtain a flat surface, it is necessary to
place the adjustable boot floor in the high
position.
When the backrest is released, the red
indicator in the release grip is visible.
Folding from the passenger
compartment
► Press the backrest release grip 1 .
► Guide the backrest 3 down to the horizontal
position.
Page 55 of 292
53
Ease of use and comfort
3If this system fails (paddle D), the third
row passengers can also get out after
having folded the backrest of the second row
seats using strap C.
Do not let children operate the seats
unsupervised.
Third row seats
The two third row seats are stored in a retracted
position in the bottom of the boot. Each one is
covered with rigid concertina panels, secured to
the vehicle.
Do not let children operate the seats
unsupervised.
Each concertina panel can support a
maximum load of 100
kg with the third
row seats folded away.
With the third row seats removed and the
removable concertina panels supports
installed, the maximum load is limited to
50
kg.
When there is a seat at the back of the boot, the
removable support is fixed against the front wall
of its housing.
If the seat is removed from the back of the boot
for extra storage space, the removable support
must be installed on the two lugs on the central
wall.
Folding the concertina
panels
► Pull one of the straps; the 3 sections of the
corresponding panel fold into concertina form.
When the 3
rd row seats are straightened, these
folded concertina panels can be left upright or
flat behind the seats (freeing up the seat well as
a storage space).
Positioning the seats
These operations are carried out from the boot
sill.
► Remove the load space cover roller .
► Straighten the continuity panels of the 2nd row
seats.
►
Fold back the concertina panel and straighten
it vertically
.
►
Pull the black strap E
, located behind the
backrest.
The backrest tilts backwards bringing the seat
cushion with it; the seat locks in the open
position.