2021 PEUGEOT 3008 run flat
[x] Cancel search: run flatPage 74 of 292

72
Ease of use and comfort
Behind the rear seats
► Remove the load space cover roller.
► Insert the ends of the bar , one after the other,
into the fixing points in the roof.
►
Attach the straps of the net to the lower rings,
located on each side trim of the boot.
►
Pull on the straps to stretch the net.
2-position boot floor
This two-position floor allows the boot volume to
be optimised using the lateral stops located on
the sides:
–
High position ( 100
kg max.): to obtain a flat
floor up to the front seats, when the rear seats
are folded down.
–
Low position ( 150
kg max.): maximum boot
volume.
On certain versions, the adjustable boot
floor cannot be fitted in the low position.
To change the height:
►
Lift and pull the floor towards you using its
central handle, then use the lateral stops to
move it.
►
Push the floor all the way forwards to place it
in the desired position.
To keep it in the inclined position:
► From the high position, lift the floor towards
the load space cover
.
►
T
ake it past the retractable stops, then rest
the floor on these stops.
Storage well
► Lift the boot floor as far as possible or lift the
articulated boot mat (depending on version) to
access the storage well.
Depending on version, it includes:
–
A
temporary puncture repair kit with the tool
kit.
–
A
spare wheel with the tool kit.
–
The traction battery charging cable
(Rechargeable hybrid).
The load space cover can also be stored here
(depending on version).
12 V accessory socket
► To connect a 12 V accessory (maximum
power: 120 W), lift the cover and plug in a
suitable adaptor.
►
Switch on the ignition.
The connection of an electrical device not approved by PEUGEOT, such as a
USB charger, may adversely affect the
operation of vehicle electrical systems,
causing faults such as poor radio reception or
interference with displays in the screens.
Boot lamp
It comes on automatically when the boot is
opened and goes off automatically when the
boot is closed.
The lighting time varies according to the
circumstances:
– When the ignition is off, approximately 10
minutes.
– In energy saving mode, approximately 30
seconds.
– With the engine running, unlimited.
Page 114 of 292
11 2
Driving
► With an automatic gearbox, select mode P
or N and press the brake pedal.
►
Press the "
START/STOP" button while
maintaining pressure on the pedal until the
engine starts.
Diesel engines
In negative temperatures and/or when the
engine is cold, starting takes place only after the
preheating warning lamp goes out.
If this warning lamp comes on after
pressing the " START/STOP" button:
►
Keep the pedal fully depressed and do not
press the "
START/STOP" button again until the
engine is running.
In all circumstances, if one of the starting
conditions is not met, a message is displayed.
In some circumstances, a message indicates
that it is necessary to turn the steering wheel
while pressing the " START/STOP" button to
assist unlocking of the steering column.
Petrol engines
With Petrol engines, after a cold start,
pre-heating the catalytic converter can cause
noticeable engine vibrations, for anything up
to 2 minutes (accelerated idle speed).
If the engine stalls, release the clutch
pedal and fully depress it again, the
engine will restart automatically.
Starting rechargeable hybrid
vehicles
► Fully depress the brake pedal and press
the START/STOP button for approximately 2
seconds.
► Keep your foot on the pedal until this
indicator lamp comes on, indicating the
activation of the rechargeable hybrid system
(confirmed by an audible signal).
To exit Park mode, wait for the READY indicator lamp to come on.
By default, the system starts in Electric mode.
Depending on certain parameters (battery
charge level or outside temperature), the system
determines whether it is necessary to start the
petrol engine.
It is possible to change the driving mode at any
time using the mode selector.
When the vehicle starts in electric mode,
it makes no noise.
Pay particular attention to pedestrians and
cyclists who may not hear the vehicle coming
despite the pedestrian horn.
Switching off
► Immobilise the vehicle using the parking
brake.
►
With a
manual gearbox, ideally put the gear
lever into neutral.
► With an automatic gearbox, ideally select
mode P or N.
►
Press the "
START/STOP" button.
►
For rechargeable hybrid vehicles, before
leaving the vehicle, check that the READY
indicator lamp is switched off.
In some circumstances, it is necessary to turn
the steering wheel to lock the steering column.
On certain versions with an automatic gearbox
(EAT6/EAT8), the steering column does not lock,
but the gearbox locks in mode P.
If the vehicle is not immobilised, the
engine will not stop.
With the engine off, the braking and
steering assistance systems are also cut
off - risk of loss of control of the vehicle!
Never leave your vehicle with the
electronic key still inside.
Switching on the ignition
without starting the engine
With the electronic key in the passenger
compartment, pressing the " START/STOP"
button, without depressing any of the pedals ,
allows the ignition to be switched on without
starting the engine (the instrument panel and
accessories such as the audio system and the
lighting will come on).
► Press this button again to switch off the
ignition and allow the vehicle to be locked.
Key not detected
Back-up starting
A back-up reader is fitted to the steering column,
to enable the engine to be started if the system
fails to detect the key in the recognition zone, or
if the battery in the electronic key is flat.
Page 180 of 292
178
Practical information
Rechargeable hybrid vehicles
The use of snow chains is only
authorised on the front wheels.
The driving mode selector must be on the
4WD position (depending on version).
Very cold climate screen
(Depending on country of sale)
This removable device prevents the
accumulation of snow around the radiator
cooling fan.
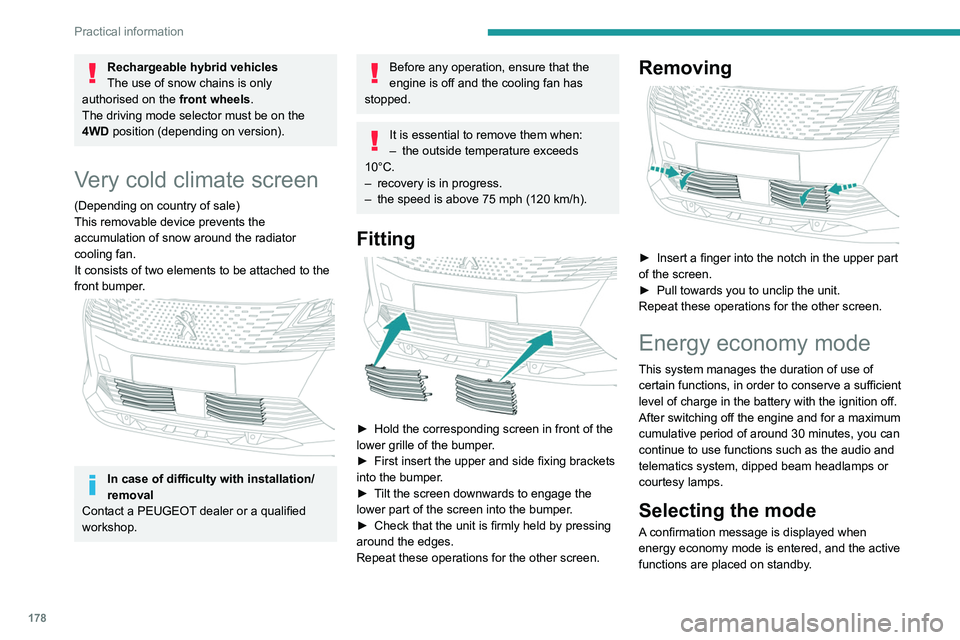
It consists of two elements to be attached to the
front bumper.
In case of difficulty with installation/
removal
Contact a PEUGEOT dealer or a qualified
workshop.
Before any operation, ensure that the
engine is off and the cooling fan has
stopped.
It is essential to remove them when:
– the outside temperature exceeds
10°C.
–
recovery is in progress.
–
the speed is above 75 mph (120
km/h).
Fitting
► Hold the corresponding screen in front of the
lower grille of the bumper .
►
First insert the upper and side fixing brackets
into the bumper
.
►
T
ilt the screen downwards to engage the
lower part of the screen into the bumper.
►
Check that the unit is firmly held by pressing
around the edges.
Repeat these operations for the other screen.
Removing
► Insert a finger into the notch in the upper part
of the screen.
►
Pull towards you to unclip the unit.
Repeat these operations for the other screen.
Energy economy mode
This system manages the duration of use of
certain functions, in order to conserve a sufficient
level of charge in the battery with the ignition off.
After switching off the engine and for a maximum
cumulative period of around 30 minutes, you can
continue to use functions such as the audio and
telematics system, dipped beam headlamps or
courtesy lamps.
Selecting the mode
A confirmation message is displayed when
energy economy mode is entered, and the active
functions are placed on standby.
If a telephone call is in progress at the
time, it will be maintained for around 10
minutes via the audio system’s hands-free
system.
Exiting the mode
These functions are automatically reactivated the
next time the vehicle is used.
To restore the use of these functions
immediately, start the engine and let it run:
– For less than 10 minutes, to use the
equipment for approximately 5 minutes.
– For more than 10 minutes, to use the
equipment for approximately 30 minutes.
Let the engine run for the specified duration to
ensure that the battery charge is sufficient.
To recharge the battery, avoid repeatedly or
continuously restarting the engine.
A flat battery prevents the engine from starting.
For more information on the 12 V battery,
refer to the corresponding section.
Load reduction mode
This system manages the use of certain
functions according to the level of charge
remaining in the battery.
When the vehicle is being driven, the load
reduction function temporarily deactivates certain
Page 181 of 292
179
Practical information
7If a telephone call is in progress at the
time, it will be maintained for around 10
minutes via the audio system’s hands-free
system.
Exiting the mode
These functions are automatically reactivated the
next time the vehicle is used.
To restore the use of these functions
immediately, start the engine and let it run:
–
For less than 10 minutes, to use the
equipment for approximately 5 minutes.
–
For more than 10 minutes, to use the
equipment for approximately 30 minutes.
Let the engine run for the specified duration to
ensure that the battery charge is sufficient.
T
o recharge the battery, avoid repeatedly or
continuously restarting the engine.
A flat battery prevents the engine from starting.
For more information on the 12
V battery,
refer to the corresponding section.
Load reduction mode
This system manages the use of certain
functions according to the level of charge
remaining in the battery.
When the vehicle is being driven, the load
reduction function temporarily deactivates certain
functions, such as the air conditioning and the
heated rear screen.
The deactivated functions are reactivated
automatically as soon as conditions permit.
Motorháztető
Stop & Start
Before doing anything under the bonnet,
you must switch off the ignition to avoid any
risk of injury resulting from an automatic
change to START mode.
Rechargeable hybrid vehicles
Before any work is carried out under the
bonnet, it is essential to switch off the ignition
and disconnect the charging connector nozzle
if it is connected, check that the READY
indicator lamp is off on the instrument panel
and wait 4 minutes - risk of serious injury!
The location of the interior bonnet release lever prevents the bonnet being
opened when the left-hand front door is
closed.
When the engine is hot, handle the
exterior safety catch and the bonnet stay
with care (risk of burns), using the protected
area.
When the bonnet is open, take care not to
damage the safety catch.
Do not open the bonnet under very windy
conditions.
Cooling of the engine when stopped
The engine cooling fan may start after
the engine has been switched off.
Take care with objects or clothing that
could be caught in the blades of the fan!
Opening
► Open the left-hand front door.
Page 188 of 292
186
Practical information
Store AdBlue® out of the reach of
children, in its original container.
Procedure
Before starting the top-up procedure, ensure that
the vehicle is parked on a flat and level surface.
In wintry conditions, ensure that the temperature
of the vehicle is above -11°C. Otherwise the
AdBlue
® may be frozen and so cannot be poured
into the tank. Park the vehicle in a warmer area
for a few hours to allow the top-up to be carried
out.
Never pour the AdBlue® into the Diesel
fuel tank.
If any AdBlue® is splashed, or if there are
any spillages on the bodywork, rinse
immediately with cold water or wipe with a
damp cloth.
If the fluid has crystallised, clean it off using a
sponge and hot water.
Important: in the event of a top-up after
an AdBlue breakdown, you must wait
about 5
minutes before switching on the
ignition, without opening the driver's door,
unlocking the vehicle or bringing the
electronic key into the passenger
compartment.
Switch on the ignition, then wait for 10
seconds before starting the engine. ►
Press the "
START/STOP" button to switch off
the engine.
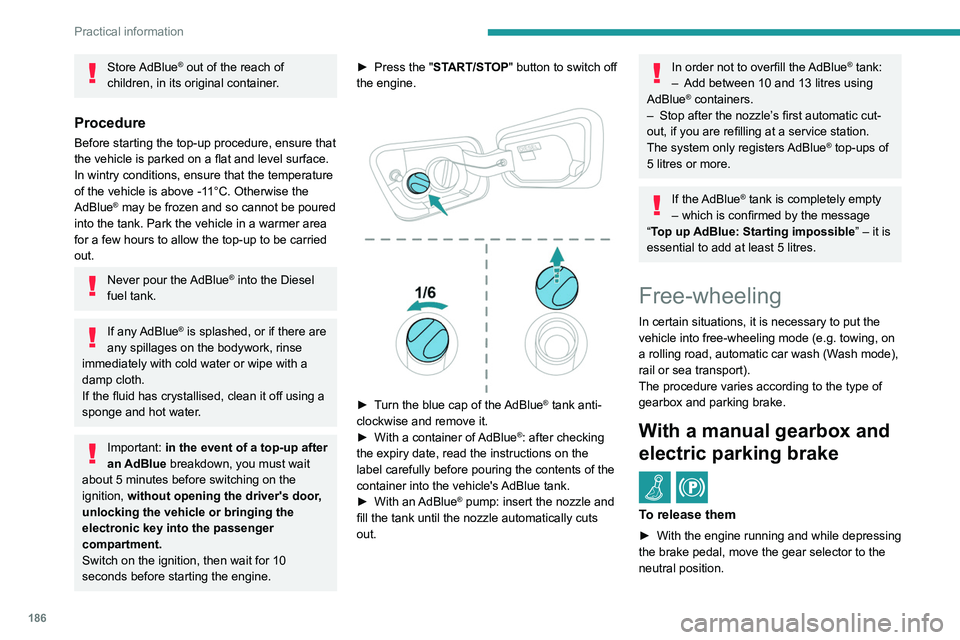
► Turn the blue cap of the AdBlue® tank anti-
clockwise and remove it.
►
With a container of
AdBlue
®: after checking
the expiry date, read the instructions on the
label carefully before pouring the contents of the
container into the vehicle's AdBlue tank.
►
With an
AdBlue® pump: insert the nozzle and
fill the tank until the nozzle automatically cuts
out.
In order not to overfill the AdBlue® tank:
–
Add between 10 and 13 litres using
AdBlue® containers.
–
Stop after the nozzle’ s first automatic cut-
out, if you are refilling at a service station.
The system only registers AdBlue
® top-ups of
5
litres or more.
If the AdBlue® tank is completely empty
– which is confirmed by the message
“Top up
AdBlue: Starting impossible ” – it is
essential to add at least 5 litres.
Free-wheeling
In certain situations, it is necessary to put the
vehicle into free-wheeling mode (e.g. towing, on
a rolling road, automatic car wash (Wash mode),
rail or sea transport).
The procedure varies according to the type of
gearbox and parking brake.
With a manual gearbox and
electric parking brake
/
To release them
► With the engine running and while depressing
the brake pedal, move the gear selector to the
neutral position.
► While depressing the brake pedal, switch off
the ignition.
► Release the brake pedal, then switch on the
ignition again.
► While depressing the brake pedal, press the
control lever to release the parking brake.
► Release the brake pedal, then switch off the
ignition.
Reverting to normal operation
► While depressing the brake pedal, restart the
engine.
With an automatic gearbox
and electric parking brake
/
Release procedure
► With the vehicle stationary and the engine
running, select mode N and switch off the
ignition.
Within 5 seconds:
► Switch on the ignition again.
► While depressing the brake pedal, move the
push selector forwards or backwards to confirm
mode N.
► While depressing the brake pedal, press the
control lever to release the parking brake.
► Release the brake pedal, switch off the
ignition.
Page 208 of 292
206
In the event of a breakdown
Version 2 (Eco)
Fuse N°Rating (A)Functions
F18 10 ARight-hand main beam headlamp
F19 10 ALeft-hand main beam headlamp
12 V battery
Procedure for starting the engine using another
battery or for charging a discharged battery.
Lead-acid starter batteries
These batteries contain harmful
substances (sulphuric acid and lead).
They must be disposed of in accordance
with regulations and must never under any
circumstances be discarded with household
waste.
Take used remote control batteries and
vehicle batteries to a special collection point.
Protect your eyes and face before
handling the battery.
All operations on the battery must be carried
out in a well ventilated area and away from
naked flames and sources of sparks, to avoid
any risk of explosion or fire.
Wash your hands afterwards.
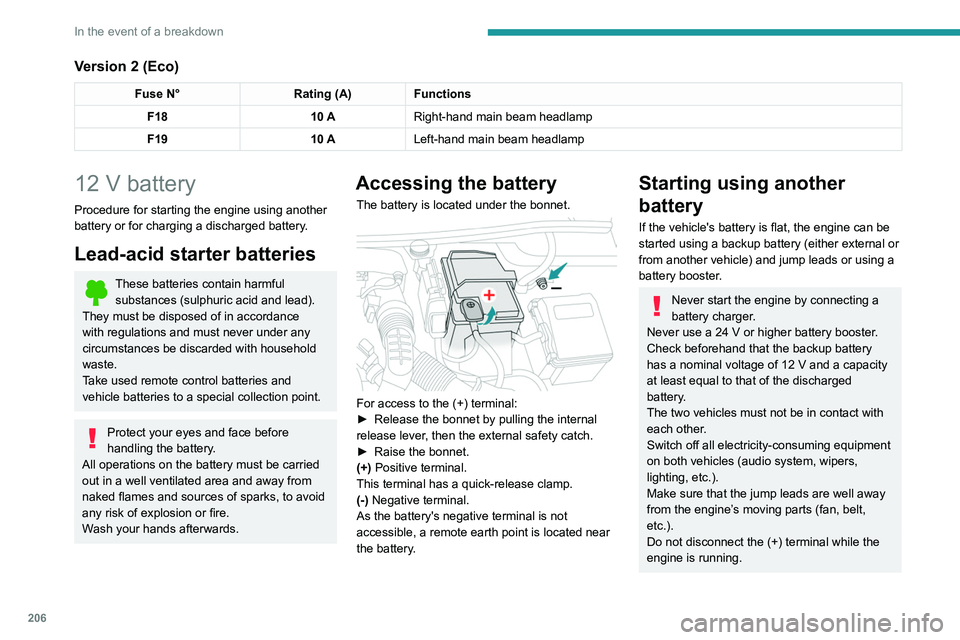
Accessing the battery
The battery is located under the bonnet.
For access to the (+) terminal:
► Release the bonnet by pulling the internal
release lever
, then the external safety catch.
►
Raise the bonnet.
(+)
Positive terminal.
This terminal has a quick-release clamp.
(-) Negative terminal.
As the battery's negative terminal is not
accessible, a remote earth point is located near
the battery.
Starting using another
battery
If the vehicle's battery is flat, the engine can be
started using a backup battery (either external or
from another vehicle) and jump leads or using a
battery booster.
Never start the engine by connecting a
battery charger.
Never use a 24
V or higher battery booster.
Check beforehand that the backup battery
has a nominal voltage of 12
V and a capacity
at least equal to that of the discharged
battery.
The two vehicles must not be in contact with
each other.
Switch off all electricity-consuming equipment
on both vehicles (audio system, wipers,
lighting, etc.).
Make sure that the jump leads are well away
from the engine’s moving parts (fan, belt,
etc.).
Do not disconnect the (+) terminal while the
engine is running.
Page 209 of 292
207
In the event of a breakdown
8
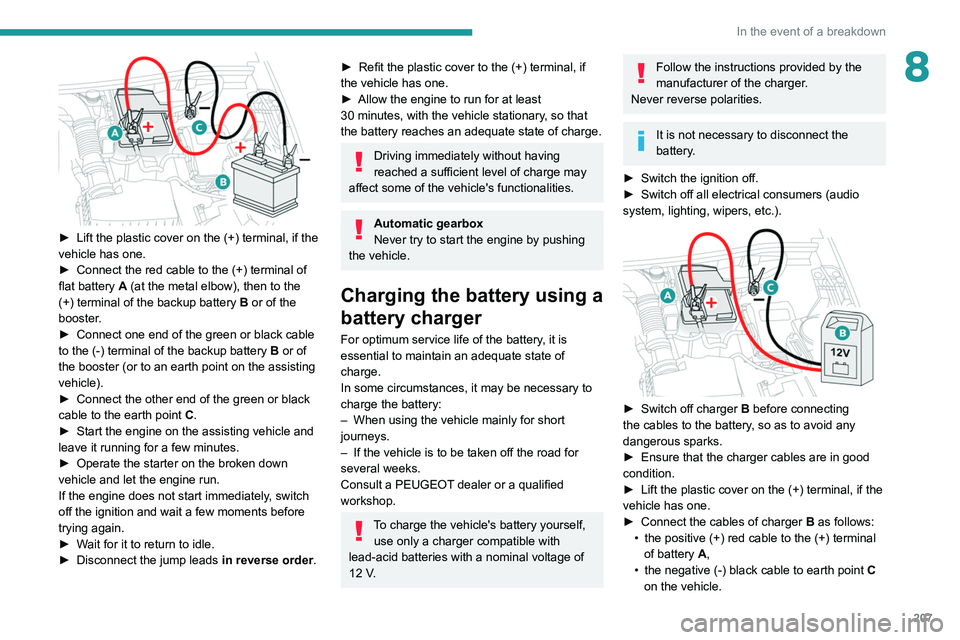
► Lift the plastic cover on the (+) terminal, if the
vehicle has one.
►
Connect the red cable to the (+) terminal of
flat battery
A (at the metal elbow), then to the
(+) terminal of the backup battery
B or of the
booster.
►
Connect one end of the green or black cable
to the (-) terminal of the backup battery
B or of
the booster (or to an earth point on the assisting
vehicle).
►
Connect the other end of the green or black
cable to the earth point
C
.
►
Start the engine on the assisting vehicle and
leave it running for a few minutes.
►
Operate the starter on the broken down
vehicle and let the engine run.
If the engine does not start immediately
, switch
off the ignition and wait a few moments before
trying again.
►
W
ait for it to return to idle.
►
Disconnect the jump leads in reverse order.
► Refit the plastic cover to the (+) terminal, if
the vehicle has one.
►
Allow the engine to run for at least
30
minutes, with the vehicle stationary, so that
the battery reaches an adequate state of charge.
Driving immediately without having
reached a sufficient level of charge may
affect some of the vehicle's functionalities.
Automatic gearbox
Never try to start the engine by pushing
the vehicle.
Charging the battery using a
battery charger
For optimum service life of the battery, it is
essential to maintain an adequate state of
charge.
In some circumstances, it may be necessary to
charge the battery:
–
When using the vehicle mainly for short
journeys.
–
If the vehicle is to be taken off the road for
several weeks.
Consult a PEUGEOT
dealer or a qualified
workshop.
To charge the vehicle's battery yourself, use only a charger compatible with
lead-acid batteries with a nominal voltage of
12
V.
Follow the instructions provided by the
manufacturer of the charger.
Never reverse polarities.
It is not necessary to disconnect the
battery.
►
Switch the ignition off.
►
Switch off all electrical consumers (audio
system, lighting, wipers, etc.).
► Switch off charger B before connecting
the cables to the battery, so as to avoid any
dangerous sparks.
►
Ensure that the charger cables are in good
condition.
►
Lift the plastic cover on the (+) terminal, if the
vehicle has one.
►
Connect the cables of charger B
as follows:
•
the positive (+) red cable to the (+) terminal
of battery
A,
•
the negative (-) black cable to earth point C
on the vehicle.
Page 214 of 292
212
In the event of a breakdown
Accessing the tools
General recommendations
Observe the legislation in force in the country where you are driving.
Check that the towing vehicle is heavier than the towed vehicle.
The driver must remain at the wheel of the towed vehicle and must have a\
valid driving licence.
When towing a vehicle with all four wheels on the ground, always use an \
approved towbar; ropes and straps are prohibited.
The towing vehicle must move off gently.
When the vehicle is towed with its engine off, there is no longer braking and steering assistance.
A professional recovery service must be called in the following cases:
– broken down on a motorway or main road;
–
not possible to put the gearbox into neutral, unlock the steering, or re\
lease the parking brake;
–
not possible to tow a vehicle with an automatic gearbox, with the engine\
running;
–
towing with only two wheels on the ground;
–
four-wheel drive vehicle;
–
no approved towbar available.
Rechargeable hybrid vehicles
Before any intervention, with the ignition
on, depress the brake pedal and select mode N, then switch off the hybrid system (READY
indicator lamp off).
Always call on professionals for recovery of
the vehicle on a flatbed lorry or trailer.Use the towing eye only to free the vehicle
if it is stuck, or to secure it for recovery on a
flatbed lorry or trailer.
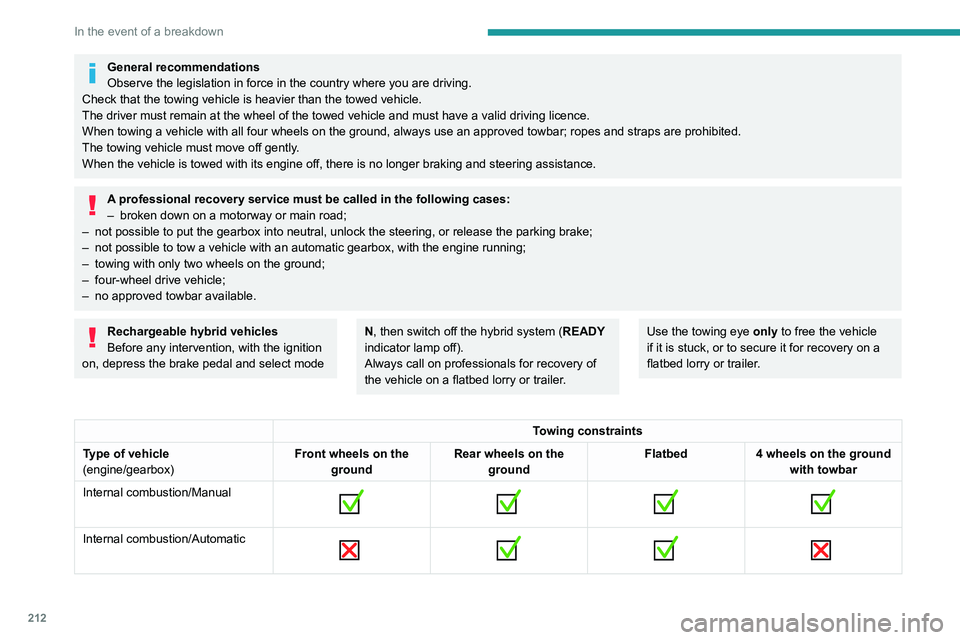
Towing constraints
Type of vehicle
(engine/gearbox) Front wheels on the
ground Rear wheels on the
ground Flatbed
4 wheels on the ground
with towbar
Internal combustion/Manual
Internal combustion/Automatic