2021 PEUGEOT 3008 height adjustment
[x] Cancel search: height adjustmentPage 77 of 292
75
Lighting and visibility
4They will go off automatically after a period
of time that depends on the level of charge in
the battery (entering energy economy mode).
In some weather conditions (e.g. low
temperature or humidity), misting on the
internal surface of the glass of the headlamps
and rear lamps is normal, and will disappear
after the lamps have been on for a few
minutes.
Never look too closely at the light beam
of LED technology lamps - risk of serious
eye injury!
Travelling abroad
Vehicles equipped with manual
headlamp beam height adjustment:
If planning to use your vehicle in a country
that drives on the other side of the road, the
dipped beam headlamps must be adjusted to
avoid dazzling oncoming drivers. Contact a
PEUGEOT dealer or a qualified workshop.
Daytime running lamps/
Sidelamps
These LED lamps at the front and rear of the
vehicle light up automatically when the engine
starts.
They perform the following functions:
–
Daytime running lamps (lighting control stalk
at position
"AUTO" with adequate ambient light).
–
Sidelamps (lighting control stalk at position
"
AUTO" with low ambient light or "Sidelamps
only" or "Dipped/main beam headlamps").
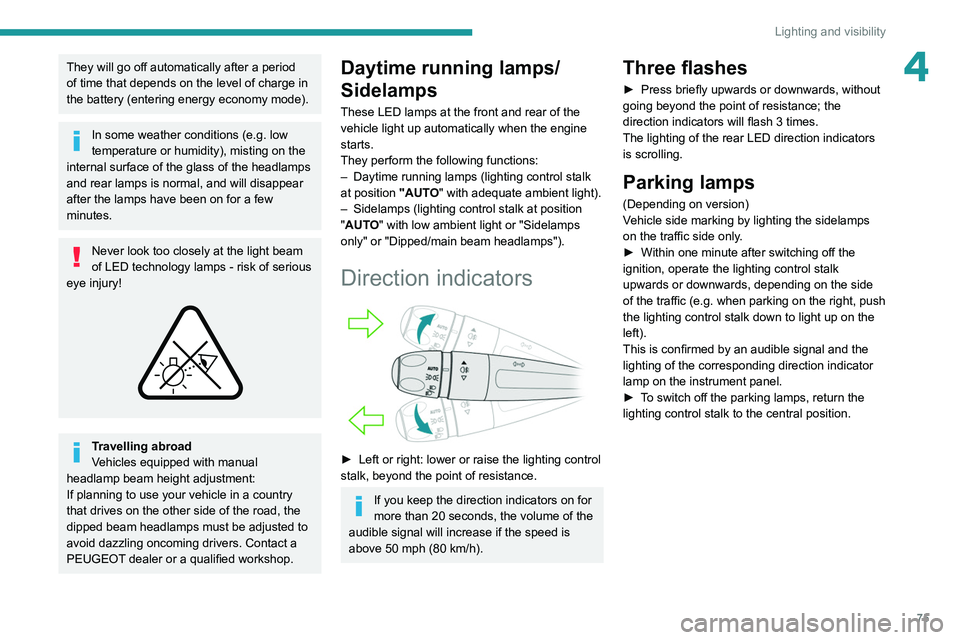
Direction indicators
► Left or right: lower or raise the lighting control
stalk, beyond the point of resistance.
If you keep the direction indicators on for
more than 20 seconds, the volume of the
audible signal will increase if the speed is
above 50 mph (80 km/h).
Three flashes
► Press briefly upwards or downwards, without
going beyond the point of resistance; the
direction indicators will flash 3 times.
The lighting of the rear LED direction indicators is scrolling.
Parking lamps
(Depending on version)
Vehicle side marking by lighting the sidelamps
on the traffic side only.
►
Within one minute after switching off the
ignition, operate the lighting control stalk
upwards or downwards, depending on the side
of the traffic (e.g.
when parking on the right, push
the lighting control stalk down to light up on the
left).
This is confirmed by an audible signal and the
lighting of the corresponding direction indicator
lamp on the instrument panel.
►
T
o switch off the parking lamps, return the
lighting control stalk to the central position.
Page 78 of 292
76
Lighting and visibility
Headlamp beam height
adjustment
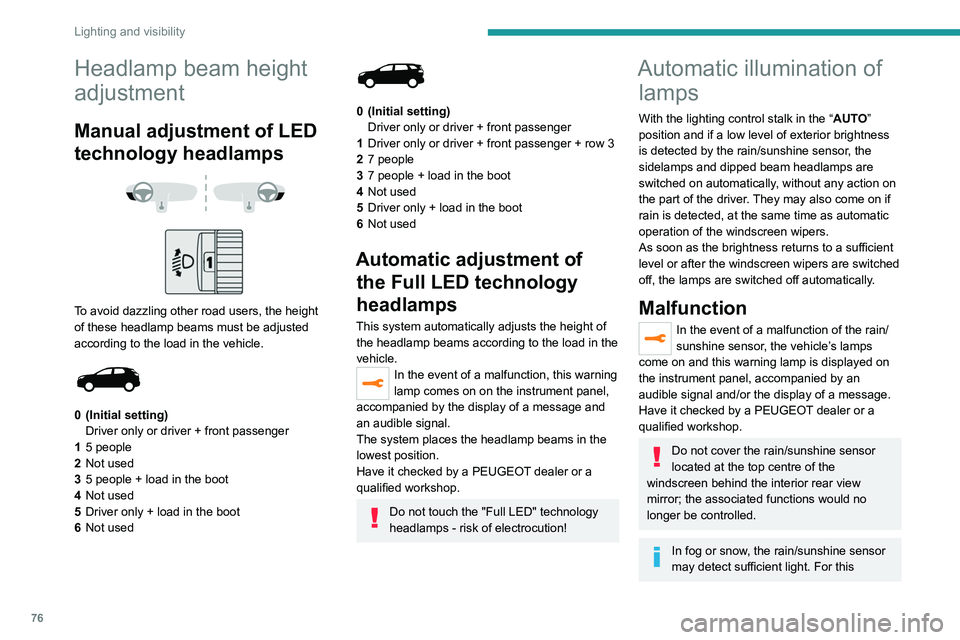
Manual adjustment of LED
technology headlamps
To avoid dazzling other road users, the height
of these headlamp beams must be adjusted
according to the load in the vehicle.
0 (Initial setting) Driver only or driver + front passenger
1 5 people
2 Not used
3 5 people + load in the boot
4 Not used
5 Driver only + load in the boot
6 Not used
0 (Initial setting)
Driver only or driver + front passenger
1 Driver only or driver + front passenger + row 3
2 7 people
3 7 people + load in the boot
4 Not used
5 Driver only + load in the boot
6 Not used
Automatic adjustment of
the Full LED technology
headlamps
This system automatically adjusts the height of
the headlamp beams according to the load in the
vehicle.
In the event of a malfunction, this warning
lamp comes on on the instrument panel,
accompanied by the display of a message and
an audible signal.
The system places the headlamp beams in the
lowest position.
Have it checked by a PEUGEOT dealer or a
qualified workshop.
Do not touch the "Full LED" technology
headlamps - risk of electrocution!
Automatic illumination of lamps
With the lighting control stalk in the “ AUTO”
position and if a low level of exterior brightness
is detected by the rain/sunshine sensor, the
sidelamps and dipped beam headlamps are
switched on automatically, without any action on
the part of the driver. They may also come on if
rain is detected, at the same time as automatic
operation of the windscreen wipers.
As soon as the brightness returns to a sufficient
level or after the windscreen wipers are switched
off, the lamps are switched off automatically.
Malfunction
In the event of a malfunction of the rain/
sunshine sensor, the vehicle’s lamps
come on and this warning lamp is displayed on
the instrument panel, accompanied by an
audible signal and/or the display of a message.
Have it checked by a PEUGEOT dealer or a
qualified workshop.
Do not cover the rain/sunshine sensor
located at the top centre of the
windscreen behind the interior rear view
mirror; the associated functions would no
longer be controlled.
In fog or snow, the rain/sunshine sensor
may detect sufficient light. For this
reason, the lighting will not come on
automatically.
The inner surface of the windscreen may become misted up and affect the proper
operation of the rain/sunshine sensor.
In humid and cold weather, demist the
windscreen regularly.
Guide-me-home and
welcome lighting
Guide-me-home lighting
With the ring of the lighting control stalk in the
"AUTO" position and when the light is poor, the
dipped beam headlamps come on automatically
when the ignition is switched off.
You can activate/deactivate this function and adjust the guide-me-home lighting
duration in the Driving/Vehicle touch screen
menu.
Welcome lighting
When the vehicle is unlocked, if the ambient
light is low and the "Automatic illumination of
headlamps" function is activated, this system
automatically turns on certain exterior lamps
as well as certain lamps in the passenger
compartment.
Page 94 of 292
92
Safety
due to the activation of the pyrotechnic
cartridge incorporated in the system.
In all cases, the airbag warning lamp comes
on.
Following an impact, have the seat belt
system checked, and if necessary replaced,
by a PEUGEOT dealer or a qualified
workshop.
Front seat belts
The front seat belts are fitted with a pyrotechnic
pretensioning system and a force limiting
system.
Fastening
► Pull the strap, then insert the tongue into the
buckle.
►
Check that the seat belt is fastened correctly
by pulling on the strap.
Unfastening
► Press the red button on the buckle.
► Guide the seat belt as it is reeled in.
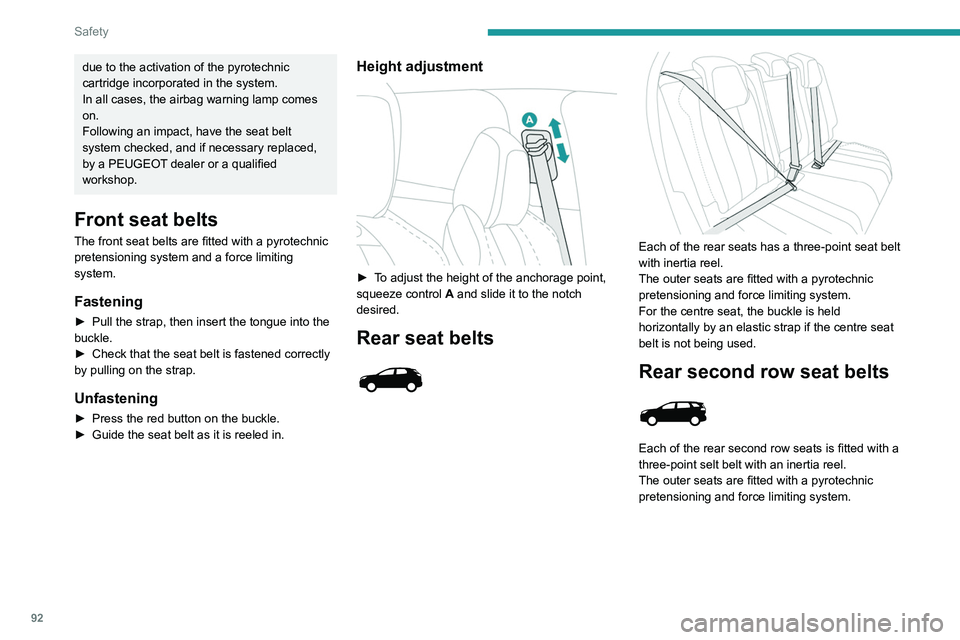
Height adjustment
► To adjust the height of the anchorage point,
squeeze control A and slide it to the notch
desired.
Rear seat belts
Each of the rear seats has a three-point seat belt
with inertia reel.
The outer seats are fitted with a pyrotechnic
pretensioning and force limiting system.
For the centre seat, the buckle is held
horizontally by an elastic strap if the centre seat
belt is not being used.
Rear second row seat belts
Each of the rear second row seats is fitted with a
three-point selt belt with an inertia reel.
The outer seats are fitted with a pyrotechnic
pretensioning and force limiting system.
Before performing any operations on the
rear seats, to avoid damage to the seat
belts, check that:
– the outer seat belts are properly tensioned.
– the central seat belt is completely reeled in.
Rear second row central
seat belt
The seat belt for the rear central seat is built into
the roof.
Page 102 of 292
100
Safety
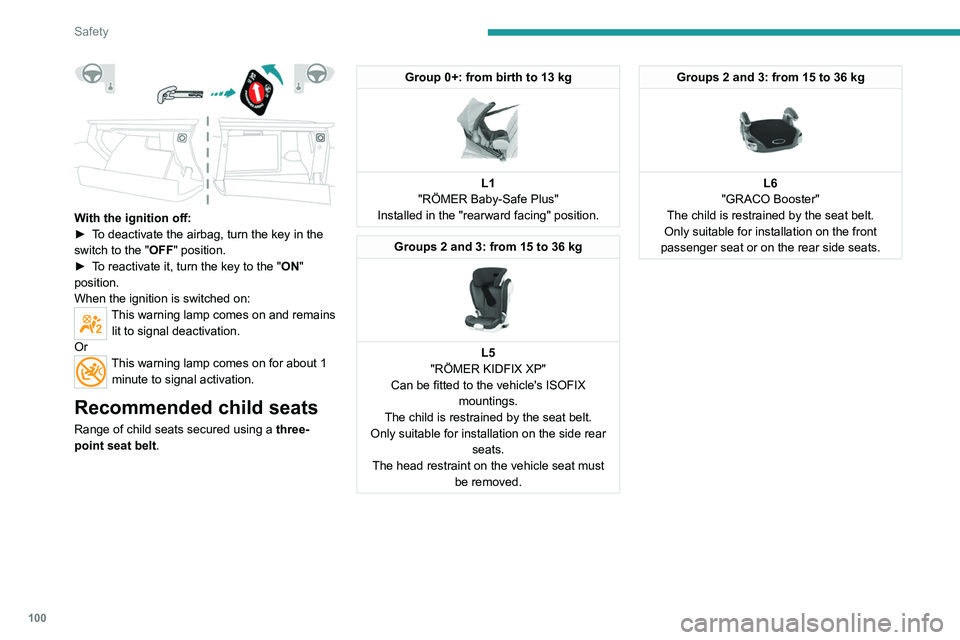
With the ignition off:
► T o deactivate the airbag, turn the key in the
switch to the "OFF " position.
►
T
o reactivate it, turn the key to the "ON"
position.
When the ignition is switched on:
This warning lamp comes on and remains lit to signal deactivation.
Or
This warning lamp comes on for about 1 minute to signal activation.
Recommended child seats
Range of child seats secured using a three-
point seat belt .
Group 0+: from birth to 13 kg
L1
"RÖMER Baby-Safe Plus"
Installed in the "rearward facing" position.
Groups 2 and 3: from 15 to 36 kg
L5
"RÖMER KIDFIX XP"
Can be fitted to the vehicle's ISOFIX mountings.
The child is restrained by the seat belt.
Only suitable for installation on the side rear seats.
The head restraint on the vehicle seat must be removed.
Groups 2 and 3: from 15 to 36 kg
L6
"GRACO Booster"
The child is restrained by the seat belt.
Only suitable for installation on the front
passenger seat or on the rear side seats.
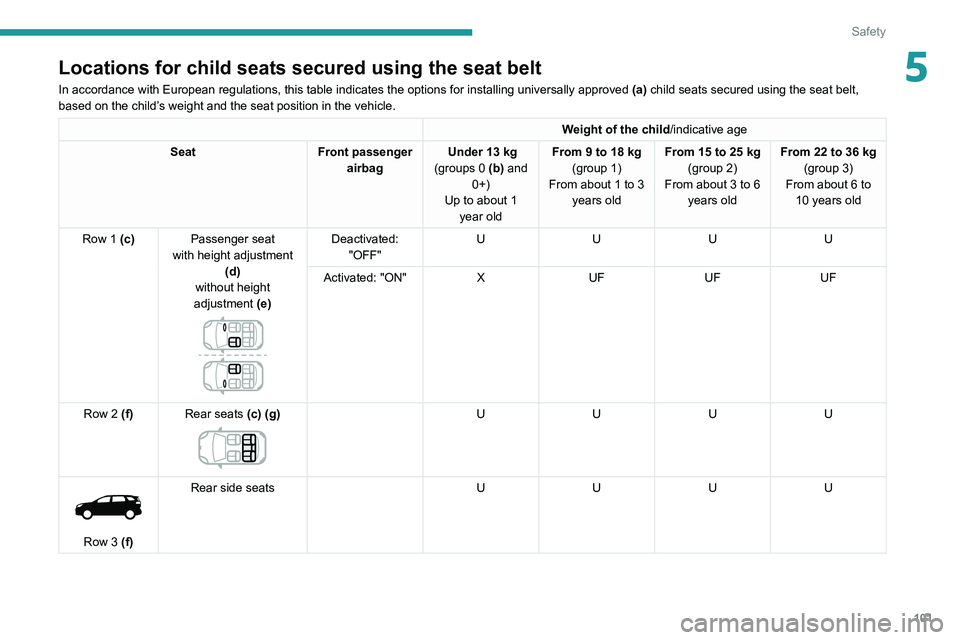
Locations for child seats secured using the seat belt
In accordance with European regulations, this table indicates the option\
s for installing universally approved (a) child seats secured using the seat belt,
based on the child’s weight and the seat position in the vehicle.
Weight of the child/indicative age
Seat Front passenger
airbag Under 13 kg
(groups 0 (b) and 0+)
Up to about 1 year old From 9 to 18 kg
(group 1)
From about 1 to 3 years old From 15 to 25 kg
(group 2)
From about 3 to 6 years old From 22 to 36 kg
(group 3)
From about 6 to 10 years old
Row 1 (c) Passenger seat
with height adjustment (d)
without height
adjustment (e)
Deactivated: "OFF" U
UUU
Activated: "ON" XUF UFUF
Row 2 (f) Rear seats (c) (g)
U UUU
Row 3 (f)Rear side seats
UUUU
Page 103 of 292
101
Safety
5Locations for child seats secured using the seat belt
In accordance with European regulations, this table indicates the option\
s for installing universally approved (a) child seats secured using the seat belt,
based on the child’s weight and the seat position in the vehicle.
Weight of the child /indicative age
Seat Front passenger
airbag Under 13
kg
(groups 0 (b) and 0+)
Up to about 1 year old From 9 to 18
kg
(group 1)
From about 1 to 3 years old From 15 to 25
kg
(group 2)
From about 3 to 6 years old From 22 to 36
kg
(group 3)
From about 6 to 10 years old
Row 1 (c) Passenger seat
with height adjustment (d)
without height
adjustment (e)
Deactivated: "OFF" U
UUU
Activated: "ON" XUF UFUF
Row 2 (f) Rear seats (c) (g)
U UUU
Row 3 (f)Rear side seats
UUUU
Page 106 of 292
104
Safety
the vehicle, so as to avoid the seat interfering
with the operation of the seat belt.
An incorrectly installed child seat in a vehicle compromises the child's safety in
the event of an accident.
Strictly observe the fitting instructions
provided in the user guide supplied with the
child seat.
For information about the options for
fitting ISOFIX child seats in your vehicle,
refer to the summary table.
Recommended ISOFIX child
seats
Also consult the user guide from the child seat’s manufacturer to find out how to
install and remove the seat.
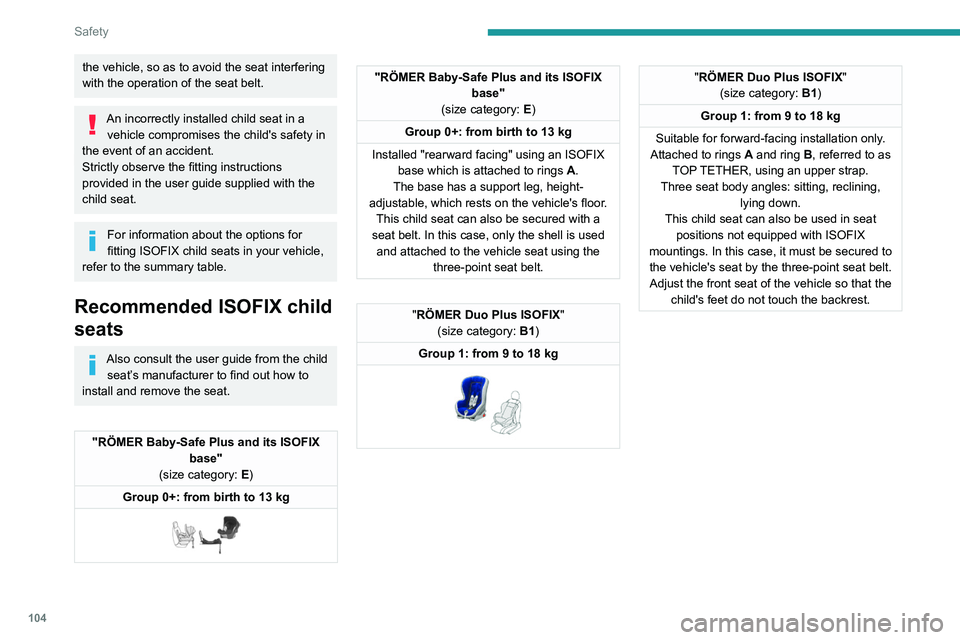
"RÖMER Baby-Safe Plus and its ISOFIX base"
(size category: E)
Group 0+: from birth to 13 kg
"RÖMER Baby-Safe Plus and its ISOFIX base"
(size category: E)
Group 0+: from birth to 13 kg
Installed "rearward facing" using an ISOFIX base which is attached to rings
A
.
The base has a support leg, height-
adjustable, which rests on the vehicle's floor. This child seat can also be secured with a
seat belt. In this case, only the shell is used and attached to the vehicle seat using the three-point seat belt.
"RÖMER Duo Plus ISOFIX "
(size category: B1)
Group 1: from 9 to 18 kg
"RÖMER Duo Plus ISOFIX "
(size category: B1)
Group 1: from 9 to 18 kg
Suitable for forward-facing installation only.
Attached to rings
A and ring B, referred to as
TOP TETHER, using an upper strap.
Three seat body angles: sitting, reclining, lying down.
This child seat can also be used in seat positions not equipped with ISOFIX
mountings. In this case, it must be secured to the vehicle's seat by the three-point seat belt. Adjust the front seat of the vehicle so that the child's feet do not touch the backrest.Locations for ISOFIX child seats
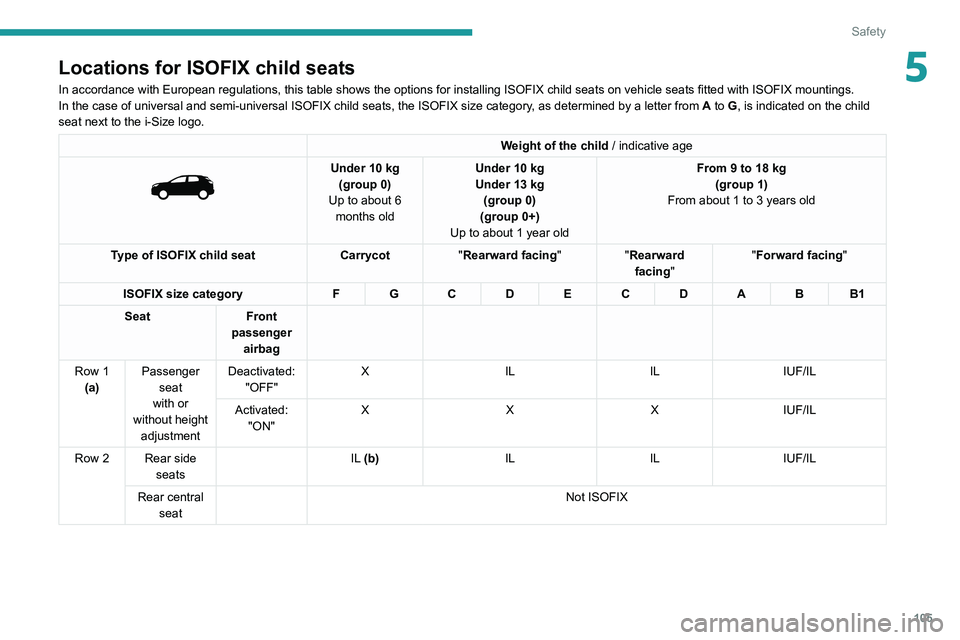
In accordance with European regulations, this table shows the options for installing ISOFIX child seats on vehicle seats fitted with ISOFIX mountings.
In the case of universal and semi-universal ISOFIX child seats, the ISOF\
IX size category, as determined by a letter from A to G, is indicated on the child
seat next to the i-Size logo.
Weight of the child / indicative age
Under 10 kg
(group 0)
Up to about 6 months old Under 10 kg
Under 13 kg
(group 0)
(group 0+)
Up to about 1 year old From 9 to 18 kg
(group 1)
From about 1 to 3 years old
Type of ISOFIX child seat Carrycot"Rearward facing" "Rearward
facing" "Forward facing
"
ISOFIX size category F G C D E C D A B B1
Seat Front
passenger airbag
Row 1 (a) Passenger
seat
with or
without height adjustment Deactivated:
"OFF" X
IL ILIUF/IL
Activated: "ON" X
XXIUF/IL
Row 2 Rear side seats IL (b)
ILILIUF/IL
Rear central seat Not ISOFIX
Page 107 of 292
105
Safety
5Locations for ISOFIX child seats
In accordance with European regulations, this table shows the options for installing ISOFIX child seats on vehicle seats fitted with ISOFIX mountings.
In the case of universal and semi-universal ISOFIX child seats, the ISOF\
IX size category, as determined by a letter from A to G, is indicated on the child
seat next to the i-Size logo.
Weight of the child / indicative age
Under 10 kg
(group 0)
Up to about 6 months old Under 10
kg
Under 13 kg
(group 0)
(group 0+)
Up to about 1 year old From 9 to 18
kg
(group 1)
From about 1 to 3 years old
Type of ISOFIX child seat Carrycot"Rearward facing" "Rearward
facing" "Forward facing
"
ISOFIX size category F G C D E C D A B B1
Seat Front
passenger airbag
Row 1 (a) Passenger
seat
with or
without height adjustment Deactivated:
"OFF" X
IL ILIUF/IL
Activated: "ON" X
XXIUF/IL
Row 2 Rear side seats IL (b)
ILILIUF/IL
Rear central seat Not ISOFIX
Page 108 of 292
106
Safety
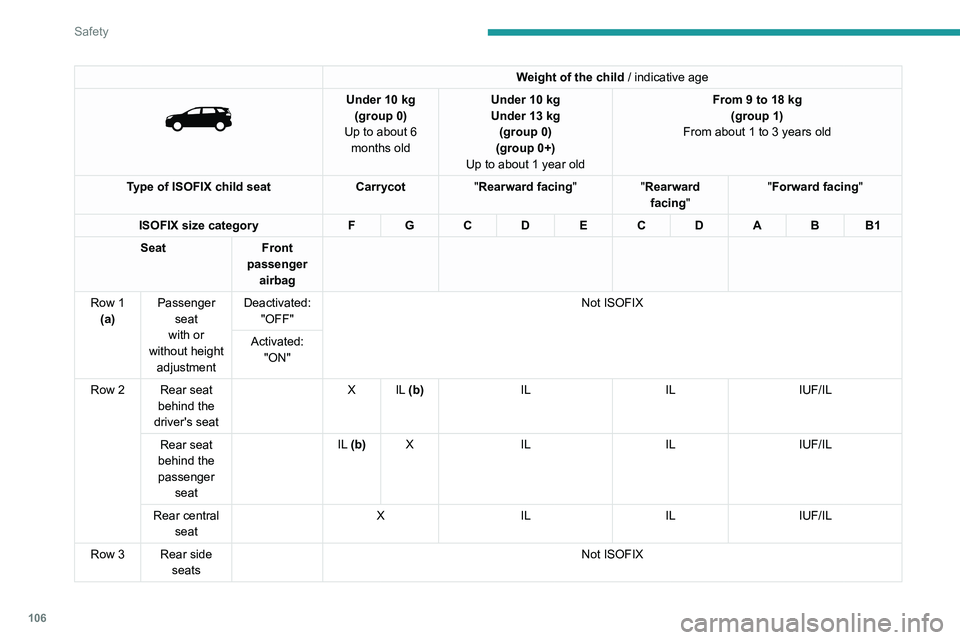
Weight of the child / indicative age
Under 10 kg
(group 0)
Up to about 6 months old Under 10
kg
Under 13 kg
(group 0)
(group 0+)
Up to about 1 year old From 9 to 18
kg
(group 1)
From about 1 to 3 years old
Type of ISOFIX child seat Carrycot"Rearward facing" "Rearward
facing" "Forward facing
"
ISOFIX size category F G C D E C D A B B1
Seat Front
passenger airbag
Row 1 (a) Passenger
seat
with or
without height adjustment Deactivated:
"OFF" Not ISOFIX
Activated: "ON"
Row 2 Rear seat behind the
driver's seat X
IL (b) IL ILIUF/IL
Rear seat
behind the
passenger seat IL (b)
X IL ILIUF/IL
Rear central seat X
IL ILIUF/IL
Row 3 Rear side seats Not ISOFIX
IUF: Seat position suitable for the installation of an
Isofix Universal seat, "Forward facing", secured using the upper strap.
IL: Seat position suitable for the installation of an Isofix Semi-Universal seat, either:
– "rearward facing" fitted with an upper strap or a support leg.
– “forward facing”, fitted with a support leg.
– a carrycot fitted with an upper strap or a support leg.
For securing the upper strap using the ISOFIX mountings, refer to the corresponding section.
X: Seat position not suitable for the installation of an ISOFIX seat or carrycot for the specified weight group.
(a) Refer to the current legislation in your country before placing a child\
in this seat position.
(b) The installation of a carrycot on this seat may prevent the use of one o\
r more of the other seats in this row.
i-Size child seats
i-Size child seats have two latches that are anchored to the two rings A.
These i-Size child seats also have:
– either an upper strap that is attached to ring B.
– or a support leg that rests on the vehicle floor, compatible with the approved i-Size seat position.
Their role is to prevent the child seat from tipping forward in the even\
t of a collision.
For more information on the ISOFIX mountings, refer to the corresponding section.
In accordance with European regulations, this table indicates the options for installing i-Size child seats on seats in the vehicle fitted with ISOFIX
mountings approved for i-Size.
Seat
Front passenger airbag i-Size restraint system i-Size restraint system
Row 1 (a) Passenger seat
with or without height adjustment
Deactivated: "OFF" i-UNot i-Size
Activated: "ON" i-UFNot i-Size