2021 NISSAN TITAN ECO mode
[x] Cancel search: ECO modePage 318 of 638
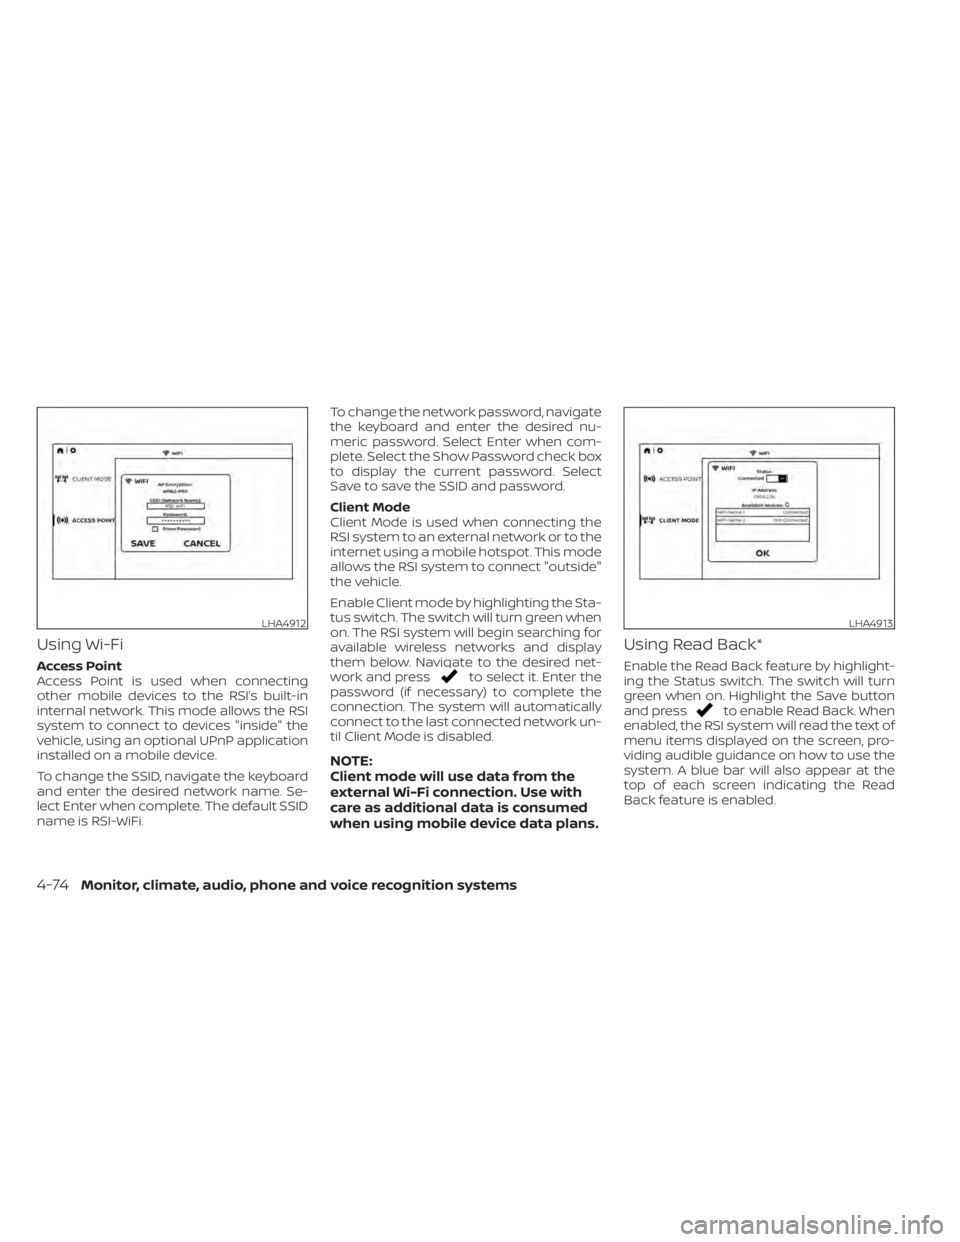
Using Wi-Fi
Access Point
Access Point is used when connecting
other mobile devices to the RSI’s built-in
internal network. This mode allows the RSI
system to connect to devices "inside" the
vehicle, using an optional UPnP application
installed on a mobile device.
To change the SSID, navigate the keyboard
and enter the desired network name. Se-
lect Enter when complete. The default SSID
name is RSI-WiFi.To change the network password, navigate
the keyboard and enter the desired nu-
meric password. Select Enter when com-
plete. Select the Show Password check box
to display the current password. Select
Save to save the SSID and password.
Client Mode
Client Mode is used when connecting the
RSI system to an external network or to the
internet using a mobile hotspot. This mode
allows the RSI system to connect "outside"
the vehicle.
Enable Client mode by highlighting the Sta-
tus switch. The switch will turn green when
on. The RSI system will begin searching for
available wireless networks and display
them below. Navigate to the desired net-
work and pressto select it. Enter the
password (if necessary) to complete the
connection. The system will automatically
connect to the last connected network un-
til Client Mode is disabled.
NOTE:
Client mode will use data from the
external Wi-Fi connection. Use with
care as additional data is consumed
when using mobile device data plans.
Using Read Back*
Enable the Read Back feature by highlight-
ing the Status switch. The switch will turn
green when on. Highlight the Save button
and press
to enable Read Back. When
enabled, the RSI system will read the text of
menu items displayed on the screen, pro-
viding audible guidance on how to use the
system. A blue bar will also appear at the
top of each screen indicating the Read
Back feature is enabled.
LHA4912LHA4913
4-74Monitor, climate, audio, phone and voice recognition systems
Page 322 of 638
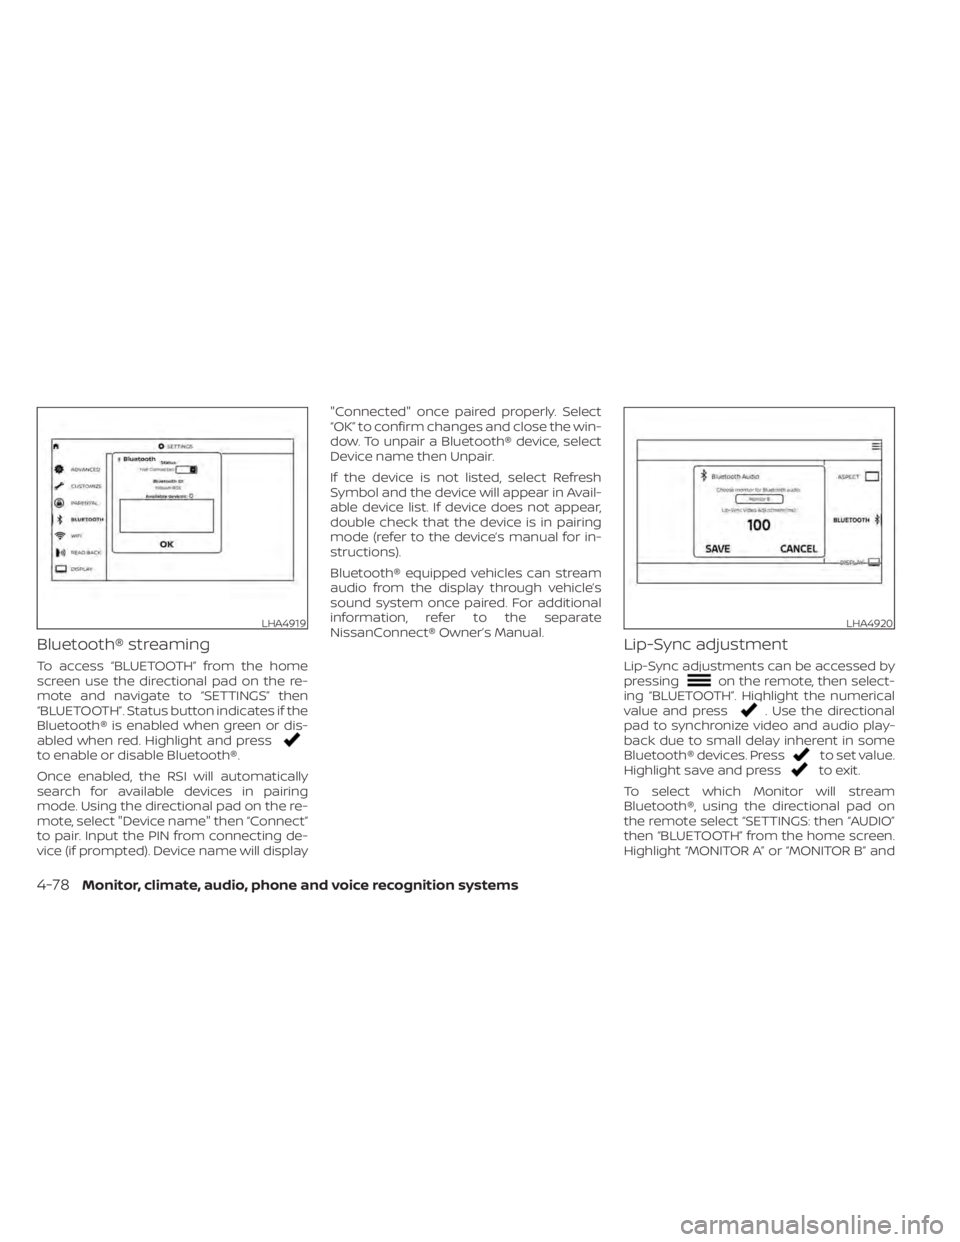
Bluetooth® streaming
To access “BLUETOOTH” from the home
screen use the directional pad on the re-
mote and navigate to “SETTINGS” then
“BLUETOOTH”. Status button indicates if the
Bluetooth® is enabled when green or dis-
abled when red. Highlight and press
to enable or disable Bluetooth®.
Once enabled, the RSI will automatically
search for available devices in pairing
mode. Using the directional pad on the re-
mote, select "Device name" then “Connect”
to pair. Input the PIN from connecting de-
vice (if prompted). Device name will display"Connected" once paired properly. Select
“OK” to confirm changes and close the win-
dow. To unpair a Bluetooth® device, select
Device name then Unpair.
If the device is not listed, select Refresh
Symbol and the device will appear in Avail-
able device list. If device does not appear,
double check that the device is in pairing
mode (refer to the device’s manual for in-
structions).
Bluetooth® equipped vehicles can stream
audio from the display through vehicle’s
sound system once paired. For additional
information, refer to the separate
NissanConnect® Owner’s Manual.
Lip-Sync adjustment
Lip-Sync adjustments can be accessed by
pressingon the remote, then select-
ing “BLUETOOTH”. Highlight the numerical
value and press
. Use the directional
pad to synchronize video and audio play-
back due to small delay inherent in some
Bluetooth® devices. Press
to set value.
Highlight save and pressto exit.
To select which Monitor will stream
Bluetooth®, using the directional pad on
the remote select “SETTINGS: then “AUDIO”
then “BLUETOOTH” from the home screen.
Highlight “MONITOR A” or “MONITOR B” and
LHA4919LHA4920
4-78Monitor, climate, audio, phone and voice recognition systems
Page 325 of 638
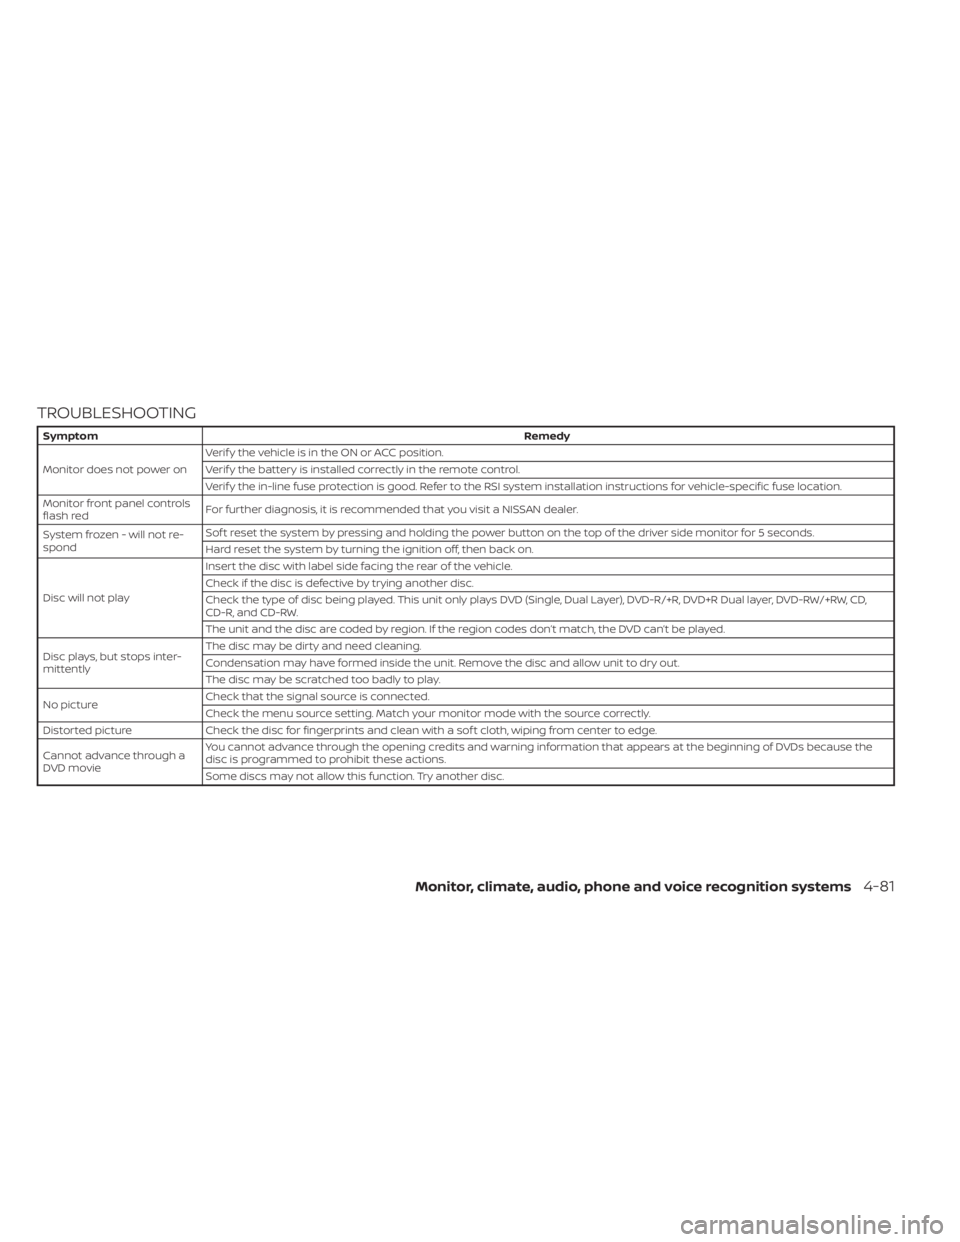
TROUBLESHOOTING
SymptomRemedy
Monitor does not power on Verif y the vehicle is in the ON or ACC position.
Verif y the battery is installed correctly in the remote control.
Verif y the in-line fuse protection is good. Refer to the RSI system installation instructions for vehicle-specific fuse location.
Monitor front panel controls
flash red For further diagnosis, it is recommended that you visit a NISSAN dealer.
System frozen - will not re-
spond Sof t reset the system by pressing and holding the power button on the top of the driver side monitor for 5 seconds.
Hard reset the system by turning the ignition off, then back on.
Disc will not play Insert the disc with label side facing the rear of the vehicle.
Check if the disc is defective by trying another disc.
Check the type of disc being played. This unit only plays DVD (Single, Dual Layer), DVD-R/+R, DVD+R Dual layer, DVD-RW/+RW, CD,
CD-R, and CD-RW.
The unit and the disc are coded by region. If the region codes don’t match, the DVD can’t be played.
Disc plays, but stops inter-
mittently The disc may be dirty and need cleaning.
Condensation may have formed inside the unit. Remove the disc and allow unit to dry out.
The disc may be scratched too badly to play.
No picture Check that the signal source is connected.
Check the menu source setting. Match your monitor mode with the source correctly.
Distorted picture Check the disc for fingerprints and clean with a sof t cloth, wiping from center to edge.
Cannot advance through a
DVD movie You cannot advance through the opening credits and warning information that appears at the beginning of DVDs because the
disc is programmed to prohibit these actions.
Some discs may not allow this function. Try another disc.
Monitor, climate, audio, phone and voice recognition systems4-81
Page 326 of 638

SymptomRemedy
No sound or distorted sound Make sure that the external media device is connected properly, and all cables are securely inserted into the appropriate jacks.
Verif y that the batteries in the headphones are fresh.
If you are using the wireless headphones, make sure you turn on the power and select the correct monitor (A or B).
Verif y the volume is turned up on headphones and the system.
Verif y nothing is blocking the path between the monitor IR sensor and headphones.
When placing the headphones on your head, make sure to observe the Lef t and Right orientation. The headphones must be ori-
ented correctly (facing forward) to receive the audio signal.
Monitor feels warm When the monitor is in use for a long period of time, the surface will be warm. This is normal.
Player does not respond to
all commands during play-
back The DVD may not permit some commands. Refer to the specific instructions included with the DVD for more information.
A Parental Setting message
is displayed, prohibiting
movie playback Enter the 4-digit Parental Password using the remote and then press
. For additional information, see “Changing parental
lock” (P. 4-80).
Cannot connect mobile de-
vice to the internal RSI Wi-Fi
network Check to make sure Wi-Fi is enabled on the mobile device.
Check to make sure RSI is set to Access Point mode.
Check to make sure the correct password is used. For additional information, see “Using Wi-Fi” (P. 4-74).
Cannot connect RSI system
to an external Wi-Fi network Check to make sure RSI is set to Client Mode. Check to make sure the correct password is used. For additional information, see
“Using Wi-Fi” (P. 4-74).
Cannot establish a
Bluetooth® connection Check to make sure Bluetooth® is enabled on the RSI system. For additional information, see “Bluetooth® streaming” (P. 4-78).
Cannot establish a Miracast®
connection to the RSI system Check to make sure mobile device supports Miracast®. Visit www.wi-fi.org for a current list of Miracast® certified devices.
Check to make sure Miracast® is enabled on the mobile device.
Select Miracast® source from the RSI main menu.
Cannot play certain files from
USB or SD cards Audio/video files embedded with DRM are not compatible.
Some USB storage devices and SD cards may not be compatible. Replace the external storage device (USB, SD).
Due to ongoing technological advancements, some USB flash drives and SD cards may be incompatible with this system.
4-82Monitor, climate, audio, phone and voice recognition systems
Page 327 of 638
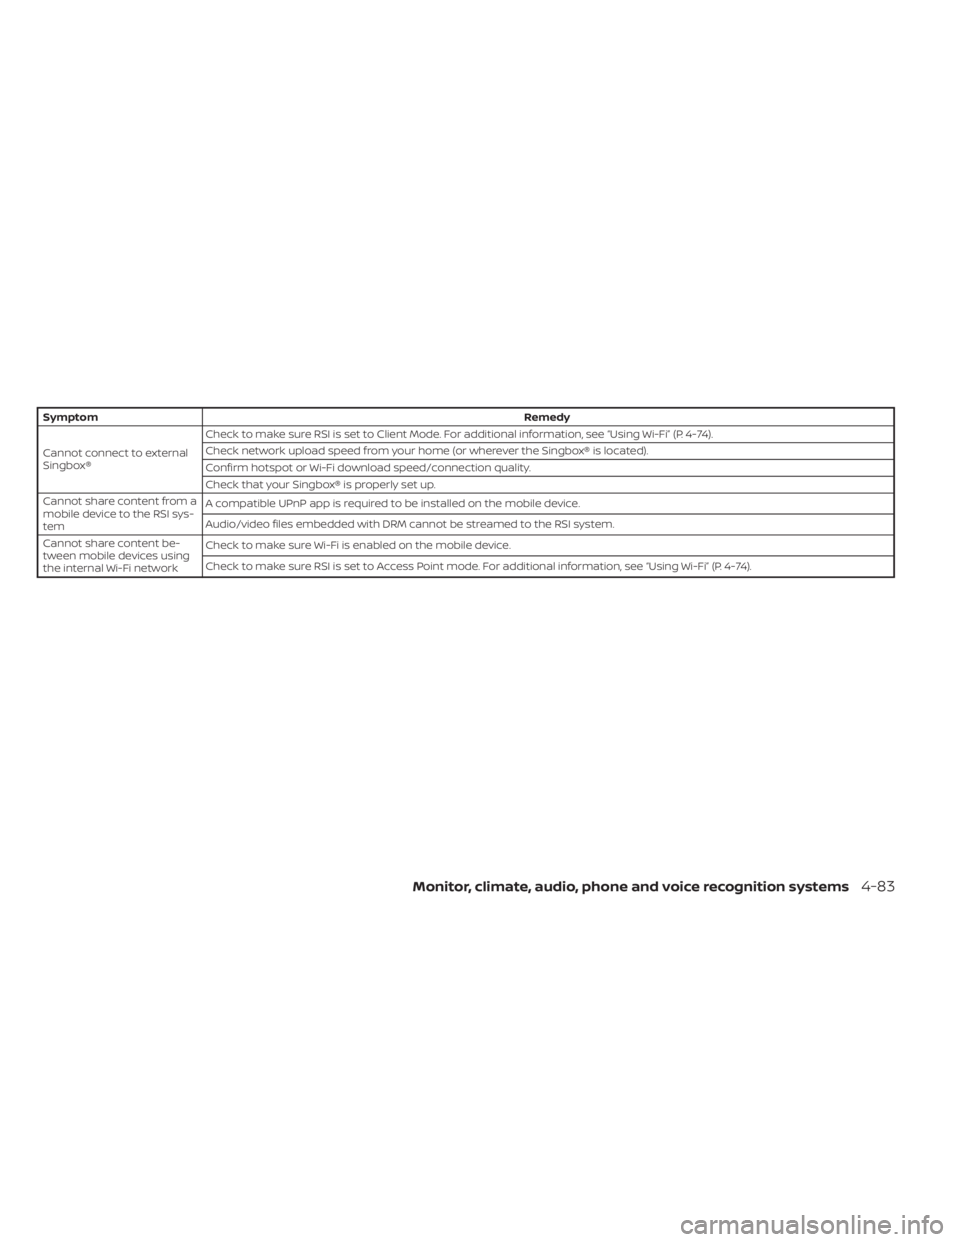
SymptomRemedy
Cannot connect to external
Singbox® Check to make sure RSI is set to Client Mode. For additional information, see “Using Wi-Fi” (P. 4-74).
Check network upload speed from your home (or wherever the Singbox® is located).
Confirm hotspot or Wi-Fi download speed/connection quality.
Check that your Singbox® is properly set up.
Cannot share content from a
mobile device to the RSI sys-
tem A compatible UPnP app is required to be installed on the mobile device.
Audio/video files embedded with DRM cannot be streamed to the RSI system.
Cannot share content be-
tween mobile devices using
the internal Wi-Fi network Check to make sure Wi-Fi is enabled on the mobile device.
Check to make sure RSI is set to Access Point mode. For additional information, see “Using Wi-Fi” (P. 4-74).
Monitor, climate, audio, phone and voice recognition systems4-83
Page 332 of 638
When installing a CB, ham radio or car
phone in your vehicle, be sure to observe
the following precautions; otherwise, the
new equipment may adversely affect the
engine control system and other electronic
parts.
WARNING
• A cellular phone should not be used
for any purpose while driving so full
attention may be given to vehicle op-
eration. Some jurisdictions prohibit
the use of cellular phones while
driving.
• If you must make a call while your
vehicle is in motion, the hands free
cellular phone operational mode (if
so equipped) is highly recom-
mended. Exercise extreme caution at
all times so full attention may be
given to vehicle operation.
• If you are unable to devote full atten-
tion to vehicle operation while talk-
ing on the phone, pull off the road to
a safe location and stop your vehicle.
CAUTION
• Keep the antenna as far away as pos-
sible from the electronic control
modules.
• Keep the antenna wire more than 8 in
(20 cm) away from the electronic
control system harnesses. Do not
route the antenna wire next to any
harness.
• Adjust the antenna standing-wave
ratio as recommended by the
manufacturer.
• Connect the ground wire from the CB
radio chassis to the body.
• For additional information, it is rec-
ommended that you visit a NISSAN
dealer for this service. “Made for iPod”, “Made for iPhone” and
“Made for iPad” mean that an electronic
accessory has been designed to connect
specifically to iPod, iPhone or iPad, respec-
tively, and has been certified by the devel-
oper to meet Apple performance stan-
dards. Apple is not responsible for the
operation of this device or its compliance
with safety and regulatory standards.
Please note that the use of this accessory
with iPod, iPhone or iPad may affect wire-
less performance.
iPad, iPhone, iPod classic, iPod Nano, iPod
shuffle and iPod touch are trademarks of
Apple Inc., registered in the U.S. and other
countries. Lightning is a trademark of
Apple Inc.
CAR PHONE OR CB RADIO
iPod®/IPHONE®
4-88Monitor, climate, audio, phone and voice recognition systems
Page 333 of 638

5 Starting and driving
Precautions when starting and driving..........5-4
Exhaust gas (carbon monoxide) ..............5-4
Three-way catalyst (if so equipped) ...........5-4
Tire Pressure Monitoring System
(TPMS) .......................................5-5
On-pavement and off-road driving
precautions ..................................5-8
Avoiding collision and rollover ................5-9
Off-roadrecovery ............................5-9
Rapid air pressure loss .......................5-9
Drinking alcohol/drugs and driving ..........5-10
Driving safety precautions ...................5-10
Push-button ignition switch ....................5-12
Operating range ............................ 5-13
Push-button ignition switch positions .......5-14
Emergency engine shut off ..................5-15
NISSAN Intelligent Key® battery
discharge ................................... 5-15
NISSAN Vehicle Immobilizer System .........5-16
Before starting the engine .....................5-16
Starting the engine ............................. 5-16
Remote Engine Start (if so equipped) ........5-17
Driving the vehicle .............................. 5-18
Engine protection mode ....................5-18
Automatic transmission (A/T) ...............5-18
Parking brake .................................. 5-23Traffic Sign Recognition (TSR) (if so equipped) . . . 5-24
System operation ........................... 5-25
Turning the Traffic Sign Recognition
(TSR) system on and off .....................5-26
System temporarily unavailable .............5-26
System malfunction ......................... 5-26
System maintenance .......................5-26
Lane Departure Warning (LDW) .................5-27
LDW system operation ......................5-28
How to enable/disable the LDW system .....5-29
LDW system limitations .....................5-29
System temporarily unavailable .............5-30
System malfunction ......................... 5-31
System maintenance ....................... 5-31
Blind Spot Warning (BSW) .......................5-32
BSW system operation ......................5-33
How to enable/disable the BSW system .....5-34
BS
W system limitations .....................5-35
BSW driving situations .......................5-36
System temporarily unavailable .............5-39
System maintenance .......................5-40
RearCrossTrafficAlert(RCTA) .................. 5-41
RCTA system operation .....................5-42
How to enable/disable the RCTA
system ...................................... 5-44
RCTA system limitations .....................5-45
Page 349 of 638
cranking the engine, release the accel-
erator pedal. Crank the engine with
your foot off the accelerator pedal by
depressing the brake pedal and push-
ing the ignition switch to start the en-
gine. If the engine starts, but fails to
run, repeat the above procedure.
CAUTION
Do not operate the starter for more
than 15 seconds at a time. If the engine
does not start, push the ignition switch
to the OFF position and wait 10 seconds
before cranking again, otherwise the
starter could be damaged.
4. Warm-up
Allow the engine to idle for at least 30
seconds af ter starting. Do not race the
engine while warming it up. Drive at a
moderate speed for a short distance
first, especially in cold weather. In cold
weather, keep the engine running for a
minimum of 2 to 3 minutes before shut-
ting it off. Starting and stopping the en-
gine over a short period of time may
make the vehicle more difficult to start. 5. To stop the engine, move the shif t lever
to the P (Park) position and push the
ignition switch to the OFF position.
In preparation for the next engine start, the
engine may have a slightly delayed shutoff
af ter placing the ignition switch in the OFF
position, depending on the driving condi-
tions.NOTE:
Care should be taken to avoid situa-
tions that can lead to potential bat-
tery discharge and potential no-start
conditions such as:
1. Installation or extended use of elec- tronic accessories that consume bat-
tery power when the engine is not
running (phone chargers, GPS, DVD
players, etc.).
2. The vehicle is not driven regularly and/or only driven short distances.
In these cases, the battery may need to
be charged to maintain battery health.
REMOTE ENGINE START (if so
equipped)
Vehicles started with the Remote Engine
Start require the ignition switch to be
placed in the ON position before the shif t
lever can be moved from the P (Park) posi-
tion. To place the ignition switch in the ON
position, follow these steps:
1. Make sure that the Intelligent Key is on you.
2. Apply the brake.
3. Push the ignition switch once to the ON position.
For additional information, see “NISSAN In-
telligent Key®” (P. 3-2).
Starting and driving5-17