Page 15 of 528
1. Engine hood (P. 3-23)
2. Wiper and washer switch (P. 2-54)
3. Windshield (P. 8-17)
4. Power windows (P. 2-70)
5. Door locks (P. 3-4)NISSAN Intelligent Key® (P. 3-7)
Keys (P. 3-2)
6. Mirrors (P. 3-29)
7. Tire pressure (P. 8-28) Flat tire (P. 6-3)
Tire chains (P. 8-28)
8. Headlight and turn signal switch
(P. 2-55)
Replacing bulbs (P. 8-24)
Daytime Running Lights (DRL)
(if so equipped) (P. 2-55)
LED Daytime Running Lights (DRL)
(if so equipped) (P. 2-55)
9. Fog light switch (if so equipped) (P. 2-55)
Refer to the page number indicated in
parentheses for operating details.
Illustrated table of contents0-3
Page 16 of 528
1. Rearview camera (P. 4-9)
2. Trunk lid (P. 3-24)Trunk lid release (P. 3-24)
3. High-mounted stop light (P. 8-24)
4. Replacing bulbs (P. 8-24)
5. Rear window defroster switch (P. 2-55)
6. Child safety rear door lock (P. 3-4)
7. Fuel-filler door (P. 3-25) Fuel-filler cap (P. 3-25)
Fuel recommendation (P. 10-2)
8. Rear sonar sensors (P. 5-120)
Refer to the page number indicated in
parentheses for operating details.
Page 99 of 528

CHECKING LIGHTS
With all doors closed, apply the parking
brake, fasten the seat belts and place the
ignition switch in the ON position without
starting the engine. The following lights (if
so equipped) will come on:
,,,,,or
The following lights (if so equipped) will
come on briefly and then go off:
,or,,,,
If any light does not come on or operate in
a way other than described, it may indicate
a burned-out bulb and/or a system mal-
function. Have the system checked. It is
recommended that you visit a NISSAN
dealer for this service.
Some indicators and warnings are also dis-
played on the vehicle information display
between the speedometer and tachom-
eter. For additional information, refer to “Ve-
hicle information display” in this section.
WARNING LIGHTS
For additional information on warnings
and indicators, refer to “Vehicle information
display” in this section.
orAnti-lock Braking
System (ABS)
warning light
When the ignition switch is placed in the ON
position, the ABS warning light illuminates
and then turns off. This indicates the ABS is
operational.
If the ABS warning light illuminates while
the engine is running or while driving, it
may indicate the ABS is not functioning
properly. Have the system checked. It is
recommended that you visit a NISSAN
dealer for this service.
If an ABS malfunction occurs, the anti-lock
function is turned off. The brake system
then operates normally but without anti-
lock assistance. For additional information,
refer to “Brake system” in the “Starting and
driving” section of this manual.
Automatic Emergency
Braking (AEB) with
Pedestrian Detection
system warning light
This light comes on when the ignition
switch is placed in the ON position. It turns
off af ter the engine is started.This light illuminates when the AEB with
Pedestrian Detection system is set to OFF
in the vehicle information display.
If the light illuminates when the AEB with
Pedestrian Detection system is on, it may
indicate that the system is unavailable. For
additional information, refer to “Automatic
Emergency Braking (AEB) with Pedestrian
Detection” and “Intelligent Forward Colli-
sion Warning (I-FCW)” in the “Starting and
driving” section of this manual.
orBrake warning
light
This light functions for both the parking
brake and the foot brake systems.
Parking brake indicator
When the ignition switch is placed in the ON
position, the light comes on when the park-
ing brake is applied.
Instruments and controls2-9
Page 151 of 528

Move the lever up or down until the turn
signal begins to flash, but the lever does
not latch, and release the lever. The turn
signal will automatically flash three times.
Choose the appropriate method to signal
a lane change based on road and traffic
conditions.
NOTE:
If the turn signal light bulb malfunctions,
the turn signal indicator will flash at a
higher frequency when the turn signal is
activated.
NOTE:
The 3 flash pass feature may be disabled.
For additional information, refer to “Ve-
hicle information display ” in this section.FOG LIGHT SWITCH (if so
equipped)
To turn the fog lights on, turn the headlight
switch to theposition, then turn the
fog light switch to theposition.
To turn the fog lights on with the headlight
switch in the AUTO position, the headlights
must be on, then turn the fog light switch to
the
position.
To turn the fog lights off, turn the fog light
switch to the OFF position. The headlights must be on and the low
beams selected for the fog lights to oper-
ate. The fog lights automatically turn off
when the high beam headlights are se-
lected.
LIC2639
Page 464 of 528

3. Replace the battery with a new one.Recommended battery: CR2032 or
equivalent.• Do not touch the internal circuit and electric terminals as doing so could
cause a malfunction.
• Hold the battery by the edges. Holding the battery across the contact points
will seriously deplete the storage ca-
pacity.
• Make sure that the + side faces the bottom of the lower part.
4. Close the lid securely as illustrated with
OCandOD.
5. Operate the buttons to check the operation.
If you need assistance with replacement, it
is recommended that you visit a NISSAN
dealer for this service.
FCC Notice:
For USA:
This device complies with Part 15 of the
FCC Rules. Operation is subject to the fol-
lowing two conditions: (1) This device
may not cause harmful interference, and
(2) this device must accept any interfer- ence received, including interference
that may cause undesired operation.
Note:
Changes or modifications not expressly
approved by the party responsible for
compliance could void the user’s author-
ity to operate the equipment.
For Canada:
This device complies with Industry
Canada licence-exempt RSS standard(s).
Operation is subject to the following two
conditions: (1) this device may not cause
interference, and (2) this device must ac-
cept any interference, including interfer-
ence that may cause undesired opera-
tion of the device.
HEADLIGHTS
For additional information on headlight
bulb replacement, refer to the instructions
outlined in this section.
Replacing the halogen headlight
bulb (if so equipped)
If halogen headlight bulb replacement is
required, it is recommended that you visit a
NISSAN dealer for this service.
Page 465 of 528

•Only touch the base when handling
the bulb. Never touch the glass enve-
lope. Touching the glass could sig-
nificantly affect bulb life and/or
headlight performance.
• High pressure halogen gas is sealed
inside the halogen bulb. The bulb
may break if the glass envelope is
scratched or the bulb is dropped.
• Use the same number and wattage
as shown in the chart.
WARNING
Do not touch bulb by hand while it is lit
or right af ter being turned off. Burning
may result.
CAUTION
• Do not touch glass surface of the bulb
with bare hands or allow oil or grease to
get on it to prevent damage to bulb.
• Do not leave the bulb out of the lamp
reflector for a long time because dust,
moisture, smoke, etc. may affect the
performance of the lamp.
• Fog may temporarily form inside the
lens of the exterior lights in the rain or in a car wash. A temperature difference
between the inside and the outside of
the lens causes the fog. This is not a
malfunction. If large drops of water col-
lect inside the lens, it is recommended
that you visit a NISSAN dealer for ser-
vicing.
Replacing the LED headlight bulb
(if so equipped)
If LED headlight bulb replacement is re-
quired, it is recommended that you visit a
NISSAN dealer for this service.
TURN SIGNAL BULB
To replace the turn signal bulb follow the
instructions listed in the “Replacing the
halogen headlight bulb” found in this sec-
tion.
FOG LIGHTS (if so equipped)
For additional information on fog light bulb
replacement, refer to the instructions out-
lined in this section.
Replacing the fog light bulb
If fog light bulb replacement is required, it is
recommended that you visit a NISSAN
dealer for this service.
Page 466 of 528

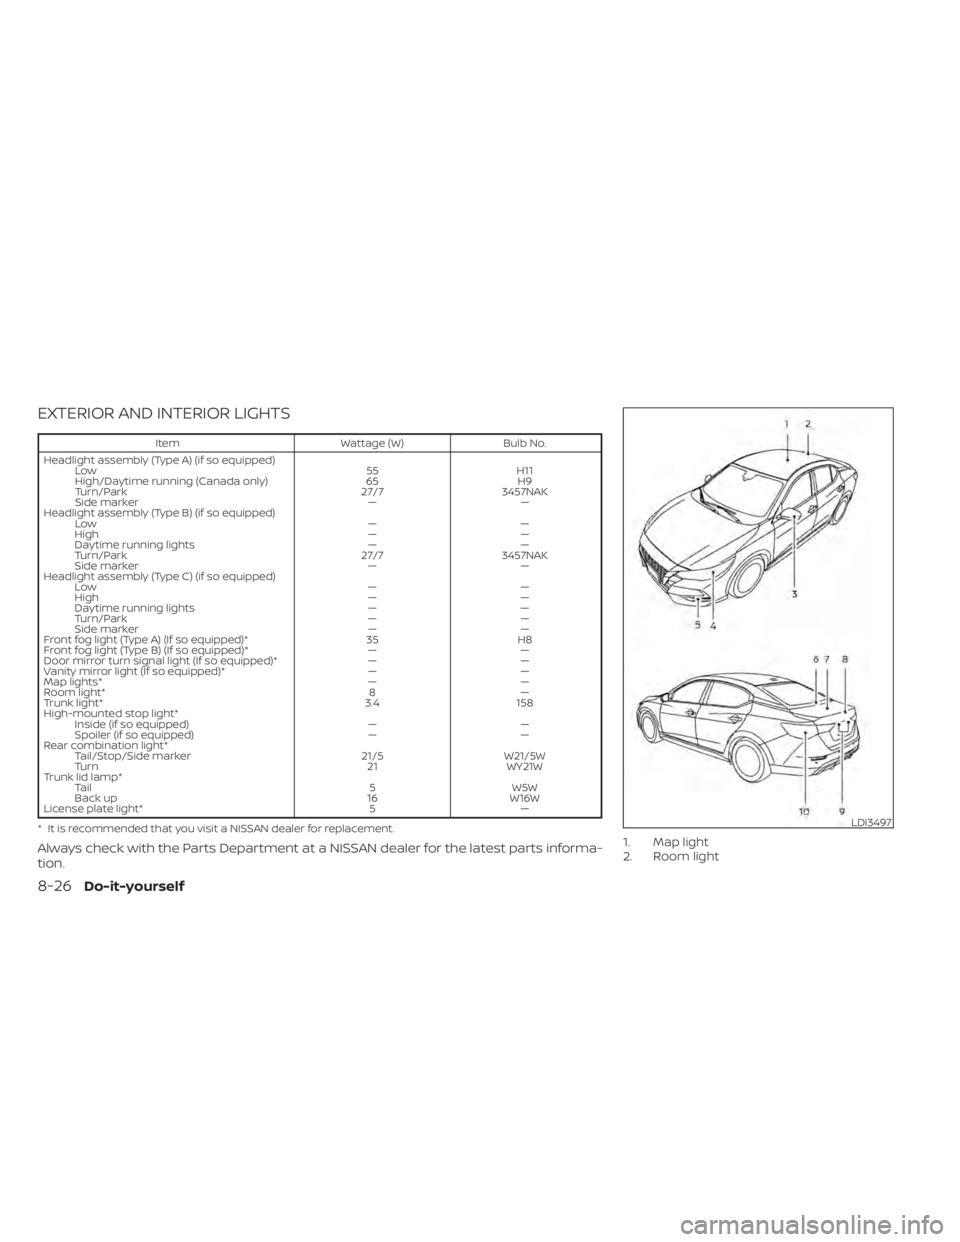
EXTERIOR AND INTERIOR LIGHTS
ItemWattage (W)Bulb No.
Headlight assembly (Type A) (if so equipped) Low 55H11
High/Daytime running (Canada only) 65H9
Turn/Park 27/73457NAK
Side marker ——
Headlight assembly (Type B) (if so equipped) Low ——
High ——
Daytime running lights ——
Turn/Park 27/73457NAK
Side marker ——
Headlight assembly (Type C) (if so equipped) Low ——
High ——
Daytime running lights ——
Turn/Park ——
Side marker ——
Front fog light (Type A) (If so equipped)* 35H8
Front fog light (Type B) (If so equipped)* ——
Door mirror turn signal light (If so equipped)* ——
Vanity mirror light (If so equipped)* ——
Map lights* ——
Room light* 8—
Trunk light* 3.4158
High-mounted stop light* Inside (if so equipped) ——
Spoiler (if so equipped) ——
Rear combination light* Tail/Stop/Side marker 21/5W21/5W
Turn 21WY21W
Trunk lid lamp* Tail 5W5W
Back up 16W16W
License plate light* 5—
* It is recommended that you visit a NISSAN dealer for replacement.
Always check with the Parts Department at a NISSAN dealer for the latest parts informa-
tion.1. Map light
2. Room light
LDI3497
8-26Do-it-yourself
Page 467 of 528
3. Door mirror turn signal light (if soequipped)
4. Headlight assembly
5. Fog light (if so equipped)
6. High-mount stop light (inside)(if so
equipped)
7. Trunk light
8. High-mount stop light (spoiler)(if so
equipped)
9. License plate light
10. Rear combination light
Replacement procedures
All other lights are either type A, B, C or D.
When replacing a bulb, first remove the
lens, lamp and/or cover.
Indicates bulb removal
Indicates bulb installation
WDI0263