2021 NISSAN SENTRA reset
[x] Cancel search: resetPage 146 of 528

Autolight system
The autolight system allows the headlights
to turn on and off automatically. The auto-
light system can:
• Turn on the headlights, front parking, tail,license plate and instrument panel lights
automatically when it is dark.
• Turn off all the lights when it is light.
• Keep all the lights on for a period of time af ter you place the ignition switch in the
OFF position and all doors are closed.
NOTE:
Autolight activation sensitivity and
the time delay for autolight shutoff
can be adjusted. For additional infor-
mation, refer to “Vehicle information
display ” in this section.
To turn on the autolight system:
1. Turn the headlight switch to the AUTO position
O1.
2. Turn the ignition switch to ON.
3. The autolight system automatically turns the headlights on and off.
Initially, if the ignition switch is placed in the
OFF position and a door is opened and lef t
open, the headlights remain on for a period
of time. If another door is opened while the
headlights are on, then the timer is reset.
To turn the autolight system off, turn the
switch to the OFF,
,orposition. Be sure you do not put anything on top
of the autolight sensor located in the top
side
O1of the instrument panel. The au-
tolight sensor controls the autolight; if it
is covered, the autolight sensor reacts as
if it is dark out and the headlights will
illuminate. If this occurs while parked
with the engine off and the ignition
switch placed in the ON position, your
vehicle's battery could become dis-
charged.
LIC3051
2-56Instruments and controls
Page 163 of 528

POWER MOONROOF
The moonroof will only operate when the
ignition switch is placed in the ON position.
The power moonroof is operational for a
period of time, even if the ignition switch is
placed in the AUTO ACC or OFF position. If
the driver's door or the front passenger's
door is opened during this period of time,
the power to the moonroof is canceled.
Sliding the moonroof
To fully open or close the moonroof, push
the switch to the open
O1or closeO2posi-
tion and release it; it need not be held. The roof will automatically open or close all the
way. To stop the roof, push the switch once
more while it is opening or closing.
Tilting the moonroof
To tilt up, first close the moonroof, then
push the switch
O3and release it; it need
not be held. To tilt down the moonroof,
push the switch to the tilt down position
O2.
Resetting the moonroof switch
If the moonroof does not operate properly,
perform the following procedure to initial-
ize the moonroof operation system.
1. If the moonroof is open, close it fully by repeatedly pushing the moonroof
switch to the close position
O2.
2. Push and hold the switch to the close position
O2for approximately 15
seconds.
3. Release the switch af ter the moonroof moves up, down, then back to the full tilt
up position.
4. Push and hold the switch to the close position
O2. 5. Release the switch af ter the moonroof
completes one full cycle from the tilt up
position to the closed position, then to
the open position, and again to the fully
closed position.
6. Check if the moonroof switch operates normally.
If the moonroof does not operate properly
af ter performing the procedure above,
have your vehicle serviced. It is recom-
mended that you visit a NISSAN dealer for
this service.
Auto-reverse function (when
closing or tilting down the
moonroof)
The auto-reverse function can be acti-
vated when the moonroof is closed or
tilted down by automatic operation when
the ignition switch is placed in the ON po-
sition or for a period of time af ter the igni-
tion switch is placed in the OFF position.
Depending on the environment or driv-
ing conditions, the auto-reverse func-
tion may be activated if an impact or
load similar to something being caught
in the moonroof occurs.
Instruments and controls2-73
Page 193 of 528

1. Pull the hood lock release handleO1lo-
cated on the lower door pillar until the
hood springs up slightly.
2. Locate the lever
O2in between the hood
and grille and push the lever sideways
with your fingertips.
3. Raise the hood
O3.
4. Remove the support rod
O4and insert it
into the slot marked by an arrow
O5.
NOTE:
Do not place the support rod in a location
other than the designated slot. Hold the coated parts
OAwhen removing
or resetting the support rod. Avoid direct
contact with the metal parts, as they
may be hot immediately af ter the engine
has been stopped.
When closing the hood, return the support
rod to its original position, lower the hood
to approximately 12 in (30 cm) above the
latch and release it. This allows proper en-
gagement of the hood latch.
Pre-driving checks and adjustments3-23
Page 249 of 528

The vehicle is not equipped with a USB de-
vice. USB devices should be purchased
separately as necessary.
This system cannot be used to format USB
devices. To format a USB device, use a per-
sonal computer.
In some jurisdictions, the USB device for the
front seats plays only sound without im-
ages for regulatory reasons, even when the
vehicle is parked.
This system supports various USB
memory devices, USB hard drives and
iPod® players. Some USB devices may not
be supported by this system.
• Partitioned USB devices may not playcorrectly.
• Some characters used in other lan- guages (Chinese, Japanese, etc.) may not
appear properly in the display. Using Eng-
lish language characters with a USB de-
vice is recommended.
General notes for USB use:
• For additional information, refer to your device manufacturer’s owner informa-
tion regarding the proper use and care of
the device. Notes for iPod® use:
iPod® is a trademark of Apple Inc., regis-
tered in the U.S. and other countries.
• Improperly plugging in the iPod® may
cause a checkmark to be displayed on
and off (flickering). Always make sure that
the iPod® is connected properly.
• An iPod® nano (1st Generation) may re- main in fast forward or rewind mode if it is
connected during a seek operation. In
this case, please manually reset the
iPod®.
• An iPod® nano (2nd Generation) will con- tinue to fast-forward or rewind if it is dis-
connected during a seek operation.
• An incorrect song title may appear when the Play Mode is changed while using an
iPod® nano (2nd Generation).
• Audiobooks may not play in the same order as they appear on an iPod®.
• Large video files cause slow responses in an iPod®. The vehicle center display may
momentarily black out, but will soon re-
cover.
• If an iPod® automatically selects large video files while in the shuffle mode, the
vehicle center display may momentarily
black out, but will soon recover.iPod®* player
• Some characters used in other lan-guages (Chinese, Japanese, etc.) are not
displayed properly on the vehicle center
screen. We recommend using English or
Spanish language characters with an
iPod®.
• Large video podcast files cause slow re- sponses in the iPod®. The vehicle center
display may momentarily black out, but it
will soon recover.
• If the iPod® automatically selects large video podcast files while in the shuffle
mode, the vehicle center display may
momentarily black out, but it will soon
recover.
• Improperly plugging in the iPod® may cause a checkmark to be displayed on
and off (flickering). Always make sure that
the iPod® is connected properly.
• The iPod® nano (2nd Generation) will con- tinue to fast forward or rewind if it is dis-
connected during a seek operation.
• An incorrect song title may appear when the Play Mode is changed while using the
iPod® nano (2nd Generation).
• Audiobooks may not play in the same order as they appear on the iPod®.
Monitor, climate, audio, phone and voice recognition systems4-47
Page 250 of 528

• The iPod® nano (1st Generation) may re-main in fast forward or rewind mode if it is
connected during a seek operation. In
this case, please manually reset the
iPod®.
• If you are using an iPod® (3rd Generation with Dock connector), do not use very
long names for the song title, album
name or artist name to prevent the iPod®
from resetting itself.
• Be careful not to do the following, or the cable could be damaged and a loss of
function may occur:– Bend the cable excessively (1.6 in (40 mm) radius maximum).
– Twist the cable excessively (more than 180 degrees).
– Pull or drop the cable.
– Do not force the iPod® cable connector into the device port.
– Close the center console lid on the cable or connectors.
– Store objects with sharp edges in the storage where the cable is stored.
– Spill liquids on the cable and connec- tors.
• Do not connect the cable to the iPod® if the cable and/or connectors are wet. It
may damage the iPod®. • If the cable and connectors are exposed
to water, allow the cable and/or connec-
tors to dry completely before connecting
the cable to the iPod® (wait 24 hours for it
to dry).
• If the connector is exposed to fluids other than water, evaporative residue may
cause a short between the connector
pins. In this case, replace the cable, other-
wise damage to the iPod® and a loss of
function may occur.
• If the cable is damaged (insulation cut, connectors cracked, contamination such
as liquids, dust, dirt, etc. in the connec-
tors), do not use the cable. It is recom-
mended that you visit a NISSAN dealer to
replace the cable with a new one.
• When not in use for extended periods of time, store the cable in a clean, dust free
environment at room temperature and
without direct sun exposure.
• Do not use the cable for any other pur- poses other than its intended use in the
vehicle.
*iPod® is a trademark of Apple Inc., regis-
tered in the U.S. and other countries.Bluetooth® streaming audio
• Some Bluetooth® audio devices may not be recognized by the in-vehicle audio
system.
• It is necessary to set up the wireless con- nection between a compatible
Bluetooth® audio device and the in-
vehicle Bluetooth® module before using
the Bluetooth® audio.
• Operating procedure of the Bluetooth® audio will vary depending on the devices.
Make sure how to operate your audio de-
vice before using it with this system.
• The Bluetooth® audio may be stopped under the following conditions:– Receiving a call on the Bluetooth® Hands-Free Phone System.
– Checking the connection to the hands-free phone.
• Do not place the Bluetooth® audio device in an area surrounded by metal or far
away from the in-vehicle Bluetooth®
module to prevent tone quality degrada-
tion and wireless connection disruption.
• While an audio device is connected through the Bluetooth® wireless connec-
tion, the battery power of the device may
discharge quicker than usual.
4-48Monitor, climate, audio, phone and voice recognition systems
Page 253 of 528

Audio button
Push to display the audio screen. When this
button is pushed while the audio screen is
not displayed, the last audio source played
will play.
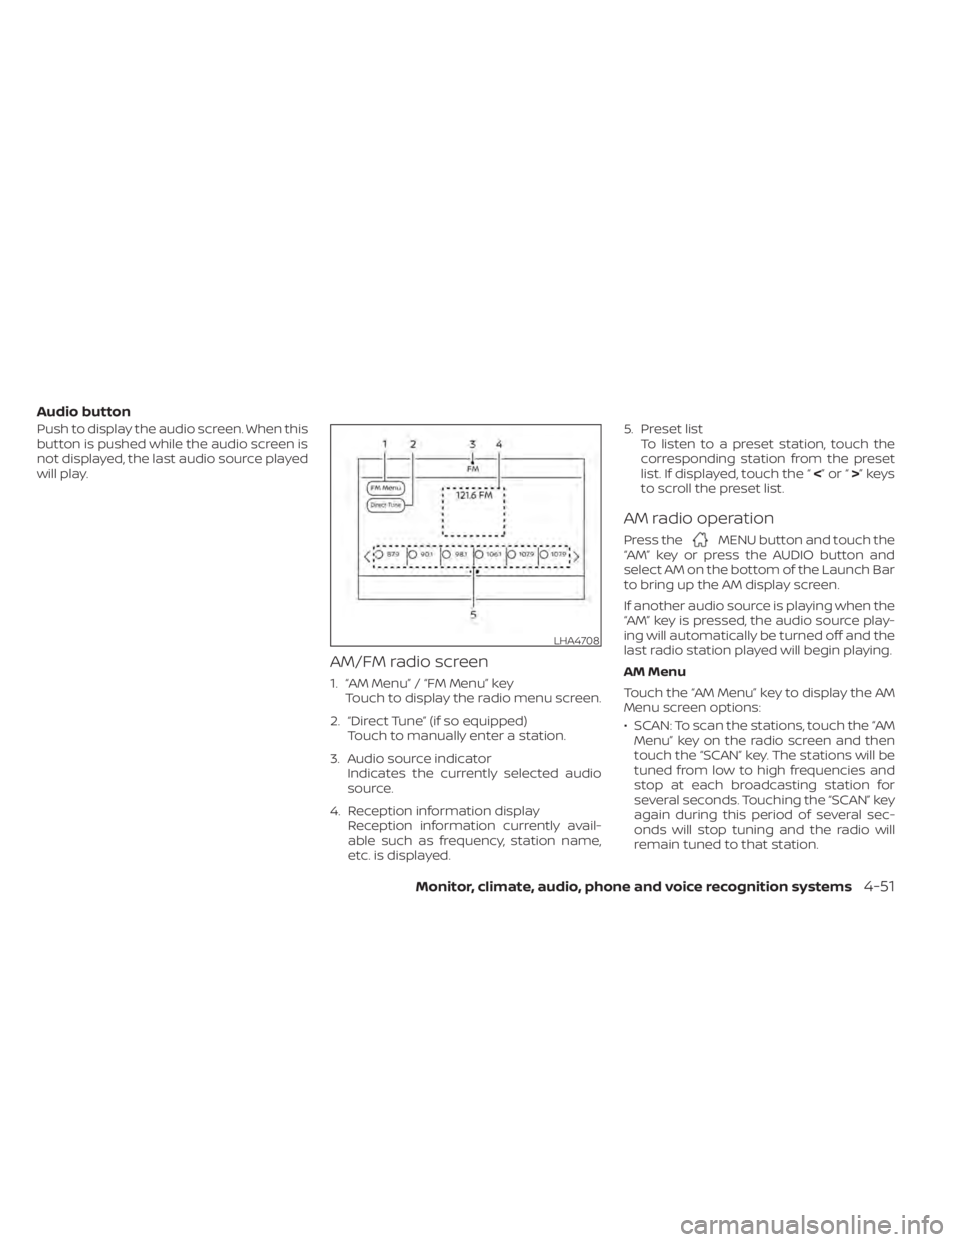
AM/FM radio screen
1. “AM Menu” / “FM Menu” keyTouch to display the radio menu screen.
2. “Direct Tune” (if so equipped) Touch to manually enter a station.
3. Audio source indicator Indicates the currently selected audio
source.
4. Reception information display Reception information currently avail-
able such as frequency, station name,
etc. is displayed. 5. Preset list
To listen to a preset station, touch the
corresponding station from the preset
list. If displayed, touch the “ <”or“>”keys
to scroll the preset list.
AM radio operation
Press theMENU button and touch the
“AM” key or press the AUDIO button and
select AM on the bottom of the Launch Bar
to bring up the AM display screen.
If another audio source is playing when the
“AM” key is pressed, the audio source play-
ing will automatically be turned off and the
last radio station played will begin playing.
AM Menu
Touch the “AM Menu” key to display the AM
Menu screen options:
• SCAN: To scan the stations, touch the “AM Menu” key on the radio screen and then
touch the “SCAN” key. The stations will be
tuned from low to high frequencies and
stop at each broadcasting station for
several seconds. Touching the “SCAN” key
again during this period of several sec-
onds will stop tuning and the radio will
remain tuned to that station.
LHA4708
Page 254 of 528

• Refresh: Touch the “Refresh” key to scanand update the station list displayed on
the right side of the AM Menu screen.
orbuttons to tune
from low to high or high to low frequencies
and to stop at the next broadcasting sta-
tion.
1 to 6 Station memory operations
Up to six stations can be registered in the
preset list.
1. Select the AM radio band.
2. Tune to the station you wish to store.
3. Touch and hold one of the preset num- bers in the preset list.
The information such as frequency will be
displayed on the preset list.
To select and listen to the preset stations,
push
on the steering wheel briefly or
touch a preferred station on the preset list
on the radio screen.
FM radio operation
Press theMENU button and touch the
“FM Menu” key or press the AUDIO button
and select FM on the bottom of the Launch
Bar to bring up the FM display screen. If another audio source is playing when the
“FM” key is pressed, the audio source play-
ing will automatically be turned off and the
last radio station played will begin playing.
The FM stereo indicator (STEREO) is shown
on the screen during FM stereo reception.
When the stereo broadcast signal is weak,
the radio automatically changes from ste-
reo to monaural reception.
FM Menu
Touch the “FM” Menu key to display the FM
Menu screen options:
• SCAN: To scan tune the stations, touch
the “FM Menu” key on the radio screen
and then touch the “SCAN” key. The sta-
tions will be tuned from low to high fre-
quencies and stop at each broadcasting
stations for several seconds. Touching
the “SCAN” key again during this period of
several seconds will stop tuning and the
radio will remain tuned to that station.
• Refresh: Touch the “Refresh” key to up- date the station list displayed on the right
side of the FM Menu screen.
• RDS Info: Radio station and song informa- tion can be displayed on the FM display
screen.
orbuttons to tune
from low to high or high to low frequencies
and to stop at the next broadcasting sta-
tion.
1 to 12 Station memory operations
Up to 12 stations can be registered in the
preset list.
1. Select the FM radio band.
2. Tune to the station you wish to store.
3. Touch and hold one of the preset num- bers in the preset list.
The information such as frequency will be
displayed on the preset list.
To select and listen to the preset stations,
push
on the steering wheel briefly or
touch a preferred station on the preset list
on the radio screen.
4-52Monitor, climate, audio, phone and voice recognition systems
Page 265 of 528

STEERING WHEEL SWITCH FOR
AUDIO CONTROL
1.Menu control switch/ OK
button
2.
(back) switch
3.
(SEEK/TRACK) buttons
4. Volume control switch
Volume control switch
Push the volume control switch up or down
to increase or decrease the volume.
Menu control
switch/OK button
In the vehicle information display, navigate
to “Audio”. Use the OK button to change the
mode in the following sequence:
AM →FM →USB/iPod®*→ Bluetooth® Au-
dio* →AUX* →AM.
* These modes are only available when
compatible media storage is inserted into
the device or connected to the system.
SEEK/TRACK buttons
For most audio sources, pushing the tun-
ing switches for more than 1.5 seconds
provides a different function than pushing
for less than 1.5 seconds.
AM and FM:
• Press the
orbuttons for less
than 1.5 seconds to increase or decrease
the preset station.
• Press the
orbuttons for more
than 1.5 seconds to seek up or down to
the next station. iPod®:
• Press the
orbuttons for less
than 1.5 seconds to increase or decrease
the track number.
USB:
• Press the
orbuttons for less
than 1.5 seconds to increase or decrease
the track number.
• Press the
orbuttons for more
than 1.5 seconds to reverse or fast for-
ward the current song.
Bluetooth® Audio:
• Press the
orbuttons for less
than 1.5 seconds to skip ahead or back to
the next song.
• Press the
orbuttons for more
than 1.5 seconds to reverse or fast for-
ward the current song.
(back) switch
Push the(back) switch to return to the
previous screen or cancel the current se-
lection.
LHA4122