2021 NISSAN ROGUE SPORT parking brake
[x] Cancel search: parking brakePage 361 of 516
RAB SYSTEM LIMITATIONS
WARNING
Listed below are the system limita-
tions for the RAB system. Failure to
follow the warnings and instructions
for proper use of the RAB system
could result in serious injury or
death.
.When the vehicle approaches an
obstacle while the accelerator or
brake pedal is depressed, the
function may not operate or the
start of the operation may be
delayed. The RAB system may
not operate or may not perform
sufficiently due to vehicle condi-
tions, driving conditions, the traf-
fic environment, the weather,
road surface conditions, etc. Do
not wait for the system to oper-
ate. Operate the brake pedal by
yourself as soon as necessary.
. If it is necessary to override RAB
operation, strongly press the ac-
celerator pedal.
. Always check your surroundings
and turn to check what is behind
you before and while backing up.
The RAB system detects station- ary objects behind the vehicle.
The RAB system does not detect
the following objects:
— Moving objects
— Low objects
— Narrow objects
— Wedge-shaped objects
— Objects close to the bumper
(less than approximately 1 ft
[30 cm])
— Objects that suddenly appear
— Thin objects such as rope, wire, chain, etc.
. The RAB system may not operate
for the following obstacles:
— Obstacles located high off the
ground
— Obstacles in a position offset from your vehicle
— Obstacles, such as spongy materials or snow, that have
soft outer surfaces and can
easily absorb a sound wave
. The RAB system may not operate
in the following conditions:
— There is rain, snow, ice, dirt,
etc., attached to the sonar sensors.
— A loud sound is heard in the area around the vehicle.
— The surface of the obstacle is diagonal to the rear of the
vehicle.
. The RAB system may uninten-
tionally operate in the following
conditions:
— There is overgrown grass in
the area around the vehicle.
— There is a structure (e.g., a wall, toll gate equipment, a
narrow tunnel, a parking lot
gate) near the side of the
vehicle.
— There are bumps, protrusions, or manhole covers on the
road surface.
— The vehicle drives through a draped flag or a curtain.
— There is an accumulation of snow or ice behind the vehi-
cle.
— An ultrasonic wave source, such as another vehicle’s so-
nar, is near the vehicle.
Starting and driving5-119
Page 369 of 516
SSD0488
WARNING
.Do not stop or park the vehicle
over flammable materials such as
dry grass, waste paper or rags.
They may ignite and cause a fire.
. Never leave the engine running
while the vehicle is unattended.
. Do not leave children unattended
inside the vehicle. They could
unknowingly activate switches
or controls. Unattended children
could become involved in serious
accidents. .
To help avoid risk of injury or
death through unintended opera-
tion of the vehicle and/or its
systems, do not leave children,
people who require the assis-
tance of others or pets unat-
tended in your vehicle.
Additionally, the temperature in-
side a closed vehicle on a warm
day can quickly become high
enough to cause a significant risk
of injury or death to people and
pets.
. Safe parking procedures require
that both the parking brake be
applied and the transmission placed into P (Park) for Continu-
ously Variable Transmission (CVT)
model or in an appropriate gear
for Manual Transmission (MT)
model. Failure to do so could
cause the vehicle to move unex-
pectedly or roll away and result in
an accident.
. Make sure the CVT shift lever has
been pushed as far forward as it
can go and cannot be moved
without depressing the foot
brake pedal.
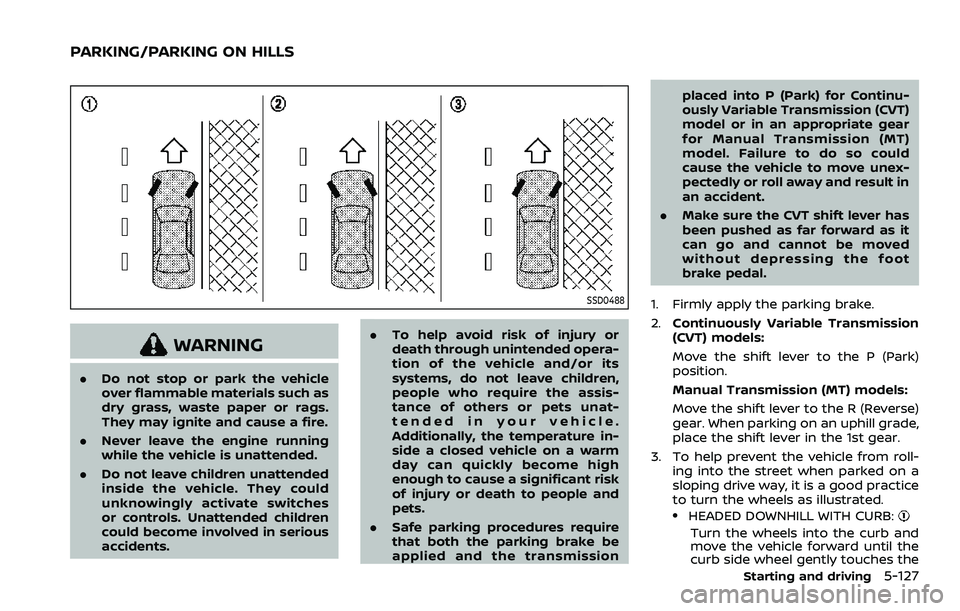
1. Firmly apply the parking brake.
2. Continuously Variable Transmission
(CVT) models:
Move the shift lever to the P (Park)
position.
Manual Transmission (MT) models:
Move the shift lever to the R (Reverse)
gear. When parking on an uphill grade,
place the shift lever in the 1st gear.
3. To help prevent the vehicle from roll- ing into the street when parked on a
sloping drive way, it is a good practice
to turn the wheels as illustrated.
.HEADED DOWNHILL WITH CURB:
Turn the wheels into the curb and
move the vehicle forward until the
curb side wheel gently touches the
Starting and driving5-127
PARKING/PARKING ON HILLS
Page 371 of 516
BRAKING PRECAUTIONS
The brake system has two separate
hydraulic circuits. If one circuit malfunc-
tions, you will still have braking at two
wheels.
Vacuum assisted brakes
The brake booster aids braking by using
engine vacuum. If the engine stops, you
can stop the vehicle by depressing the
brake pedal. However, greater foot pres-
sure on the brake pedal will be required to
stop the vehicle and the stopping dis-
tance will be longer.
Using the brakes
Avoid resting your foot on the brake
pedal while driving. This will cause over-
heating of the brakes, wearing out the
brake pads faster and reduce gas mile-
age.
To help reduce brake wear and to prevent
the brakes from overheating, reduce
speed and downshift to a lower gear
before going down a slope or long grade.
Overheated brakes may reduce braking
performance and could result in loss of
vehicle control.
WARNING
.While driving on a slippery sur-
face, be careful when braking,
accelerating or downshifting.
Abrupt braking or accelerating
could cause the wheels to skid
and result in an accident.
. If the engine is not running or is
turned off while driving, the
power assist for the brakes will
not work. Braking will be harder.
Wet brakes
When the vehicle is washed or driven
through water, the brakes may get wet.
As a result, your braking distance will be
longer and the vehicle may pull to one
side during braking.
To dry brakes, drive the vehicle at a safe
speed while lightly tapping the brake
pedal to heat-up the brakes. Do this until
the brakes return to normal. Avoid driving
the vehicle at high speeds until the brakes
function correctly.
Parking brake break-in
Break in the parking brake shoes when-
ever the stopping effect of the parking
brake is weakened or whenever the
parking brake shoes and/or drums/ro-
tors are replaced, in order to assure the
best braking performance.
This procedure is described in the vehicle
service manual. It is recommended you
visit a NISSAN dealer for this service.
Starting and driving5-129
BRAKE SYSTEM
Page 378 of 516
5-136Starting and driving
WARNING
.Never rely solely on the hill start
assist system to prevent the ve-
hicle from moving backward on a
hill. Always drive carefully and
attentively. Depress the brake
pedal when the vehicle is stopped
on a steep hill. Be especially care-
ful when stopped on a hill on
frozen or muddy roads. Failure
to prevent the vehicle from rolling
backwards may result in a loss of
control of the vehicle and possi-
ble serious injury or death.
. The hill start assist system is not
designed to hold the vehicle at a
standstill on a hill. Depress the
brake pedal when the vehicle is
stopped on a steep hill. Failure to
do so may cause the vehicle to
roll backwards and may result in
a collision or serious personal
injury.
. The hill start assist system may
not prevent the vehicle from roll-
ing backwards on a hill under all
load or road conditions. Always
be prepared to depress the brake
pedal to prevent the vehicle from
rolling backwards. Failure to do so may result in a collision or
serious personal injury.
The hill start assist system automatically
keeps the brakes applied to help prevent
the vehicle from rolling backwards in the
time it takes the driver to release the
brake pedal and apply the accelerator
when the vehicle is stopped on a hill.
The hill start assist system will operate
automatically under the following condi-
tions:
. The transmission is shifted to a for-
ward or reverse gear.
. The vehicle is stopped completely on a
hill by applying the brake.
The maximum holding time is 2 seconds.
After 2 seconds the vehicle will begin to
roll back and the hill start assist system
will stop operating completely.
The hill start assist system will not
operate when the transmission is shifted
to the N (Neutral) or P (Park) position (CVT
models) or on a flat and level road.
When the Vehicle Dynamic Control (VDC)
warning light illuminates in the meter, the
hill start assist system will not operate.
(See “Vehicle Dynamic Control (VDC)
warning light” (P.2-17).)
WAF0072X
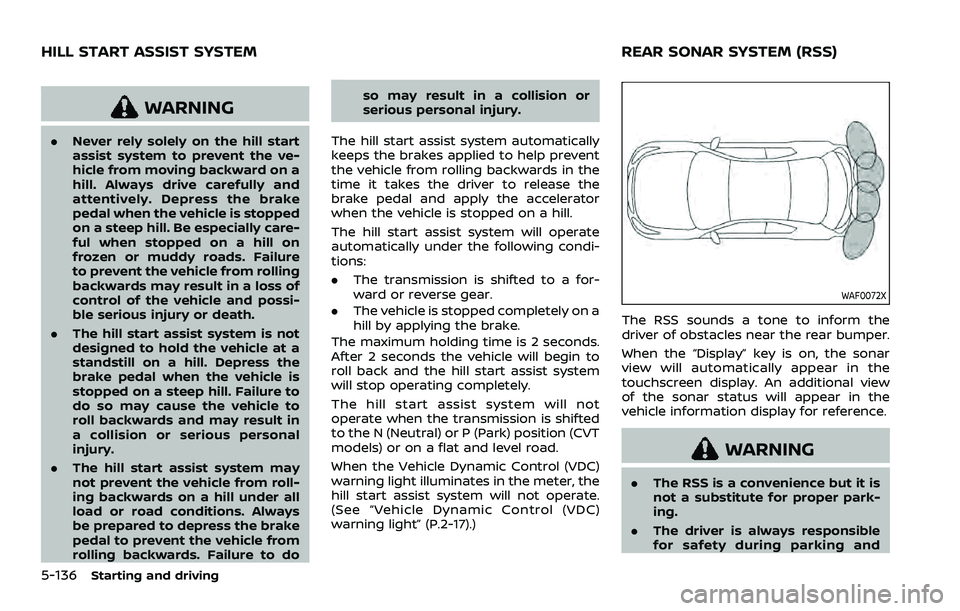
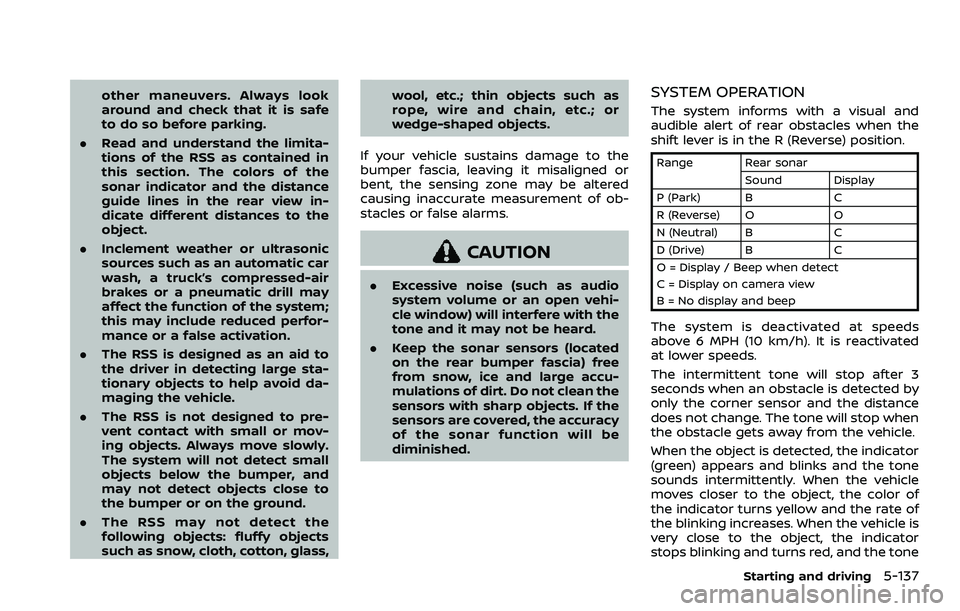
The RSS sounds a tone to inform the
driver of obstacles near the rear bumper.
When the “Display” key is on, the sonar
view will automatically appear in the
touchscreen display. An additional view
of the sonar status will appear in the
vehicle information display for reference.
WARNING
. The RSS is a convenience but it is
not a substitute for proper park-
ing.
. The driver is always responsible
for safety during parking and
HILL START ASSIST SYSTEM REAR SONAR SYSTEM (RSS)
Page 379 of 516
other maneuvers. Always look
around and check that it is safe
to do so before parking.
. Read and understand the limita-
tions of the RSS as contained in
this section. The colors of the
sonar indicator and the distance
guide lines in the rear view in-
dicate different distances to the
object.
. Inclement weather or ultrasonic
sources such as an automatic car
wash, a truck’s compressed-air
brakes or a pneumatic drill may
affect the function of the system;
this may include reduced perfor-
mance or a false activation.
. The RSS is designed as an aid to
the driver in detecting large sta-
tionary objects to help avoid da-
maging the vehicle.
. The RSS is not designed to pre-
vent contact with small or mov-
ing objects. Always move slowly.
The system will not detect small
objects below the bumper, and
may not detect objects close to
the bumper or on the ground.
. The RSS may not detect the
following objects: fluffy objects
such as snow, cloth, cotton, glass, wool, etc.; thin objects such as
rope, wire and chain, etc.; or
wedge-shaped objects.
If your vehicle sustains damage to the
bumper fascia, leaving it misaligned or
bent, the sensing zone may be altered
causing inaccurate measurement of ob-
stacles or false alarms.
CAUTION
. Excessive noise (such as audio
system volume or an open vehi-
cle window) will interfere with the
tone and it may not be heard.
. Keep the sonar sensors (located
on the rear bumper fascia) free
from snow, ice and large accu-
mulations of dirt. Do not clean the
sensors with sharp objects. If the
sensors are covered, the accuracy
of the sonar function will be
diminished.
SYSTEM OPERATION
The system informs with a visual and
audible alert of rear obstacles when the
shift lever is in the R (Reverse) position.
Range Rear sonar
Sound Display
P (Park) B C
R (Reverse) O O
N (Neutral) B C
D (Drive) B C
O = Display / Beep when detect
C = Display on camera view
B = No display and beep
The system is deactivated at speeds
above 6 MPH (10 km/h). It is reactivated
at lower speeds.
The intermittent tone will stop after 3
seconds when an obstacle is detected by
only the corner sensor and the distance
does not change. The tone will stop when
the obstacle gets away from the vehicle.
When the object is detected, the indicator
(green) appears and blinks and the tone
sounds intermittently. When the vehicle
moves closer to the object, the color of
the indicator turns yellow and the rate of
the blinking increases. When the vehicle is
very close to the object, the indicator
stops blinking and turns red, and the tone
Starting and driving5-137
Page 388 of 516
6-4In case of emergency
.Replacing tires with those not
originally specified by NISSAN
could affect the proper operation
of the TPMS.
. Do not inject any tire liquid or
aerosol tire sealant into the tires,
as this may cause a malfunction
of the tire pressure sensors
(models without emergency tire
puncture repair kit).
. NISSAN recommends using only
Genuine NISSAN Emergency Tire
Sealant provided with your vehi-
cle. Other tire sealants may da-
mage the valve stem seal which
can cause the tire to lose air
pressure. Visit a NISSAN dealer
as soon as possible after using
tire repair sealant (models with
emergency tire puncture repair
kit).CHANGING A FLAT TIRE (models
with spare tire)
If you have a flat tire, follow the instruc-
tions below.
Stopping the vehicle
1. Safely move the vehicle off the road
and away from traffic.
2. Turn on the hazard warning flashers.
3. Park on a level surface and apply the parking brake.
4. Continuously Variable Transmission
(CVT) models:
Move the shift lever to the P (Park)
position.
Manual Transmission (MT) models:
Move the shift lever to the R (Reverse)
position.
5. Turn off the engine.
6. Raise the hood to warn other traffic, and to signal professional road assis-
tance personnel that you need assis-
tance.
7. Have all passengers get out of the vehicle and stand in a safe place, away
from traffic and clear of the vehicle.
WARNING
.Make sure the parking brake is
securely applied and the Manual
Transmission is shifted into R
(Reverse), or the CVT into P (Park).
. Never change tires when the ve-
hicle is on a slope, ice or slippery
areas. This is hazardous.
. Never change tires if oncoming
traffic is close to your vehicle.
Wait for professional road assis-
tance.
Page 399 of 516
JVE0279X
WARNING
Always follow the instructions below.
Failure to do so could result in
damage to the charging system and
cause personal injury.1. If the booster battery is in another
vehicle
, position the two vehicles (and) to bring their batteries into
close proximity to each other.
Do not allow the two vehicles to
touch. 2. Apply the parking brake.
3.
Continuously Variable Transmission
(CVT) models:
Move the shift lever to the P (Park)
position.
Manual Transmission (MT) models:
Move the shift lever to the N (Neutral)
position.
4. Switch off all unnecessary electrical systems (headlights, heater, air condi-
tioner, etc.).
5. Remove the vent caps on the battery (if so equipped). Cover the battery with
a firmly wrung out moist cloth to
reduce explosion hazard.
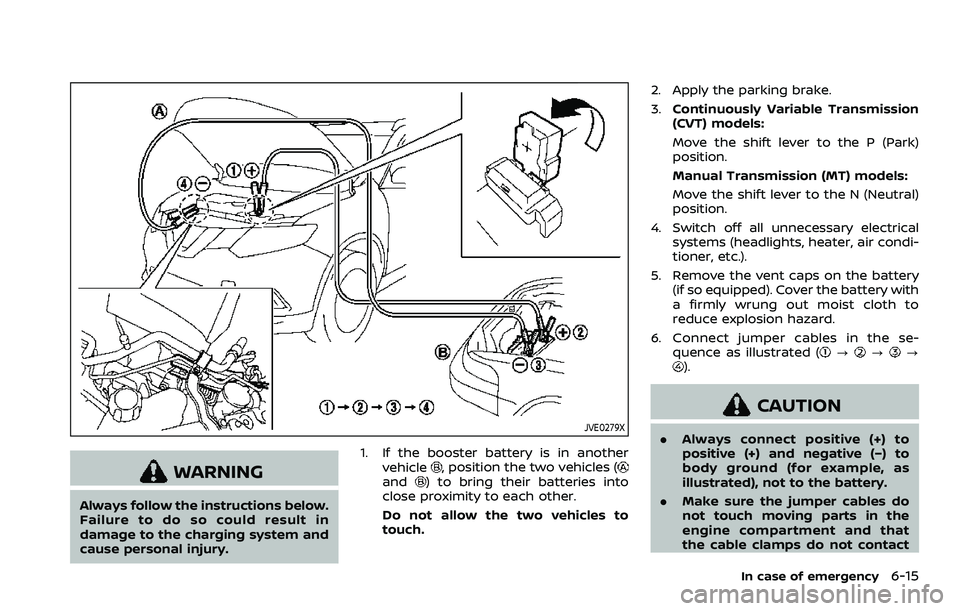
6. Connect jumper cables in the se- quence as illustrated (
???).
CAUTION
.Always connect positive (+) to
positive (+) and negative (−) to
body ground (for example, as
illustrated), not to the battery.
. Make sure the jumper cables do
not touch moving parts in the
engine compartment and that
the cable clamps do not contact
In case of emergency6-15
Page 401 of 516
an extremely high temperature gauge
reading), or if you feel a lack of engine
power, detect abnormal noise, etc., take
the following steps:
1. Move the vehicle safely off the roadand apply the parking brake.
2. Continuously Variable Transmission
(CVT) models:
Move the shift lever to the P (Park)
position.
Manual Transmission (MT) models:
Move the shift lever to the N (Neutral)
position.
Do not stop the engine.
3. Turn off the air conditioner (if so equipped). Open all the windows,
move the heater or air conditioner
temperature control to maximum hot
and fan control to high speed.
4. Get out of the vehicle. Look and listen for steam or coolant escaping from
the radiator before opening the hood.
(If steam or coolant is escaping, turn
off the engine.) Do not open the hood
further until no steam or coolant can
be seen. 5. Open the engine hood.
WARNING
If steam or water is coming from the
engine, stand clear to prevent get-
ting burned.
6. Visually check the drive belt for da- mage or looseness. Also check if the
cooling fan is running. The radiator
hoses and radiator should not leak
water. If coolant is leaking or the
cooling fan does not run, stop the
engine.
WARNING
Be careful not to allow your hands,
hair, jewelry or clothing to come into
contact with, or get caught in, engine
belts or the engine cooling fan. The
engine cooling fan can start at any
time. 7. After the engine cools down, check
the coolant level in the reservoir with
the engine running. Add coolant to
the reservoir if necessary. Have your
vehicle repaired. It is recommended
you visit a NISSAN dealer for this
service.
In case of emergency6-17