Page 195 of 482

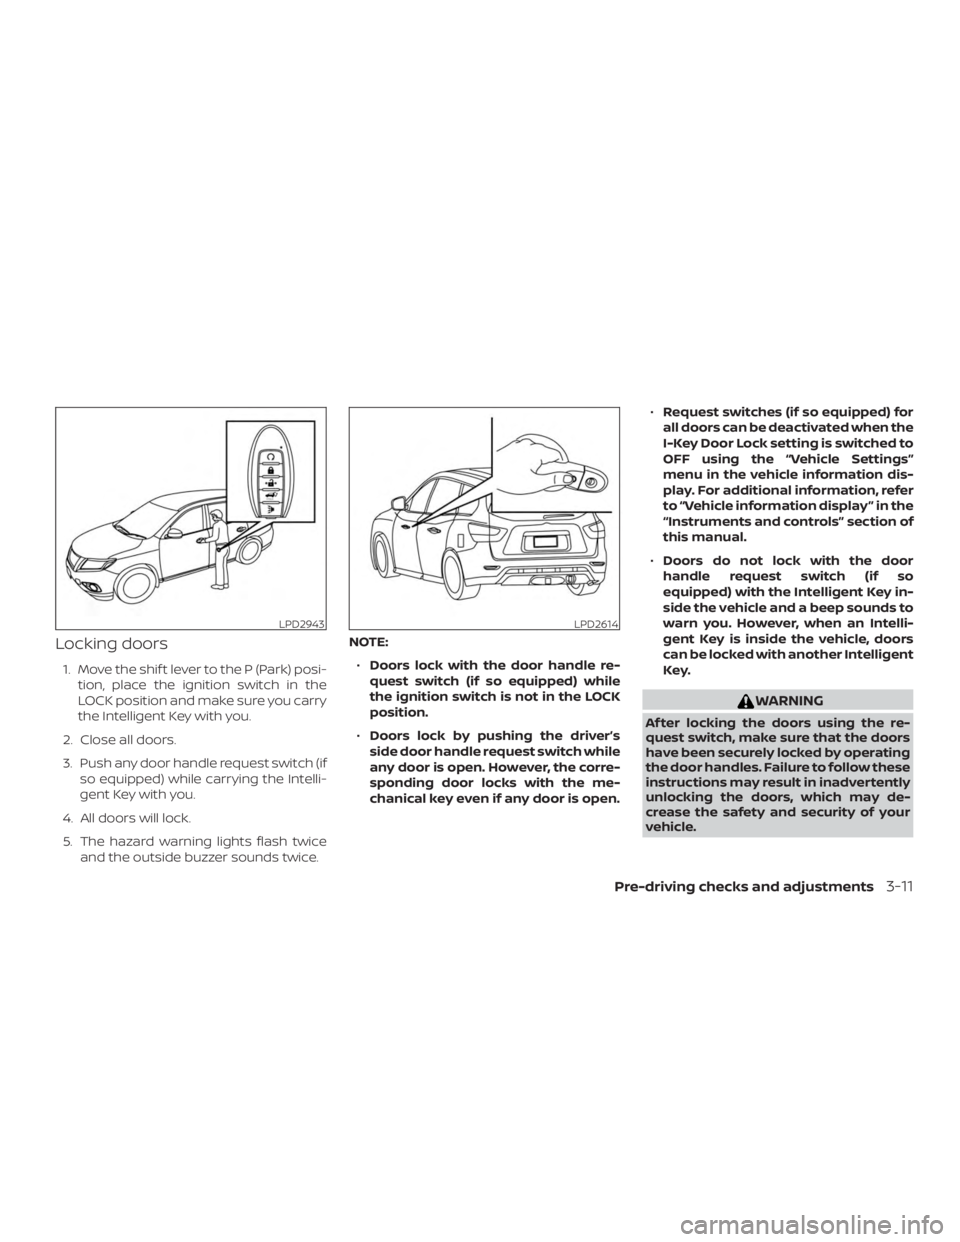
Locking doors
1. Move the shif t lever to the P (Park) posi-tion, place the ignition switch in the
LOCK position and make sure you carry
the Intelligent Key with you.
2. Close all doors.
3. Push any door handle request switch (if so equipped) while carrying the Intelli-
gent Key with you.
4. All doors will lock.
5. The hazard warning lights flash twice and the outside buzzer sounds twice. NOTE:
∙ Doors lock with the door handle re-
quest switch (if so equipped) while
the ignition switch is not in the LOCK
position.
∙ Doors lock by pushing the driver’s
side door handle request switch while
any door is open. However, the corre-
sponding door locks with the me-
chanical key even if any door is open. ∙
Request switches (if so equipped) for
all doors can be deactivated when the
I-Key Door Lock setting is switched to
OFF using the “Vehicle Settings”
menu in the vehicle information dis-
play. For additional information, refer
to “Vehicle information display ” in the
“Instruments and controls” section of
this manual.
∙ Doors do not lock with the door
handle request switch (if so
equipped) with the Intelligent Key in-
side the vehicle and a beep sounds to
warn you. However, when an Intelli-
gent Key is inside the vehicle, doors
can be locked with another Intelligent
Key.
Page 220 of 482
MANUAL ANTI-GLARE REARVIEW
MIRROR (if so equipped)
Use the night position�1to reduce glare
from the headlights of vehicles behind you
at night.
Use the day position
�2when driving in
daylight hours.
Page 285 of 482

∙ Make sure the area around the vehicle isclear.
∙ Check fluid levels such as engine oil, coolant, brake fluid, and windshield-
washer fluid as frequently as possible,
or at least whenever you refuel.
∙ Check that all windows and lights are clean.
∙ Visually inspect tires for their appear- ance and condition. Also check tires for
proper inflation.
∙ Check that all doors are closed.
∙ Position seat and adjust head restraints/headrests.
∙ Adjust inside and outside mirrors.
∙ Fasten seat belts and ask all passen- gers to do likewise.
∙ Check the operation of warning lights when the ignition switch is placed in the
ON position. For additional information,
refer to “Warning lights, indicator lights
and audible reminders” in the “Instru-
ments and controls” section of this
manual. 1. Apply the parking brake.
2. Move the shif t lever to P (Park) or N
(Neutral). P (Park) is recommended.
The starter is designed not to oper-
ate if the shif t lever is in any of the
driving positions.
3. Push the ignition switch to the ON po- sition. Depress the brake pedal and
push the ignition switch to start the
engine.
To start the engine immediately, push
and release the ignition switch while
depressing the brake pedal with the
ignition switch in any position.
∙ If the engine is very hard to start in extremely cold weather or when re-
starting, depress the accelerator
pedal a little (approximately 1/3 to the
floor) and while holding, crank the en-
gine. Release the accelerator pedal
when the engine starts.
∙ If the engine is very hard to start be- cause it is flooded, depress the accel-
erator pedal all the way to the floor
and hold it. Push the ignition switch
to the ON position to start cranking
the engine. Af ter 5 or 6 seconds, stop
cranking by pushing the ignition switch to the LOCK position. Af ter
cranking the engine, release the ac-
celerator pedal. Crank the engine
with your foot off the accelerator
pedal by depressing the brake pedal
and pushing the ignition switch to
start the engine. If the engine starts,
but fails to run, repeat the above pro-
cedure.
Page 354 of 482
Push the switch on to warn other drivers
when you must stop or park under emer-
gency conditions. All turn signal lights flash.
Page 355 of 482

TIRE PRESSURE MONITORING
SYSTEM (TPMS)
This vehicle is equipped with Tire Pressure
Monitoring System (TPMS). It monitors tire
pressure of all tires except the spare. When
the low tire pressure warning light is lit, and
the “Tire Pressure Low - Add Air” warning
appears in the vehicle information display,
one or more of your tires is significantly
under-inflated. If equipped, the system also
displays pressure of all tires (except the
spare tire) on the display screen by sending
a signal from a sensor that is installed in
each wheel. If the vehicle is being driven
with low tire pressure, the TPMS will acti-
vate and warn you of it by the low tire pres-
sure warning light. This system will activate
only when the vehicle is driven at speeds
above 16 mph (25 km/h). For additional in-
formation, refer to “Warning lights, indicator
lights and audible reminders” in “Instru-
ments and controls” section and the “Tire
Pressure Monitoring System (TPMS)” in the
“Starting and driving” sections of this
manual.
Page 403 of 482
HEADLIGHTS
For additional information on headlight
bulb replacement, refer to the instructions
outlined in this section.
Replacing the halogen headlight
bulb (if so equipped)
If bulb replacement is required, it is recom-
mended that you visit a NISSAN dealer for
this service.
Page 456 of 482
∙ To reduce the possibility of additionaldamage if your vehicle is struck from
the rear, where practical, remove the
receiver when not in use.
∙ Regularly check that all trailer hitch mounting bolts are securely
mounted.
Tire pressures
∙ When towing a trailer, inflate the
vehicle tires to the recom-
mended cold tire pressure indi-
cated on the Tire and Loading In-
formation label.
∙ Trailer tire condition, size, load rat- ing and proper inflation pressure
should be in accordance with the
trailer and tire manufacturer’s
specifications.
Safety chains
Always use suitable safety chains between
your vehicle and the trailer. The safety
chains should be crossed and should be
attached to the hitch, not to the vehicle
bumper or axle. The safety chains can be
attached to the bumper if the hitch ball is mounted to the bumper. Be sure to leave
enough slack in the chains to permit turn-
ing corners.
Trailer lights
Page 461 of 482

∙ Avoid holding the brake pedal down toolong or too frequently. This could cause
the brakes to overheat, resulting in re-
duced braking efficiency.
∙ Increase your following distance to al- low for greater stopping distances
while towing a trailer. Anticipate stops
and brake gradually.
∙ NISSAN recommends that the cruise control not be used while towing a
trailer.
∙ Some states or provinces have specific regulations and speed limits for ve-
hicles that are towing trailers. Obey the
local speed limits.
∙ Check your hitch, trailer wiring harness connections, and trailer wheel lug nuts
af ter 50 miles (80 km) of travel and at
every break.
∙ When launching a boat, don’t allow the water level to go over the exhaust tail
pipe or rear bumper.
∙ Make sure you disconnect the trailer lights before backing the trailer into the
water or the trailer lights may burn out.
When towing a trailer, final drive gear oil
should be replaced and transmission oil/fluid should be changed more fre-
quently. For additional information, refer
to the “Do-it-yourself ” section in this
manual.
Tow mode
Using tow mode is recommended when
pulling a heavy trailer or hauling a heavy
load. Push the TOW MODE switch to acti-
vate tow mode. Push the TOW MODE
switch again to turn tow mode off. Tow
mode is automatically canceled when the
ignition switch is turned off.
Tow mode includes the following features:
∙ Grade logic — Adjusts transmission shif ts when pulling a trailer or hauling a
load up a grade.
∙ Downhill Speed Control (DSC) — auto- matically downshif ts when driving
down a grade with a trailer or heavy
load to help control vehicle speed.
Driving the vehicle in the tow mode with no
trailer/load or light trailer/light load will not
cause any damage. However, fuel
economy may be reduced and the
transmission/engine driving characteris-
tics may feel unusual. When towing a trailer, final drive gear oil
should be replaced and transmission
oil/fluid should be changed more fre-
quently. For additional information, refer
to the “Do-it-yourself ” section of this
manual.FLAT TOWING FOR 4–WHEEL DRIVE
VEHICLE (if so equipped)
Towing your vehicle with all four wheels on
the ground is sometimes called flat towing.
This method is sometimes used when
towing a vehicle behind a recreational ve-
hicle, such as a motor home.