2021 NISSAN NV200 air conditioner
[x] Cancel search: air conditionerPage 133 of 300
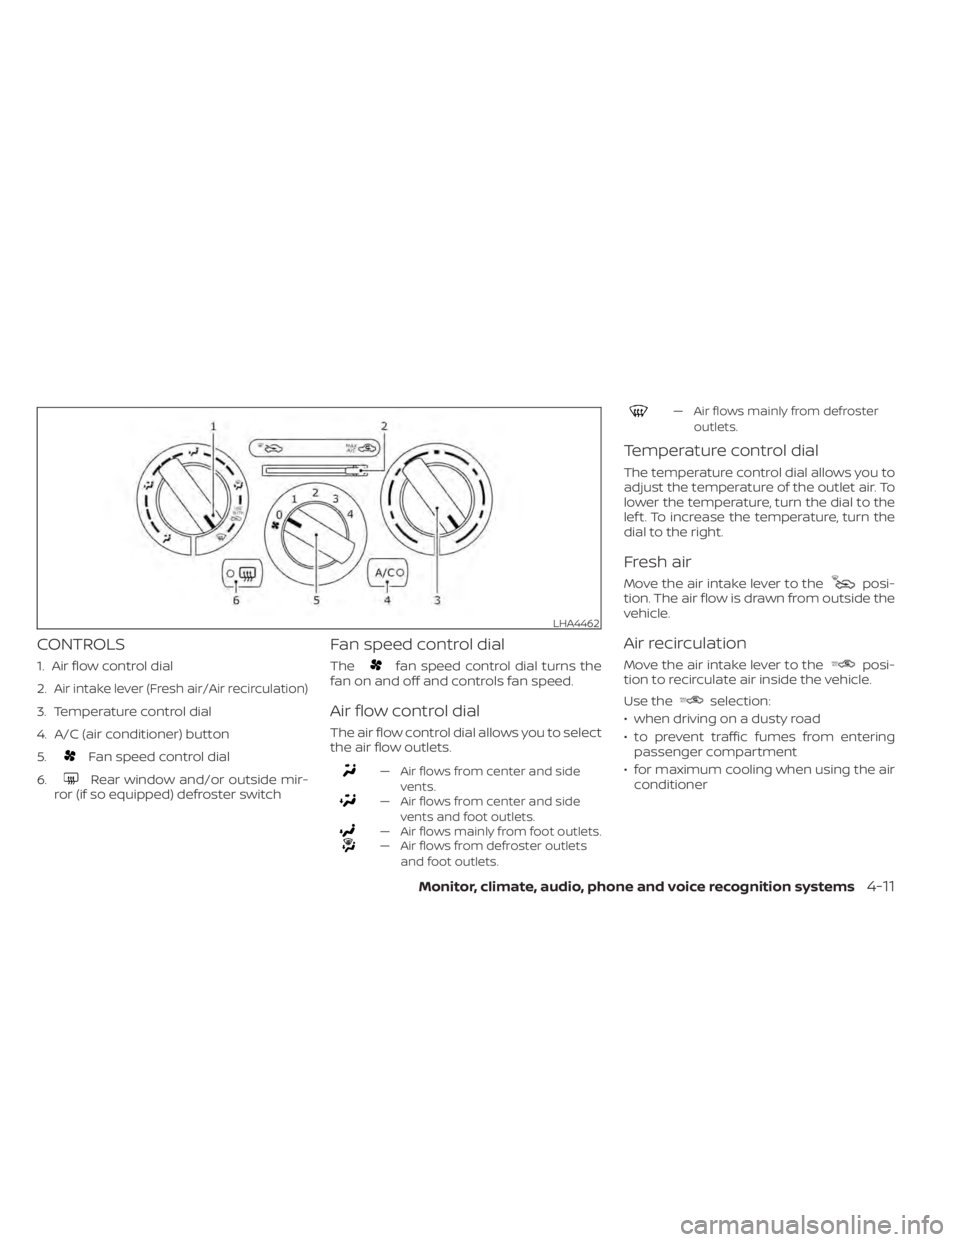
Fan speed control dial
6.
Rear window and/or outside mir-
ror (if so equipped) defroster switch
Fan speed control dial
Thefan speed control dial turns the
fan on and off and controls fan speed.
Air flow control dial
The air flow control dial allows you to select
the air flow outlets.
„ Air flows from center and side
vents.
„ Air flows from center and sidevents and foot outlets.
„ Air flows mainly from foot outlets.„ Air flows from defroster outletsand foot outlets.
„ Air flows mainly from defrosteroutlets.
Temperature control dial
The temperature control dial allows you to
adjust the temperature of the outlet air. To
lower the temperature, turn the dial to the
lef t. To increase the temperature, turn the
dial to the right.
Fresh air
Move the air intake lever to theposi-
tion. The air flow is drawn from outside the
vehicle.
Air recirculation
Move the air intake lever to theposi-
tion to recirculate air inside the vehicle.
Use the
selection:
€ when driving on a dusty road
€ to prevent traffic fumes from entering passenger compartment
€ for maximum cooling when using the air conditioner
LHA4462
Page 134 of 300
fan speed
control dial to the desired position and
press the
button to turn on the air
conditioner. To turn off the air conditioner,
press the
button again.
The air conditioner cooling function op-
erates only when the engine is running.
Rear window and/or outside
mirror defroster switch (if so
equipped)
For additional information, see “Rear win-
dow and/or outside mirror defroster
switch (if so equipped)” (P. 2-21).
HEATER OPERATION
Heating
This mode is used to direct heated air to
the foot outlets. Some air also flows from
the defrost outlets.
1. Move the air intake lever to the
position for normal heating.
2. Turn the air flow control dial to the
position. 3. Turn the
fan speed control dial to
the desired position.
4. Turn the temperature control dial to the desired position between the middle
and the hot position.
Ventilation
This mode directs outside air to the side
and center vents.
1. Move the air intake lever to the
position.
2. Turn the air flow control dial to the
position.
3. Turn the
fan speed control dial to
the desired position.
4. Turn the temperature control dial to the desired position.
Defrosting or defogging
This mode directs the air to the defrost
outlets to defrost/defog the windows.
1. Move the air intake lever to the
position.
2. Turn the air flow control dial to the
position. 3. Turn the
fan speed control dial to
the desired position.
4. Turn the temperature control dial to the desired position between the middle
and the hot position.
• To quickly remove ice or fog from the win- dows, turn the
fan speed control dial
to the maximum position and the tem-
perature control dial to the full hot
position.
When the
orposition is se-
lected, the air conditioner automatically
turns on (however, the indicator light will
not illuminate). In this position, the air con-
ditioner cannot be turned off. When the air
flow control is turned to any position other
than
or(the air conditioner will
continue operating). and can be turned off
using the air conditioner button. This dehu-
midifies the air, which helps defog the
windshield.
Bi-level heating
This mode directs cooler air from the side
and center vents and warmer air from the
floor outlets. When the temperature con-
trol dial is moved to the full hot or full cool
position, the air between the vents and the
floor outlets is the same temperature.
4-12Monitor, climate, audio, phone and voice recognition systems
Page 135 of 300
position.
2. Turn the air flow control dial to the
position.
3. Turn the
fan speed control dial to
the desired position.
4. Turn the temperature control dial to the desired position.
Heating and defogging
This mode heats the interior and defogs
the windshield.
1. Move the air intake lever to the
position.
2. Turn the air flow control dial to the
position.
3. Turn the
fan speed control dial to
the desired position.
4. Turn the temperature control dial to the desired position between the middle
and the hot position.
When the
orposition is se-
lected, the air conditioner automatically
turns on (however, the indicator light will
not illuminate). In this position, the air con-
ditioner cannot be turned off. When the air
flow control is turned to any position other than
or(the air conditioner will
continue operating) and can be turned off
using the air conditioner button. This dehu-
midifies the air, which helps defog the
windshield.
Operating tips
Clear snow and ice from the wiper blades
and air inlet in front of the windshield.
This improves heater operation.
AIR CONDITIONER OPERATION
Start the engine, turn thefan speed
control dial to the desired position, and
press the
button to activate the air
conditioner. When the air conditioner is on,
cooling and dehumidif ying functions are
added to the heater operation.
The air conditioner cooling function op-
erates only when the engine is running.
Cooling
This mode is used to cool and dehumidif y
the air.
1. Move the air intake lever to the
position.
2. Turn the air flow control dial to the
position. 3. Turn the
fan speed control dial to
the desired position.
4. Press the
button. The indicator
light comes on.
5. Turn the temperature control dial to the desired position.
• For quick cooling when the outside tem- perature is high, move the air intake lever
to the
position. Be sure to return to
theposition for normal cooling.
Dehumidified heating
This mode is used to heat and dehumidif y
the air.
1. Move the air intake lever to the
position.
2. Turn the air flow control dial to the
position.
3. Turn the
fan speed control dial to
the desired position.
4. Press the
button. The indicator
light comes on.
5. Turn the temperature control dial to the desired position.
Monitor, climate, audio, phone and voice recognition systems4-13
Page 136 of 300
position.
2. Turn the air flow control dial to the
position.
3. Turn the
fan speed control dial to
the desired position. When theorposition is selected, the air condi-
tioner automatically turns on (however,
the indicator light will not illuminate). In
this position, the air conditioner cannot
be turned off. When the air flow control is
turned to any position other than
or(the air conditioner will continue
operating). and can be turned off using
the air conditioner button. This dehu-
midifies the air, which helps defog the
windshield.
4. Turn the temperature control dial to the desired position.
Operating tips
€ Keep the windows closed while the airconditioner is in operation.
€ Af ter parking in the sun, drive for 2 or 3 minutes with the windows open to vent
hot air from the passenger compart-
ment before closing the windows. This
allows the air conditioner to cool the inte-
rior more quickly.
€ The air conditioning system should be
operated for approximately 10 minutes
at least once a month. This helps pre-
vent damage to the system due to lack
of lubrication.
• A visible mist may be seen coming from the ventilators in hot, humid conditions
as the air is cooled rapidly. This does not
indicate a malfunction.
• If the high temperature warning light
illuminates in red indicating en-
gine coolant temperature is over the
normal range, turn the air conditioner
off. For additional information, see “If
your vehicle overheats” (P. 6-12).
AIR FLOW CHARTS
The following charts show the button and
dial positions for MAXIMUM AND QUICK
heating, cooling or defrosting. The air in-
take lever should always be in the
position for heating and defrosting.
4-14Monitor, climate, audio, phone and voice recognition systems
Page 140 of 300
The air conditioner system in your NISSAN
vehicle is charged with a refrigerant de-
signed with the environment in mind.
This refrigerant does not harm the
earth's ozone layer.
Special charging equipment and lubricant
is required when servicing your NISSAN air
conditioner. Using improper refrigerants or
lubricants will cause severe damage to
your air conditioner system. For additional
information, see “Air conditioner system re-
frigerant and oil recommendations”
(P. 10-7).
It is recommended that you visit a NISSAN
dealer to service your “environmentally
friendly ” air conditioner system.
Page 187 of 300
WARNING
Always follow the instructions below.
Failure to do so could result in damage
to the charging system and cause per-
sonal injury.
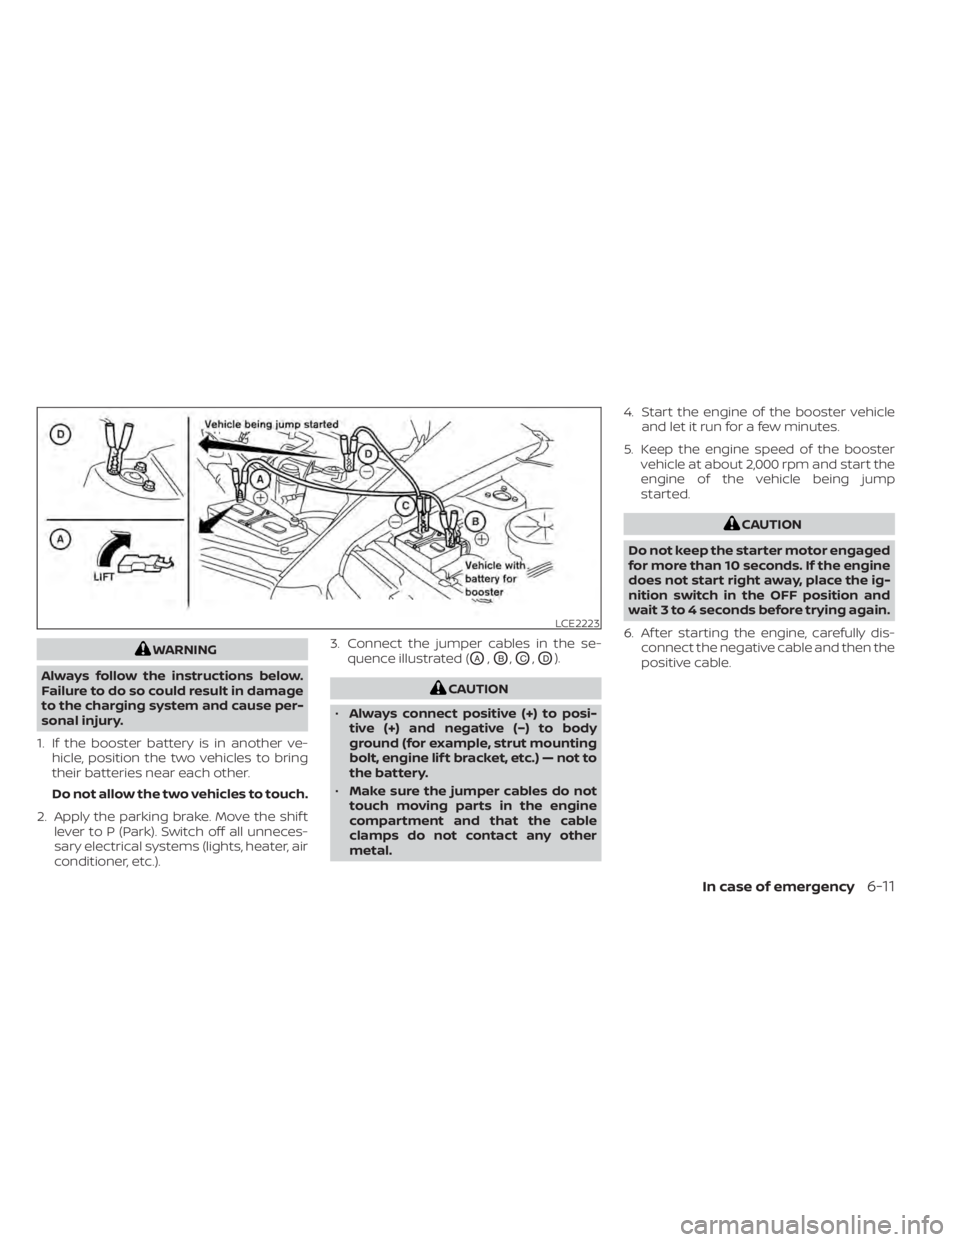
1. If the booster battery is in another ve- hicle, position the two vehicles to bring
their batteries near each other.
Do not allow the two vehicles to touch.
2. Apply the parking brake. Move the shif t lever to P (Park). Switch off all unneces-
sary electrical systems (lights, heater, air
conditioner, etc.). 3. Connect the jumper cables in the se-
quence illustrated (OA,OB,OC,OD).
LCE2223
Page 188 of 300
CAUTION
• Do not push start this vehicle. The
three-way catalyst may be
damaged.
• Continuously Variable Transmission
(CVT) models cannot be push-
started or tow-started. Attempting
to do so may cause transmission
damage.WARNING
• Do not continue to drive if your ve-
hicle overheats. Doing so could cause
engine damage or a vehicle fire.
• To avoid the danger of being scalded,
never remove the radiator or coolant
reservoir cap while the engine is still
hot. When the radiator or coolant res-
ervoir cap is removed, pressurized
hot water will spurt out, possibly
causing serious injury.
• Do not open the hood if steam is
coming out.
• Overheating can result in reduced
engine power and vehicle speed. The
reduced speed may be lower than
other traffic, which could increase
the chance of a collision. Be espe-
cially careful when driving. If the ve-
hicle cannot maintain a safe driving
speed, pull to the side of the road in a
safe area. Allow the engine to cool
and return to normal operation.
If your vehicle is overheating (indicated by a
red high temperature warning light
),
or if you feel a lack of engine power, detect
abnormal noise, etc., take the following
steps. 1. Move the vehicle safely off the road, ap-
ply the parking brake and move the shif t
lever to P (Park).
Do not stop the engine.
2. Turn off the air conditioner. Open all the windows, move the heater or air condi-
tioner temperature control to maximum
hot and fan control to high speed.
3. Get out of the vehicle. Look and listen for steam or coolant escaping from the ra-
diator before opening the hood. If steam
or coolant is escaping, turn off the en-
gine. Do not open the hood further until
no steam or coolant can be seen.
4. Open the engine hood.
Page 214 of 300
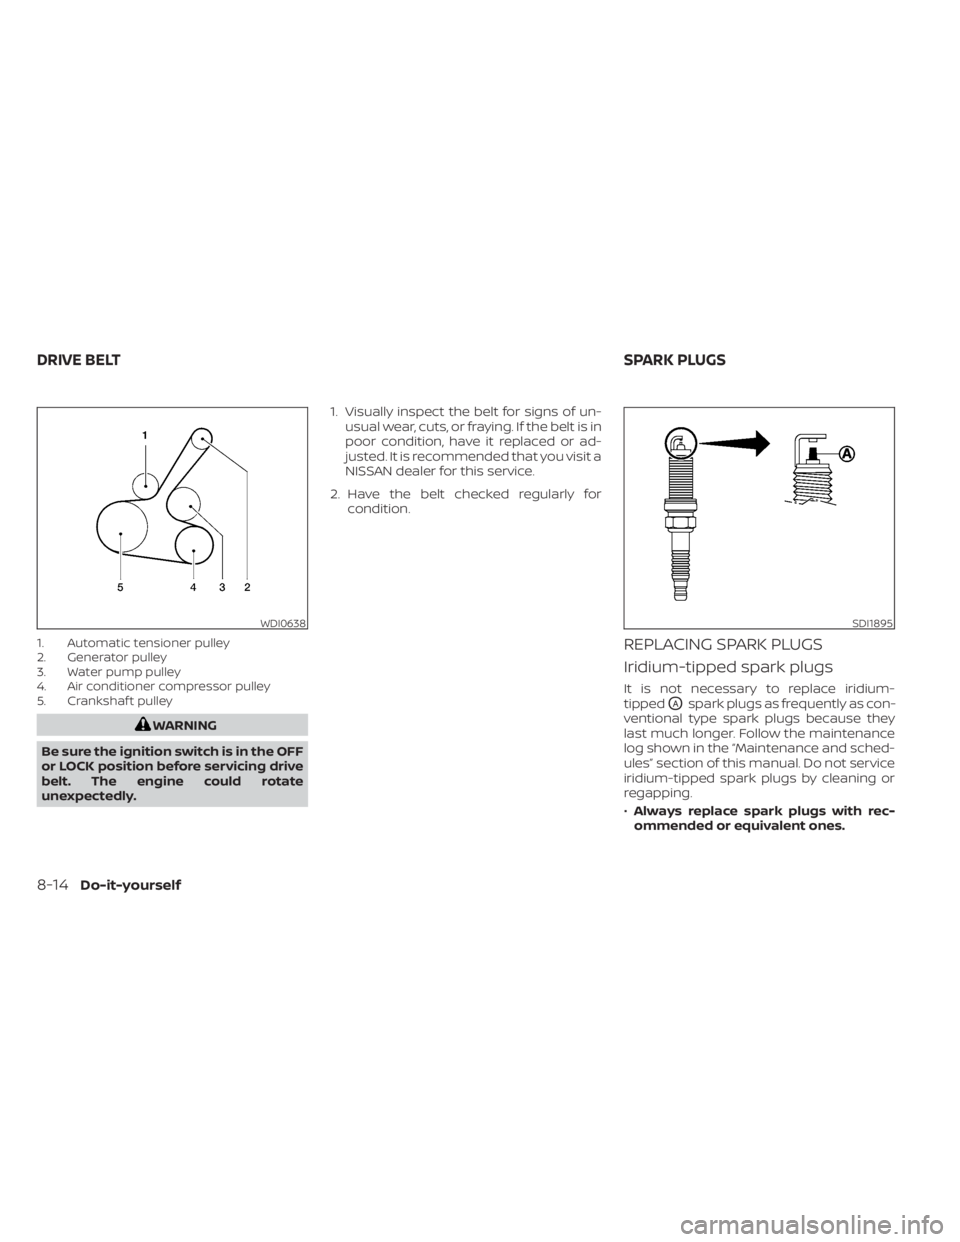
1. Automatic tensioner pulley
2. Generator pulley
3. Water pump pulley
4. Air conditioner compressor pulley
5. Crankshaf t pulley
SDI1895
DRIVE BELTSPARK PLUGS