2021 NISSAN NV200 warning light
[x] Cancel search: warning lightPage 83 of 300
pressure is adjusted. Af ter the tire is in-
flated to the recommended pressure,
the vehicle must be driven at speeds
above 16 mph (25 km/h) to activate the
TPMS and turn off the low tire pressure
warning light. Use a tire pressure gauge
to check the tire pressure.
The low tire pressure warning light remains
illuminated until the tires are inflated to the
recommended COLD tire pressure. The
CHECK TIRE PRES warning message is dis-
played each time the ignition switch is
placed in the ON position as long as the low
tire pressure warning light remains
illuminated.
For additional information, see "Check tire
pressure warning message" (P. 2-5) and
“Tire Pressure Monitoring System (TPMS)”
(P. 5-3) and (P. 6-2).
TPMS malfunction
If the TPMS is not functioning properly, the
low tire pressure warning light will flash for
approximately 1 minute when the ignition
switch is placed in the ON position. The
light will remain on af ter 1 minute. Have the
system checked. It is recommended that
you visit a NISSAN dealer for this service.
The "CHECK TIRE PRES" warning does notappear if the low tire pressure warning light
illuminates to indicate a TPMS malfunction.
For additional information, see “Tire Pres-
sure Monitoring System (TPMS)” (P. 5-3) and
“Tire pressure” (P. 8-29).
Page 84 of 300
•When using a wheel without the
TPMS such as the spare tire, the TPMS
will not function and the low tire
pressure warning light will flash for
approximately 1 minute. The light will
remain on af ter 1 minute. Have your
tires replaced and/or TPMS system
reset as soon as possible. It is recom-
mended that you visit a NISSAN
dealer for these services.
• Replacing tires with those not origi-
nally specified by NISSAN could af-
fect the proper operation of the
TPMS.
CAUTION
• The TPMS is not a substitute for the
regular tire pressure check. Be sure
to check the tire pressure regularly.
• If the vehicle is being driven at
speeds of less than 16 mph (25 km/h),
the TPMS may not operate correctly.
• Be sure to install the specified size of
tires to the four wheels correctly.
Malfunction Indicator Light
(MIL)
If this indicator light comes on steady or
blinks while the engine is running, it may
indicate a potential emission control
malfunction.
The
may also come on steady if the
fuel-filler cap is loose or missing or if the
vehicle runs out of fuel. Check to make sure
the fuel-filler cap is installed and closed
tightly and that the vehicle has at least 3 gal
(11.4 L) of fuel in the fuel tank.
Af ter a few driving trips, the
light
should turn off if no other potential emis-
sion control system malfunction exists.
If this indicator light comes on steady for 20
seconds and then blinks for 10 seconds
when the engine is not running, it indicates
that the vehicle is not ready for an emission control system inspection/maintenance
test. For additional information, see “Readi-
ness for Inspection/Maintenance (I/M) test”
(P. 10-22).
Overdrive OFF indicator
light
The overdrive OFF indicator light illumi-
nates when the overdrive OFF mode is
selected.
For additional information, see “Continu-
ously Variable Transmission (CVT)” (P. 5-12).
Power steering warning
light
Page 85 of 300
•When the power steering warning
light illuminates with the engine run-
ning, there will be no power assist for
the steering. You will still have control
of the vehicle, but the steering will be
harder to operate. Have the power
steering system checked. It is recom-
mended that you visit a NISSAN
dealer for this service.
When the ignition switch is placed in the ON
position, the power steering warning light
illuminates. Af ter starting the engine, the
power steering warning light turns off. This
indicates the power steering is operational.
If the power steering warning light illumi-
nates while the engine is running, it may
indicate the power steering is not function-
ing properly and may need servicing. Have
the power steering checked. It is recom-
mended that you visit a NISSAN dealer for
this service.
When the power steering warning light illu-
minates with the engine running, there will
be no power assist for the steering, but you
will still have control of the vehicle. At this
time, greater steering effort is required to
operate the steering wheel, especially in
sharp turns and at low speeds. For additional information, see “Power
steering” (P. 5-22).
Slip indicator light
This indicator light will blink when the VDC
system is operating, thus alerting the driver
to the fact that the road surface is slippery
and the vehicle is nearing its traction limits.
You may feel or hear the system working;
this is normal.
The light will blink for a few seconds af ter
the VDC system stops limiting wheel spin.
The
indicator light also comes on
when you place the ignition switch in the
ON position. The light will turn off af ter ap-
proximately 2 seconds if the system is op-
erational. If the light does not come on
have the system checked. It is recom-
mended that you visit a NISSAN dealer for
this service.
Vehicle Dynamic Control
(VDC) OFF indicator light
This indicator light comes on when the
VDC OFF switch is pushed to off. This indi-
cates the VDC system has been turned off. Push the VDC OFF switch again or restart
the engine and the system will operate
normally. For additional information, see
“Vehicle Dynamic Control (VDC) system”
(P. 5-25).
The VDC OFF indicator light also comes on
when you place the ignition switch in the
ON position. The light will turn off af ter
about 2 seconds if the system is opera-
tional. If the light stays on or comes on
along with the
indicator light while
you are driving, have the VDC system
checked. It is recommended that you visit a
NISSAN dealer for this service.
While the VDC system is operating, you
might feel a slight vibration or hear the sys-
tem working when starting the vehicle or
accelerating, but this is normal.
WARNING/INDICATOR LIGHTS
(other)
This vehicle has various warning lights that
may illuminate to indicate a potential prob-
lem. For additional information, refer to the
specific light in this section.
Instruments and controls2-15
Page 86 of 300

High beam indicator light
(blue)
This blue light comes on when the head-
light high beams are on and goes out when
the low beams are selected.
The high beam indicator light also comes
on when the passing signal is activated.
Turn signal/hazard
indicator lights (green)
The appropriate light flashes when the turn
signal switch is activated.
NOTE:
In case of turn signal light bulb malfunc-
tion, the turn signal will flash at a higher
frequency when the turn signal switch is
activated.Both lights flash when the hazard switch is
turned on.
AUDIBLE REMINDERS
Brake pad wear warning
The disc brake pads have audible wear
warnings. When a disc brake pad requires
replacement, it makes a high pitched
scraping sound when the vehicle is in mo-
tion, whether or not the brake pedal is de-
pressed. Have the brakes checked as soon
as possible if the warning sound is heard.
Key reminder chime
A chime sounds if the driver's door is
opened while the key is lef t in the ignition
switch. Remove the key and take it with you
when leaving the vehicle.
Light reminder chime
With the ignition switch placed in the OFF
position, a chime sounds when the driver's
door is opened if the headlights or parking
lights are on.
Turn the headlight control switch off before
leaving the vehicle.
Parking brake reminder chime
A chime sounds if the parking brake is set
and the vehicle is driven. The chime will
stop if the parking brake is released or the
vehicle speed returns to zero.
2-16Instruments and controls
Page 93 of 300
WARNING
When the DRL system is active, tail
lights on your vehicle are not on. It is
necessary at dusk to turn on your
headlights. Failure to do so could cause
an accident injuring yourself and
others.
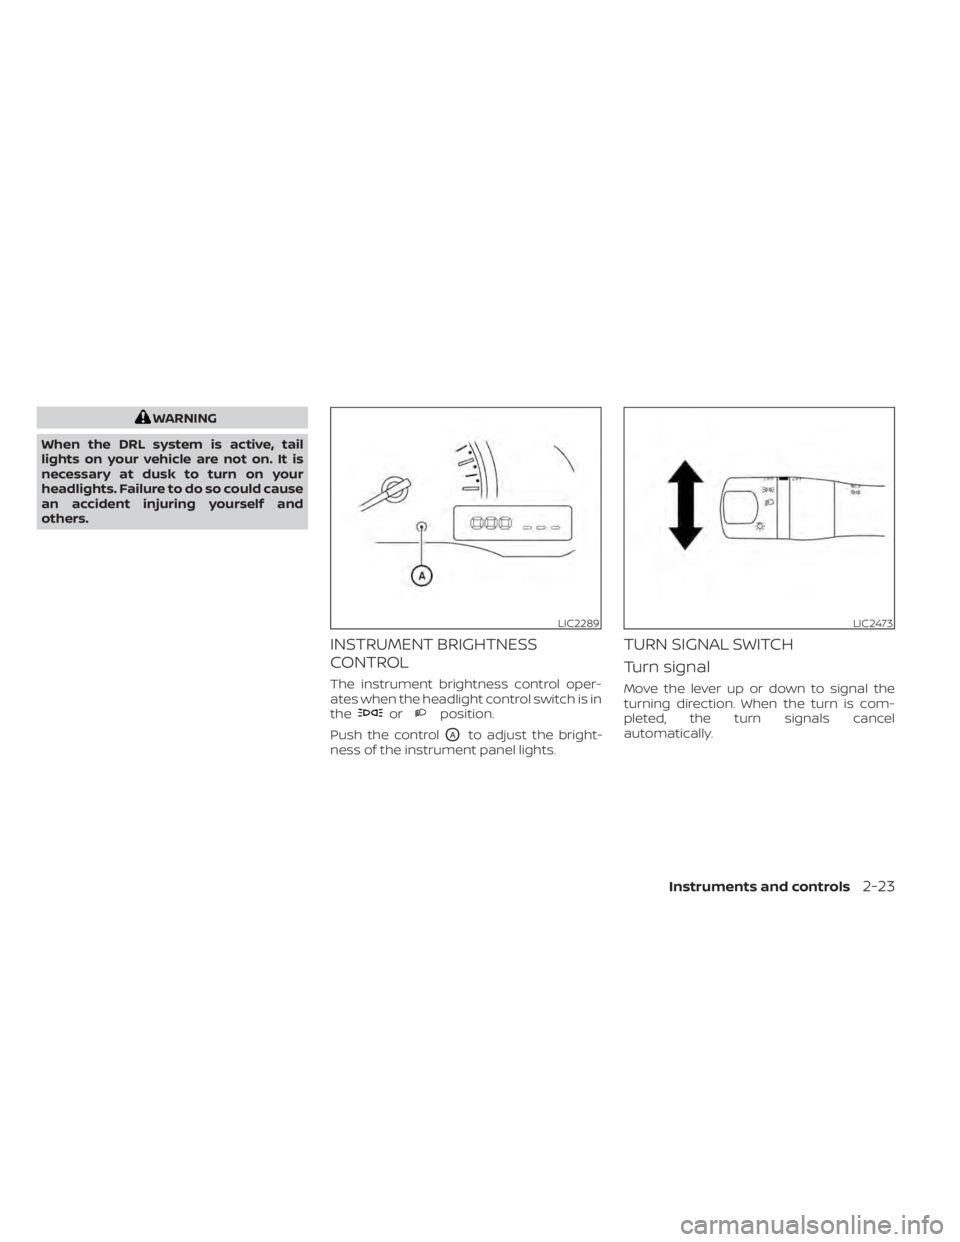
INSTRUMENT BRIGHTNESS
CONTROL
The instrument brightness control oper-
ates when the headlight control switch is in
the
orposition.
Push the control
OAto adjust the bright-
ness of the instrument panel lights.
TURN SIGNAL SWITCH
Turn signal
Move the lever up or down to signal the
turning direction. When the turn is com-
pleted, the turn signals cancel
automatically.
LIC2289LIC2473
Page 119 of 300
•Failure to tighten the fuel-filler cap
properly may cause theMal-
function Indicator Light (MIL) to illu-
minate. If the
light illuminates
because the fuel-filler cap is loose or
missing, tighten or install the cap and
continue to drive the vehicle. The
light should turn off af ter a few
driving trips. If thelight does not
turn off af ter a few driving trips, have
the vehicle inspected. It is recom-
mended that you visit a NISSAN
dealer for this service.
• The LOOSE FUEL CAP warning mes-
sage will be displayed if the fuel-filler
cap is not properly tightened. It may
take a few driving trips for the mes-
sage to be displayed. Failure to
tighten the fuel-filler cap properly af-
ter the LOOSE FUEL CAP warning
message is displayed may cause the
Malfunction Indicator Light (MIL)
to illuminate.
• For additional information, “Malfunc-
tion Indicator Light (MIL)” (P. 2-14).
• If fuel is spilled on the vehicle body,
flush it away with water to avoid
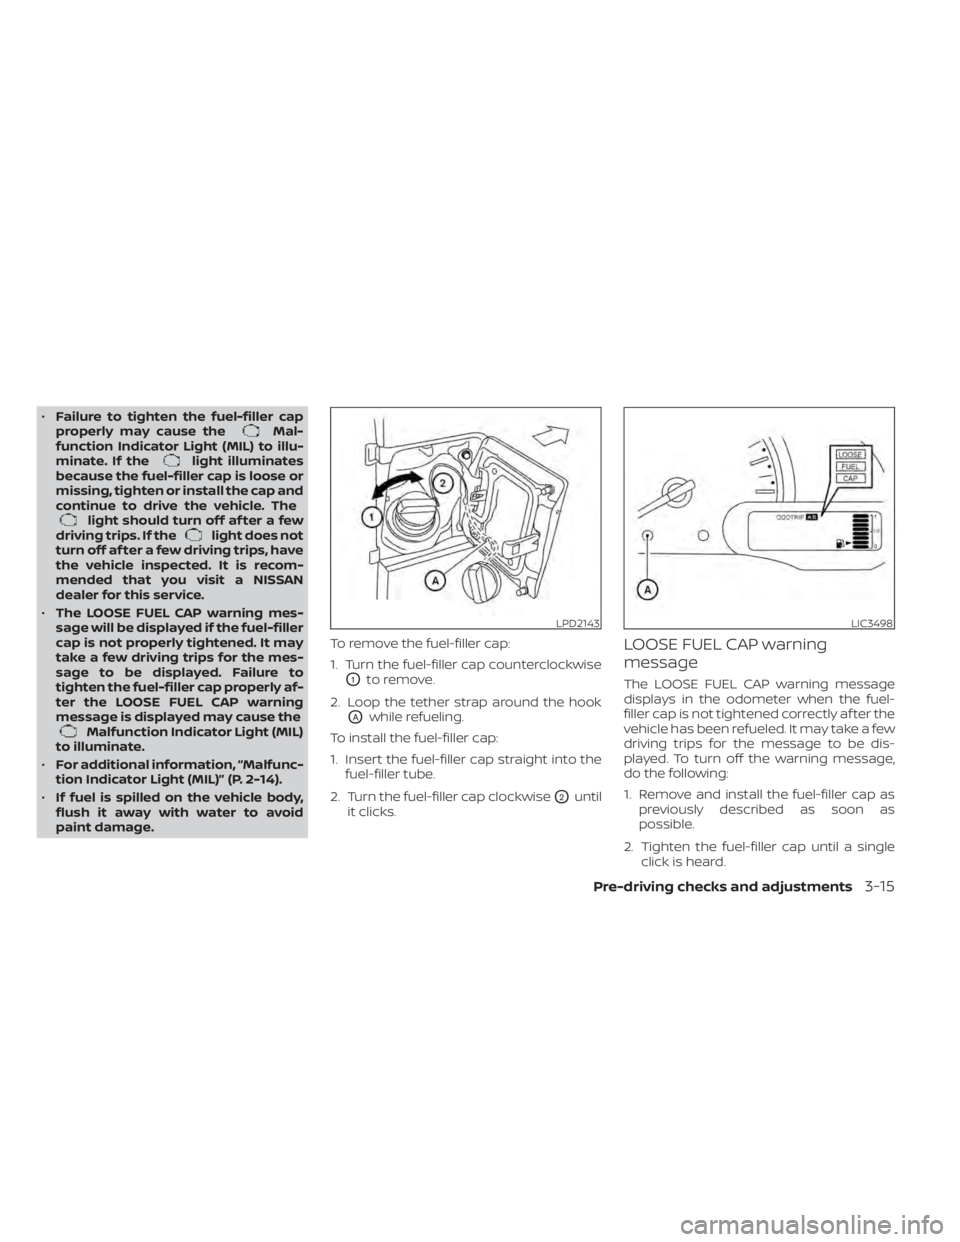
paint damage. To remove the fuel-filler cap:
1. Turn the fuel-filler cap counterclockwise
O1to remove.
2. Loop the tether strap around the hook
OAwhile refueling.
To install the fuel-filler cap:
1. Insert the fuel-filler cap straight into the fuel-filler tube.
2. Turn the fuel-filler cap clockwise
O2until
it clicks.
LOOSE FUEL CAP warning
message
The LOOSE FUEL CAP warning message
displays in the odometer when the fuel-
filler cap is not tightened correctly af ter the
vehicle has been refueled. It may take a few
driving trips for the message to be dis-
played. To turn off the warning message,
do the following:
1. Remove and install the fuel-filler cap as previously described as soon as
possible.
2. Tighten the fuel-filler cap until a single click is heard.
LPD2143LIC3498
Page 136 of 300
position.
2. Turn the air flow control dial to the
position.
3. Turn the
fan speed control dial to
the desired position. When theorposition is selected, the air condi-
tioner automatically turns on (however,
the indicator light will not illuminate). In
this position, the air conditioner cannot
be turned off. When the air flow control is
turned to any position other than
or(the air conditioner will continue
operating). and can be turned off using
the air conditioner button. This dehu-
midifies the air, which helps defog the
windshield.
4. Turn the temperature control dial to the desired position.
Operating tips
€ Keep the windows closed while the airconditioner is in operation.
€ Af ter parking in the sun, drive for 2 or 3 minutes with the windows open to vent
hot air from the passenger compart-
ment before closing the windows. This
allows the air conditioner to cool the inte-
rior more quickly.
€ The air conditioning system should be
operated for approximately 10 minutes
at least once a month. This helps pre-
vent damage to the system due to lack
of lubrication.
• A visible mist may be seen coming from the ventilators in hot, humid conditions
as the air is cooled rapidly. This does not
indicate a malfunction.
• If the high temperature warning light
illuminates in red indicating en-
gine coolant temperature is over the
normal range, turn the air conditioner
off. For additional information, see “If
your vehicle overheats” (P. 6-12).
AIR FLOW CHARTS
The following charts show the button and
dial positions for MAXIMUM AND QUICK
heating, cooling or defrosting. The air in-
take lever should always be in the
position for heating and defrosting.
4-14Monitor, climate, audio, phone and voice recognition systems
Page 146 of 300
Additional information:
• When using a wheel without the TPMSsuch as the spare tire, the TPMS does not
monitor the tire pressure of the spare tire.
• The TPMS will activate only when the ve- hicle is driven at speeds above 16 mph (25
km/h). Also, this system may not detect a
sudden drop in tire pressure (for example,
a flat tire while driving).
• The low tire pressure warning light does not automatically turn off when the tire
pressure is adjusted for all four tires. Af ter
all your tires are inflated to the recom-
mended pressure, the vehicle must be
driven at speeds above 16 mph (25 km/h)
to activate the TPMS and turn off the low
tire pressure warning light. Use a tire
pressure gauge to check the tire
pressure.
• The CHECK TIRE PRES (pressure) warning message is displayed in the odometer
when the low tire pressure warning light
is illuminated and low tire pressure is de-
tected. The CHECK TIRE PRES warning
message turns off when the low tire pres-
sure warning light turns off. • The low tire pressure warning light re-
mains illuminated until the tires are in-
flated to the recommended COLD tire
pressure. The CHECK TIRE PRES warning
message is displayed each time the igni-
tion switch is placed in the ON position as
long as the low tire pressure warning light
remains illuminated.
• The CHECK TIRE PRES warning message is not displayed if the low tire pressure
warning light illuminates to indicate a
TPMS malfunction.
• Tire pressure rises and falls depending on the heat caused by the vehicle’s opera-
tion and the outside temperature. Do not
reduce the tire pressure af ter driving be-
cause the tire pressure rises af ter driving.
Low outside temperature can lower the
temperature of the air inside the tire
which can cause a lower tire inflation
pressure. This may cause the low tire
pressure warning light to illuminate. If the
warning light illuminates, check the tire
pressure for all four tires.
• The Tire and Loading Information label is located in the driver's door opening.
For additional information, see “Low tire
pressure warning light” (P. 2-12) and “Tire
Pressure Monitoring System (TPMS)” (P. 6-2).