2021 NISSAN NV200 key
[x] Cancel search: keyPage 115 of 300
•Do not place the key fob for an ex-
tended period in an area where tem-
peratures exceed 140°F (60°C).
• Do not attach the key fob with a key
holder that contains a magnet.
• Do not place the key fob near equip-
ment that produces a magnetic field,
such as a TV, audio equipment and
personal computers.
If a key fob is lost or stolen, NISSAN rec-
ommends erasing the ID code of that
key fob. This will prevent the key fob
from unauthorized use to unlock the
vehicle. For information regarding the
erasing procedure, it is recommended
that you visit a NISSAN dealer.
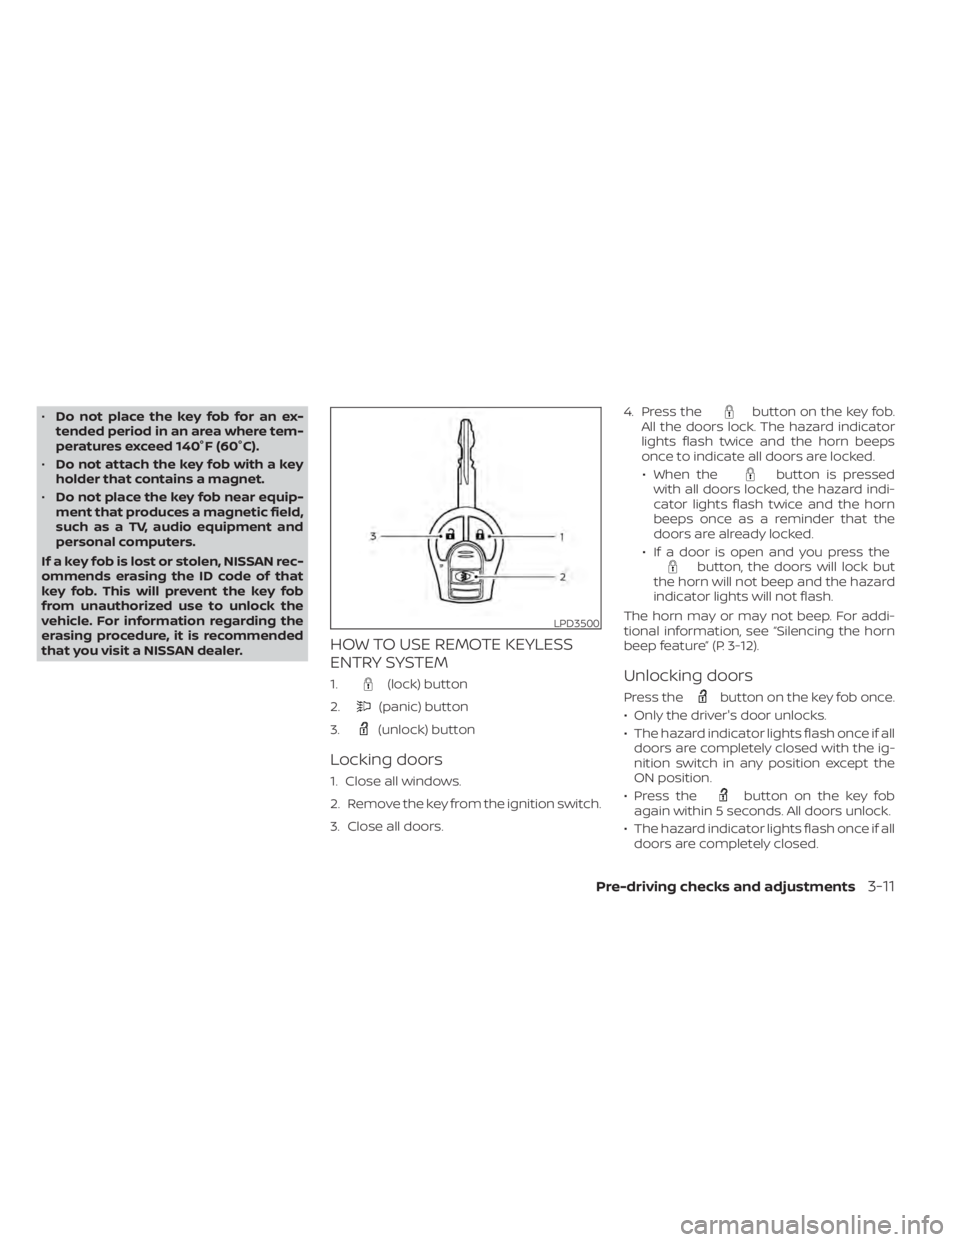
HOW TO USE REMOTE KEYLESS
ENTRY SYSTEM
1.(lock) button
2.
(panic) button
3.
(unlock) button
Locking doors
1. Close all windows.
2. Remove the key from the ignition switch.
3. Close all doors. 4. Press the
button on the key fob.
All the doors lock. The hazard indicator
lights flash twice and the horn beeps
once to indicate all doors are locked.
• When the
button is pressed
with all doors locked, the hazard indi-
cator lights flash twice and the horn
beeps once as a reminder that the
doors are already locked.
• If a door is open and you press the
button, the doors will lock but
the horn will not beep and the hazard
indicator lights will not flash.
The horn may or may not beep. For addi-
tional information, see “Silencing the horn
beep feature” (P. 3-12).
Unlocking doors
Press thebutton on the key fob once.
• Only the driver's door unlocks.
• The hazard indicator lights flash once if all doors are completely closed with the ig-
nition switch in any position except the
ON position.
• Press the
button on the key fob
again within 5 seconds. All doors unlock.
• The hazard indicator lights flash once if all doors are completely closed.
LPD3500
Page 116 of 300

button on the key fob once
to turn on the interior lights.
The interior lights can be turned off without
waiting a period of time by inserting the key
into the ignition switch and placing the ig-
nition switch in the ON or START position,
locking the doors with the key fob, power
door lock switch or pushing the interior
light switch to the OFF position.
For additional information, see
lightsŽ (P. 2-32).
Auto relock
When thebutton on the key fob is
pressed, all doors will lock automatically
within one minute unless one of the follow-
ing operations is performed:
€ Any door is opened.
€ A key is inserted into the ignition switch and the switch is cycled from OFF to ON.
€ Press key fob
button.
Using the panic alarm
If you are near your vehicle and feel threat-
ened, you may activate the panic alarm to call attention by pressing and holding the
button on the key fob for
longer than
0.5 seconds.
The panic alarm and headlights will stay on
for a period of time.
The panic alarm stops when:
• It has run for a period of time.
• Any button is pressed on the key fob.
Silencing the horn beep feature
If desired, the horn beep feature can be
deactivated using the key fob.
To deactivate: Press and hold the
andbuttonsfor at least 2 seconds.
The hazard indicator lights will flash three
times to confirm that the horn beep fea-
ture has been deactivated.
To activate: Press and hold the
andbuttonsfor at least 2 seconds once
more.
The hazard indicator lights will flash once
and the horn will sound once to confirm
that the horn beep feature has been
reactivated.
Deactivating the horn beep feature does
not silence the horn if the alarm is
triggered.
3-12Pre-driving checks and adjustments
Page 130 of 300
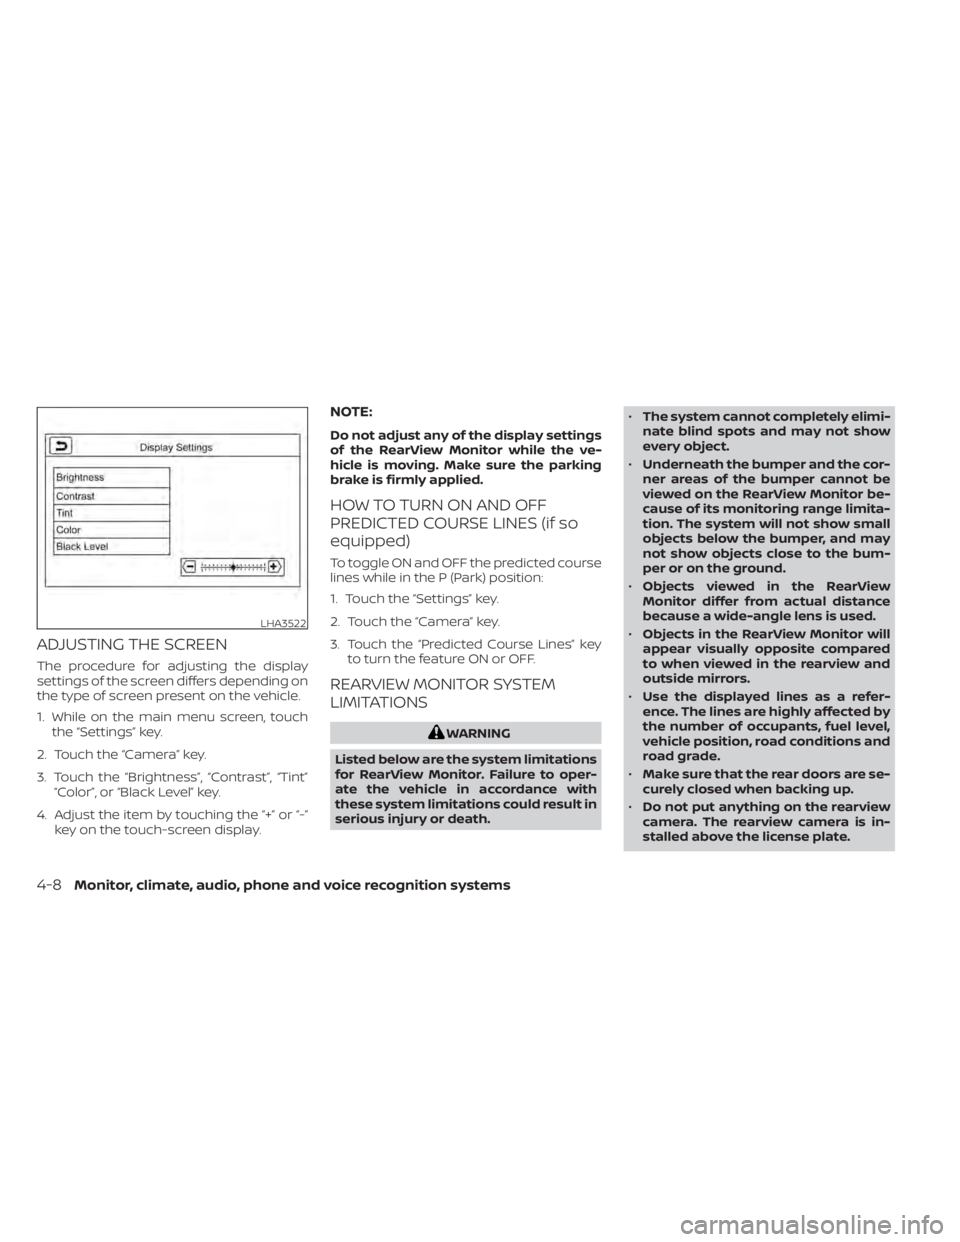
ADJUSTING THE SCREEN
The procedure for adjusting the display
settings of the screen differs depending on
the type of screen present on the vehicle.
1. While on the main menu screen, touchthe “Settings” key.
2. Touch the “Camera” key.
3. Touch the “Brightness”, “Contrast”, “Tint” “Color”, or “Black Level” key.
4. Adjust the item by touching the “+” or “-” key on the touch-screen display.
NOTE:
Do not adjust any of the display settings
of the RearView Monitor while the ve-
hicle is moving. Make sure the parking
brake is firmly applied.
HOW TO TURN ON AND OFF
PREDICTED COURSE LINES (if so
equipped)
To toggle ON and OFF the predicted course
lines while in the P (Park) position:
1. Touch the “Settings” key.
2. Touch the “Camera” key.
3. Touch the “Predicted Course Lines” keyto turn the feature ON or OFF.
REARVIEW MONITOR SYSTEM
LIMITATIONS
4-8Monitor, climate, audio, phone and voice recognition systems
Page 150 of 300
WARNING
• Never remove the ignition key or
place the ignition switch in the LOCK
position while driving. The steering
wheel will lock (for models with a
steering lock mechanism). This may
cause the driver to lose control of the
vehicle and could result in serious ve-
hicle damage or personal injury.
CONTINUOUSLY VARIABLE
TRANSMISSION
The ignition lock is designed so that the
ignition switch cannot be turned to the
LOCK position until the shif t lever is moved
to the P (Park) position.
• When placing the ignition switch in the LOCK position, make sure that the shif t
lever is in the P (Park) position
• When removing the key from the ignition switch (if it is inserted), make sure that the
shif t lever is in the P (Park) position. When the ignition switch cannot be placed
in the LOCK position:
1. Move the shif t lever to the P (Park)
position.
2. Move the ignition switch slightly in the ON direction.
3. Turn the ignition switch to the LOCK position.
4. Remove the key if it is inserted in the ignition switch.
If the ignition switch is placed in the LOCK
position, the shif t lever cannot be moved
from the P (Park) position.
The shif t lever can be moved if the igni-
tion switch is in the ON position and the
foot brake pedal is depressed.
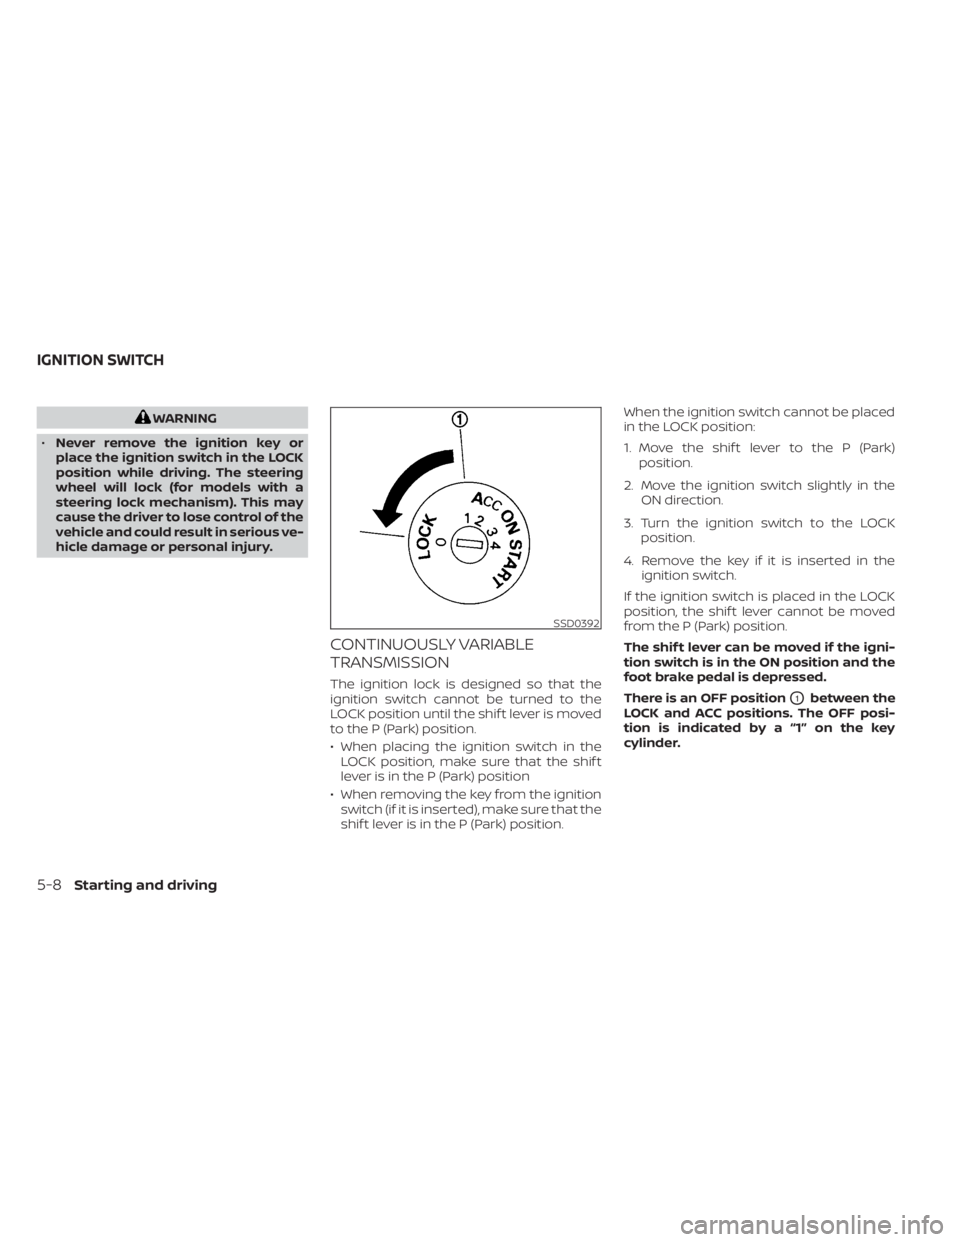
There is an OFF position
O1between the
LOCK and ACC positions. The OFF posi-
tion is indicated by a “1” on the key
cylinder.
Page 152 of 300
1. Apply the parking brake.
2. Move the shif t lever to P (Park) or N (Neu-tral). P (Park) is recommended.
The shif t lever cannot be moved out of
P (Park) and into any of the other gear
positions if the ignition switch is
turned to the OFF position or if the key
is removed from the ignition switch.
The starter is designed not to operate
if the shif t lever is in any of the driving
positions.
3. Crank the engine with your foot off the
accelerator pedal by placing the igni-
tion switch in the START position. Re-
lease the key when the engine starts. If
the engine starts, but fails to run, repeat
the above procedure.
• If the engine is very hard to start in extremely cold weather or when re-
starting, depress the accelerator
pedal a little (approximately 1/3 to the
floor) and hold it and then crank the
engine. Release the key and the accel-
erator pedal when the engine starts. • If the engine is very hard to start be-
cause it is flooded, depress the accel-
erator pedal all the way to the floor
and hold it. Crank the engine for 5–6
seconds. Af ter cranking the engine, re-
lease the accelerator pedal. Crank the
engine with your foot off the accel-
erator pedal by turning the ignition
key to the START position. Release the
key when the engine starts. If the en-
gine starts, but fails to run, repeat the
above procedure.
Page 155 of 300
CAUTION
To avoid possible damage to your ve-
hicle, when stopping the vehicle on an
uphill grade, do not hold the vehicle by
depressing the accelerator pedal. The
foot brake should be used for this
purpose.
1. Af ter starting the engine, fully depress the foot brake pedal before moving the
shif t lever out of the P (Park) position.
2. Keep the foot brake pedal depressed and move the shif t lever into a driving
gear.
3. Release the foot brake, then gradually start the vehicle in motion.
4. Stop the vehicle completely before mov- ing the shif t lever into the P (Park)
position.
The Continuously Variable Transmission
is designed so the foot brake pedal MUST
be depressed before shif ting from P
(Park) to any drive position while the ig-
nition switch is in the ON position. The shif t lever cannot be moved out of P
(Park) and into any of the other gear po-
sitions if the ignition switch is placed in
the LOCK, OFF or ACC position or if the
keyisremoved.
Shif ting
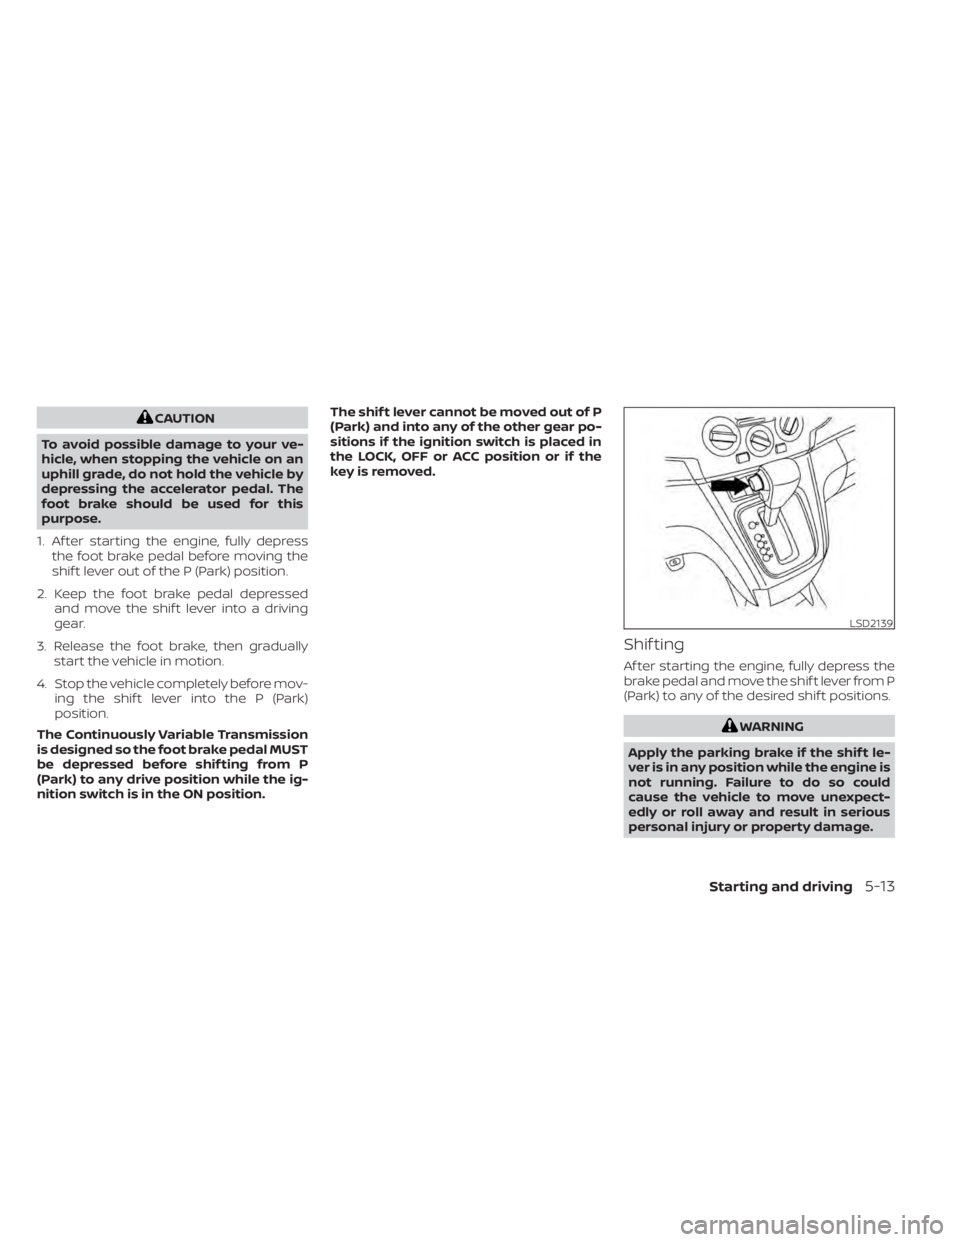
Af ter starting the engine, fully depress the
brake pedal and move the shif t lever from P
(Park) to any of the desired shif t positions.
Page 156 of 300
If the ignition switch is placed in the OFF or
ACC position for any reason while the ve-
hicle is in N (Neutral), or any drive position,
the key cannot be turned to the LOCK po-
sition and cannot be removed from the
ignition switch. If this occurs, perform the
following steps:
1. Apply the parking brake when the ve-hicle is stopped.
2. Move the shif t lever to P (Park) to park the vehicle and place the ignition switch
in the LOCK position to remove the key.
P (Park)
CAUTION
To prevent transmission damage, use
the P (Park) position only when the ve-
hicle is completely stopped.
Use the P (Park) shif t lever position when
the vehicle is parked or when starting the
engine. Make sure the vehicle is completely
stopped. The brake pedal must be de-
pressed and the shif t lever button
pressed in to move the shif t lever from N
(Neutral) or any drive position to P (Park).
Apply the parking brake. When parking on a
hill, apply the parking brake first, then place
the shif t lever into the P (Park) position.
R (Reverse)
CAUTION
To prevent transmission damage, use
the R (Reverse) position only when the
vehicle is completely stopped.
Use the R (Reverse) position to back up.
Make sure the vehicle is completely
stopped before selecting the R (Reverse)
position. R (Reverse) speed is limited to 30
mph (48 km/h). Do not exceed 30 mph (48
km/h) in the R (Reverse) position. The
brake pedal must be depressed and the
shif t lever button pressed in to move the
shif t lever from P (Park), N (Neutral) or
any drive position to R (Reverse).
N (Neutral)
Neither forward nor reverse gear is en-
gaged. The engine can be started in this
position. You may shif t to N (Neutral) and
restart a stalled engine while the vehicle is
moving.
D (Drive)
Use this position for all normal forward
driving.
L(Low)
Use this position for engine braking on
steep downhill gradients/climbing steep
slopes and whenever approaching sharp
bends. Do not use the L (Low) position in
any other circumstances.
5-14Starting and driving
Page 221 of 300
CAUTION
Be careful not to allow children to swal-
low the battery or removed parts.
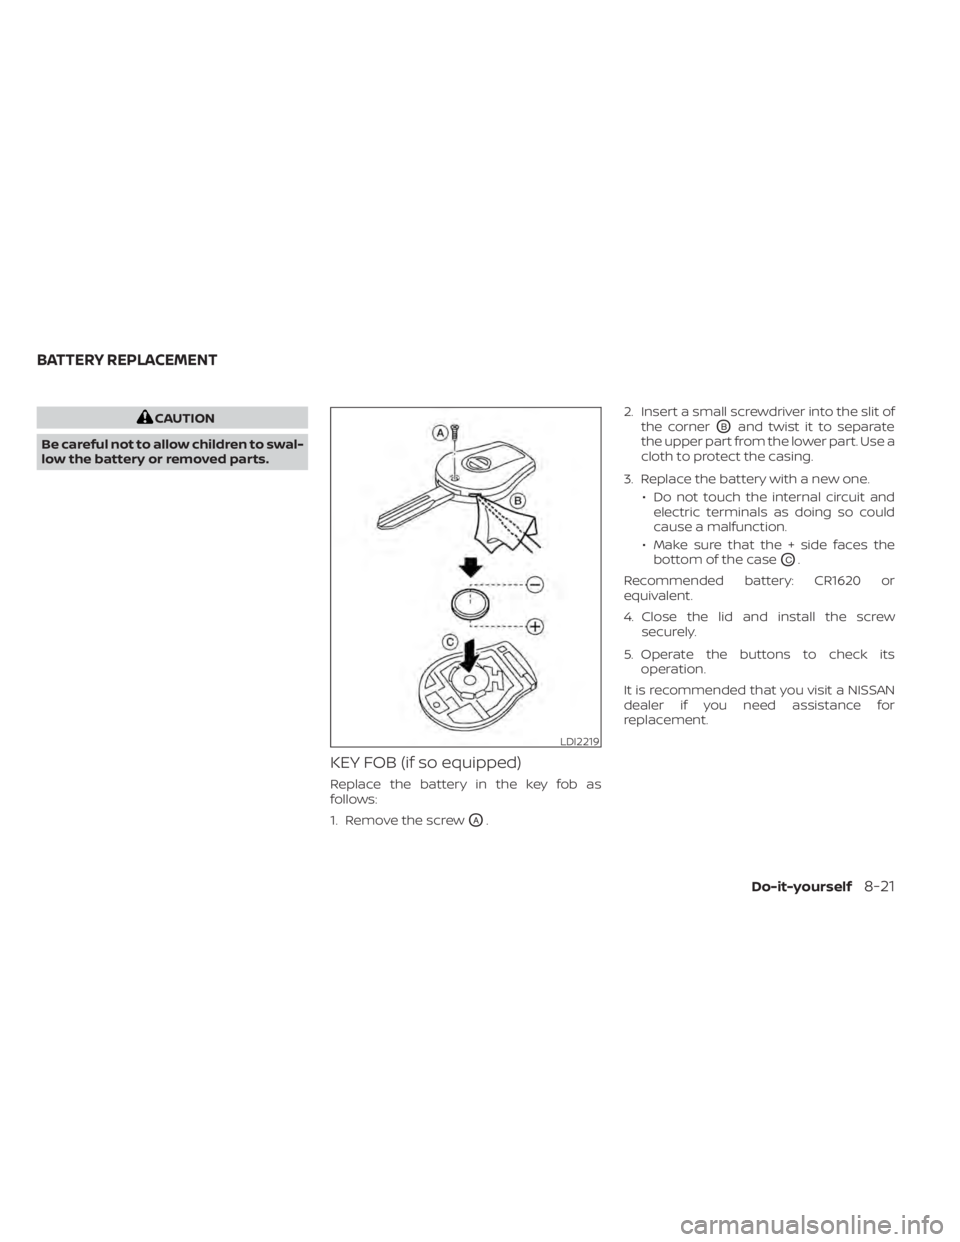
KEY FOB (if so equipped)
Replace the battery in the key fob as
follows:
1. Remove the screw
OA. 2. Insert a small screwdriver into the slit of
the corner
OBand twist it to separate
the upper part from the lower part. Use a
cloth to protect the casing.
3. Replace the battery with a new one. • Do not touch the internal circuit andelectric terminals as doing so could
cause a malfunction.
• Make sure that the + side faces the bottom of the case
OC.
Recommended battery: CR1620 or
equivalent.
4. Close the lid and install the screw securely.
5. Operate the buttons to check its operation.
It is recommended that you visit a NISSAN
dealer if you need assistance for
replacement.
LDI2219
BATTERY REPLACEMENT
Do-it-yourself8-21