2021 NISSAN MURANO tire type
[x] Cancel search: tire typePage 386 of 508
TIRE DRESSINGS
NISSAN does not recommend the use of
tire dressings. Tire manufacturers apply a
coating to the tires to help reduce discolor-
ation of the rubber. If a tire dressing is ap-
plied to the tires, it may react with the coat-
ing and form a compound. This compound
may come off the tire while driving and
stain the vehicle paint.
If you choose to use a tire dressing, take the
following precautions:
• Use a water-based tire dressing. Thecoating on the tire dissolves more easily
than with an oil-based tire dressing.
• Apply a light coat of tire dressing to help prevent it from entering the tire tread/
grooves (where it would be difficult to
remove).
• Wipe off excess tire dressing using a dry towel. Make sure the tire dressing is com-
pletely removed from the tire
tread/grooves.
• Allow the tire dressing to dry as recom- mended by the tire dressing
manufacturer. Occasionally remove loose dust from the
interior trim, plastic parts and seats using a
vacuum cleaner or sof t bristled brush. Wipe
the vinyl and leather (if so equipped) sur-
faces with a clean, sof t cloth dampened in
mild soap solution, then wipe clean with a
dry, sof t cloth.
Regular care and cleaning is required in
order to maintain the appearance of the
leather (if so equipped).
Before using any fabric protector, read the
manufacturer's recommendations. Some
fabric protectors contain chemicals that
may stain or bleach the seat material.
Use a cloth dampened only with water to
clean the meter and gauge lens.
WARNING
Do not use water or acidic cleaners (hot
steam cleaners) on the seat. This can
damage the seat or occupant classifi-
cation sensor. This can also affect the
operation of the air bag system and re-
sult in serious personal injury.
CAUTION
• Never use benzine, thinner or any
similar material.
• Small dirt particles can be abrasive
and damaging to leather surfaces
and should be removed promptly. Do
not use saddle soap, car waxes, pol-
ishes, oils, cleaning fluids, solvents,
detergents or ammonia-based
cleaners as they may damage the
leather's natural finish.
• Never use fabric protectors unless
recommended by the manufacturer.
• Do not use glass or plastic cleaner on
meter or gauge lens covers. It may
damage the lens cover.
AIR FRESHENERS
Most air fresheners use a solvent that
could affect the vehicle interior. If you use
an air freshener, take the following
precautions:
• Hanging-type air fresheners can cause permanent discoloration when they con-
tact vehicle interior surfaces. Place the air
freshener in a location that allows it to
hang free and not contact an interior
surface.
CLEANING INTERIOR
7-4Appearance and care
Page 391 of 508

8 Do-it-yourself
Maintenance precautions.......................8-2
Engine compartment check locations ...........8-3
Engine cooling system ..........................8-4
Checking engine coolant level ................8-5
Changing engine coolant ....................8-5
Engine oil .......................................8-6
Checking engine oil level .....................8-6
Changing engine oil and oil filter ..............8-6
Continuously Variable Transmission (CVT)
fluid ............................................ 8-10
Power Steering Fluid (PSF) .......................8-11
Brake fluid ....................................... 8-11
Windshield-washer fluid ........................8-12
Windshield-washer fluid reservoir ...........8-12
Battery......................................... 8-13
Jump starting ............................... 8-14
Drive belt ....................................... 8-15
Spark plugs .................................... 8-15
Replacing spark plugs ....................... 8-15
Air cleaner ..................................... 8-16In-cabin microfilter
.......................... 8-17
Windshield wiper blades ........................8-17
Cleaning .................................... 8-17
Replacing ................................... 8-17
Brakes ......................................... 8-19
Fuses .......................................... 8-19
Engine compartment .......................8-20
Passenger compartment ...................8-21
Battery replacement ........................... 8-23
NISSAN Intelligent Key® ......................8-23
Lights .......................................... 8-25
Headlights .................................. 8-25
Fog lights (if so equipped) ...................8-25
Exterior and interior lights ...................8-25
Wheels and tires ............................... 8-27
Tire pressure ................................ 8-27
Tire labeling ................................. 8-30
Types of tires ................................
8-33
Tir
e chains .................................. 8-34
Changing wheels and tires ..................8-35
Page 417 of 508

All other lights are either type A, B, C or D.
When replacing a bulb, first remove the
lens, lamp and/or cover.
Indicates bulb removal
Indicates bulb installationIf you have a flat tire, refer to the “In case
of emergency ” section of this manual.
TIRE PRESSURE
Tire Pressure Monitoring System
(TPMS)
WARNING
Radio waves could adversely af-
fect electric medical equipment.
Those who use a pacemaker
should contact the electric medi-
cal equipment manufacturer for
the possible influences before
use.
This vehicle is equipped with the Tire
Pressure Monitoring System (TPMS).
It monitors tire pressure of all tires
except the spare. When the low tire
pressure warning light is lit and the
“Tire Pressure Low - Add Air” warning
appears in the vehicle information
display, one or more of your tires is
significantly under-inflated. If equipped, the system also displays
pressure of all tires (except the spare
tire) on the display screen by send-
ing a signal from a sensor that is
installed in each wheel.
The TPMS will activate only when the
vehicle is driven at speeds above 16
mph (25 km/h). Also, this system
may not detect a sudden drop in tire
pressure (for example a flat tire while
driving).
For additional information, see “Low
tire pressure warning light” (P. 2-12),
“Tire Pressure Monitoring System
(TPMS)” (P. 5-5) and ““Flat tire” (P. 6-3).
Tire inflation pressure
Check the tire pressures (including
the spare) of ten and always prior to
long distance trips. The recom-
mended tire pressure specifications
are shown on the F.M.V.S.S./C.M.V.S.S.
certification label or the Tire and
Loading Information label under the
WHEELS AND TIRES
Do-it-yourself8-27
Page 422 of 508
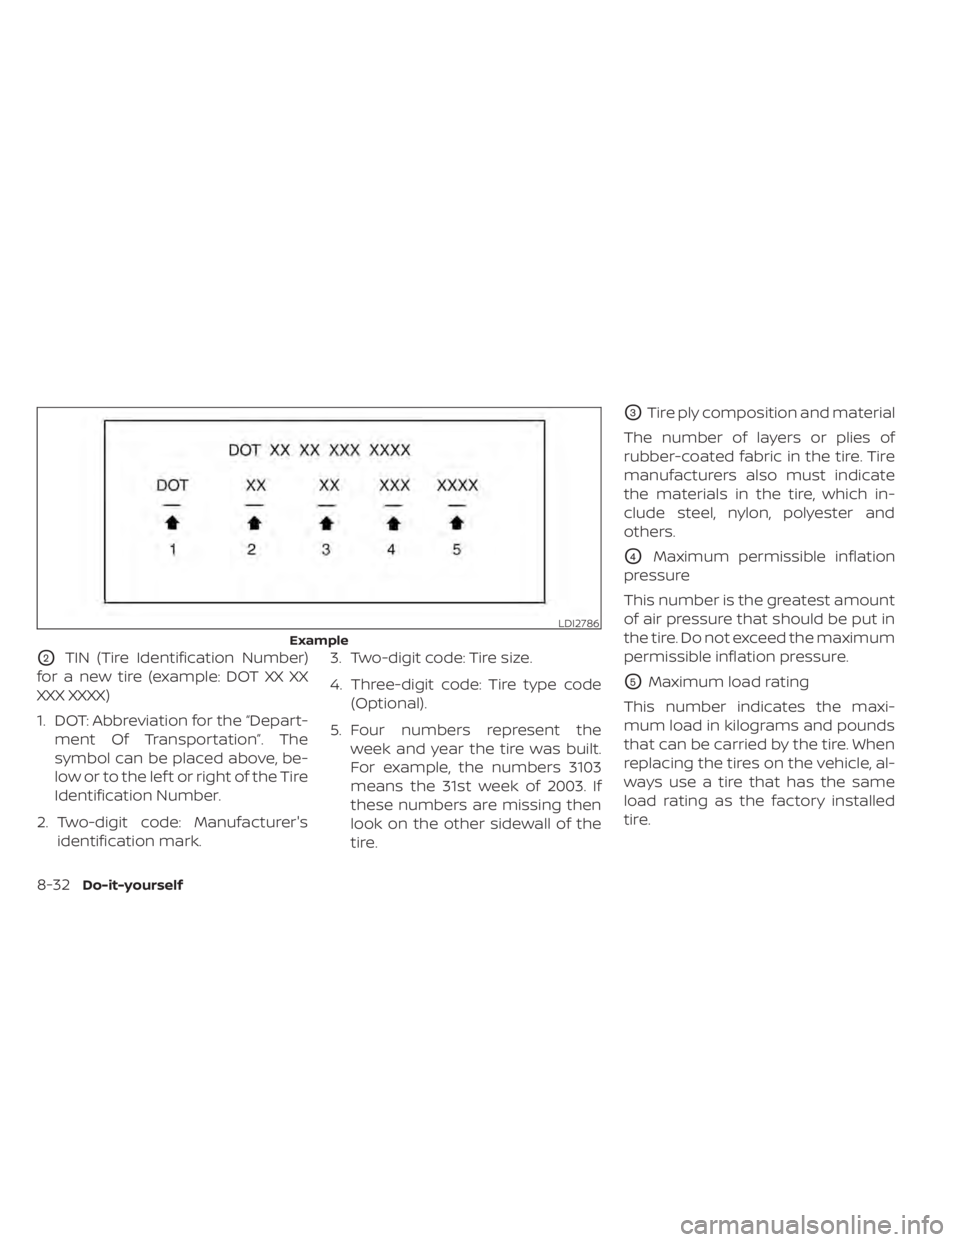
O2TIN (Tire Identification Number)
for a new tire (example: DOT XX XX
XXX XXXX)
1. DOT: Abbreviation for the “Depart- ment Of Transportation”. The
symbol can be placed above, be-
low or to the lef t or right of the Tire
Identification Number.
2. Two-digit code: Manufacturer's identification mark. 3. Two-digit code: Tire size.
4. Three-digit code: Tire type code
(Optional).
5. Four numbers represent the week and year the tire was built.
For example, the numbers 3103
means the 31st week of 2003. If
these numbers are missing then
look on the other sidewall of the
tire.
O3Tire ply composition and material
The number of layers or plies of
rubber-coated fabric in the tire. Tire
manufacturers also must indicate
the materials in the tire, which in-
clude steel, nylon, polyester and
others.
O4Maximum permissible inflation
pressure
This number is the greatest amount
of air pressure that should be put in
the tire. Do not exceed the maximum
permissible inflation pressure.
O5Maximum load rating
This number indicates the maxi-
mum load in kilograms and pounds
that can be carried by the tire. When
replacing the tires on the vehicle, al-
ways use a tire that has the same
load rating as the factory installed
tire.
LDI2786
Example
8-32Do-it-yourself
Page 423 of 508
O6Term of “tubeless” or “tube type”
Indicates whether the tire requires
an inner tube (“tube type”) or not
(“tubeless”).
O7The word “radial”
The word “radial” is shown if the tire
has radial structure.
O8Manufacturer or brand name
Manufacturer or brand name is shown.
Other Tire-related Terminology
In addition to the many terms that
are defined throughout this section,
Intended Outboard Sidewall is (1) the
sidewall that contains a whitewall,
bears white lettering or bears
manufacturer, brand, and/or model
name molding that is higher or
deeper than the same molding on
the other sidewall of the tire, or (2)
the outward facing sidewall of an
asymmetrical tire that has a particu-
lar side that must always face out-
ward when mounted on a vehicle.
TYPES OF TIRES
WARNING
• When changing or replacing tires, be
sure all four tires are of the same type
(i.e., Summer, All Season or Snow)
and construction. A NISSAN dealer
may be able to help you with infor-
mation about tire type, size, speed
rating and availability.
• Replacement tires may have a lower
speed rating than the factory
equipped tires, and may not match
the potential maximum vehicle
speed. Never exceed the maximum
speed rating of the tire.
• Replacing tires with those not origi-
nally specified by NISSAN could af-
fect the proper operation of the low
tire pressure warning system.
•
Always use tires of the same type, size,
brand, construction and tread pattern
on all four wheels. Failure to do so may
result in a circumference difference
between tires on the front and rear ax-
les which can cause the Vehicle Dy-
namic Control (VDC) system to mal-
function resulting in personal injury or
death, excessive tire wear and may
damage the transmission, transfer
case and differential gears.
• For additional information regarding
tires, refer to “Important Tire Safety
Information” (US) or “Tire Safety In-
formation” (Canada) in the Warranty
Information Booklet.
All-Wheel Drive (AWD) models
CAUTION
• ONLY use spare tires specified for the
AWD model.
If excessive tire wear is found, it is recom-
mended that all four tires be replaced with
tires of the same size, brand, construction
and tread pattern. The tire pressure and
wheel alignment should also be checked
and corrected as necessary. It is recom-
mended that you visit a NISSAN dealer for
this service.
All season tires
NISSAN specifies All Season tires on some
models to provide good performance all
year, including snowy and icy road condi-
tions. All Season tires are identified by ALL
SEASON and/or M&S on the tire sidewall.
Snow tires have better snow traction than
All Season tires and may be more appropri-
ate in some areas.
Do-it-yourself8-33
Page 424 of 508
Summer tires
NISSAN specifies summer tires on some
models to provide superior performance
on dry roads. Summer tire performance is
substantially reduced in snow and ice.
Summer tires do not have the tire traction
rating “M&S” on the tire sidewall.
If you plan to operate your vehicle in snowy
or icy conditions, NISSAN recommends the
use of SNOW tires or ALL SEASON tires on all
four wheels.
Snow tires
If snow tires are needed, it is necessary to
select tires equivalent in size and load rat-
ing to the original equipment tires. If you do
not, it can adversely affect the safety and
handling of your vehicle.
Generally, snow tires have lower speed rat-
ings than factory equipped tires and may
not match the potential maximum vehicle
speed. Never exceed the maximum speed
rating of the tire.
If you install snow tires, they must be the
same size, brand, construction and tread
pattern on all four wheels.
For additional traction on icy roads, stud-
ded tires may be used. However, some U.S.states and Canadian provinces prohibit
their use. Check local, state and provincial
laws before installing studded tires. Skid
and traction capabilities of studded snow
tires on wet or dry surfaces may be poorer
than that of non-studded snow tires.
TIRE CHAINS
CAUTION
Tire chains/cables should not be in-
stalled on 235/55R20 size tires. Instal-
lation of the tire chains/cables on 235/
55R20 size tires will cause damage to
the vehicle. If you plan to use tire
chains/cables, you should install 235/
65R18 size tires on your vehicle.
Use of tire chains may be prohibited ac-
cording to location. Check the local laws
before installing tire chains. When installing
tire chains, make sure they are the proper
size for the tires on your vehicle and are
installed according to the chain manufac-
turer's suggestions. Use only SAE class “S”
chains. Class “S” chains are used on ve-
hicles with restricted tire to vehicle clear-
ance. Vehicles that can use Class “S” chains
are designed to meet the minimum clear-
ances between the tire and the closest ve-
hicle suspension or body component re- quired to accommodate the use of a
winter traction device (tire chains or
cables). The minimum clearances are de-
termined using the factory equipped tire
size. Other types may damage your vehicle.
Use chain tensioners when recommended
by the tire chain manufacturer to ensure a
tight fit. Loose end links of the tire chain
must be secured or removed to prevent
the possibility of whipping action damage
to the fenders or underbody. If possible,
avoid fully loading your vehicle when using
tire chains. In addition, drive at a reduced
speed. Otherwise, your vehicle may be
damaged and/or vehicle handling and
performance may be adversely affected.
Do not use tire chains on dry roads. Driving
with chains in such conditions can cause
damage to the various mechanisms of the
vehicle due to some overstress.
8-34Do-it-yourself
Page 477 of 508
cargo should never exceed XXX
lbs. or XXX kg” on your vehicle’s
placard.
2. Determine the combined weight of the driver and passengers that
will be riding in your vehicle.
3. Subtract the combined weight of the driver and passengers from
XXX lbs. or XXX kg.
4. The resulting figure equals the available amount of cargo and
luggage load capacity. For ex-
ample, if the XXX amount equals
1,400 lbs. and there will be five 150
lbs. passengers in your vehicle,
the amount of available cargo
and luggage load capacity is 650
lbs. (1,400-750 (5 X 150) = 650 lbs.) or
(640-340 (5 X 70) = 300 kg.) 5. Determine the combined weight
of luggage and cargo being
loaded on the vehicle. That weight
may not safely exceed the avail-
able cargo and luggage load ca-
pacity calculated in step 4.
6. If your vehicle will be towing a trailer, load from your trailer will be
transferred to your vehicle. Con-
sult this manual to determine
how this reduces the available
cargo and luggage load capacity
of your vehicle.
Before driving a loaded vehicle, con-
firm that you do not exceed the
GVWR or the GAWR for your vehicle.
For additional information, see “Mea-
surement of weights” (P. 10-19).
Also check tires for proper inflation
pressures. For additional informa-
tion, see “Tire and Loading Informa-
tion label” (P. 10-13).
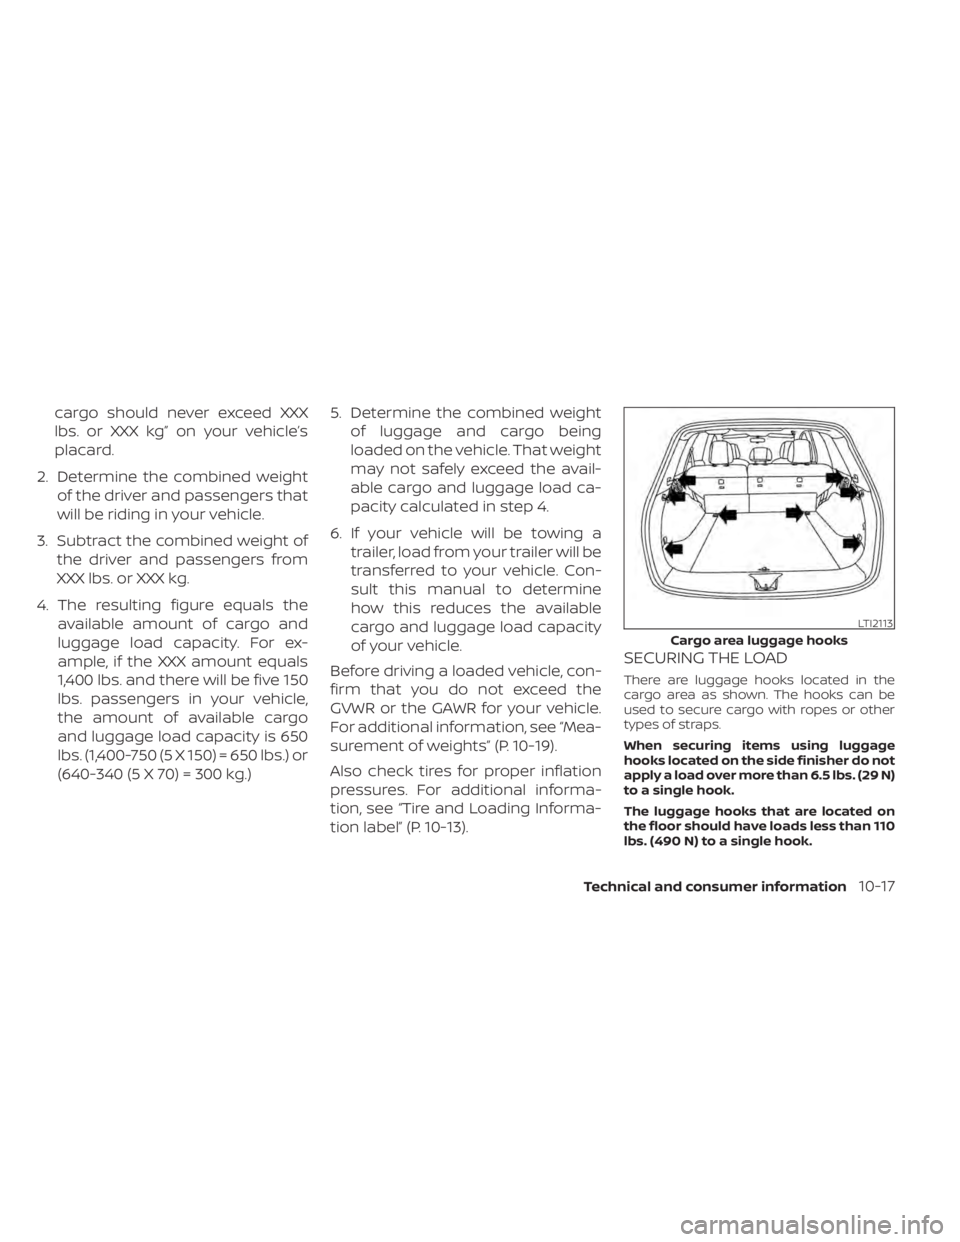
SECURING THE LOAD
There are luggage hooks located in the
cargo area as shown. The hooks can be
used to secure cargo with ropes or other
types of straps.
When securing items using luggage
hooks located on the side finisher do not
apply a load over more than 6.5 lbs. (29 N)
to a single hook.
The luggage hooks that are located on
the floor should have loads less than 110
lbs. (490 N) to a single hook.
LTI2113
Cargo area luggage hooks
Technical and consumer information10-17
Page 486 of 508
mounted to the bumper. Be sure to leave
enough slack in the chains to permit turn-
ing corners.
Trailer lights
CAUTION
When splicing into the vehicle electrical
system, a commercially available
power-type module/converter must
be used to provide power for all trailer
lighting. This unit uses the vehicle bat-
tery as a direct power source for all
trailer lights while using the vehicle tail
light, stop light and turn signal circuits
as a signal source. The module/
converter must draw no more than 15
milliamps from the stop and tail lamp
circuits. Using a module/converter that
exceeds these power requirements
may damage the vehicle's electrical
system. It is recommended that you
visit a reputable trailer retailer to ob-
tain the proper equipment and to have
it installed.
Trailer lights should comply with federal
and/or local regulations. For assistance in
hooking up trailer lights, it is recommended
that you contact a NISSAN dealer or repu-
table trailer retailer. Vehicles equipped with the optional trailer tow package are
equipped with a flat 4-pin connector, an
adapter will be needed to connect the
trailer lights to the vehicle. Adapters are
available at auto parts stores and hitch
retailers.Pre-towing tips
• Be certain your vehicle maintains a level
position when a loaded and/or unloaded
trailer is hitched. Do not drive the vehicle if
it has an abnormal nose-up or nose-
down condition; check for improper
tongue load, overload, worn suspension
or other possible causes of either
condition.
• Always secure items in the trailer to pre- vent load shif t while driving.
• Keep the cargo load as low as possible in the trailer to keep the trailer center of
gravity low.
• Load the trailer so approximately 60% of the trailer load is in the front half and 40%
is in the back half. Also make sure the load
is balanced side to side.
• Check your hitch, trailer tire pressure, ve- hicle tire pressure, trailer light operation,
and trailer wheel lug nuts every time you
attach a trailer to the vehicle. • Be certain your rearview mirrors conform
to all federal, state or local regulations. If
not, install any mirrors required for towing
before driving the vehicle.
• Determine the overall height of the ve- hicle and trailer so the required clearance
is known.Trailer towing tips
In order to gain skill and an understanding
of the vehicle's behavior, you should prac-
tice turning, stopping and backing up in an
area which is free from traffic. Steering sta-
bility and braking performance will be
somewhat different than under normal
driving conditions.
• Always secure items in the trailer to pre-vent load shif t while driving.
• Lock the trailer hitch coupler with a pin or lock to prevent the coupler from inadver-
tently becoming unlatched.
• Avoid abrupt starts, acceleration or stops.
• Avoid sharp turns or lane changes.
• Always drive your vehicle at a moderate speed.
10-26Technical and consumer information