2021 NISSAN MURANO horn
[x] Cancel search: hornPage 178 of 508
3. Press thebutton on the Intelli-
gent Key.
4. The hazard indicator lights flash twice and the horn beeps once.
5. All doors will be locked.
WARNING
Af ter locking the doors using the Intel-
ligent Key, be sure that the doors have
been securely locked by operating the
door handles. Failure to follow these in-
structions may result in inadvertently
unlocking the doors, which may de-
crease the safety and security of your
vehicle.
Unlocking doors
1. Press thebutton on the Intelligent
Key to unlock the driver’s door.
2. The hazard indicator lights flash once and the driver’s door unlocks.
3. Press the
button again within 1
minute to unlock all doors.
NOTE:
The Selective Unlock feature can be
changed using the “Vehicle Settings”
menu on the vehicle information display.
For additional information, see “Vehicle
information display ” (P. 2-17).
All doors will be locked automatically un-
less one of the following operations is per-
formed within 1 minute af ter pressing the
button:
• Opening any doors.
• Pushing the ignition switch.
Using the interior lights
The interior lights illuminate for a period of
time when a door is unlocked and the inte-
rior light switch is in the DOOR position.
The lights can be turned off without waiting
by performing one of the following
operations:
• Placing the ignition switch in the ON position.
• Locking the doors with the Intelligent Key.
• Switching the interior lights switch to the “OFF” position.
For additional information, see “Interior
lights” (P. 2-64).
Opening windows
The Intelligent Key allows you to simultane-
ously open windows equipped with auto-
matic operation.
To open the windows, press and hold the
button on the Intelligent Key for lon-
ger than 3 seconds.
The door windows will lower while holding
down thebutton on the Intelligent Key.
NOTE:
The windows will stop lowering at the
time thebutton is released. How-
ever, the door windows cannot be closed
with the Intelligent Key.
Releasing the rear lif tgate (if so
equipped)
The rear lif tgate can be opened and closed
by performing the following:
• Press the
button for longer than 1
second to open the rear lif tgate.
• Press the
button again for longer
than 1 second to close the rear lif tgate.
When the
button is pressed during
the open or close process, the lif tgate mo-
tors will stop. When the
button is
pressed again for longer than 1 second the
lif tgate will reverse direction.
3-14Pre-driving checks and adjustments
Page 179 of 508
Using the panic alarm
If you are near your vehicle and feel threat-
ened, you may activate the panic alarm to
call attention by pressing and holding the
button on the Intelligent Key forlon-
ger than 0.5 seconds.
The panic alarm and headlights will stay on
for a period of time.
The panic alarm stops when:
• It has run for a period of time.
• Any button is pressed on the Intelligent Key.
• The request switch on the driver or pas- senger door is pushed and the Intelligent
Key is in range of the door handle.
Answer back horn feature
If desired, the answer back horn feature
can be deactivated using the Intelligent
Key. When it is deactivated and the
button is pressed, the hazard indicator
lights flash twice. When thebutton is
pressed, neither the hazard indicator lights
nor the horn operates.
NOTE:
If you change the Answer Back Horn
feature with the Intelligent Key, the
vehicle information display screen
will show the current mode af ter the
ignition switch has been cycled from
the OFF to the ON position. The ve-
hicle information display screen can
also be used to change the answer
back horn mode.
For additional information, see “Ve-
hicle settings” (P. 2-17).
To deactivate:
Press and hold theandbut-
tons for at least 2 seconds. The hazard
indicator lights will flash three times to con-
firm that the answer back horn feature has
been deactivated.
To activate:
Press and hold the
andbut-
tons for at least 2 seconds once more.
The hazard indicator lights will flash once
and the horn will sound once to confirm
that the horn beep feature has been
reactivated.
Deactivating the horn beep feature does
not silence the horn if the alarm is
triggered.
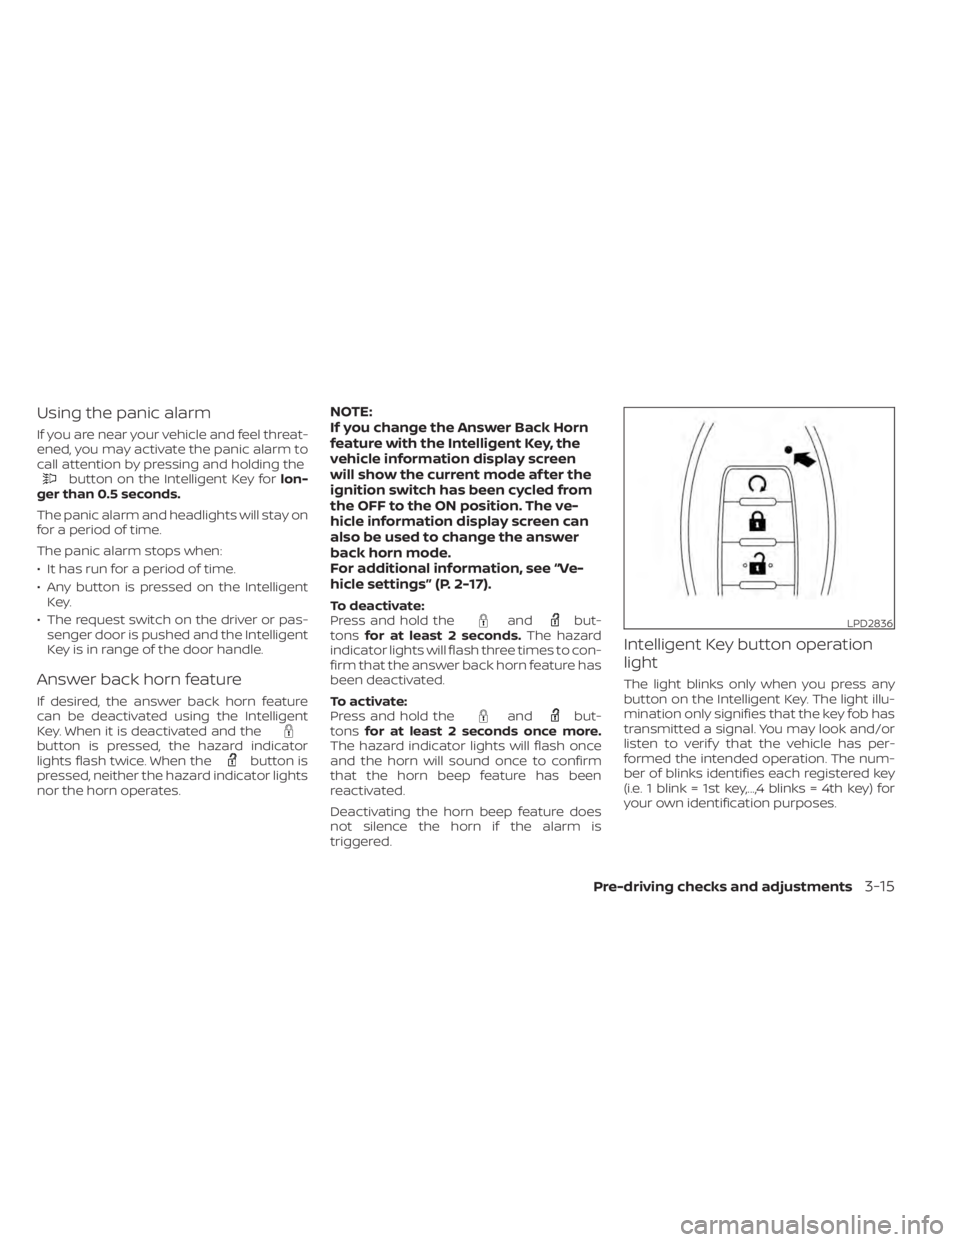
Intelligent Key button operation
light
The light blinks only when you press any
button on the Intelligent Key. The light illu-
mination only signifies that the key fob has
transmitted a signal. You may look and/or
listen to verif y that the vehicle has per-
formed the intended operation. The num-
ber of blinks identifies each registered key
(i.e. 1 blink = 1st key,...,4 blinks = 4th key) for
your own identification purposes.
LPD2836
Pre-driving checks and adjustments3-15
Page 181 of 508
SymptomPossible CauseRemedy
When closing the door af ter getting
out of the vehicle The No Key Detected warning appears
on the display, the outside chime
sounds three times and the inside
warning chime sounds for approxi-
mately three seconds.
The ignition switch is in the ACC or ON
position.
Place the ignition switch in the OFF
position.
The Shif t to Park warning appears on
the display and the inside and outside
chimes sound continuously. The ignition switch is in the ACC or OFF
position and the shif t lever is not in the
P (Park) positionMove the shif t lever to the P (Park) po-
sition and place the ignition switch in
the OFF position.
The Rear Door Alert warning message
appears on the display, the horn
sounds three times twice, or a Check
Rear Seat for All Articles warning ap-
pears on the display. The Rear Door Alert is activated.
Check the back seat for all articles,
press the OK button to clear the Rear
Door Alert warning message.
When closing the door with the inside
lock knob turned to LOCK The outside chime sounds for approxi-
mately three seconds and all the doors
unlock.
The Intelligent Key is inside the vehicle. Carry the Intelligent Key with you.
When pushing the door handle re-
quest switch or the
button on
the Intelligent Key to lock the door The outside chime sounds for approxi-
mately two seconds.
The Intelligent Key is inside the vehicle. Carry the Intelligent Key with you.
When pushing the ignition switch to
start the engine The Key Battery Low warning appears
on the display.
The battery charge is low.Replace the battery with a new one.
For additional information, see “Battery
replacement” (P. 8-23).
The No Key Detected warning appears
on the display, the inside chime sounds
three times. The Intelligent Key is not in the vehicle. Carry the Intelligent Key with you.
When pushing the ignition switch The Key System Fault message ap-
pears. It warns of a malfunction with the Intel-
ligent Key system.It is recommended that you visit a
NISSAN dealer.
Pre-driving checks and adjustments3-17
Page 246 of 508
FCC Notice:
For USA:
This device complies with Part 15 of the
FCC Rules. Operation is subject to the fol-
lowing two conditions: (1) This device
may not cause harmful interference, and
(2) this device must accept any interfer-
ence received, including interference
that may cause undesired operation.
NOTE:
Changes or modifications not ex-
pressly approved by the party re-
sponsible for compliance could void
the user's authority to operate the
equipment.
For Canada:
This device complies with Industry
Canada licence-exempt RSS standard(s).
Operation is subject to the following two
conditions: (1) this device may not cause
interference, and (2) this device must ac-
cept any interference, including interfer-
ence that may cause undesired opera-
tion of the device.
TPMS with Easy-Fill Tire Alert
When adding air to an under-inflated tire,
the TPMS with Easy-Fill Tire Alert provides
visual and audible signals outside the ve-
hicle to help you inflate the tires to the rec-
ommended COLD tire pressure.
Vehicle set-up
1. Park the vehicle in a safe and level place.
2. Apply the parking brake and place theshif t lever in the P (Park) position.
3. Place the ignition switch in the ON posi- tion. Do not start the engine.
Operation
1. Add air to the tire.
2. Af ter a few seconds, the hazard indica- tors will start flashing.
3. When the designated pressure is reached, the horn beeps once and the
hazard indicators stop flashing.
4. Perform the above steps for each tire. • If the tire is over-inflated more thanapproximately 4 psi (30 kPa), the horn
beeps and the hazard indicators flash
three times. To correct the pressure,
push the core of the valve stem on the
tire briefly to release pressure. When the pressure reaches the designated
pressure, the horn beeps once.
• If the hazard indicator does not flash within approximately 15 seconds af ter
starting to inflate the tire, it indicates
that the Easy-Fill Tire Alert is not
operating.
• The TPMS will not activate the Easy-Fill Tire Alert under the following
conditions:– If there is interference from an exter- nal device or transmitter.
– The air pressure from the inflation device is not sufficient to inflate the
tire.
– There is a malfunction in the TPMS.
– There is a malfunction in the horn or hazard indicators.
– The identification code of the tire pressure sensor is not registered to
the system.
– The battery of the tire pressure sen- sor is low.
• If the Easy-Fill Tire Alert does not oper- ate due to TPMS interference, move
the vehicle about 3 f t (1 m) backward
or forward and try again.
If the Easy-Fill Tire Alert is not working, use a
tire pressure gauge.
5-8Starting and driving
Page 363 of 508
WARNING
• The sonar (parking sensor) system is
a convenience but it is not a substi-
tute for proper parking.
• The driver is always responsible for
safety during parking and other ma-
neuvers. Always look around and
check that it is safe to do so before
parking.
• Read and understand the limitations
of the sonar (parking sensor) system
as contained in this section. The col-
ors of the corner sonar indicator and
the distance guide lines in the front/
rear view indicate different distances
to the object.
• Inclement weather or ultrasonic
sources such as an automatic car
wash, a truck's compressed-air
brakes or a pneumatic drill may af-
fect the function of the system; this
may include reduced performance or
a false activation.
• This function is designed as an aid to
the driver in detecting large station-
ary objects to help avoid damaging
the vehicle. •
The system is not designed to pre-
vent contact with small or moving
objects. Always move slowly. The
system will not detect small objects
below the bumper, and may not de-
tect objects close to the bumper or
on the ground.
• The system may not detect the fol-
lowing objects: fluff y objects such as
snow, cloth, cotton, glass, wool, etc.,
and thin objects such as rope, wire
and chain, etc., or wedge-shaped
objects.
• The sonar sensors may cause mal-
function when a horn, etc. sounds or
there is an ultrasonic source (such as
parking sensors of other vehicles)
around the vehicle because the so-
nar sensors detect the distance be-
tween the vehicle and the obstacle
by detecting the sound wave re-
flected from the surface of an
obstacle.
If your vehicle sustains damage to the
bumper fascia, leaving it misaligned or
bent, the sensing zone may be altered
causing inaccurate measurement of ob-
stacles or false alarms.CAUTION
• Excessive noise (such as audio sys-
tem volume or an open vehicle win-
dow) will interfere with the tone and
it may not be heard.
• Keep the sonar sensors (located on
the bumper fascia) free from snow,
ice and large accumulations of dirt.
Do not clean the sensors with sharp
objects. If the sensors are covered,
the accuracy of the sonar function
will be diminished.
Starting and driving5-125
Page 436 of 508
3.5L 6 CYLINDER (VQ35DE engine
model)
The following shows the maintenance
schedule.
Choose the maintenance schedule
needed based on your vehicle driving
conditions.
Af ter 120,000 miles (192,000 km)/96
months, continue maintenance at the
same mileage/time interval.
5,000 miles/(8,000 km)/6 months
Perform at number of miles, kilometers or
months, whichever comes first.
Standard maintenance:
Not Applicable. Proceed to next interval
Severe maintenance:
Inspections:
• Brake pads & rotors
• Exhaust system
• Propeller shaf t (AWD models)
• Steering gear & linkage
• Drive shaf t boots
• Axle & suspension parts
• Horn, lights, signals, wipers, rear hatch/hood lif t supports
• All fluids inspected (engine, wiper, brake, power steering, coolant)
• Engine drive belt and hose inspections
• Engine air filter
• Suspension components (shocks, sub- frame, tie rods)
• Differential gear oil
• Battery terminals and cables, battery test
• Tire pressure, treadwear and depth Essential:
• Replace engine oil & filter
9-8Maintenance and schedules
Page 437 of 508
7,500 miles/(12,000 km)/6 months
Perform at number of miles, kilometers or
months, whichever comes first.
Standard maintenance:
Inspections:
• Horn, lights, signals, wipers, rear hatch/hood lif t supports
• All fluids inspected (engine, wiper, brake, power steering, coolant)
• Engine drive belt and hose inspections
• Engine air filter
• Propeller shaf t (AWD models)
• Suspension components (shocks, sub- frame, tie rods)
• Differential gear oil
• Battery terminals and cables, battery test
• Tire pressure, treadwear and depth
Essential:
• Replace engine oil & filter
• Tire rotation
Severe maintenance:
Not Applicable. Proceed to next interval
10,000 miles/(16,000 km)/
12 months
Perform at number of miles, kilometers or
months, whichever comes first.
Standard maintenance:
Not Applicable. Proceed to next interval
Severe maintenance:
Inspections:
• Brake pads & rotors
• Exhaust system
• Propeller shaf t (AWD models)
• Steering gear & linkage
• Axle & suspension parts
• Drive shaf t boots
• Horn, lights, signals, wipers, rear hatch/ hood lif t supports
• All fluids inspected (engine, wiper, brake, power steering, coolant)
• Engine drive belt and hose inspections
• Engine air filter
• Suspension components (shocks, sub- frame, tie rods)
• Differential gear oil
• Battery terminals and cables, battery test
• Tire pressure, treadwear and depth Essential:
• Replace engine oil & filter
• Replace brake fluid
Maintenance and schedules9-9
Page 438 of 508
15,000 miles/(24,000 km)/
12 months
Perform at number of miles, kilometers or
months, whichever comes first.
Standard maintenance:
Inspections:
• Brake lines and cables
• Brake pads and rotors
• CVT transmission fluid
• Differential gear oil (AWD models)
• Propeller shaf t (AWD models)
• Transfer case oil (AWD models)
• Drive shaf t boots
• Horn, lights, signals, wipers, rear hatch/hood lif t supports
• All fluids inspected (engine, wiper, brake, power steering, coolant)
• Engine drive belt and hose inspections
• Engine air filter
• Suspension components (shocks, sub- frame, tie rods)
• Battery terminals and cables, battery test
• Tire pressure, treadwear and depth Essential:
• Replace engine oil & filter
• Tire rotation
• Replace in-cabin microfilter
Severe maintenance:
Not Applicable. Proceed to next interval
15,000 miles/(24,000 km)/
18 months
Perform at number of miles, kilometers or
months, whichever comes first.
Standard maintenance:
Not Applicable. Proceed to next interval
Severe maintenance:
Inspections:
• Brake pads & rotors
• Exhaust system
• Propeller shaf t (AWD models)
• Steering gear & linkage
• Axle & suspension parts
• Drive shaf t boots
• Horn, lights, signals, wipers, rear hatch/
hood lif t supports
• All fluids inspected (engine, wiper, brake, power steering, coolant)
• Engine drive belt and hose inspections
• Engine air filter
• Suspension components (shocks, sub- frame, tie rods)
• Differential gear oil
• Battery terminals and cables, battery test
• Tire pressure, treadwear and depth
9-10Maintenance and schedules