Page 158 of 346
Fade and drif t: As your vehicle moves away
from a station transmitter, the signals will
tend to fade and/or drif t.
Static and flutter: During signal interfer-
ence from buildings, large hills or due to
antenna position (usually in conjunction
with increased distance from the station
transmitter), static or flutter can be heard.
This can be reduced by adjusting the treble
control to reduce treble response.
Multipath reception: Because of the reflec-
tive characteristics of FM signals, direct and
reflected signals reach the receiver at the
same time. The signals may cancel each
other, resulting in momentary flutter or loss
of sound.
AM RADIO RECEPTION
AM signals, because of their low frequency,
can bend around objects and skip along
the ground. In addition, the signals can be
bounced off the ionosphere and bent back
to earth. Because of these characteristics,
AM signals are also subject to interference
as they travel from transmitter to receiver.
Fading: Occurs while the vehicle is passing
through freeway underpasses or in areas
with many tall buildings. It can also occurfor several seconds during ionospheric tur-
bulence even in areas where no obstacles
exist.
Static: Caused by thunderstorms, electrical
power lines, electric signs and even traffic
lights.
AUDIO OPERATION PRECAUTIONS
USB (Universal Serial Bus)
connection port
Page 207 of 346
∙ Make sure the area around the vehicle isclear.
∙ Check fluid levels such as engine oil, coolant, brake and clutch fluid (if so
equipped), and windshield-washer fluid
as frequently as possible, or at least
whenever you refuel.
∙ Check that all windows and lights are clean.
∙ Visually inspect tires for their appear- ance and condition. Also check tires for
proper inflation.
∙ Lock all doors.
∙ Position seat and adjust head re- straints.
∙ Adjust inside and outside mirrors.
∙ Fasten seat belts and ask all passen- gers to do likewise.
∙ Check the operation of warning lights when the key is turned to the ON posi-
tion. For additional information, refer to
“Warning lights, indicator lights and au-
dible reminders” in the “Instruments
and controls” section of this manual. 1. Apply the parking brake.
2.
Automatic transmission:
Move the shif t lever to P (Park) or N
(Neutral). P (Park) is recommended.
The shif t lever cannot be moved out
of the P (Park) position and into any
of the other gear positions if the ig-
nition switch is placed in the OFF po-
sition or if the key is removed from
the ignition switch.
The starter is designed not to oper-
ate if the shif t lever is in any of the
driving positions.
Manual transmission:
Move the shif t lever to N (Neutral). De-
press the clutch pedal to the floor
while cranking the engine.
3. Crank the engine with your foot off
the accelerator pedal by placing the
ignition switch in the START position.
Release the key when the engine
starts. If the engine starts, but fails to
run, repeat the above procedure.
∙ If the engine is very hard to start in extremely cold weather or when re-
starting, depress the accelerator
pedal a little (approximately 1/3 to the floor) and hold it and then crank the
engine. Release the key and the ac-
celerator pedal when the engine
starts.
∙ If the engine is very hard to start be- cause it is flooded, depress the accel-
erator pedal all the way to the floor
and hold it. Crank the engine for
5-6 seconds. Af ter cranking the en-
gine, release the accelerator pedal.
Crank the engine with your foot off
the accelerator pedal by placing the
ignition in the START position. Re-
lease the key when the engine starts.
If the engine starts, but fails to run,
repeat the above procedure.
Page 215 of 346
WARNING
∙ Be sure the parking brake is fully re-leased before driving. Failure to do so
can cause brake failure and lead to an
accident.
∙ Do not release the parking brake from outside the vehicle.
∙ Do not use the shif t lever in place of the parking brake. When parking, be
sure the parking brake is fully
engaged.
∙ To help avoid risk of injury or death through unintended operation of the
vehicle and/or its systems, do not
leave children, people who require the
assistance of others or pets unat-
tended in your vehicle. Additionally,
the temperature inside a closed ve-
hicle on a warm day can quickly be-
come high enough to cause a signifi-
cant risk of injury or death to people
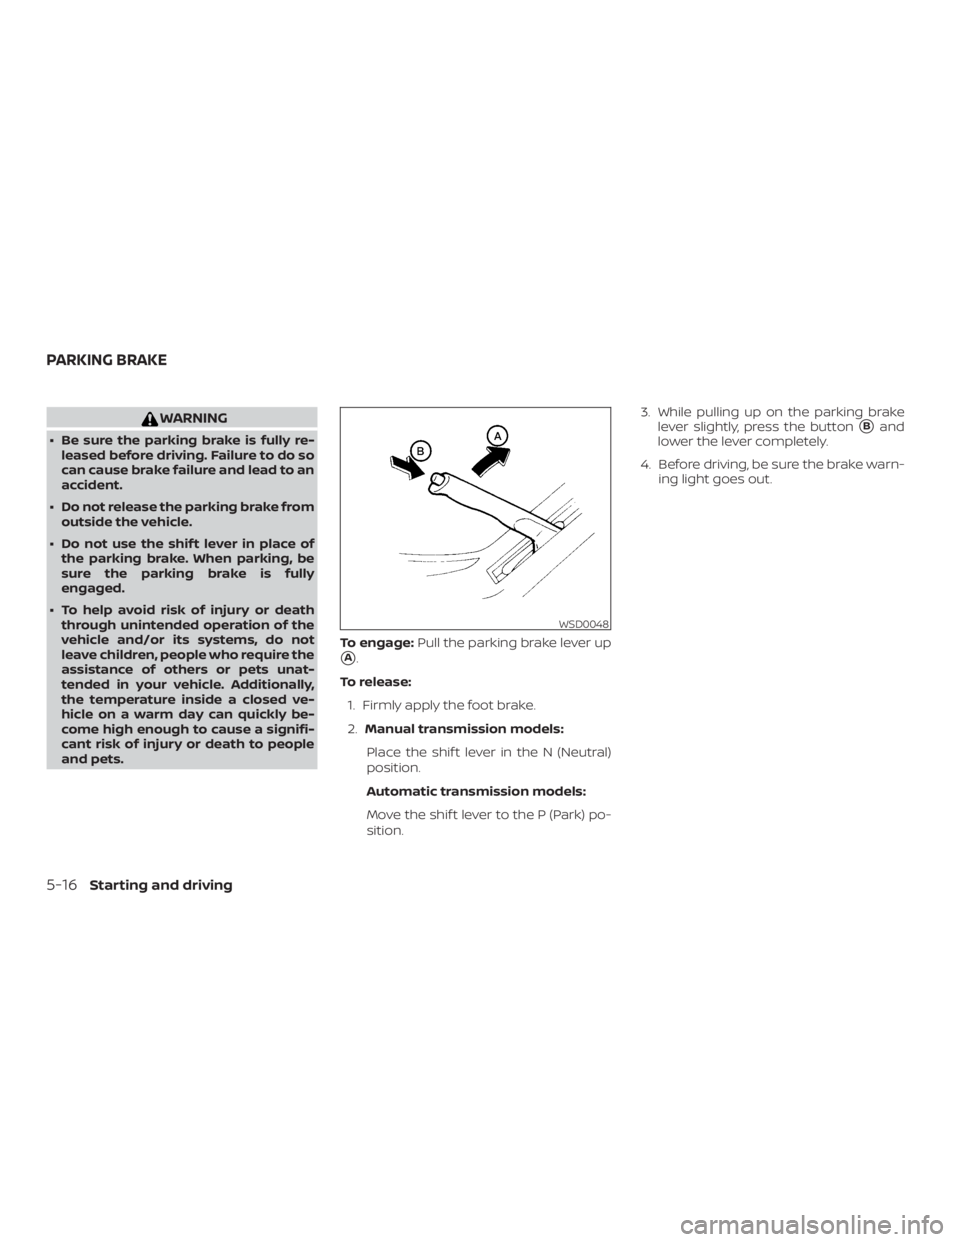
and pets. To engage:
Pull the parking brake lever up
�A.
To release: 1. Firmly apply the foot brake.
2. Manual transmission models:
Place the shif t lever in the N (Neutral)
position.
Automatic transmission models:
Move the shif t lever to the P (Park) po-
sition. 3. While pulling up on the parking brake
lever slightly, press the button
�Band
lower the lever completely.
4. Before driving, be sure the brake warn- ing light goes out.
Page 217 of 346
To reset at a faster cruising speed,use
one of the following three methods:
∙ Depress the accelerator pedal. When the vehicle attains the desired speed,
push and release the COAST/SET
switch.
∙ Push and hold the ACCEL/RES switch. When the vehicle attains the speed you
desire, release the switch.
∙ Push and release the ACCEL/RES switch. Each time you do this, the set
speed increases by about 1.6 km/h
(1 mph).
To reset at a slower cruising speed, use
one of the following three methods:
∙ Lightly tap the brake pedal. When the vehicle attains the desired speed, push
the COAST/SET switch and release it.
∙ Push and hold the COAST/SET switch. Release the switch when the vehicle
slows to the desired speed.
∙ Push and release the COAST/SET switch. Each time you do this, the set
speed decreases by about 1.6 km/h
(1 mph). To resume the preset speed,
push and
release the ACCEL/RES switch. The vehicle
returns to the last set cruising speed when
the vehicle speed is over 37 km/h (23 mph).
Page 231 of 346
Push the switch on to warn other drivers
when you must stop or park under emer-
gency conditions. All turn signal lights flash.
Page 241 of 346
WARNING
Always follow the instructions below.
Failure to do so could result in damage
to the charging system and cause per-
sonal injury.1. If the booster battery is in another ve- hicle, position the two vehicles to bring
their batteries near each other.
Do not allow the two vehicles to
touch. 2. Apply the parking brake. Move the shif t
lever to N (Neutral) (manual transmis-
sion) or to P (Park) (automatic trans-
mission). Switch off all unnecessary
electrical systems (lights, heater, air
conditioner, etc.).
3. Connect jumper cables in the se- quence illustrated (
�A,�B,�C,�D).
Page 242 of 346
CAUTION
∙ Do not push start this vehicle. Thethree-way catalyst may be damaged.
∙ Automatic Transmission (AT) models and Manual Transmission (MT) cannot
be push-started or tow-started. At-
tempting to do so may cause trans-
mission damage.
∙ For Manual Transmission (MT) mod- els, never try to start the vehicle by
towing it. When the engine starts, the
forward surge could cause the vehicle
to collide with the tow vehicle. If your vehicle is overheating (indicated by a
red high temperature warning light
Page 251 of 346
If you choose to use a tire dressing, take the
following precautions:∙ Use a water-based tire dressing. The coating on the tire dissolves more easily
than with an oil-based tire dressing.
∙ Apply a light coat of tire dressing to help prevent it from entering the tire
tread/grooves (where it would be diffi-
cult to remove).
∙ Wipe off excess tire dressing using a dry towel. Make sure the tire dressing is
completely removed from the tire
tread/grooves.
∙ Allow the tire dressing to dry as recom- mended by the tire dressing manufac-
turer. Occasionally remove loose dust from the
interior trim, plastic parts and seats using a
vacuum cleaner or sof t bristled brush. Wipe
the vinyl and leather (if so equipped) sur-
faces with a clean, sof t cloth dampened in
mild soap solution, then wipe clean with a
dry, sof t cloth.
Regular care and cleaning is required in
order to maintain the appearance of the
leather (if so equipped).
Before using any fabric protector, read the
manufacturer’s recommendations. Some
fabric protectors contain chemicals that
may stain or bleach the seat material.
Use a cloth dampened only with water to
clean the meter and gauge lens.