2021 NISSAN KICKS ESP
[x] Cancel search: ESPPage 39 of 500
All U.S. states and Canadian provinces or
territories require the use of approved child
restraints for infants and small children. For
additional information, refer to “Child re-
straints” in this section.
A child restraint may be secured in the ve-
hicle by using either the LATCH (Lower An-
chors and Tethers for CHildren) system or
with the vehicle seat belt. For additional
information, refer to “Child restraints” in this
section.
NISSAN recommends that all pre-teens
and children be restrained in the rear
seat. Studies show that children are
safer when properly restrained in the
rear seat than in the front seat.
This is especially important because
your vehicle has a supplemental re-
straint system (air bag system) for the
front passenger. For additional informa-
tion, refer to “Supplemental Restraint
System (SRS)” in this section.
INFANTS
Infants up to at least 1 year old should be
placed in a rear-facing child restraint.
NISSAN recommends that infants be
placed in child restraints that comply with
Federal Motor Vehicle Safety Standards or
Canadian Motor Vehicle Safety Standards.You should choose a child restraint that fits
your vehicle and always follow the manu-
facturer's instructions for installation and
use.
SMALL CHILDREN
Children that are over 1 year old and weigh
at least 20 lbs. (9 kg) should remain in a
rear-facing child restraint as long as pos-
sible up to the height or weight limit of the
child restraint. Children who outgrow the
height or weight limit of the rear-facing
child restraint and are at least 1 year old
should be secured in a forward-facing child
restraint with a harness. Refer to the manu-
facturer’s instructions for minimum and
maximum weight and height recommen-
dations. NISSAN recommends that small
children be placed in child restraints that
comply with Federal Motor Vehicle Safety
Standards or Canadian Motor Vehicle
Safety Standards. You should choose a
child restraint that fits your vehicle and al-
ways follow the manufacturer’s instruc-
tions for installation and use.
LARGER CHILDREN
Children should remain in a forward-facing
child restraint with a harness until they
reach the maximum height or weight limit
allowed by the child restraint manufac-
turer.
Once a child outgrows the height or weight
limit of the harness-equipped forward-
facing child restraint, NISSAN recommends
that the child be placed in a commercially
available booster seat to obtain proper
seat belt fit. For a seat belt to fit properly, the
booster seat should raise the child so that
the shoulder belt is properly positioned
across the chest and the top, middle por-
tion of the shoulder. The shoulder belt
should not cross the neck or face and
should not fall off the shoulder. The lap belt
should lie snugly across the lower hips or
upper thighs, not the abdomen. A booster
seat can only be used in seating positions
that have a three-point type seat belt. The
booster seat should fit the vehicle seat and
have a label certif ying that it complies with
Federal Motor Vehicle Safety Standards or
Canadian Motor Vehicle Safety Standards.
Safety-Seats, seat belts and supplemental restraint system1-19
Page 67 of 500
WARNING
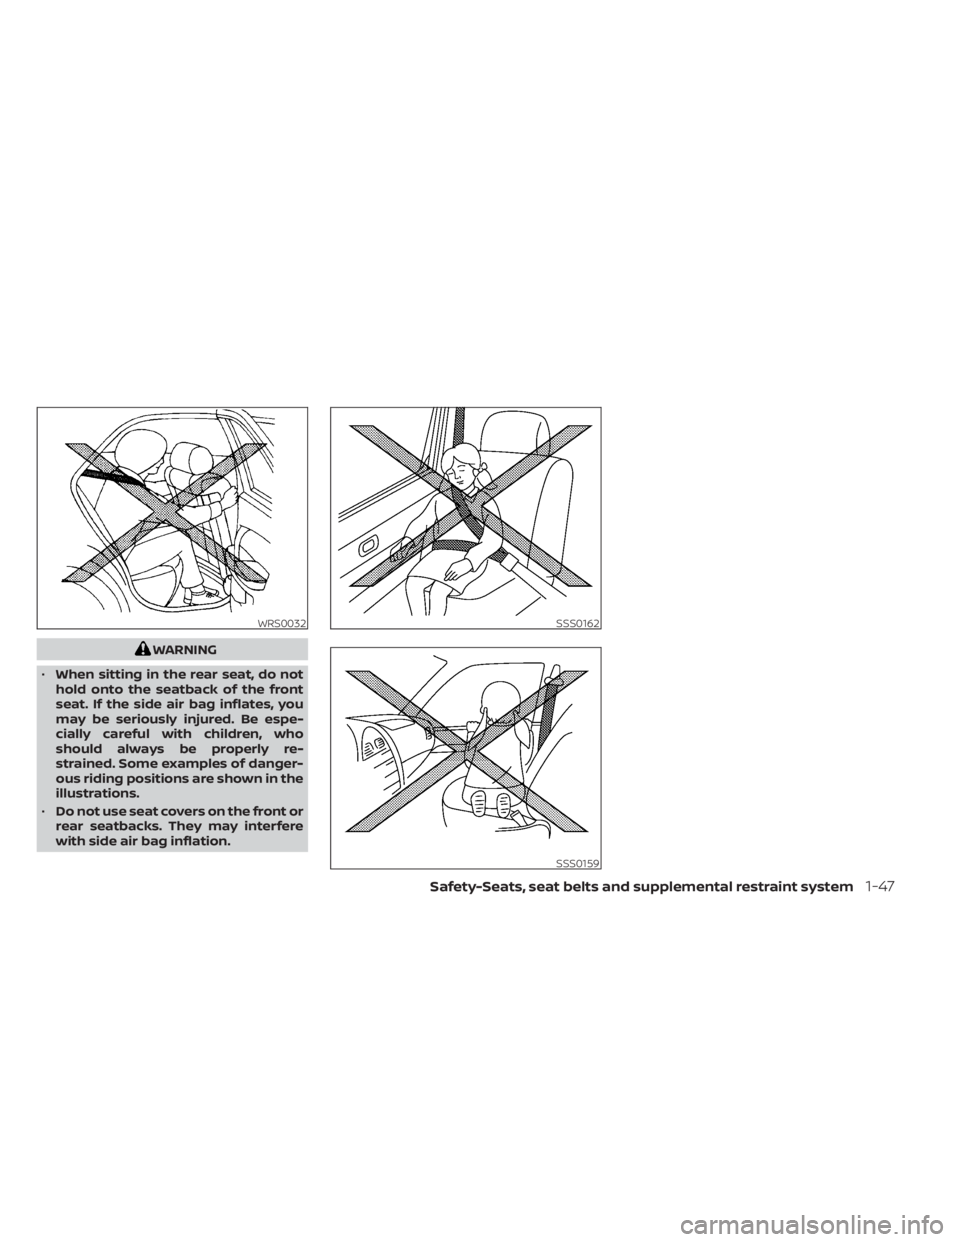
• When sitting in the rear seat, do not
hold onto the seatback of the front
seat. If the side air bag inflates, you
may be seriously injured. Be espe-
cially careful with children, who
should always be properly re-
strained. Some examples of danger-
ous riding positions are shown in the
illustrations.
• Do not use seat covers on the front or
rear seatbacks. They may interfere
with side air bag inflation.
SSS0162
SSS0159
Page 112 of 500
Menu itemResult
Welcome Headlight (if so equipped) Displays the available welcome headlight options. Welcome & Farewell Allows user to set the headlights to turn on when they approach and leave the vehicle.
Welcome Allows user to set the headlights to turn on when they approach the vehicle.
Farewell Allows user to set the headlights to turn on when they leave the vehicle.
OFF Allows user to set the headlights to turn off when not driving.
Auto Room Lamp Allows user to turn the auto room lamp on or off.
Light Sensitivity Allows user to change when the lights illuminate based on the brightness outside the vehicle.
Auto Light (if so equipped) Allows user to turn the auto light feature on or off.
Light Off Delay (if so equipped) Allows user to change the duration of time, from 0 to 180 seconds, that the automatic headlights stay on af-
ter the vehicle is shut off.
Turn Indicator Displays the available turn indicator settings.
3 Flash Pass Allows user to turn the 3 flash pass feature on or off. For additional information, refer to “Headlight and turn
signal switch” in this section.
Locking Displays the available locking settings.
Ext. Door Switch Allows user to turn the exterior door switch on or off. When turned on, the request switch on the door is acti-
vated.
Selective Unlock Allows user to turn selective unlock on or off. When turned on, only the driver’s door is unlocked af ter the
door unlock operation. When the door handle request switch on the driver’s or front passenger’s side door is
pushed to be unlocked, only the corresponding door is unlocked first. All the doors can be unlocked if the
door unlock operation is performed again within 5 seconds. When this item is turned off, all the doors will be
unlocked af ter the door unlock operation is performed once.
Auto Door Unlock Displays the available auto door unlock options.
Shif t to P Doors will unlock when the vehicle is shif ted into P (Park).
IGN OFF Doors will unlock when the ignition is turned off.
OFF Doors will have to be manually unlocked.
Answer Back Horn Allows user to turn the answer back horn feature on or off. When turned on, the horn will chirp and the haz-
ard indicators will flash twice when locking the vehicle with the Intelligent Key.
Wipers Displays the available wipers settings.
2-28Instruments and controls
Page 124 of 500
Start the engine using the following proce-
dure:
1. Remove any items that may be causingthe interference away from the NATS key.
2. Leave the ignition switch in the ON posi- tion for approximately 5 seconds.
3. Place the ignition switch in the OFF or LOCK position and wait approximately
10 seconds.
4. Repeat steps 2 and 3 again.
5. Start the engine.
6. Repeat the steps above until all possible interferences are eliminated.
If this procedure allows the engine to start,
NISSAN recommends placing the regis-
tered NATS key separate from other de-
vices to avoid interference.NISSAN VEHICLE IMMOBILIZER
SYSTEM (if so equipped)
The NISSAN Vehicle Immobilizer System
will not allow the engine to start without
the use of a registered key.
If the engine fails to start using a registered
key (for example, when interference is
caused by another registered key, an auto-
mated toll road device or automatic pay-
ment device on the key ring), restart the
engine using the following procedures:
1. Leave the ignition switch in the ON posi- tion for approximately 5 seconds.
2. Turn the ignition switch to the OFF or LOCK position, and wait approximately
10 seconds.
3. Repeat steps 1 and 2.
4. Restart the engine while holding the de- vice (which may have caused the inter-
ference) separate from the registered
key.
If the no start condition re-occurs, NISSAN
recommends placing the registered key on
a separate key ring to avoid interference
from other devices. FCC Notice:
For USA:
This device complies with Part 15 of the
FCC Rules. Operation is subject to the fol-
lowing two conditions; (1) This device
may not cause harmful interference, and
(2) this device must accept any interfer-
ence received, including interference
that may cause undesired operation of
the device.
NOTE:
Changes or modifications not expressly
approved by the party responsible for
compliance could void the user's author-
ity to operate the equipment.
For Canada:
This device complies with Industry
Canada licence-exempt RSS standard(s).
Operation is subject to the following two
conditions: (1) this device may not cause
interference, and (2) this device must ac-
cept any interference, including interfer-
ence that may cause undesired opera-
tion of the device.
2-40Instruments and controls
Page 151 of 500
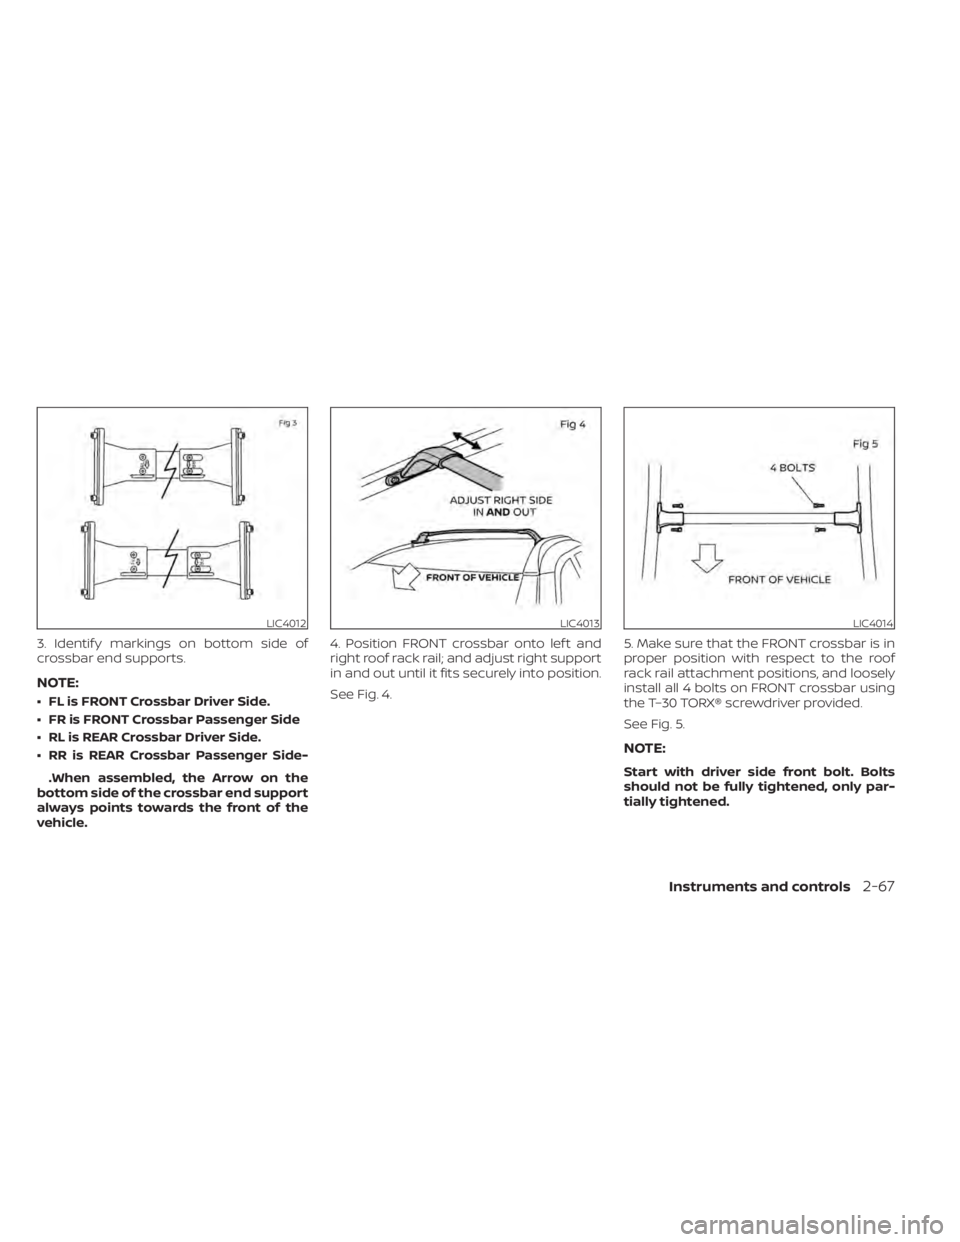
3. Identif y markings on bottom side of
crossbar end supports.
NOTE:
• FL is FRONT Crossbar Driver Side.
• FR is FRONT Crossbar Passenger Side
• RL is REAR Crossbar Driver Side.
• RR is REAR Crossbar Passenger Side-.When assembled, the Arrow on the
bottom side of the crossbar end support
always points towards the front of the
vehicle. 4. Position FRONT crossbar onto lef t and
right roof rack rail; and adjust right support
in and out until it fits securely into position.
See Fig. 4.
5. Make sure that the FRONT crossbar is in
proper position with respect to the roof
rack rail attachment positions, and loosely
install all 4 bolts on FRONT crossbar using
the T–30 TORX® screwdriver provided.
See Fig. 5.
NOTE:
Start with driver side front bolt. Bolts
should not be fully tightened, only par-
tially tightened.
LIC4013LIC4014
Page 153 of 500
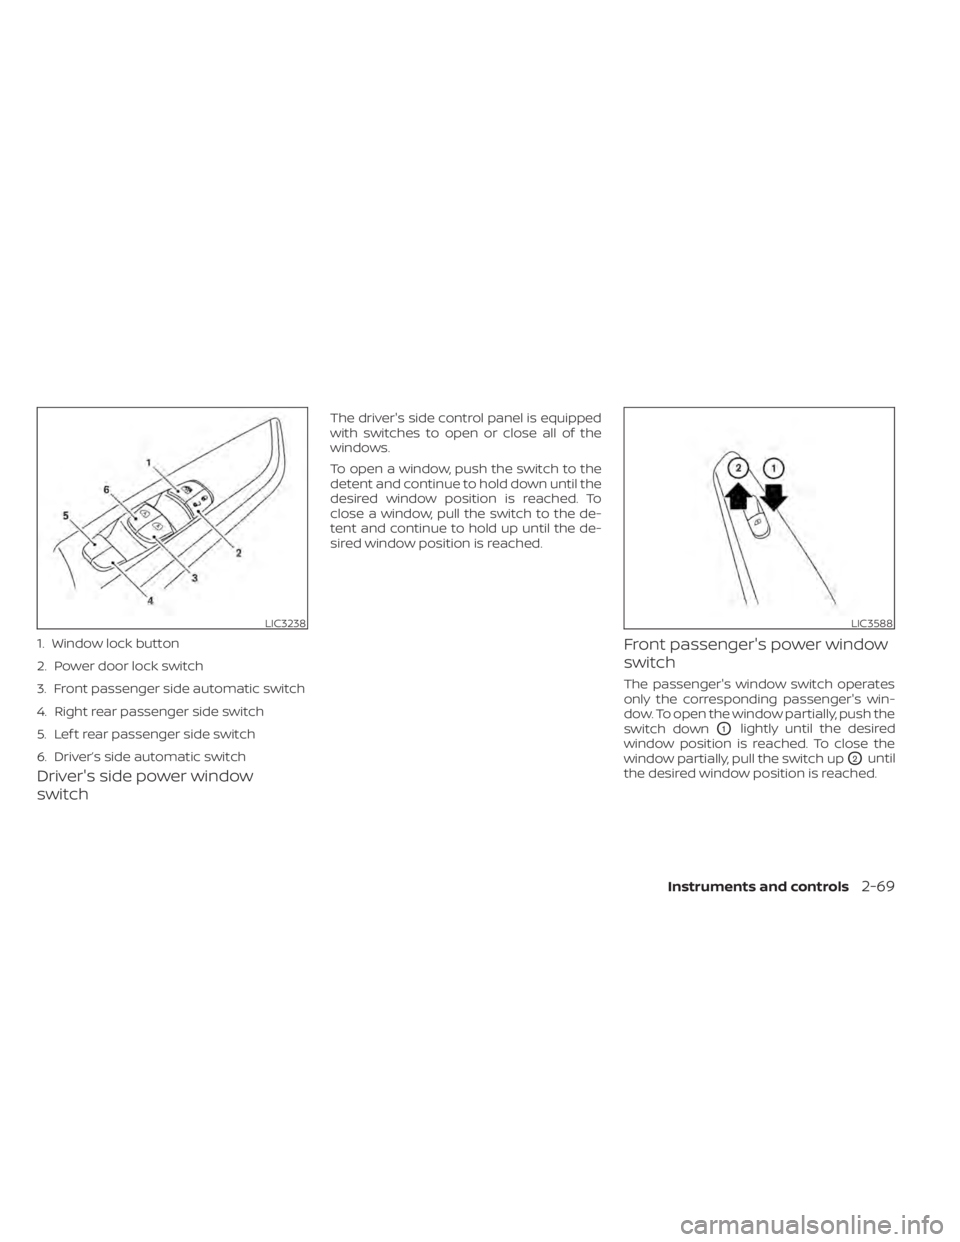
Driver's side power window
switch
The driver's side control panel is equipped
with switches to open or close all of the
windows.
To open a window, push the switch to the
detent and continue to hold down until the
desired window position is reached. To
close a window, pull the switch to the de-
tent and continue to hold up until the de-
sired window position is reached.
Front passenger's power window
switch
The passenger's window switch operates
only the corresponding passenger's win-
dow. To open the window partially, push the
switch down
O1lightly until the desired
window position is reached. To close the
window partially, pull the switch up
O2until
the desired window position is reached.
LIC3238
1. Window lock button
2. Power door lock switch
3. Front passenger side automatic switch
4. Right rear passenger side switch
5. Lef t rear passenger side switch
6. Driver’s side automatic switch
LIC3588
Page 154 of 500
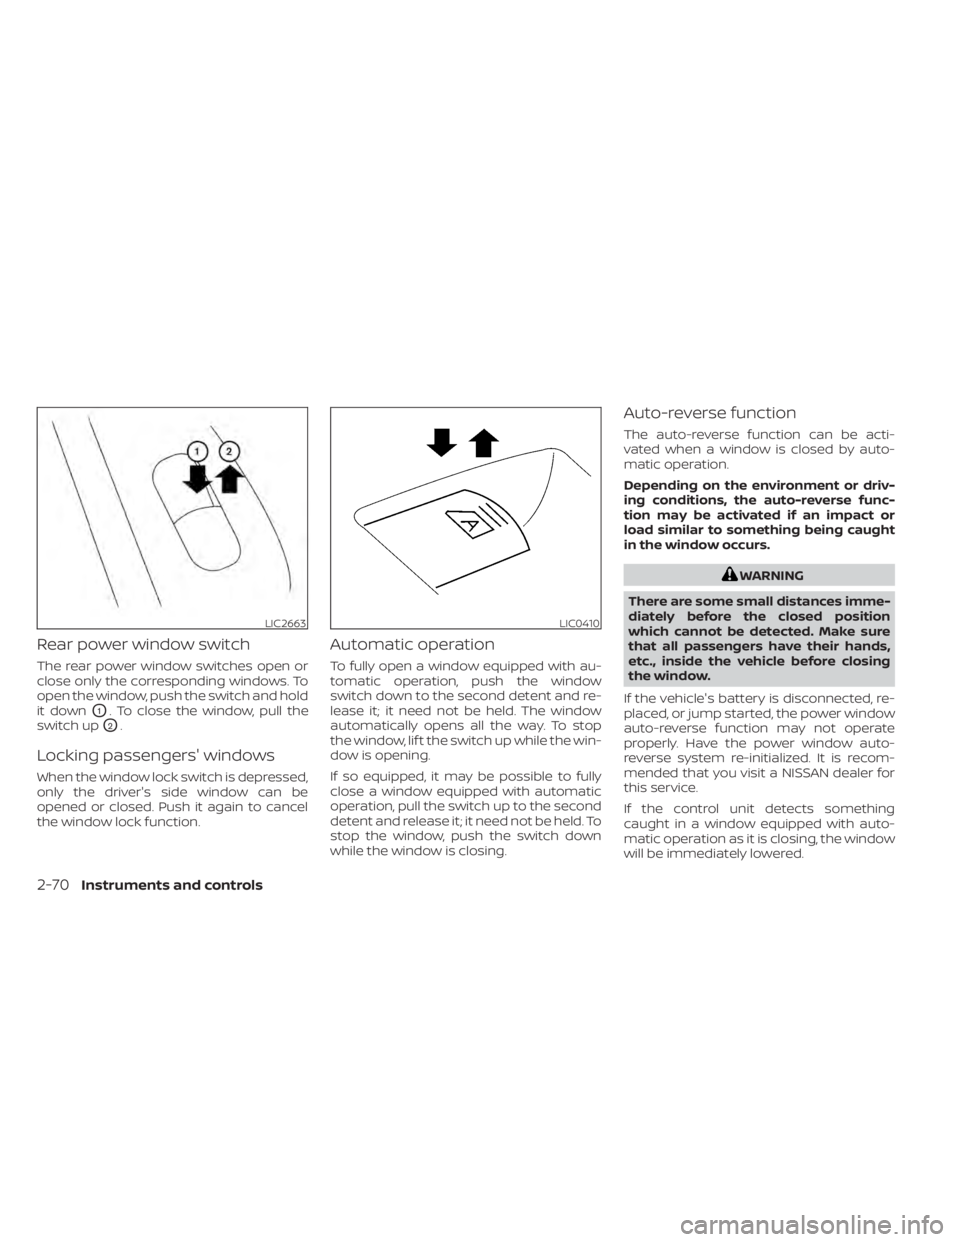
Rear power window switch
The rear power window switches open or
close only the corresponding windows. To
open the window, push the switch and hold
it down
O1. To close the window, pull the
switch up
O2.
Locking passengers' windows
When the window lock switch is depressed,
only the driver's side window can be
opened or closed. Push it again to cancel
the window lock function.
Automatic operation
To fully open a window equipped with au-
tomatic operation, push the window
switch down to the second detent and re-
lease it; it need not be held. The window
automatically opens all the way. To stop
the window, lif t the switch up while the win-
dow is opening.
If so equipped, it may be possible to fully
close a window equipped with automatic
operation, pull the switch up to the second
detent and release it; it need not be held. To
stop the window, push the switch down
while the window is closing.
Auto-reverse function
The auto-reverse function can be acti-
vated when a window is closed by auto-
matic operation.
Depending on the environment or driv-
ing conditions, the auto-reverse func-
tion may be activated if an impact or
load similar to something being caught
in the window occurs.
WARNING
There are some small distances imme-
diately before the closed position
which cannot be detected. Make sure
that all passengers have their hands,
etc., inside the vehicle before closing
the window.
If the vehicle's battery is disconnected, re-
placed, or jump started, the power window
auto-reverse function may not operate
properly. Have the power window auto-
reverse system re-initialized. It is recom-
mended that you visit a NISSAN dealer for
this service.
If the control unit detects something
caught in a window equipped with auto-
matic operation as it is closing, the window
will be immediately lowered.
LIC2663LIC0410
2-70Instruments and controls
Page 174 of 500
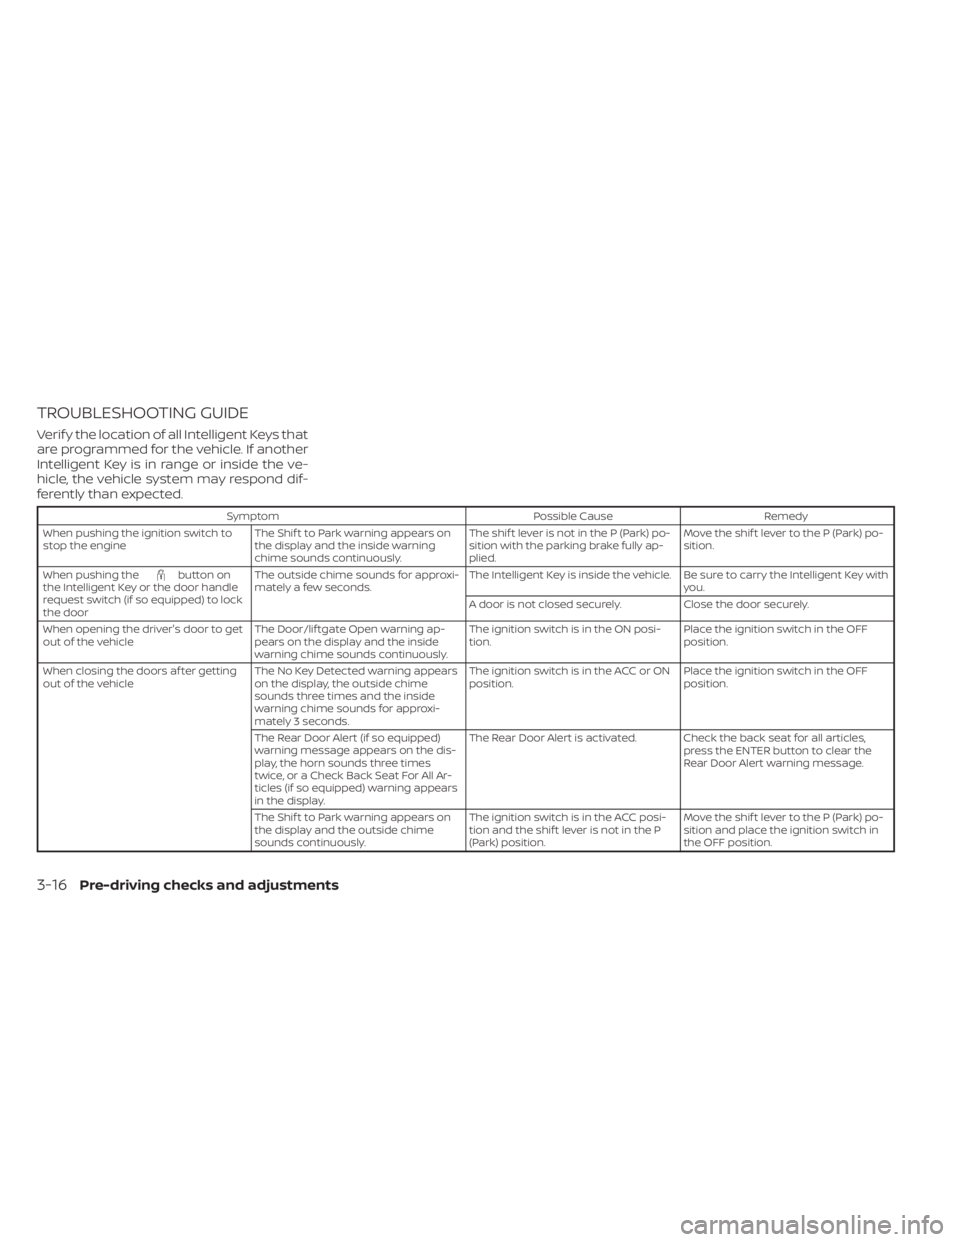
TROUBLESHOOTING GUIDE
Verif y the location of all Intelligent Keys that
are programmed for the vehicle. If another
Intelligent Key is in range or inside the ve-
hicle, the vehicle system may respond dif-
ferently than expected.
SymptomPossible CauseRemedy
When pushing the ignition switch to
stop the engine The Shif t to Park warning appears on
the display and the inside warning
chime sounds continuously. The shif t lever is not in the P (Park) po-
sition with the parking brake fully ap-
plied.Move the shif t lever to the P (Park) po-
sition.
When pushing the
button on
the Intelligent Key or the door handle
request switch (if so equipped) to lock
the door The outside chime sounds for approxi-
mately a few seconds.
The Intelligent Key is inside the vehicle. Be sure to carry the Intelligent Key with
you.
A door is not closed securely. Close the door securely.
When opening the driver's door to get
out of the vehicle The Door/lif tgate Open warning ap-
pears on the display and the inside
warning chime sounds continuously. The ignition switch is in the ON posi-
tion.
Place the ignition switch in the OFF
position.
When closing the doors af ter getting
out of the vehicle The No Key Detected warning appears
on the display, the outside chime
sounds three times and the inside
warning chime sounds for approxi-
mately 3 seconds. The ignition switch is in the ACC or ON
position.
Place the ignition switch in the OFF
position.
The Rear Door Alert (if so equipped)
warning message appears on the dis-
play, the horn sounds three times
twice, or a Check Back Seat For All Ar-
ticles (if so equipped) warning appears
in the display. The Rear Door Alert is activated. Check the back seat for all articles,
press the ENTER button to clear the
Rear Door Alert warning message.
The Shif t to Park warning appears on
the display and the outside chime
sounds continuously. The ignition switch is in the ACC posi-
tion and the shif t lever is not in the P
(Park) position.Move the shif t lever to the P (Park) po-
sition and place the ignition switch in
the OFF position.
3-16Pre-driving checks and adjustments