2021 NISSAN KICKS window
[x] Cancel search: windowPage 225 of 500
Dehumidified defogging
This mode is used to defog the windows
and dehumidif y the air.
1. Turn the air flow control dial to the
position.
2. Turn the
fan speed control dial to
the desired position.
3. Press the
button. The indicator
light comes on.
When the
,or positions in be-
tween are selected, the air conditioner au-
tomatically turns on. The air conditioning
system will continue to operate until the
fan speed control dial is turned to OFF or
the vehicle is shut off, even if the air flow
control dial is turned to a position other
than the
position. This dehumidifies
the air which helps defog the windshield.
The
mode automatically turns off, al-
lowing outside air to be drawn into the pas-
senger compartment to further improve
the defogging performance.
4. Turn the temperature control dial to the desired position.
Operating tips
• Keep the windows closed while the airconditioner is in operation.
• Af ter parking in the sun, drive for two or three minutes with the windows open to
vent hot air from the passenger com-
partment. Then, close the windows. This
allows the air conditioner to cool the inte-
rior more quickly.
• The air conditioning system should be
operated for approximately ten min-
utes at least once a month. This helps
prevent damage to the system due to
lack of lubrication.
• A visible mist may be seen coming from the ventilators in hot, humid conditions
as the air is cooled rapidly. This does not
indicate a malfunction.
• If the high temperature warning light
illuminates in red indicating en-
gine coolant temperature is over the
normal range, turn the air conditioner
off. For additional information, refer to
“If your vehicle overheats” in the “In
case of emergency ” section of this
manual.
AIR FLOW CHARTS
The following charts show the button and
dial positions for MAXIMUM AND QUICK
heating, cooling or defrosting. The
air
recirculation button should always be in
the OFF position for heating and defrost-
ing.
Monitor, climate, audio, phone and voice recognition systems4-37
Page 229 of 500
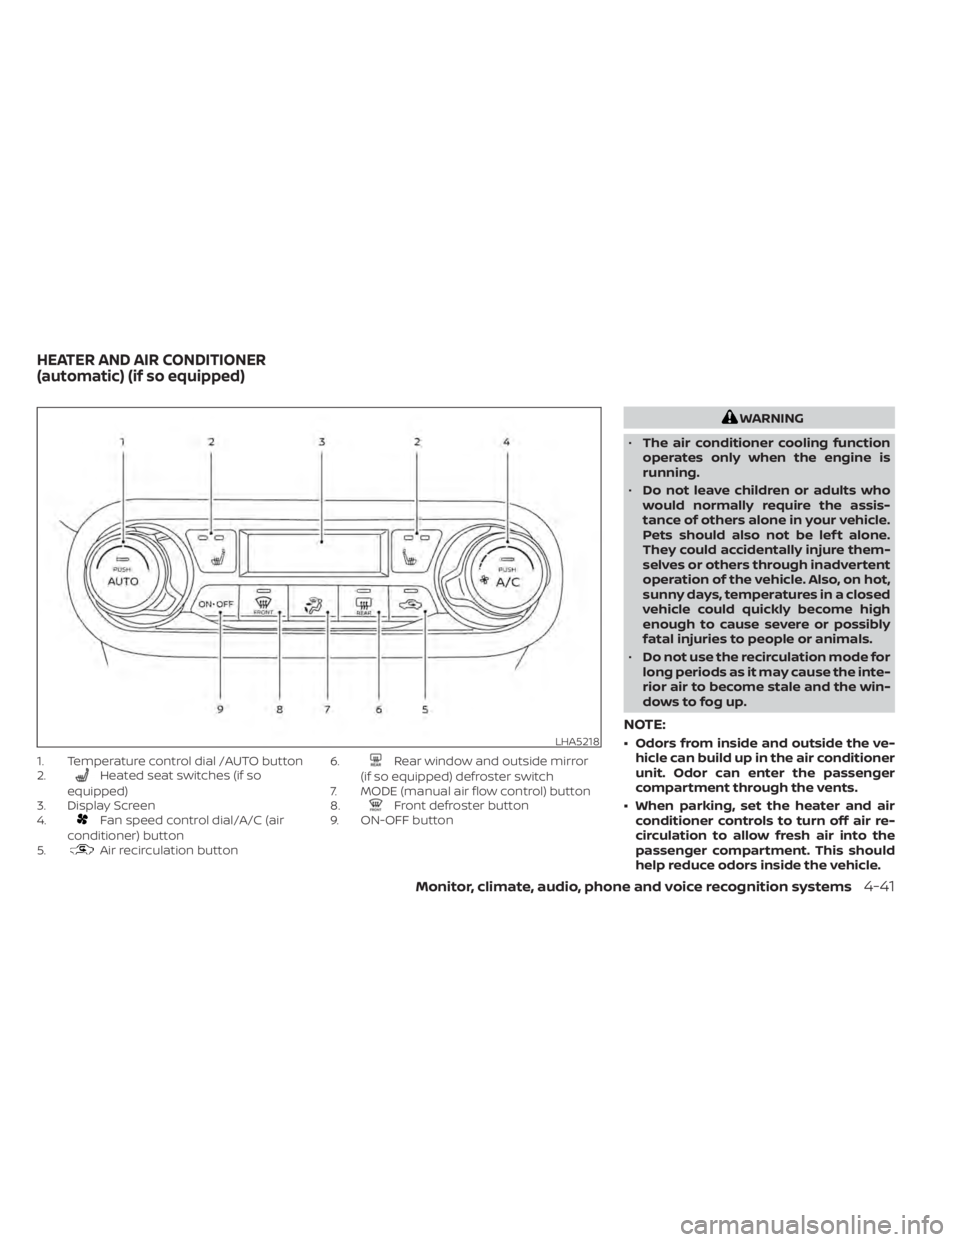
1. Temperature control dial /AUTO button
2.Heated seat switches (if so
equipped)
3. Display Screen
4.
Fan speed control dial/A/C (air
conditioner) button
5.
Air recirculation button 6.
Rear window and outside mirror
(if so equipped) defroster switch
7. MODE (manual air flow control) button
8.
Front defroster button
9. ON-OFF button
Monitor, climate, audio, phone and voice recognition systems4-41
Page 230 of 500
AUTOMATIC OPERATION
Heating (A/C OFF)
The air conditioner does not activate. When
you need to heat only, use this mode.
1. Press the AUTO button.
2. Turn the temperature control dial to setthe desired temperature.
• The temperature of the passenger com- partment will be maintained automati-
cally. Air flow distribution and fan speed
are also controlled automatically.
• Do not set the temperature lower than the outside air temperature. Otherwise,
the system may not work properly.
• Not recommended if windows fog up.
Cooling and/or dehumidified
heating (AUTO)
This mode may be used all year round as
the system automatically works to keep a
constant temperature. Air flow distribution
and fan speed are also controlled auto-
matically.
1. Press the AUTO button on.
2. Turn the temperature control dial to the lef t or right to set the desired
temperature. • The temperature of the passenger com-
partment will be maintained automati-
cally. Air flow distribution and fan speed
are also controlled automatically.
• A visible mist may be seen coming from the vents in hot, humid conditions as the
air is cooled rapidly. This does not indicate
a malfunction.
Dehumidified defrosting or
defogging
1. Press thefront defroster button on.
2. Turn the temperature control dial to set the maximum temperature to aid in
defogging.
• To quickly remove ice from the outside of the windows, use the
fan speed con-
trol dial to set the fan speed to maximum.
• As soon as possible af ter the windshield is clean, press the AUTO button to return
to the automatic mode.
• When the
front defroster button is
pressed, the air conditioner will automati-
cally be turned on.
Remote Engine Start with
Intelligent Climate Control (if so
equipped)
Vehicles equipped with automatic climate
controls and Remote Engine Start function
may go into automatic heating or cooling
mode when Remote Engine Start is acti-
vated depending on outside and cabin
temperatures. During this period, the cli-
mate control display and buttons will be
inoperable until the ignition switch is
turned on. In Remote Engine Start defrost-
ing mode, the rear window defroster and
heated seats (if so equipped) may be acti-
vated automatically.
MANUAL OPERATION
Fan speed control
Turn thefan speed control dial to
manually control the fan speed.
Press the AUTO button to return to auto-
matic control of the fan speed.
Temperature control dial
The temperature control dial allows you to
adjust the temperature of the outlet air. To
lower the temperature, turn the dial to the
lef t. To increase the temperature, turn the
dial to the right.
4-42Monitor, climate, audio, phone and voice recognition systems
Page 231 of 500
Air recirculation
Press theair recirculation button to
recirculate interior air inside the vehicle.
A/C (air conditioner) button
Start the engine, turn thefan speed
control dial to the desired position and
press the
button to turn on the air
conditioner. To turn off the air conditioner,
press the
button again.
The air conditioner cooling function op-
erates only when the engine is running.
Air flow control
Press the MODE button to manually control
air flow and select the air outlet.
— Air flows from center and side vents.
— Air flows from center and sidevents and foot outlets.
— Air flows mainly from foot outlets.— Air flows from defroster and footoutlets.
To turn system off
To turn off the heater and air conditioner,
press the ON-OFF button. Press the ON-
OFF button again, the system will turn on in
the mode which was used immediately
before the system was turned off.
Rear window and outside mirror
(if so equipped) defroster switch
For additional information, refer to “Rear
window and/or outside mirror defroster
switch (if so equipped)” in the “Instruments
and controls” section of this manual.
Heated seat switches (if so
equipped)
For additional information, refer to “Heated
seat switches” in the “Instruments and con-
trols” section of this manual.
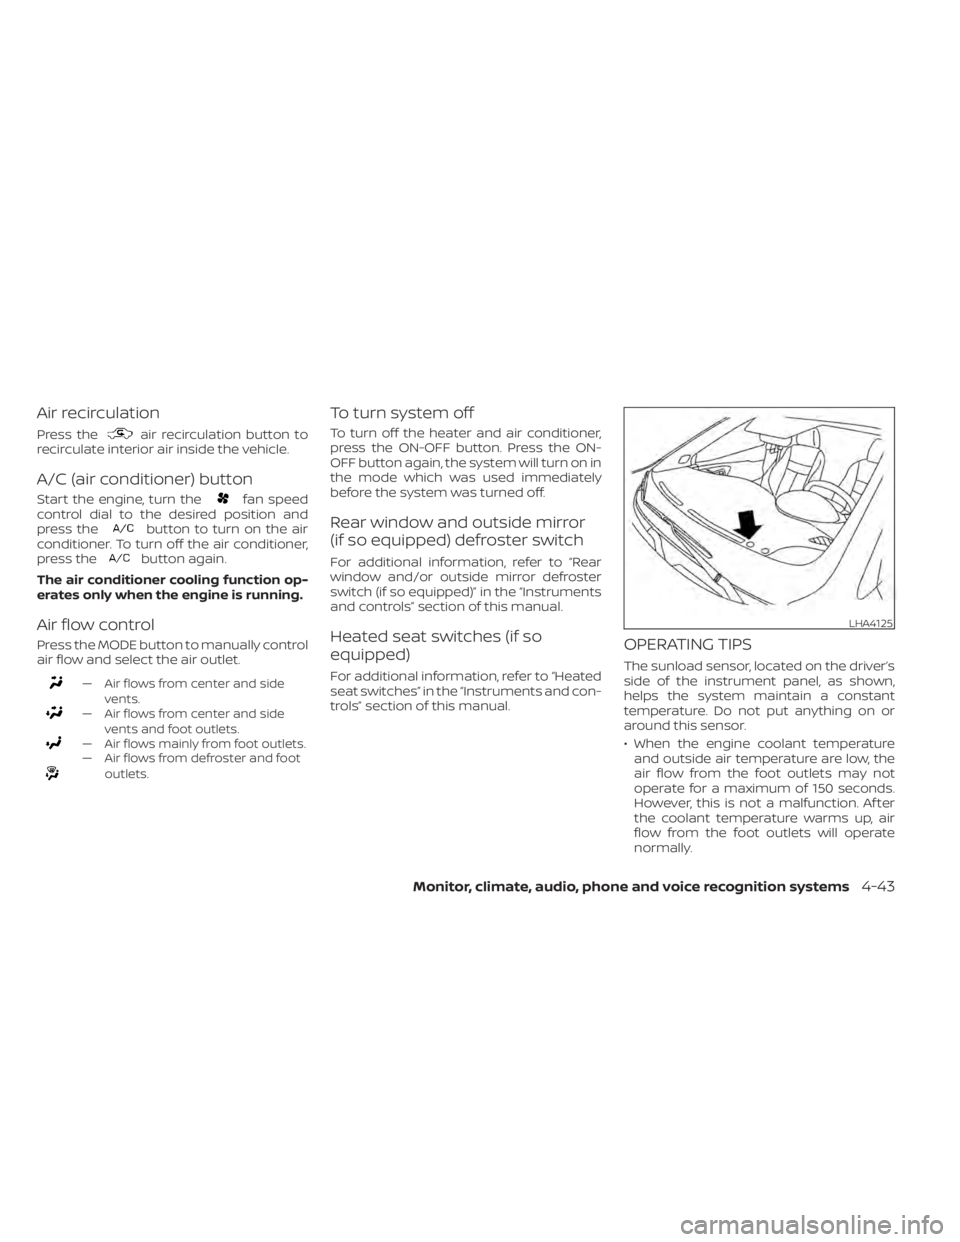
OPERATING TIPS
The sunload sensor, located on the driver’s
side of the instrument panel, as shown,
helps the system maintain a constant
temperature. Do not put anything on or
around this sensor.
• When the engine coolant temperatureand outside air temperature are low, the
air flow from the foot outlets may not
operate for a maximum of 150 seconds.
However, this is not a malfunction. Af ter
the coolant temperature warms up, air
flow from the foot outlets will operate
normally.
LHA4125
Page 233 of 500
Reception conditions will constantly
change because of vehicle movement.
Buildings, terrain, signal distance and inter-
ference from other vehicles can work
against ideal reception. Described below
are some of the factors that can affect your
radio reception.
Some cellular phones or other devices may
cause interference or a buzzing noise to
come from the audio system speakers.
Storing the device in a different location
may reduce or eliminate the noise.
FM RADIO RECEPTION
Range: FM range is normally limited to 25 –
30 mi (40 – 48 km), with monaural (single
channel) FM having slightly more range
than stereo FM. External influences may
sometimes interfere with FM station re-
ception even if the FM station is within 25
mi (40 km). The strength of the FM signal is
directly related to the distance between
the transmitter and receiver. FM signals fol-
low a line-of-sight path, exhibiting many of
the same characteristics as light. For ex-
ample, they will reflect off objects.
Fade and drif t: As your vehicle moves away
from a station transmitter, the signals will
tend to fade and/or drif t.Static and flutter: During signal interfer-
ence from buildings, large hills or due to
antenna position (usually in conjunction
with increased distance from the station
transmitter), static or flutter can be heard.
This can be reduced by adjusting the treble
control to reduce treble response.
Multipath reception: Because of the reflec-
tive characteristics of FM signals, direct and
reflected signals reach the receiver at the
same time. The signals may cancel each
other, resulting in momentary flutter or loss
of sound.AM RADIO RECEPTION
AM signals, because of their low frequency,
can bend around objects and skip along
the ground. In addition, the signals can be
bounced off the ionosphere and bent back
to earth. Because of these characteristics,
AM signals are also subject to interference
as they travel from transmitter to receiver.
Fading: Occurs while the vehicle is passing
through freeway underpasses or in areas
with many tall buildings. It can also occur
for several seconds during ionospheric tur-
bulence even in areas where no obstacles
exist.
Static: Caused by thunderstorms, electrical
power lines, electric signs and even traffic
lights.
AUDIO OPERATION PRECAUTIONS
MP3 or WMA terms
• MP3 — MP3 is short for Moving Pictures
Experts Group Audio Layer 3. MP3 is the
most well-known compressed digital au-
dio file format. This format allows for near
“CD quality” sound, but at a fraction of the
size of normal audio files. MP3 conversion
of an audio track from CD-ROM can re-
duce the file size by approximately a 10:1
ratio with virtually no perceptible loss in
quality. MP3 compression removes the
redundant and irrelevant parts of a
sound signal that the human ear doesn’t
hear.
• WMA — Windows Media Audio (WMA)* is a compressed audio format created by Mi-
crosof t as an alternative to MP3. The WMA
codec offers greater file compression
than the MP3 codec, enabling storage of
more digital audio tracks in the same
amount of space when compared to
MP3s at the same level of quality.
Monitor, climate, audio, phone and voice recognition systems4-45
Page 234 of 500
• Bit rate — Bit rate denotes the number ofbits per second used by a digital music
file. The size and quality of a compressed
digital audio file is determined by the bit
rate used when encoding the file.
• Sampling frequency — Sampling fre- quency is the rate at which the samples
of a signal are converted from analog to
digital (A/D conversion) per second.
• Multisession — Multisession is one of the methods for writing data to media. Writ-
ing data once to the media is called a
single session, and writing more than
once is called a multisession.
• ID3/WMA Tag — The ID3/WMA tag is the part of the encoded MP3 or WMA file that
contains information about the digital
music file such as song title, artist, encod-
ing bit rate, track time duration, etc. ID3
tag information is displayed on the Artist/
song title line on the display.
* Windows® and Windows Media® are reg-
istered trademarks and trademarks in the
United States of America and other coun-
tries of Microsof t Corporation of the USA.USB (Universal Serial Bus)
connection port
CAUTION
• Do not force the USB device into the
USB port. Inserting the USB device
tilted or up-side-down into the port
may damage the port. Make sure
that the USB device is connected cor-
rectly into the USB port.
• Do not grab the USB port cover (if so
equipped) when pulling the USB de-
vice out of the port. This could dam-
age the port and the cover.
• Do not leave the USB cable in a place
where it can be pulled unintention-
ally. Pulling the cable may damage
the port. The vehicle is not equipped with a USB de-
vice. USB devices should be purchased
separately as necessary.
This system cannot be used to format USB
devices. To format a USB device, use a per-
sonal computer.
In some jurisdictions, the USB device for the
front seats plays only sound without im-
ages for regulatory reasons, even when the
vehicle is parked.
This system supports various USB
memory devices, USB hard drives and
iPod® players. Some USB devices may not
be supported by this system.
• Partitioned USB devices may not play
correctly.
• Some characters used in other lan- guages (Chinese, Japanese, etc.) may not
appear properly in the display. Using Eng-
lish language characters with a USB de-
vice is recommended.
4-46Monitor, climate, audio, phone and voice recognition systems
Page 252 of 500
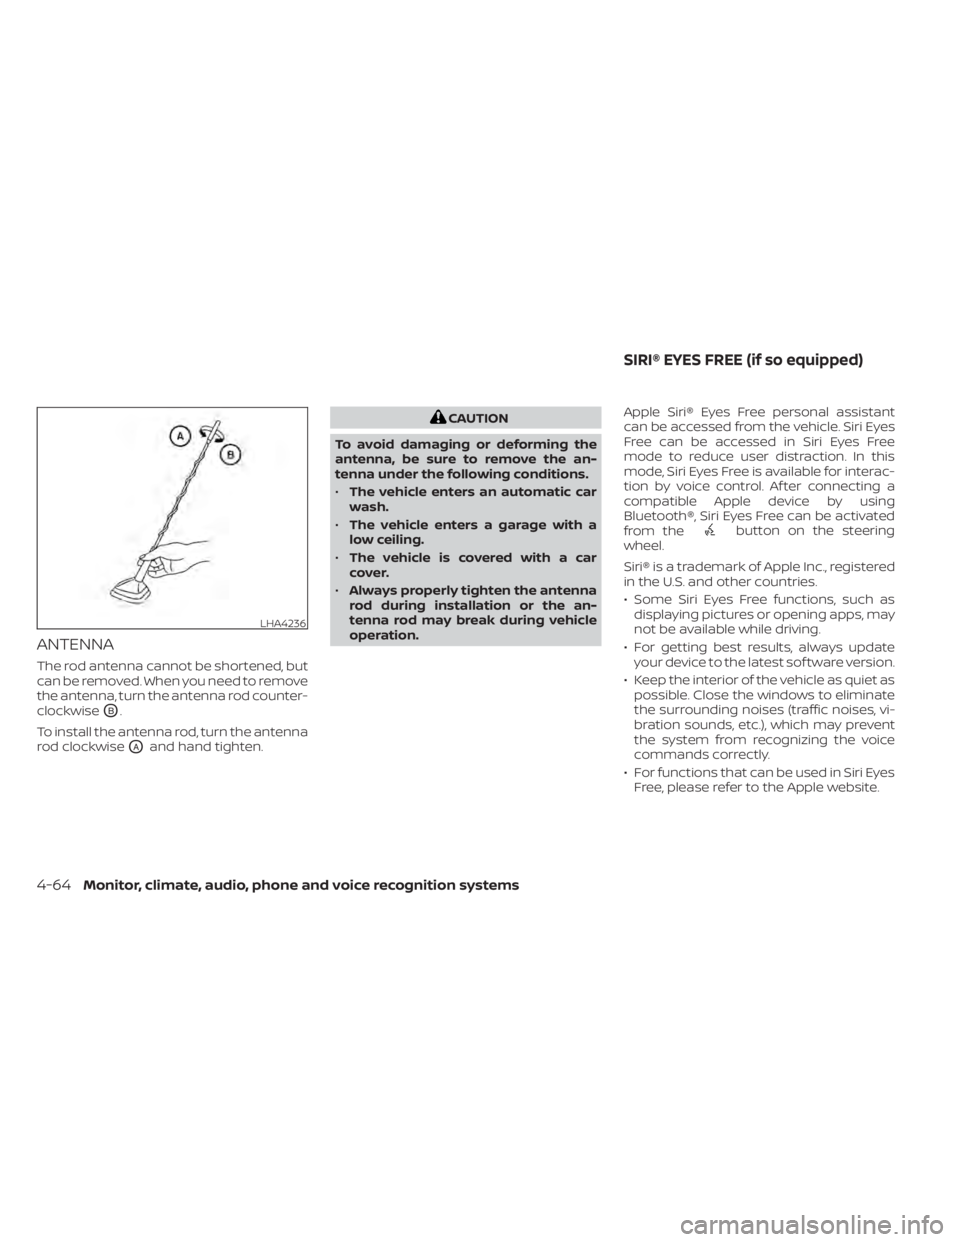
ANTENNA
The rod antenna cannot be shortened, but
can be removed. When you need to remove
the antenna, turn the antenna rod counter-
clockwise
OB.
To install the antenna rod, turn the antenna
rod clockwise
OAand hand tighten.
button on the steering
wheel.
Siri® is a trademark of Apple Inc., registered
in the U.S. and other countries.
• Some Siri Eyes Free functions, such as displaying pictures or opening apps, may
not be available while driving.
• For getting best results, always update your device to the latest sof tware version.
• Keep the interior of the vehicle as quiet as possible. Close the windows to eliminate
the surrounding noises (traffic noises, vi-
bration sounds, etc.), which may prevent
the system from recognizing the voice
commands correctly.
• For functions that can be used in Siri Eyes Free, please refer to the Apple website.
LHA4236
SIRI® EYES FREE (if so equipped)
Page 279 of 500
WARNING
• Radio waves could adversely affect
electric medical equipment. Those
who use a pacemaker should contact
the electric medical equipment
manufacturer for the possible influ-
ences before use.
• If the low tire pressure warning light
illuminates while driving, avoid sud-
den steering maneuvers or abrupt
braking, reduce vehicle speed, pull
off the road to a safe location and
stop the vehicle as soon as possible.
Driving with under-inflated tires may
permanently damage the tires and
increase the likelihood of tire failure.
Serious vehicle damage could occur
and may lead to an accident and
could result in serious personal in-
jury. Check the tire pressure for all
four tires. Adjust the tire pressure to
the recommended COLD tire pres-
sure shown on the Tire and Loading
Information label to turn the low tire
pressure warning light off. If you have
a flat tire, replace it with a spare tire
as soon as possible. (For additional
information, refer to “Flat tire” in the
“In case of emergency ” section for
changing a flat tire.) •
When replacing a wheel without the
TPMS such as the spare tire, when a
spare tire is mounted or a wheel is
replaced, the TPMS will not function
and the low tire pressure warning
light will flash for approximately 1
minute. The light will remain on af ter
1 minute. Have your tires replaced
and/or TPMS system reset as soon as
possible. It is recommended that you
visit a NISSAN dealer for this service.
• Replacing tires with those not origi-
nally specified by NISSAN could af-
fect the proper operation of the
TPMS.
• Do not inject any tire liquid or aerosol
tire sealant into the tires, as this may
cause a malfunction of the tire pres-
sure sensors.
CAUTION
• The TPMS may not function properly
when the wheels are equipped with
tire chains or the wheels are buried in
snow. •
Do not place metalized film or any
metal parts (antenna, etc.) on the
windows. This may cause poor re-
ception of the signals from the tire
pressure sensors, and the TPMS will
not function properly.
Some devices and transmitters may tem-
porarily interfere with the operation of the
TPMS and cause the low tire pressure
warning light to illuminate.
Some examples are:
• Facilities or electric devices using similar radio frequencies are near the vehicle.
• If a transmitter set to similar frequencies is being used in or near the vehicle.
• If a computer (or similar equipment) or a DC/AC converter is being used in or near
the vehicle.
The low tire pressure warning light may
illuminate in the following cases:
• If the vehicle is equipped with a wheel and tire without TPMS.
• If the TPMS has been replaced and the ID has not been registered.
• If the wheel is not originally specified by NISSAN.
Starting and driving5-7