2021 NISSAN KICKS climate control
[x] Cancel search: climate controlPage 242 of 500
USB (Universal Serial Bus)
CONNECTION PORT
Connecting a device to the USB
connection port
CAUTION
• To avoid damage and loss of function
when using a USB device, note the
following precautions.
• Do not force the USB device into the
USB port. Inserting the USB device
tilted or up-side-down into the port
may damage the port. Make sure
that the USB device is connected cor-
rectly into the USB port.
• Do not grab the USB port cover (if so
equipped) when pulling the USB de-
vice out of the port. This could dam-
age the port and the cover.
• Do not leave the USB cable in a place
where it can be pulled unintention-
ally. Pulling the cable may damage
the port.
For additional information, refer to your de-
vice manufacturer's owner information re-
garding the proper use and care of the
device.
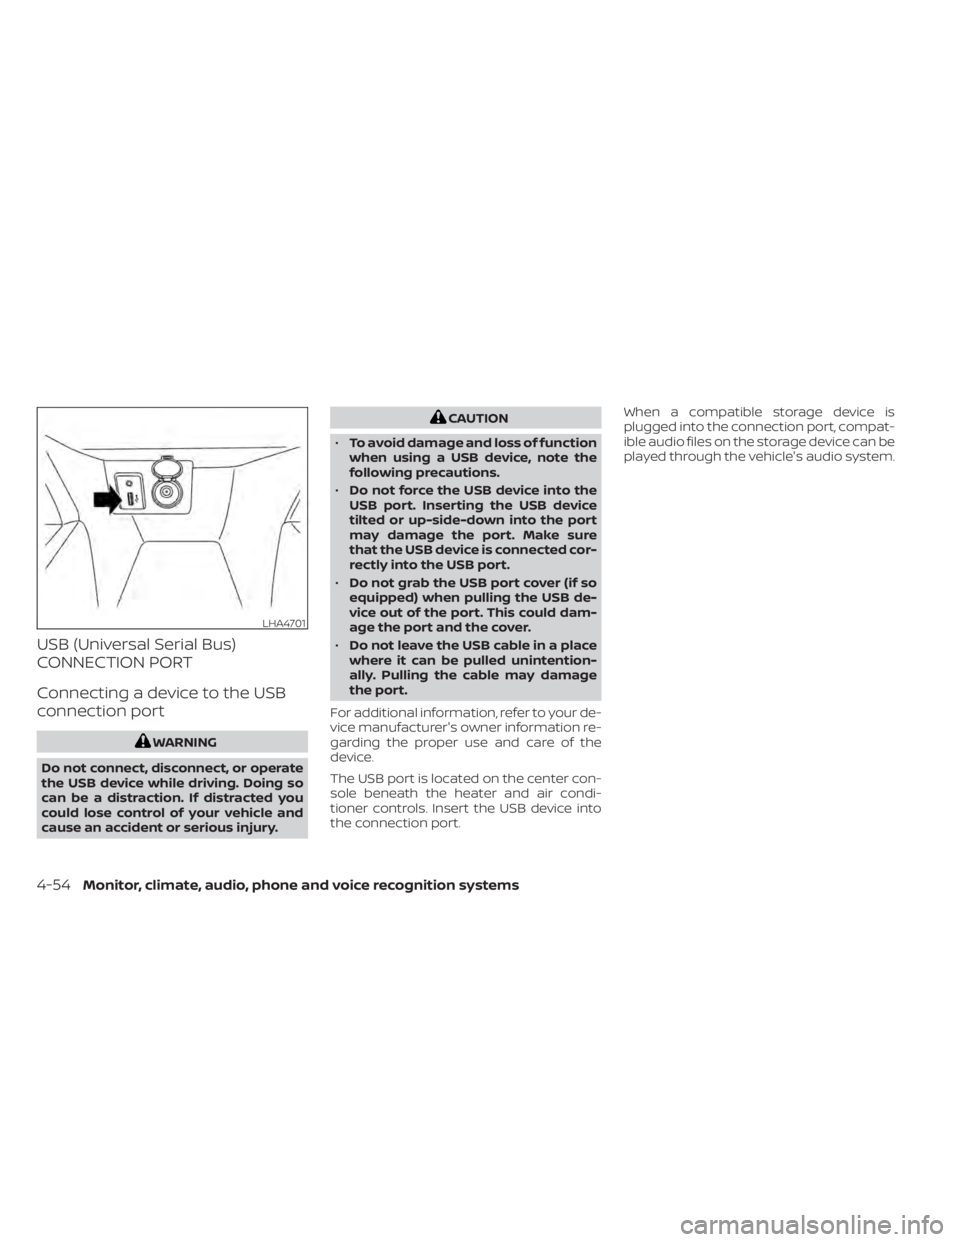
The USB port is located on the center con-
sole beneath the heater and air condi-
tioner controls. Insert the USB device into
the connection port. When a compatible storage device is
plugged into the connection port, compat-
ible audio files on the storage device can be
played through the vehicle's audio system.
LHA4701
4-54Monitor, climate, audio, phone and voice recognition systems
Page 244 of 500
USB memory device player
operation
Activation and playing
Connecting the USB memory device into
the port will start playing the USB memory.
USB memory device can also be played by
touching the “USB” key on the Menu screen
or by touching USB on the Launch Bar.
To pause playing the USB memory device
touch the “
” key. To resume playing,
touch the “”key.
Skipping tracks
To skip the tracks, press theorbuttons on the control panel or touch the “”or“” keys on the screen repeat-
edly until the preferred track is selected.
NOTE:
Depending on the condition, skipping to
the previous track may require pressing
the button or touching the key twice.
Pressing the button or touching the key
once may only restart the current track
from the beginning.
Fast-forwarding/rewinding
To rewind or fast-forward the track, press
and hold theorbuttons on the
control panel or touch and hold the “”
or “” keys on the screen.
Changing play mode
Repeat mode
Touch the “
” key on the USB screen to
change the repeat mode.
The following modes are available:
All: Repeat all
1 Folder: Repeat folder/sub-folder
1 Track: Repeat track
Random mode
Touch the “
” key on the screen to
change the random mode as follows:
No text displayed: Random off
All: Repeat all
1 Folder: Repeat folder/sub-folder
USB menu
Touch the “USB Menu” key on the USB
screen to display the USB Menu screen.
“Now Playing” key Touch to display the USB
screen.
“Folder List” key Touch to display the folder list. Touch an item on the list to
select the folder. The sub-
folder or track list will be dis-
played. Select a sub-folder or
track from the list.
“Album Artwork” Touch to run on/off the album artwork display on the USB
screen.
4-56Monitor, climate, audio, phone and voice recognition systems
Page 246 of 500
• iPod® nano - 1st generation (firmwareversion 1.3.1 or later)
• iPod® nano - 2nd generation (firmware version 1.1.3 or later)
• iPod® nano - 3rd generation (firmware version 1.1.3 or later)
• iPod® nano - 4th generation (firmware version 1.0.4 or later)
• iPod® nano - 5th generation (firmware version 1.0.2 or later)
• iPod® nano - 6th generation (firmware version 1.1 or later)
• iPhone® 3G (firmware version 4.2.1 or later)
• iPhone® 3GS (firmware version 5.1 or later)
• iPhone® 4 (firmware version 5.1 or later)
• iPhone® 4S (firmware version 5.1 or later)
* Some features of this iPod® may not be
fully functional.
Make sure that your iPod® firmware is up-
dated to the version indicated above.
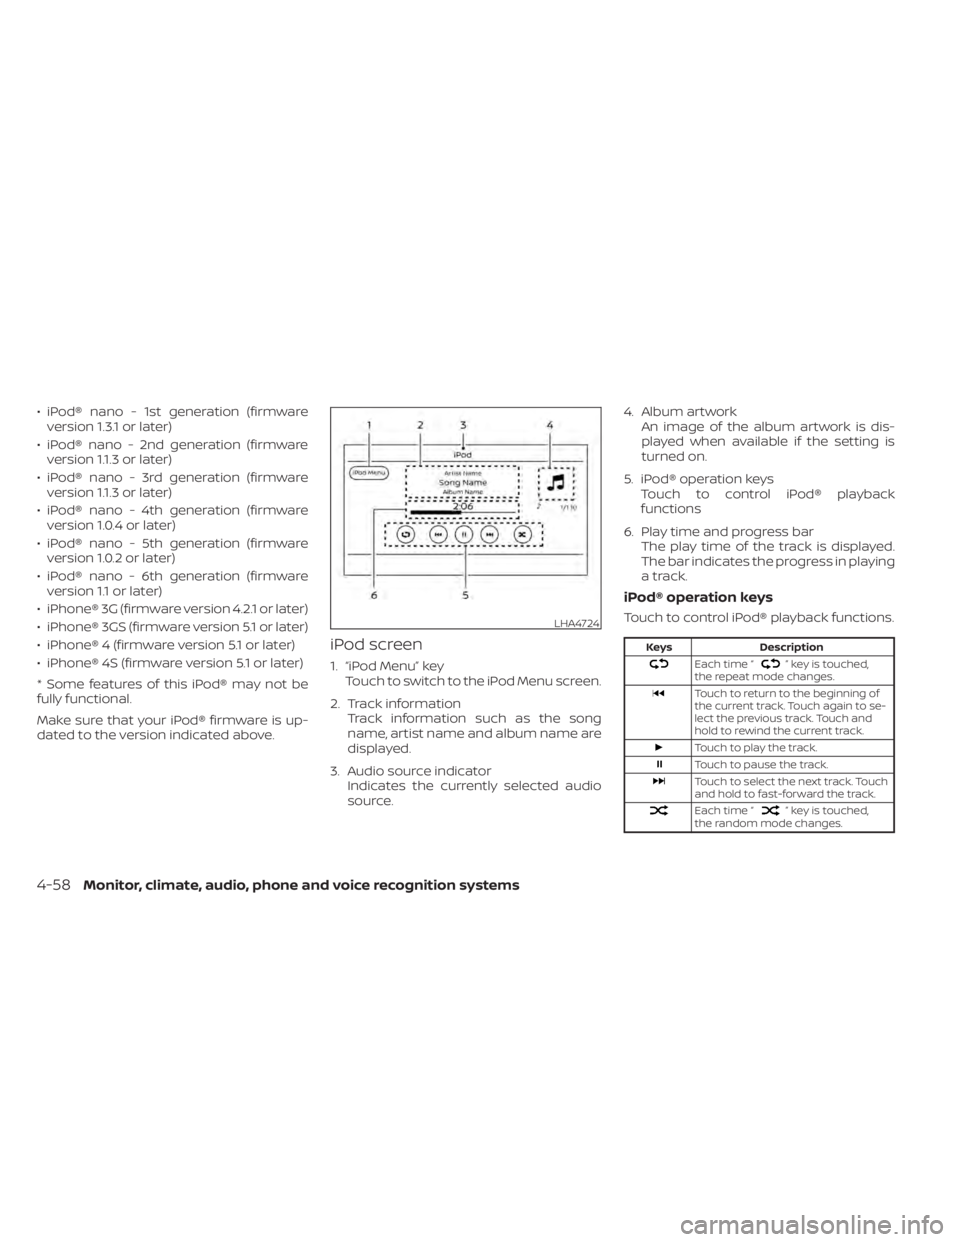
iPod screen
1. “iPod Menu” key Touch to switch to the iPod Menu screen.
2. Track information Track information such as the song
name, artist name and album name are
displayed.
3. Audio source indicator Indicates the currently selected audio
source. 4. Album artwork
An image of the album artwork is dis-
played when available if the setting is
turned on.
5. iPod® operation keys Touch to control iPod® playback
functions
6. Play time and progress bar The play time of the track is displayed.
The bar indicates the progress in playing
a track.
iPod® operation keys
Touch to control iPod® playback functions.
” key is touched,
the repeat mode changes.
Touch to return to the beginning of
the current track. Touch again to se-
lect the previous track. Touch and
hold to rewind the current track.
Touch to play the track.
Touch to pause the track.
Touch to select the next track. Touch
and hold to fast-forward the track.
Each time “” key is touched,
the random mode changes.
LHA4724
4-58Monitor, climate, audio, phone and voice recognition systems
Page 247 of 500
iPod® memory device player
operation
Activation and playing
Connecting the iPod® to the vehicle via USB
cable will activate the iPod® mode.
The iPod® can also be played by touching
the “iPod” key on the Menu screen or by
touching iPod on the Launch Bar.
Skipping tracks
To skip the tracks, press theorbuttons on the control panel or touch the “”or“” keys on the screen repeat-
edly until the preferred track is selected.
NOTE:
Depending on the condition, skipping to
the previous track may require pressing
the button or touching the key twice.
Pressing the button or touching the key
once may only restart the current track
from the beginning.
Fast-forwarding/rewinding
To rewind or fast-forward the track, press
and hold theorbuttons on the
control panel or touch and hold the “”
or “” keys on the screen,
Changing play mode
Repeat mode
Touch the “
” key on the iPod® screen
to change the repeat mode. The following
modes are available.
No text displayed: Repeat off
All: Repeat all
One: Repeat track
Random mode
Touch the “
” key on the screen to
change the random mode as follows.
“
” is not highlighted: Random off
“
” highlighted: Random on
iPod® Menu
Touch the “iPod Menu” key on the iPod®
screen to display the iPod® Menu screen.
“Now Playing” key Touch to display the USB screen.
“Folder List” key (if
so equipped) Touch to display the folder list.
Touch an item on the list to
select the folder. The sub-
folder or track list will be dis-
played. Select a sub-folder or
track from the list.
“Album Artwork”
key Touch to run on/off the album
artwork display on the USB
screen.
“Playlists” key Touch to display the list ac- cording to the selected item.
“Artists” key
“Albums” key
“Songs” key
“Podcasts” key
“Genres” key
“Composers” key
“Audiobooks” key
“iTunes Radio”
key
Monitor, climate, audio, phone and voice recognition systems4-59
Page 250 of 500
Bluetooth® audio operation
The ability to pause, change tracks, fast
forward, rewind, randomize and repeat
music may be different between devices.
Some or all of these functions may not be
supported on each device.
NOTE:
Depending on the Bluetooth® audio de-
vice that is connected, it may not be pos-
sible to perform audio operations or a
delay may occur before music is played
back.
Activation and playing
A Bluetooth® audio device can be played by
touching the “Bluetooth” key on the Menu
screen or by touching Bluetooth on the
Launch Bar.
To pause playing the Bluetooth® audio,
touch the “
” key. Touch the “”key
to resume playing.
Changing folders
To change folders, touch the “BT Menu” key.
Fast-forwarding/rewinding
To fast-forward or rewind the track, press
and hold theorbuttons on the
control panel or touch the “”or“”
keys on the screen.
Changing play mode
Repeat mode
Touch the “
” key on the screen to
change the repeat mode.
Random mode
Touch the “
” key on the screen to
change the random mode.
NOTE:
Available repeat/random modes change
depending on the connected device.
BT Menu
Touch the “BT Menu” key on the Bluetooth®
audio screen to display the Bluetooth® au-
dio menu screen. The following items are available.
“Now Playing” key Touch to display the
Bluetooth® audio screen.
“Current List” key (if so
equipped)* A list of track in the cur-
rently selected folder is
displayed.
“Connections” key Touch to display the con- nections screen.
“Folder List” key* Touch to display the folder list. Touch an item
on the list to select the
folder.
*: displayed only when available.
NOTE:
Depending on the connected device, the
“BT Menu” key may not be displayed.
4-62Monitor, climate, audio, phone and voice recognition systems
Page 255 of 500
When installing a CB, ham radio or car
phone in your vehicle, be sure to observe
the following precautions; otherwise, the
new equipment may adversely affect the
engine control system and other electronic
parts.CAUTION
• Keep the antenna as far away as pos-
sible from the electronic control
modules.
• Keep the antenna wire more than 8 in
(20 cm) away from the electronic
control system harnesses. Do not
route the antenna wire next to any
harness.
• Adjust the antenna standing-wave
ratio as recommended by the
manufacturer.
• Connect the ground wire from the CB
radio chassis to the body.
• For additional information, it is rec-
ommended that you visit a NISSAN
dealer.WARNING
• Use a phone af ter stopping your ve-
hicle in a safe location. If you have to
use a phone while driving, exercise
extreme caution at all times so full
attention may be given to vehicle
operation.
• If you are unable to devote full atten-
tion to vehicle operation while talk-
ing on the phone, pull off the road to
a safe location and stop your vehicle.
CAUTION
To avoid discharging the vehicle bat-
tery, use a phone af ter starting the en-
gine.
CAR PHONE OR CB RADIO BLUETOOTH® HANDS-FREE PHONE
SYSTEM
Monitor, climate, audio, phone and voice recognition systems4-67
Page 258 of 500
Initialization
When the ignition switch is placed in the ON
position, NISSAN Voice Recognition is initial-
ized, which takes a few seconds. If the
button is pressed before the initialization
completes, the system will announce
“There is no phone connected” and will not
react to voice commands.
Operating tips
To get the best performance out of the
NISSAN Voice Recognition System, observe
the following:
• Keep the interior of the vehicle as quiet aspossible. Keep all vents pointed away
from the microphone and close the win-
dows to eliminate surrounding noises
(traffic noises, vibration sounds, etc.),
which may prevent the system from rec-
ognizing voice commands correctly.
• Wait until the tone sounds before speak- ing a command. Otherwise, the com-
mand will not be received properly.
• Start speaking a command within 5 sec- onds af ter the tone sounds.
• Speak in a natural voice without pausing between words. • For calling contacts by name, please say
both the first and last name of the con-
tact for better recognition.
Giving voice commands
To operate NISSAN Voice Recognition,
press thebutton located on the steer-
ing wheel for less than 1.5 seconds. Af ter
the tone sounds, speak a command.
The command given is picked up by the
microphone, and voice feedback is given
when the command is accepted.
• If a command is not recognized, the sys- tem announces, “Please say or select a
command from the displayed list.” Make
sure the command is said exactly as
prompted by the system and repeat the
command in a clear voice.
• If you want to go back to the previous command, you can say “Go back” or “Cor-
rection” any time the system is waiting for
a response. • You can cancel a command when the
system is waiting for a response by say-
ing, “Cancel” or “Quit.” The system an-
nounces “Exit” and ends the Voice Recog-
nition session. You can also press and
hold the
button on the steering
wheel for 1.5 seconds at any time to end
the Voice Recognition session. Whenever
the Voice Recognition session is can-
celed, a double beep is played to indicate
you have exited the system.
• If you want to adjust the volume of the voice feedback, push the (+ or -) volume
control switches on the steering wheel
while being provided with feedback. You
can also use the radio volume control
knob.
Voice Prompt Interrupt
In most cases you can interrupt the voice
feedback to speak the next command by
pressing the
button on the steering
wheel. Af ter interrupting the system, wait
for a beep before speaking your command.
One Shot Call (if so equipped)
To use the system faster, you may speak
the second level commands with the main
menu command on the main menu. For
example, press the
button and af ter
the tone say, “Call Redial”.
4-70Monitor, climate, audio, phone and voice recognition systems
Page 264 of 500
• Call HistoryDisplays the Call History screen. For addi-
tional information, refer to “Making a call”
in this section.
• Dial Number Displays the Dial Number screen. For ad-
ditional information, refer to “Making a
call” in this section.
• Text Message Displays the received message screen.
For additional information, refer to “Text
messaging” in this section.
• Connections Displays the Connections screen. For ad-
ditional information, refer to “Bluetooth®
connections screen” in this section.
• Volume Displays the volume adjustment screen.
For additional information, refer to “Vol-
ume & beeps” in this section.MAKING A CALL
To make a call press thebutton on the
control panel. Touch an option from menu
screen:
• Phonebook Select a person and the phone number
you wish to call from the phonebook.
Depending on the device, the phonebook
will be downloaded from the cellular
phone automatically when it is con-
nected. If the automatic download does
not take place, the phone number must
be transferred to the hands-free phone
system from the cellular phone prior to
using this method. For additional infor-
mation, refer to “Phone and text message
settings” in this section.
• Call History Select a phonebook name or phone
number from the recent incoming, out-
going or missed calls tabs. Touch a
phonebook name or phone number
listed to initiate the call.
• Dial Number Enter the phone number manually using
the keypad displayed on the screen.
Touch the “OK” key on the screen to initi-
ate the call.
For additional options to make a call, refer
to “Voice commands” in this section.
Quick Dial
Quick Dial entries can be used to quickly
make a call. The system allows up to 20
entries to be stored. To set up a quick dial
press the
button on the control panel.
Touch the “Quick Dial” key to display a list of
quick dial entries. Touch the “Edit” key to
edit current entries or touch the “Add New”
key to make a new entry. Two methods are
given to create a quick dial entry:
• Touch the “Copy from Call History ” key to save a phone number from the Incoming,
Outgoing or Missed call history lists. Se-
lect the person or phone number from
the menu to be added. A registration
menu will display the Entry #, phone num-
ber, phone number type stored in the cel-
lular phone and Voice Tag. Touch the “OK”
key.
• Touch the “Copy from Phonebook” key to save a number from the phonebook. Use
the scroll keys on the side to move up and
down through the menu. Select a person
to be added. A menu will display the Entry
#, phone number, phone number type
stored in the cellular phone and Voice
Tag. Touch the “OK” key.
4-76Monitor, climate, audio, phone and voice recognition systems