2021 NISSAN KICKS radio
[x] Cancel search: radioPage 239 of 500
BACK button
Press theBACK button to return to the
previous menu screen.
AUDIO button
Press to display the audio screen. When
this button is pressed while the audio
screen is not displayed, the last audio
source played will play.
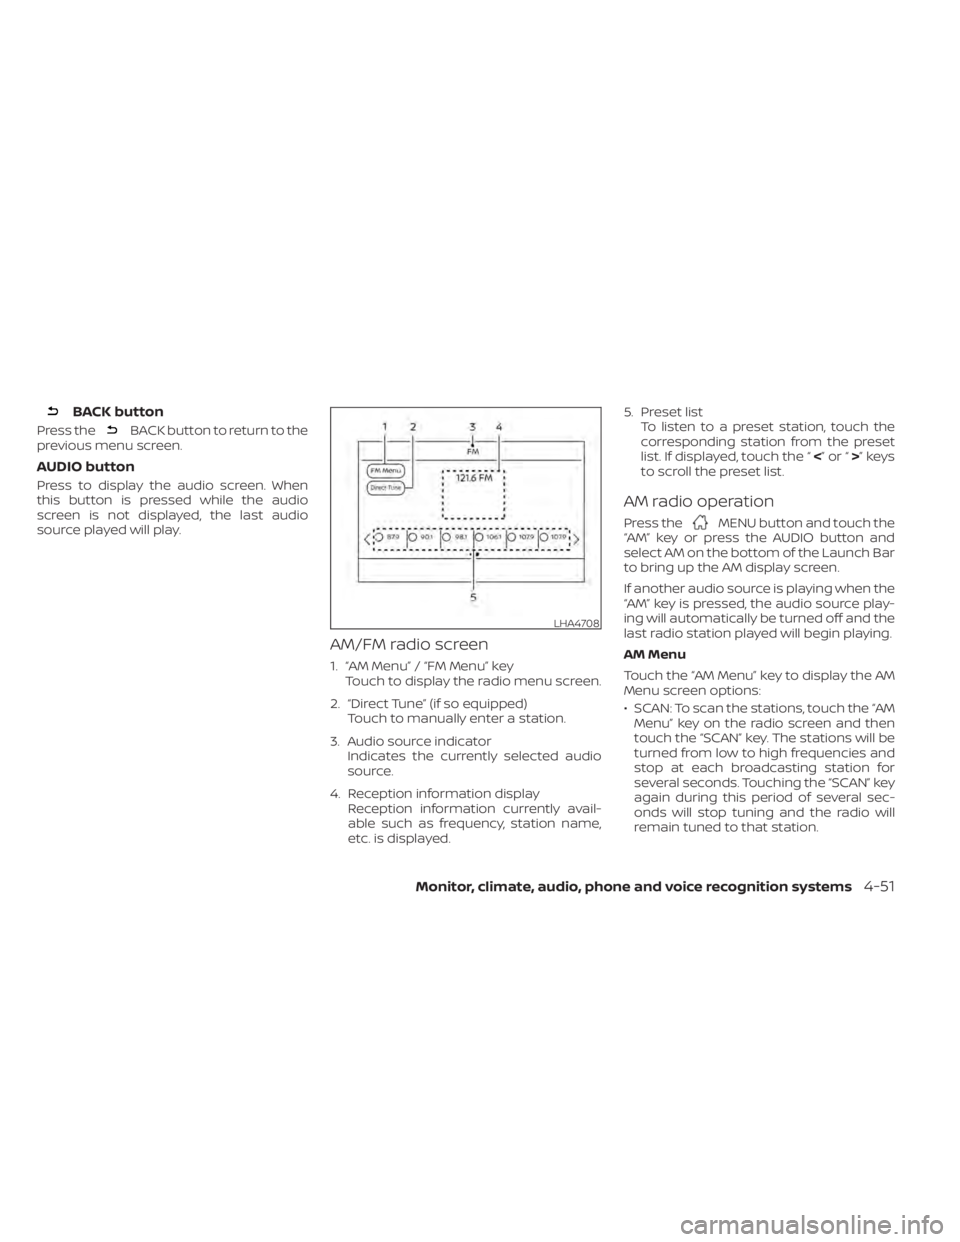
AM/FM radio screen
1. “AM Menu” / “FM Menu” key Touch to display the radio menu screen.
2. “Direct Tune” (if so equipped) Touch to manually enter a station.
3. Audio source indicator Indicates the currently selected audio
source.
4. Reception information display Reception information currently avail-
able such as frequency, station name,
etc. is displayed. 5. Preset list
To listen to a preset station, touch the
corresponding station from the preset
list. If displayed, touch the “ <”or“>”keys
to scroll the preset list.
AM radio operation
Press theMENU button and touch the
“AM” key or press the AUDIO button and
select AM on the bottom of the Launch Bar
to bring up the AM display screen.
If another audio source is playing when the
“AM” key is pressed, the audio source play-
ing will automatically be turned off and the
last radio station played will begin playing.
AM Menu
Touch the “AM Menu” key to display the AM
Menu screen options:
• SCAN: To scan the stations, touch the “AM Menu” key on the radio screen and then
touch the “SCAN” key. The stations will be
turned from low to high frequencies and
stop at each broadcasting station for
several seconds. Touching the “SCAN” key
again during this period of several sec-
onds will stop tuning and the radio will
remain tuned to that station.
LHA4708
Page 240 of 500
• Refresh: Touch the “Refresh” key to up-date the station list displayed on the right
side of the AM Menu screen.
orbuttons to tune
from low to high or high to low frequencies
and to stop at the next broadcasting sta-
tion.
Direct Tune
Touch the “Direct Tune” key to display the
Direct Tune menu and manually enter a
station.
1 to 6 station memory operations
Up to six stations can be registered in the
preset list.
1. Select the AM radio band.
2. Tune to the station you wish to store.
3. Touch and hold one of the preset num- bers in the preset list.
The information such as frequency will be
displayed on the preset list.
To select and listen to the preset stations,
press
oron the steering wheel
briefly or touch a preferred station on the
preset list on the radio screen.
FM radio operation
Press theMENU button and touch the
“FM” key or press the AUDIO button and
select FM on the bottom of the Launch Bar
to bring up the FM display screen.
If another audio source is playing when the
“FM” key is pressed, the audio source play-
ing will automatically be turned off and the
last radio station played will begin playing.
The FM stereo indicator (STEREO) is shown
on the screen during FM stereo reception.
When the stereo broadcast signal is weak,
the radio automatically changes from ste-
reo to monaural reception.
FM Menu
Touch the “FM Menu” key to display the FM
Menu screen options:
• SCAN: To scan the stations, touch the “FM Menu” key on the radio screen and then
touch the “SCAN” key. The stations will be
tuned from low to high frequencies and
stop at each broadcasting stations for
several seconds. Touching the “SCAN” key
again during this period of several sec-
onds will stop tuning and the radio will
remain tuned to that station. • Refresh: Touch the “Refresh” key to up-
date the station list displayed on the right
side of the FM Menu screen.
• RDS Info: Radio station and song informa- tion can be displayed on the FM display
screen.
orbuttons to tune
from low to high or high to low frequencies
and to stop at the next broadcasting sta-
tion.
1 to 12 station memory operations
Up to 12 stations can be registered in the
preset list.
1. Select the FM radio band.
2. Tune to the station you wish to store.
3. Touch and hold one of the preset num- bers in the preset list.
The information such as frequency will be
displayed on the preset list.
To select and listen to the preset stations,
press
oron the steering wheel
briefly or touch a preferred station on the
preset list on the radio screen.
4-52Monitor, climate, audio, phone and voice recognition systems
Page 247 of 500
iPod® memory device player
operation
Activation and playing
Connecting the iPod® to the vehicle via USB
cable will activate the iPod® mode.
The iPod® can also be played by touching
the “iPod” key on the Menu screen or by
touching iPod on the Launch Bar.
Skipping tracks
To skip the tracks, press theorbuttons on the control panel or touch the “”or“” keys on the screen repeat-
edly until the preferred track is selected.
NOTE:
Depending on the condition, skipping to
the previous track may require pressing
the button or touching the key twice.
Pressing the button or touching the key
once may only restart the current track
from the beginning.
Fast-forwarding/rewinding
To rewind or fast-forward the track, press
and hold theorbuttons on the
control panel or touch and hold the “”
or “” keys on the screen,
Changing play mode
Repeat mode
Touch the “
” key on the iPod® screen
to change the repeat mode. The following
modes are available.
No text displayed: Repeat off
All: Repeat all
One: Repeat track
Random mode
Touch the “
” key on the screen to
change the random mode as follows.
“
” is not highlighted: Random off
“
” highlighted: Random on
iPod® Menu
Touch the “iPod Menu” key on the iPod®
screen to display the iPod® Menu screen.
“Now Playing” key Touch to display the USB screen.
“Folder List” key (if
so equipped) Touch to display the folder list.
Touch an item on the list to
select the folder. The sub-
folder or track list will be dis-
played. Select a sub-folder or
track from the list.
“Album Artwork”
key Touch to run on/off the album
artwork display on the USB
screen.
“Playlists” key Touch to display the list ac- cording to the selected item.
“Artists” key
“Albums” key
“Songs” key
“Podcasts” key
“Genres” key
“Composers” key
“Audiobooks” key
“iTunes Radio”
key
Monitor, climate, audio, phone and voice recognition systems4-59
Page 248 of 500
BLUETOOTH® STREAMING AUDIO
If you have a compatible Bluetooth® audio
device that is capable of playing audio files,
the device can be connected to the vehi-
cle's audio system so that the audio files on
the device play through the vehicle's
speakers. For additional information, refer
to “FM/AM radio” in this section.
NOTE:
For additional information regarding
Bluetooth® Streaming Audio, refer to the
cellular phone owner’s manual.
Connecting procedure
NOTE:
The connecting procedure must be per-
formed when the vehicle is stationary. If
the vehicle starts moving during the pro-
cedure, the procedure will be canceled.To connect a phone to the Bluetooth®
Hands-Free Phone System:
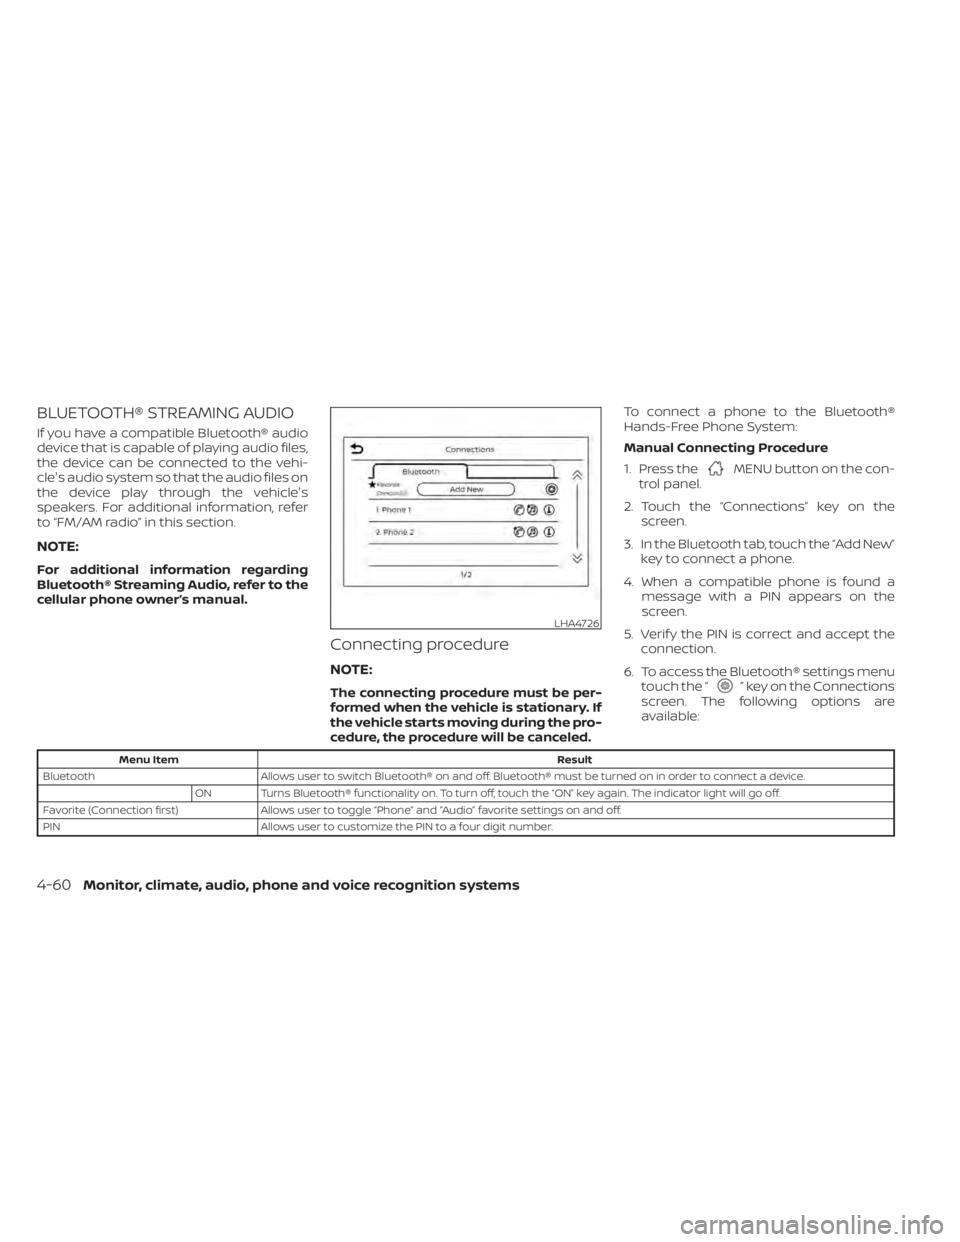
Manual Connecting Procedure
1. Press the
MENU button on the con-
trol panel.
2. Touch the “Connections” key on the screen.
3. In the Bluetooth tab, touch the “Add New” key to connect a phone.
4. When a compatible phone is found a message with a PIN appears on the
screen.
5. Verif y the PIN is correct and accept the connection.
6. To access the Bluetooth® settings menu touch the “
” key on the Connections
screen. The following options are
available:
LHA4726
4-60Monitor, climate, audio, phone and voice recognition systems
Page 255 of 500
When installing a CB, ham radio or car
phone in your vehicle, be sure to observe
the following precautions; otherwise, the
new equipment may adversely affect the
engine control system and other electronic
parts.CAUTION
• Keep the antenna as far away as pos-
sible from the electronic control
modules.
• Keep the antenna wire more than 8 in
(20 cm) away from the electronic
control system harnesses. Do not
route the antenna wire next to any
harness.
• Adjust the antenna standing-wave
ratio as recommended by the
manufacturer.
• Connect the ground wire from the CB
radio chassis to the body.
• For additional information, it is rec-
ommended that you visit a NISSAN
dealer.WARNING
• Use a phone af ter stopping your ve-
hicle in a safe location. If you have to
use a phone while driving, exercise
extreme caution at all times so full
attention may be given to vehicle
operation.
• If you are unable to devote full atten-
tion to vehicle operation while talk-
ing on the phone, pull off the road to
a safe location and stop your vehicle.
CAUTION
To avoid discharging the vehicle bat-
tery, use a phone af ter starting the en-
gine.
CAR PHONE OR CB RADIO BLUETOOTH® HANDS-FREE PHONE
SYSTEM
Monitor, climate, audio, phone and voice recognition systems4-67
Page 257 of 500
• You will not be able to use a hands-freephone under the following conditions:
Your vehicle is outside of the cellular ser-
vice area.
Your vehicle is in an area where it is difficult
to receive a cellular signal; such as in a
tunnel, in an underground parking garage,
near a tall building or in a mountainous
area.
Your cellular phone is locked to prevent it
from being dialed.
• When the radio wave condition is not ideal or ambient sound is too loud, it may
be difficult to hear the other person's
voice during a call.
• Do not place the cellular phone in an area surrounded by metal or far away from
the in-vehicle phone module to prevent
tone quality degradation and wireless
connection disruption.
• While a cellular phone is connected through the Bluetooth® wireless connec-
tion, the battery power of the cellular
phone may discharge quicker than usual.
The Bluetooth® Hands-Free Phone Sys-
tem cannot charge cellular phones. • Some cellular phones or other devices
may cause interference or a buzzing
noise to come from the audio system
speakers. Storing the device in a different
location may reduce or eliminate the
noise.
• For additional information, refer to the cellular phone owner's manual regarding
the telephone charges, cellular phone
antenna and body, etc.
REGULATORY INFORMATION
FCC Regulatory information
– CAUTION: To maintain compliance with FCC’s RF exposure guidelines, use only
the supplied antenna. Unauthorized an-
tenna, modification, or attachments
could damage the transmitter and may
violate FCC regulations.
– Operation is subject to the following two conditions:1. 1) This device may not cause interfer- ence and
2.2) this device must accept any interfer- ence, including interference that may
cause undesired operation of the
device. IC Regulatory information
– Operation is subject to the following two
conditions: (1) this device may not cause
interference, and (2) this device must ac-
cept any interference, including interfer-
ence that may cause undesired opera-
tion of the device.
– This Class B digital apparatus meets all requirements of the Canadian
Interference-Causing Equipment Regu-
lations.BLUETOOTH® is a
trademark owned by
Bluetooth SIG, Inc. and
licensed to
Panasonic.
USING THE SYSTEM
The system allows hands-free operation of
the Bluetooth® Hands-Free Phone System.
If the vehicle is in motion, some commands
may not be available so full attention may
be given to vehicle operation.
Monitor, climate, audio, phone and voice recognition systems4-69
Page 258 of 500
Initialization
When the ignition switch is placed in the ON
position, NISSAN Voice Recognition is initial-
ized, which takes a few seconds. If the
button is pressed before the initialization
completes, the system will announce
“There is no phone connected” and will not
react to voice commands.
Operating tips
To get the best performance out of the
NISSAN Voice Recognition System, observe
the following:
• Keep the interior of the vehicle as quiet aspossible. Keep all vents pointed away
from the microphone and close the win-
dows to eliminate surrounding noises
(traffic noises, vibration sounds, etc.),
which may prevent the system from rec-
ognizing voice commands correctly.
• Wait until the tone sounds before speak- ing a command. Otherwise, the com-
mand will not be received properly.
• Start speaking a command within 5 sec- onds af ter the tone sounds.
• Speak in a natural voice without pausing between words. • For calling contacts by name, please say
both the first and last name of the con-
tact for better recognition.
Giving voice commands
To operate NISSAN Voice Recognition,
press thebutton located on the steer-
ing wheel for less than 1.5 seconds. Af ter
the tone sounds, speak a command.
The command given is picked up by the
microphone, and voice feedback is given
when the command is accepted.
• If a command is not recognized, the sys- tem announces, “Please say or select a
command from the displayed list.” Make
sure the command is said exactly as
prompted by the system and repeat the
command in a clear voice.
• If you want to go back to the previous command, you can say “Go back” or “Cor-
rection” any time the system is waiting for
a response. • You can cancel a command when the
system is waiting for a response by say-
ing, “Cancel” or “Quit.” The system an-
nounces “Exit” and ends the Voice Recog-
nition session. You can also press and
hold the
button on the steering
wheel for 1.5 seconds at any time to end
the Voice Recognition session. Whenever
the Voice Recognition session is can-
celed, a double beep is played to indicate
you have exited the system.
• If you want to adjust the volume of the voice feedback, push the (+ or -) volume
control switches on the steering wheel
while being provided with feedback. You
can also use the radio volume control
knob.
Voice Prompt Interrupt
In most cases you can interrupt the voice
feedback to speak the next command by
pressing the
button on the steering
wheel. Af ter interrupting the system, wait
for a beep before speaking your command.
One Shot Call (if so equipped)
To use the system faster, you may speak
the second level commands with the main
menu command on the main menu. For
example, press the
button and af ter
the tone say, “Call Redial”.
4-70Monitor, climate, audio, phone and voice recognition systems
Page 279 of 500
WARNING
• Radio waves could adversely affect
electric medical equipment. Those
who use a pacemaker should contact
the electric medical equipment
manufacturer for the possible influ-
ences before use.
• If the low tire pressure warning light
illuminates while driving, avoid sud-
den steering maneuvers or abrupt
braking, reduce vehicle speed, pull
off the road to a safe location and
stop the vehicle as soon as possible.
Driving with under-inflated tires may
permanently damage the tires and
increase the likelihood of tire failure.
Serious vehicle damage could occur
and may lead to an accident and
could result in serious personal in-
jury. Check the tire pressure for all
four tires. Adjust the tire pressure to
the recommended COLD tire pres-
sure shown on the Tire and Loading
Information label to turn the low tire
pressure warning light off. If you have
a flat tire, replace it with a spare tire
as soon as possible. (For additional
information, refer to “Flat tire” in the
“In case of emergency ” section for
changing a flat tire.) •
When replacing a wheel without the
TPMS such as the spare tire, when a
spare tire is mounted or a wheel is
replaced, the TPMS will not function
and the low tire pressure warning
light will flash for approximately 1
minute. The light will remain on af ter
1 minute. Have your tires replaced
and/or TPMS system reset as soon as
possible. It is recommended that you
visit a NISSAN dealer for this service.
• Replacing tires with those not origi-
nally specified by NISSAN could af-
fect the proper operation of the
TPMS.
• Do not inject any tire liquid or aerosol
tire sealant into the tires, as this may
cause a malfunction of the tire pres-
sure sensors.
CAUTION
• The TPMS may not function properly
when the wheels are equipped with
tire chains or the wheels are buried in
snow. •
Do not place metalized film or any
metal parts (antenna, etc.) on the
windows. This may cause poor re-
ception of the signals from the tire
pressure sensors, and the TPMS will
not function properly.
Some devices and transmitters may tem-
porarily interfere with the operation of the
TPMS and cause the low tire pressure
warning light to illuminate.
Some examples are:
• Facilities or electric devices using similar radio frequencies are near the vehicle.
• If a transmitter set to similar frequencies is being used in or near the vehicle.
• If a computer (or similar equipment) or a DC/AC converter is being used in or near
the vehicle.
The low tire pressure warning light may
illuminate in the following cases:
• If the vehicle is equipped with a wheel and tire without TPMS.
• If the TPMS has been replaced and the ID has not been registered.
• If the wheel is not originally specified by NISSAN.
Starting and driving5-7