2021 NISSAN ARMADA weight
[x] Cancel search: weightPage 10 of 603

0-2Illustrated table of contents
WAA0284X
1. Seat belt for 3rd row center seat (P.1-26)
2. Roof-mounted curtain side-impact androllover supplemental air bags (P.1-54)
3. Head Restraints (P.1-14) — Front-seat Active Head Restraints
(P.1-19)
4. Seat belts (P.1-20) 5. Front seat-mounted side-impact supple-
mental air bags (P.1-54)
6. Supplemental front-impact air bags (P.1-54)
7. Child restraint anchor points (for top tether strap child restraint) (P.1-46, P.1-50)
8. 3rd row seats (P.1-7) — Child restraints (P.1-32) 9. LATCH (Lower Anchors and Tethers for
CHildren) system (P.1-35)
10. Armrest (2nd row seat) (P.1-11)
11. 2nd row seats (P.1-5) — Child restraints (P.1-32)
12. Seat belt pretensioner (P.1-71)
13. Front armrest (P.1-11)
14. Front seats (P.1-4) — Occupant classification sensors
(weight sensors) (P.1-60)
15. Front passenger air bag status light (P.1-62)
16. Driver and front passenger supplemental knee air bags (P.1-54)
SEATS, SEAT BELTS AND SUPPLEMENTAL
RESTRAINT SYSTEM (SRS)
Page 49 of 603

seat. Studies show that children are
safer when properly restrained in the
rear seat than in the front seat.
This is especially important because
your vehicle has a supplemental re-
straint system (Air bag system) for the
front passenger. See “Supplemental re-
straint system” (P.1-54).
INFANTS
Infants up to at least 1 year old should be
placed in a rear-facing child restraint.
NISSAN recommends that infants be
placed in child restraints that comply with
Federal Motor Vehicle Safety Standards
or Canadian Motor Vehicle Safety Stan-
dards. You should choose a child restraint
that fits your vehicle and always follow
the manufacturer’s instructions for instal-
lation and use.
SMALL CHILDREN
Children that are over 1 year old and
weigh at least 20 lbs (9 kg) should remain
in a rear-facing child restraint as long as
possible up to the height or weight limit
of the child restraint. Children who out-
grow the height or weight limit of the
rear-facing child restraint and are at least
1 year old should be secured in a forward-
facing child restraint with a harness. Refer
to the manufacturer’s instructions for
minimum and maximum weight andheight recommendations. NISSAN recom-
mends that small children be placed in
child restraints that comply with Federal
Motor Vehicle Safety Standards or Cana-
dian Motor Vehicle Safety Standards. You
should choose a child restraint that fits
your vehicle and always follow the man-
ufacturer’s instructions for installation
and use.
LARGER CHILDREN
Children should remain in a forward-
facing child restraint with a harness until
they reach the maximum height or
weight limit allowed by the child restraint
manufacturer.
Once a child outgrows the height or
weight limit of the harness-equipped
forward-facing child restraint, NISSAN
recommends that the child be placed in
a commercially available booster seat to
obtain proper seat belt fit. For a seat belt
to fit properly, the booster seat should
raise the child so that the shoulder belt is
properly positioned across the chest and
the top, middle portion of the shoulder.
The shoulder belt should not cross the
neck or face and should not fall off the
shoulder. The lap belt should lie snugly
across the lower hips or upper thighs, not
the abdomen.
A booster seat can only be used in
seating positions that have a three-pointtype seat belt. The booster seat should fit
the vehicle seat and have a label certify-
ing that it complies with Federal Motor
Vehicle Safety Standards or Canadian
Motor Vehicle Safety Standards.
A booster seat should be used until the
child can pass the seat belt fit test below:
.
Are the child’s back and hips against
the vehicle seatback?
. Is the child able to sit without slouch-
ing?
. Do the child’s knees bend easily over
the front edge of the seat with feet flat
on the floor?
. Can the child safely wear the seat belt
(lap belt low and snug across the hips
and shoulder belt across mid-chest
and shoulder)?
. Is the child able to use the properly
adjusted head restraint/headrest?
. Will the child be able to stay in position
for the entire ride?
Safety — seats, seat belts and supplemental restraint system1-31
Page 52 of 603

1-34Safety — seats, seat belts and supplemental restraint system
For details, see “Lower Anchors and
Tethers for CHildren (LATCH) system ”
(P.1-35).
If you do not have a LATCH compatible
child restraint, the vehicle seat belts can
be used.
Several manufacturers offer child re-
straints for infants and small children of
various sizes. When selecting any child
restraint, keep the following points in
mind:
.Choose only a restraint with a label
certifying that it complies with Federal
Motor Vehicle Safety Standard 213 or
Canadian Motor Vehicle Safety Stan-
dard 213.
. Check the child restraint in your
vehicle to be sure it is compatible with
the vehicle’s seat and seat belt sys-
tem.
. If the child restraint is compatible with
your vehicle, place your child in the
child restraint and check the various
adjustments to be sure the child
restraint is compatible with your child.
Choose a child restraint that is de-
signed for your child’s height and
weight. Always follow all recom-
mended procedures.
. If the combined weight of the child
and child restraint is less than 65 lbs
(29.5 kg), you may use either the LATCH lower anchors or the seat belt
to install the child restraint (not both
at the same time).
. If the combined weight of the child
and child restraint is greater than 65
lbs (29.5 kg), use the vehicle’s seat belt
(not the lower anchors) to install the
child restraint.
. Be sure to follow the child restraint
manufacturer’s instructions for instal-
lation.
All U.S. states and Canadian provinces
or territories require that infants and
small children be restrained in an ap-
proved child restraint at all times while
the vehicle is being operated. Canadian
law requires the top tether strap on
forward-facing child restraints be se-
cured to the designated anchor point
on the vehicle.
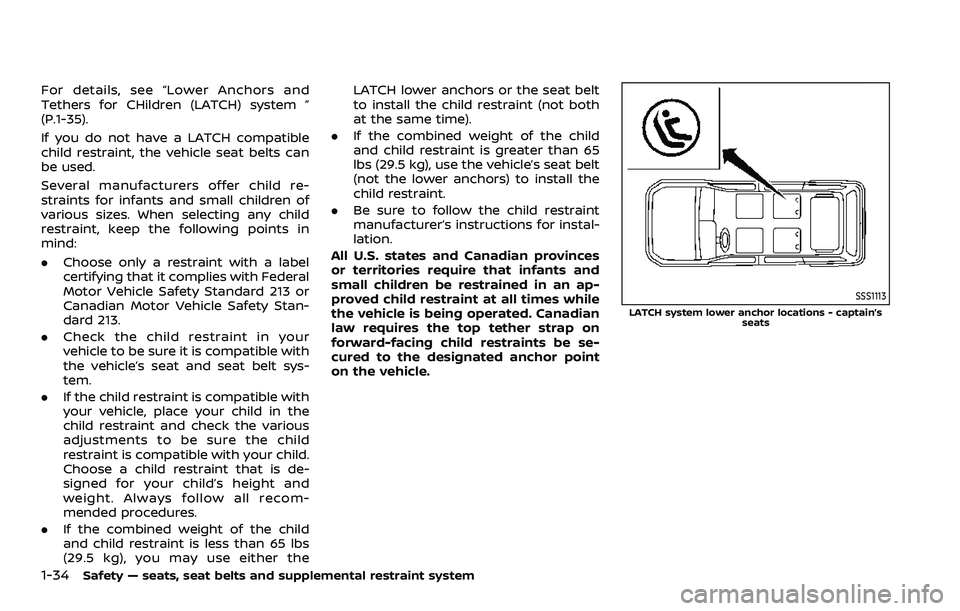
SSS1113
LATCH system lower anchor locations - captain’s seats
Page 53 of 603

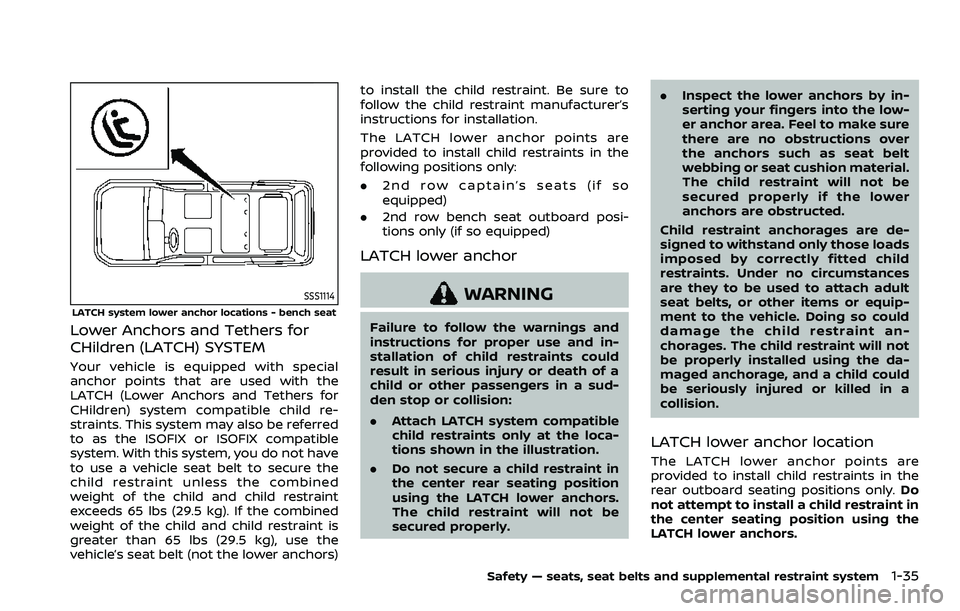
SSS1114
LATCH system lower anchor locations - bench seat
Lower Anchors and Tethers for
CHildren (LATCH) SYSTEM
Your vehicle is equipped with special
anchor points that are used with the
LATCH (Lower Anchors and Tethers for
CHildren) system compatible child re-
straints. This system may also be referred
to as the ISOFIX or ISOFIX compatible
system. With this system, you do not have
to use a vehicle seat belt to secure the
child restraint unless the combined
weight of the child and child restraint
exceeds 65 lbs (29.5 kg). If the combined
weight of the child and child restraint is
greater than 65 lbs (29.5 kg), use the
vehicle’s seat belt (not the lower anchors)to install the child restraint. Be sure to
follow the child restraint manufacturer’s
instructions for installation.
The LATCH lower anchor points are
provided to install child restraints in the
following positions only:
.
2nd row captain’s seats (if so
equipped)
. 2nd row bench seat outboard posi-
tions only (if so equipped)
LATCH lower anchor
WARNING
Failure to follow the warnings and
instructions for proper use and in-
stallation of child restraints could
result in serious injury or death of a
child or other passengers in a sud-
den stop or collision:
.Attach LATCH system compatible
child restraints only at the loca-
tions shown in the illustration.
. Do not secure a child restraint in
the center rear seating position
using the LATCH lower anchors.
The child restraint will not be
secured properly. .
Inspect the lower anchors by in-
serting your fingers into the low-
er anchor area. Feel to make sure
there are no obstructions over
the anchors such as seat belt
webbing or seat cushion material.
The child restraint will not be
secured properly if the lower
anchors are obstructed.
Child restraint anchorages are de-
signed to withstand only those loads
imposed by correctly fitted child
restraints. Under no circumstances
are they to be used to attach adult
seat belts, or other items or equip-
ment to the vehicle. Doing so could
damage the child restraint an-
chorages. The child restraint will not
be properly installed using the da-
maged anchorage, and a child could
be seriously injured or killed in a
collision.
LATCH lower anchor location
The LATCH lower anchor points are
provided to install child restraints in the
rear outboard seating positions only. Do
not attempt to install a child restraint in
the center seating position using the
LATCH lower anchors.
Safety — seats, seat belts and supplemental restraint system1-35
Page 56 of 603

1-38Safety — seats, seat belts and supplemental restraint system
tether strap to the outboard seat-
ing position (right side).
. Child restraint anchorages are
designed to withstand only those
loads imposed by correctly fitted
child restraints. Under no circum-
stances are they to be used to
attach adult seat belts, or other
items or equipment to the vehi-
cle. Doing so could damage the
child restraint anchorages. The
child restraint will not be properly
installed using the damaged an-
chorage, and a child could be
seriously injured or killed in a
collision.
. Properly secure cargo and do not
allow it to contact the top tether
strap when it is attached to the
top tether anchor. Cargo that is
not properly secured or cargo
that contacts the top tether strap
may damage the top tether strap
during a collision. Your child
could be seriously injured or
killed in a collision if the child
restraint top tether strap is da-
maged.Top tether anchor point locations
Anchor points are located in the following
locations:
.2nd row bench seat (if so equipped)
on the seatback of the outboard
seating positions as shown.
. 2nd row captain’s seats (if so
equipped) on the seatback of the
outboard seating positions as shown.
. 3rd row bench seat on the seatback of
the outboard seating position (right
side) as shown.
If you have any questions when instal-
ling a top tether strap child restraint on
the rear seat, it is recommended you
visit a NISSAN dealer for this service.
REAR-FACING CHILD RESTRAINT
INSTALLATION USING LATCH
Refer to all Warnings and Cautions in the
“Child safety” and “Child restraints” sec-
tions before installing a child restraint.
Do not use the lower anchors if the
combined weight of the child and the
child restraint exceeds 65 lbs (29.5 kg). If
the combined weight of the child and the
child restraint is greater than 65 lbs (29.5
kg), use the vehicle’s seat belt (not the
lower anchors) to install the child re-
straint. Be sure to follow the child re-
straint manufacturer’s instructions for
installation. Follow these steps to install a rear-facing
child restraint in the 2nd row seats using
the LATCH system:
1. Position the child restraint on the seat.
Always follow the child restraint man-
ufacturer’s instructions.
Page 59 of 603

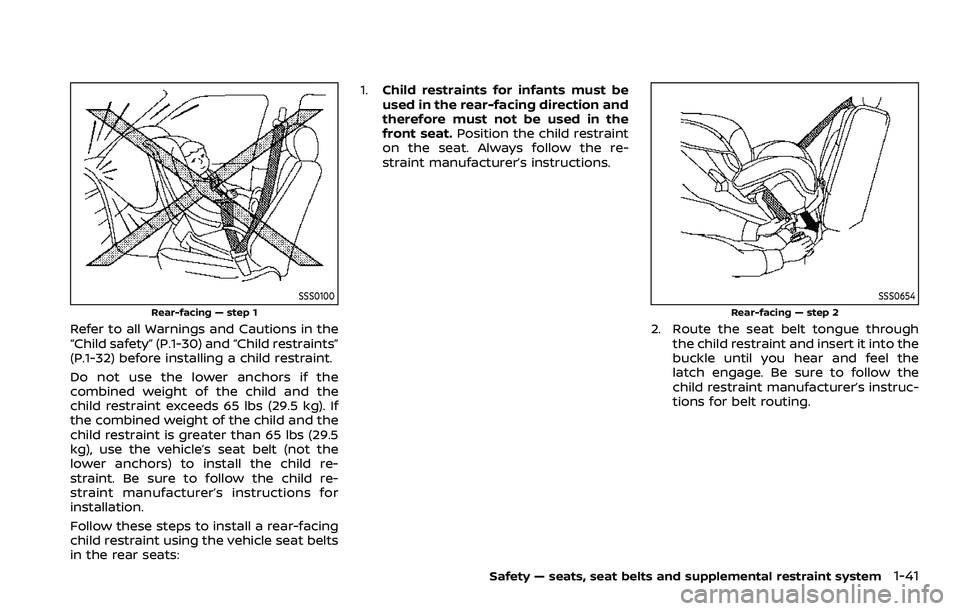
SSS0100
Rear-facing — step 1
Refer to all Warnings and Cautions in the
“Child safety” (P.1-30) and “Child restraints”
(P.1-32) before installing a child restraint.
Do not use the lower anchors if the
combined weight of the child and the
child restraint exceeds 65 lbs (29.5 kg). If
the combined weight of the child and the
child restraint is greater than 65 lbs (29.5
kg), use the vehicle’s seat belt (not the
lower anchors) to install the child re-
straint. Be sure to follow the child re-
straint manufacturer’s instructions for
installation.
Follow these steps to install a rear-facing
child restraint using the vehicle seat belts
in the rear seats:1.
Child restraints for infants must be
used in the rear-facing direction and
therefore must not be used in the
front seat. Position the child restraint
on the seat. Always follow the re-
straint manufacturer’s instructions.
SSS0654
Rear-facing — step 2
2. Route the seat belt tongue through the child restraint and insert it into the
buckle until you hear and feel the
latch engage. Be sure to follow the
child restraint manufacturer’s instruc-
tions for belt routing.
Safety — seats, seat belts and supplemental restraint system1-41
Page 61 of 603

SSS0658
Rear-facing — step 6
6. After attaching the child restraint, testit before you place the child in it. Push
it from side to side while holding the
child restraint near the seat belt path.
The child restraint should not move
more than 1 inch (25 mm), from side to
side. Try to tug it forward and check to
see if the belt holds the restraint in
place. If the restraint is not secure,
tighten the seat belt as necessary, or
put the restraint in another seat and
test it again. You may need to try a
different child restraint. Not all child
restraints fit in all types of vehicles.
7. Check to make sure that the child restraint is properly secured prior to each use. If the seat belt is not locked,
repeat steps 1 through 6.
After the child restraint is removed and
the seat belt fully retracted, the ALR mode
(child restraint mode) is canceled.
FORWARD-FACING CHILD RE-
STRAINT INSTALLATION USING
LATCH
Refer to all Warnings and Cautions in the
“Child safety” and “Child restraints” sec-
tions before installing a child restraint.
Do not use the lower anchors if the
combined weight of the child and the
child restraint exceeds 65 lbs (29.5 kg). If
the combined weight of the child and the
child restraint is greater than 65 lbs (29.5
kg), use the vehicle’s seat belt (not the
lower anchors) to install the child re-
straint. Be sure to follow the child re-
straint manufacturer’s instructions for
installation.
Follow these steps to install a forward-
facing child restraint using the LATCH
system:
1. Position the child restraint on the seat. Always follow the child restraint man-
ufacturer’s instructions.
JVR0637X
Forward-facing web-mounted — step 2
2. Secure the child restraint anchor at- tachments to the LATCH lower an-
chors. Check to make sure the LATCH
attachment is properly attached to
the lower anchors.
If the child restraint is equipped with a
top tether strap, route the top tether
strap and secure the tether strap to
the tether anchor point. See “Installing
top tether strap” (P.1-46). Do not install
child restraints that require the use of
a top tether strap in seating positions
that do not have a top tether anchor.
Safety — seats, seat belts and supplemental restraint system1-43
Page 64 of 603

1-46Safety — seats, seat belts and supplemental restraint system
Installing top tether strap
First, secure the child restraint with the
LATCH lower anchors (2nd row captain’s
or bench outboard seating positions
only).
1. If necessary, raise or remove the headrestraint or headrest to position the
top tether strap over the top of the
seatback. If the head restraint or
headrest is removed, store it in a
secure place. Be sure to reinstall the
head restraint or headrest when the
child restraint is removed. See “Head
restraints/headrests” (P.1-14) for head
restraint or headrest adjustment, re-
moval and installation information.
2. Secure the tether strap to the tether anchor point on the back of each
seatback behind the child restraint.
3. Tighten the tether strap according to the manufacturer’s instructions to
remove any slack. Make sure the head
restraint or headrest does not contact
the top tether strap.
If you have any questions when instal-
ling a top tether strap on the rear seat,
it is recommended you visit a NISSAN
dealer for this service.
FORWARD-FACING CHILD RE-
STRAINT INSTALLATION USING THE
SEAT BELTS
WARNING
. The three-point seat belt with
Automatic Locking Retractor
(ALR) must be used when instal-
ling a child restraint. Failure to
use the ALR mode will result in
the child restraint not being prop-
erly secured. The restraint could
tip over or be loose and cause
injury to a child in a sudden stop
or collision. Also, it can change
the operation of the front pas-
senger air bag. See “Front pas-
senger air bag and status light”
(P.1-62)
. When installing a child restraint
system in the 3rd center position,
both the center seat belt connec-
tor tongue and buckle tongue
must be secured. See “3rd row
center seat belt” (P.1-26).
SSS0640
Forward-facing (front passenger seat) — step 1
Refer to all Warnings and Cautions in the
“Child safety” and “Child restraints” sec-
tions before installing a child restraint.
Do not use the lower anchors if the
combined weight of the child and the
child restraint exceeds 65 lbs (29.5 kg). If
the combined weight of the child and the
child restraint is greater than 65 lbs (29.5
kg), use the vehicle’s seat belt (not the
lower anchors) to install the child re-
straint. Be sure to follow the child re-
straint manufacturer’s instructions for
installation.
Follow these steps to install a forward-
facing child restraint using the vehicle
seat belt in the rear seats or in the front