2021 NISSAN ARMADA brake light
[x] Cancel search: brake lightPage 370 of 603

5-104Starting and driving
.The camera area of windshield glass is
continuously covered with dirt, etc.
Action to take:
When the above conditions no longer
exist, the AEB with pedestrian detection
system will resume automatically.
NOTE:
When the inside of the windshield on
camera area is misted or frozen, it will
take a period of time to remove it after
air conditioner turns on. If dirt appears
on this area, it is recommended you
visit a NISSAN dealer.
Condition B
When the radar sensor picks up interfer-
ence from another radar source, making
it impossible to detect a vehicle ahead,
the AEB system is automatically turned
off. The AEB system warning light (or-
ange) will illuminate.
Action to take:
When the above conditions no longer
exist, the AEB system will resume auto-
matically.
Condition C
Under the following conditions, making it
impossible to detect a vehicle ahead, the
AEB with pedestrian detection system is
automatically turned off.
The AEB system warning light (orange)
will illuminate and the “Forward Driving
Aids temporarily disabled Front Sensor
blocked See Owner’s Manual” warning
message will appear in the vehicle infor-
mation display.
. When the sensor area of the front
bumper is covered with dirt or is
obstructed
Action to take:
If the AEB system warning light (orange)
comes on, stop the vehicle in a safe place,
place the shift lever in the P (Park)
position and turn the engine off. Clean
the radar cover below the front bumper
with a soft cloth, and restart the engine. If
the AEB system warning light continues
to illuminate, have the AEB with pedes-
trian detection system checked. It is
recommended you visit a NISSAN dealer
for this service.
. When driving on roads with limited
road structures or buildings (for ex-
ample, long bridges, deserts, snow
fields, driving next to long walls) Action to take:
When the above conditions no longer
exist, the AEB with pedestrian detection
system will resume automatically.
Condition D
When the accelerator pedal actuator
detects that the internal motor tempera-
ture is high, the AEB with pedestrian
detection system is automatically turned
off. The AEB system warning light (or-
ange) will illuminate.
Action to take:
When the above conditions no longer
exist, the AEB with pedestrian detection
system will resume automatically.
Condition E
When VDC system is OFF, the AEB brake
will not operate. In this case only visible
and audible warning operates. The AEB
system warning light (orange) will illumi-
nate.
Action to take:
When VDC system is ON, the AEB with
pedestrian detection system will resume
automatically.
Page 375 of 603

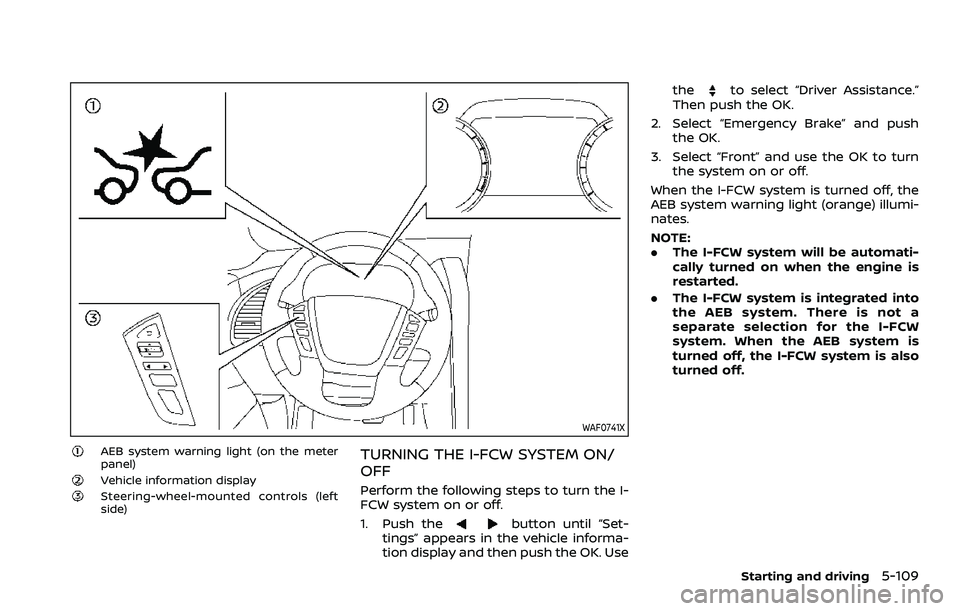
WAF0741X
AEB system warning light (on the meter
panel)
Vehicle information displaySteering-wheel-mounted controls (left
side)
TURNING THE I-FCW SYSTEM ON/
OFF
Perform the following steps to turn the I-
FCW system on or off.
1. Push the
button until “Set-
tings” appears in the vehicle informa-
tion display and then push the OK. Use the
to select “Driver Assistance.”
Then push the OK.
2. Select “Emergency Brake” and push the OK.
3. Select “Front” and use the OK to turn the system on or off.
When the I-FCW system is turned off, the
AEB system warning light (orange) illumi-
nates.
NOTE:
. The I-FCW system will be automati-
cally turned on when the engine is
restarted.
. The I-FCW system is integrated into
the AEB system. There is not a
separate selection for the I-FCW
system. When the AEB system is
turned off, the I-FCW system is also
turned off.
Starting and driving5-109
Page 384 of 603

5-118Starting and driving
RAB SYSTEM OPERATION
When the shift lever is in the R (Reverse)
position and the vehicle speed is less than
approximately 9 MPH (15 km/h), the RAB
system operates.
If a risk of a collision with an obstacle is
detected when your vehicle is backing up,
the RAB system warning indicator will
flash in the vehicle information display, a
red frame will appear in the touch screen
display (models with the Intelligent
Around View® Monitor system), and the
system will chime three times. The system
will then automatically apply the brakes.
After the automatic brake application, the
driver must depress the brake pedal to
maintain brake pressure.
NOTE:
.The stop lights of the vehicle come
on when braking is performed by
the RAB system.
. When the brakes operate, a noise
may be heard. This is not a malfunc-
tion.
. When the “P” key is touched, the
indicator light on the key will turn off
and the the Rear Automatic Braking
(RAB) system will turn off tempora-
rily. The Moving Object Detection
(MOD) (if so equipped), the Intelligent
Back-up Intervention (I-BI) (if so
equipped) and the sonar systems will also be turned off at the same
time.
. When the sonar and MOD systems is
turned off on the settings menu in
the touch screen display, the “P” key
will disappear.
To enable or disable the RAB system,
use the vehicle information display. See
“Turning the RAB system ON/OFF” (P.5-
119).
Page 385 of 603

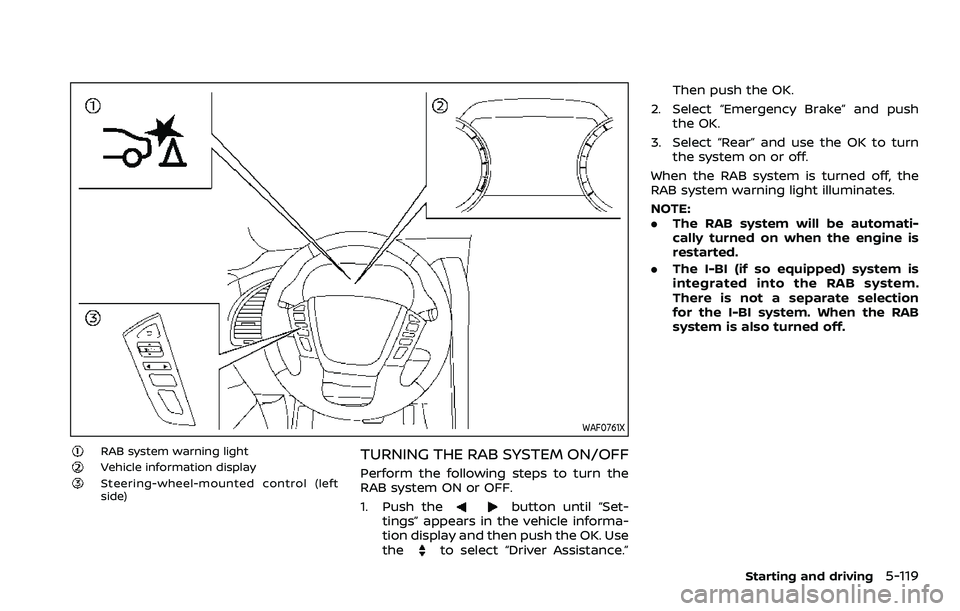
WAF0761X
RAB system warning lightVehicle information displaySteering-wheel-mounted control (left
side)
TURNING THE RAB SYSTEM ON/OFF
Perform the following steps to turn the
RAB system ON or OFF.
1. Push the
button until “Set-
tings” appears in the vehicle informa-
tion display and then push the OK. Use
the
to select “Driver Assistance.” Then push the OK.
2. Select “Emergency Brake” and push the OK.
3. Select “Rear” and use the OK to turn the system on or off.
When the RAB system is turned off, the
RAB system warning light illuminates.
NOTE:
. The RAB system will be automati-
cally turned on when the engine is
restarted.
. The I-BI (if so equipped) system is
integrated into the RAB system.
There is not a separate selection
for the I-BI system. When the RAB
system is also turned off.
Starting and driving5-119
Page 389 of 603

CAUTION
During the first 1,200 miles (2,000
km), follow these recommendations
to obtain maximum engine perfor-
mance and ensure the future relia-
bility and economy of your new
vehicle.
Failure to follow these recommenda-
tions may result in shortened engine
life and reduced engine perfor-
mance.
. Avoid driving for long periods at con-
stant speed, either fast or slow. Do not
run the engine over 4,000 rpm.
. Do not accelerate at full throttle in any
gear.
. Avoid quick starts.
. Avoid hard braking as much as possi-
ble.
. Do not tow a trailer for the first 500
miles (805 km). Follow these easy-to-use Fuel Efficient
Driving Tips to help you achieve the most
fuel economy from your vehicle.
1. Use smooth accelerator and brake
pedal application.
.Avoid rapid starts and stops..Use smooth, gentle accelerator andbrake application whenever possi-
ble.
.Maintain constant speed whilecommuting and coast whenever
possible.
2. Maintain constant speed.
.Look ahead to try and anticipate and minimize stops.
.Synchronizing your speed with traf-fic lights allows you to reduce your
number of stops.
.Maintaining a steady speed canminimize red light stops and im-
prove fuel efficiency.
3. Use air conditioning (A/C) at higher vehicle speeds.
.Below 40 MPH (64 km/h), it is moreefficient to open windows to cool
the vehicle due to reduced engine
load.
.Above 40 MPH (64 km/h), it is more
efficient to use A/C to cool the
vehicle due to increased aerody-
namic drag.
.Recirculating the cool air in thecabin when the A/C is on reduces
cooling load.
4. Drive at economical speeds and dis- tances.
.Observing the speed limit and notexceeding 60 MPH (97 km/h)
(where legally allowed) can improve
fuel efficiency due to reduced aero-
dynamic drag.
.Maintaining a safe following dis-tance behind other vehicles re-
duces unnecessary braking.
.Safely monitoring traffic to antici- pate changes in speed permits
reduced braking and smooth accel-
eration changes.
.Select a gear range suitable to roadconditions.
5. Use cruise control.
.Using cruise control during highway driving helps maintain a steady
speed.
.Cruise control is particularly effec-tive in providing fuel savings when
driving on flat terrains.
6. Plan for the shortest route.
.Utilize a map or navigation system to determine the best route to save
time.
Starting and driving5-123
BREAK-IN SCHEDULE FUEL EFFICIENT DRIVING TIPS
Page 391 of 603

CAUTION
.Do not drive the vehicle in the 4HI
or 4LO position on dry hard sur-
face roads. Driving on dry, hard
surfaces in 4HI or 4LO may cause
unnecessary noise, tire wear and
increased fuel consumption.
If the Four-Wheel Drive (4WD)
warning light turns on when driv-
ing on dry hard surface roads:
— in the 4HI position, shift the
4WD shift switch to AUTO.
— in the 4LO position, stop the vehicle and shift the transmis-
sion lever to the N (Neutral)
position with the brake pedal
depressed and shift the 4WD
shift switch to AUTO.
If the 4WD warning light is still
on after the above operation,
have your vehicle checked as
soon as possible. It is recom-
mended you visit a NISSAN
dealer for this service.
. The transfer case may be da-
maged if you continue driving
with the 4WD warning light blink-
ing. See “On-pavement and off-road driving
precautions” (P.5-9) for other precautions
for off-road driving.
NISSAN ALL-MODE 4WD® SYSTEM
The all mode 4WD system provides 3
positions (AUTO, 4HI and 4LO), so you
can select the desired drive mode accord-
ing to the driving conditions.
4WD shift procedure:
Starting and driving5-125
Page 394 of 603

5-128Starting and driving
The 4WD shift switch is used to select the
4WD mode depending on the driving
conditions. There are 3 types of drive
modes available, AUTO, 4HI and 4LO.
The 4WD shift switch electronically con-
trols the transfer case operation. Rotate
the switch to move between each mode,
AUTO, 4H and 4L.
You must depress the 4WD shift switch
to select 4L, and the vehicle MUST be
stationary and the shift lever in the N
(Neutral) position when changing into
or out of 4L.
WARNING
.When parking, apply the parking
brake before stopping the engine
and make sure that the 4WD shift
indicator is on and the ATP warn-
ing light turns off. Otherwise, the
vehicle could unexpectedly move
even if the automatic transmis-
sion is in the P (Park) position.
. The 4LO and 4HI indicators must
stop blinking and the 4LO or 4HI
indicator must remain illumi-
nated or turn off before shifting
the transmission into gear. If the
shift lever is shifted from the N
(Neutral) position to any other gear while the 4LO and 4HI in-
dicators are blinking alternately,
the vehicle may move unexpect-
edly.
CAUTION
.
Never shift the 4WD shift switch
between 4L and 4H while driving.
. The 4HI position provides greater
traction. Avoid excessive speed,
as it will cause increased fuel
consumption and higher oil tem-
peratures, and could damage dri-
vetrain component. Speeds over
62 MPH (100 km/h) in 4HI is not
recommended.
. The 4LO position provides max-
imum traction. Avoid raising ve-
hicle speed excessively, as the
maximum speed is approxi-
mately 31 MPH (50 km/h).
. When driving straight, shift the
4WD shift switch to the AUTO or
4H position. Do not move the 4WD
shift switch when making a turn
or reversing.
. Do not shift the 4WD shift switch
(between AUTO and 4H) while
driving on steep downhill grades. Use the engine brake and low
automatic transmission gears
for engine braking.
. Do not operate the 4WD shift
switch (between AUTO and 4H)
with the rear wheels spinning.
. Do not drive on dry hard surface
roads in the 4HI or 4LO position.
Driving on dry hard surfaces in
4HI or 4LO may cause unneces-
sary noise and tire wear. NISSAN
recommends driving in the AUTO
position under these conditions.
. The 4WD transfer case may not
be shifted between 4HI and 4LO
at low ambient temperatures and
the 4LO and 4HI indicators may
blink even when the 4WD shift
switch is shifted. After driving for
a while you can change the 4WD
shift switch between 4H and 4L.
When driving on rough roads,
. Drive carefully according to the road
surface conditions.
When the vehicle is stuck,
. Place stones or wooden blocks under
the tires to free the vehicle.
. Set the 4WD shift switch to 4H or 4L.
Page 395 of 603

.If it is difficult to free the vehicle,
repeat forward and backward move-
ment to increase the movement.
. If the vehicle is stuck deep in mud, tire
chains may be effective.
CAUTION
.Do not spin the tires excessively.
Tires will sink deep into the mud,
making it difficult to free the
vehicle.
. Avoid shifting gears with the en-
gine running at high speeds as
this may cause malfunction.
SSD1048
4WD SHIFT SWITCH
.Shift the 4WD shift switch to either the
AUTO, 4H or 4L position, depending on
driving conditions.
. With the switch set to the AUTO
position, distribution of torque to the
front and rear wheels changes auto-
matically, depending on road condi-
tions encountered [ratio; 0 : 100 (2WD)
? 50 : 50 (4WD)]. This results in
improved driving stability.
. If the 4WD shift switch is operated
while making a turn, accelerating or
decelerating or if the ignition switch
is placed in the OFF position while in
the AUTO, 4H or 4L, you may feel a jolt. This is not abnormal.
. When the vehicle is stopped after
making a turn, you may feel a slight
jolt after the shift lever is shifted to N
(Neutral) or P (Park) position. This
occurs because the transfer clutch is
released and not because of a mal-
function.
CAUTION
.When driving straight, shift the
4WD shift switch to the AUTO or
4H position. Do not move the 4WD
shift switch when making a turn
or reversing.
. Do not shift the 4WD shift switch
while driving on steep downhill
grades. Use the engine brake and
low automatic transmission
gears for engine braking.
. Do not operate the 4WD shift
switch with the rear wheels spin-
ning.
. Before placing the 4WD shift
switch in the 4H position from
AUTO, ensure the vehicle speed is
less than 62 MPH (100 km/h).
Failure to do so can damage the
4WD system.
Starting and driving5-129