2021 NISSAN ARMADA warning
[x] Cancel search: warningPage 490 of 603

9-4Maintenance and schedules
belt system (for example, buckles, an-
chors, adjuster and retractors) operate
properly and smoothly, and are installed
securely. Check the belt webbing for cuts,
fraying, wear or damage.
Steering wheel:Check for changes in the
steering conditions, such as excessive
free play, hard steering or strange noises.
Warning lights and chimes: Make sure
that all warning lights and chimes are
operating properly.
Windshield defroster: Check that the air
comes out of the defroster outlets prop-
erly and in sufficient quantity when oper-
ating the heater or air conditioner.
Windshield wiper and washer*: Check
that the wipers and washer operate
properly and that the wipers do not
streak.
Under the hood and vehicle
The maintenance items listed here should
be checked periodically (for example,
each time you check the engine oil or
refuel).
Battery*: Check the fluid level in each cell.
It should be between the MAX and MIN
lines. Vehicles operated in high tempera-
tures or under severe condition require
frequent checks of the battery fluid level. NOTE:
Care should be taken to avoid situations
that can lead to potential battery dis-
charge and potential no-start condi-
tions such as:
1.
Installation or extended use of elec-
tronic accessories that consume
battery power when the engine is
not running (Phone chargers, GPS,
DVD players, etc.)
2. Vehicle is not driven regularly and/
or only driven short distances.
In these cases, the battery may need to
be charged to maintain battery health.
Brake fluid level*: Make sure that the
brake fluid level is between the MAX and
MIN lines on the reservoir.
Engine coolant level*: Check the coolant
level when the engine is cold.
Engine drive belts*: Make sure that no
belt is frayed, worn, cracked or oily.
Engine oil level*: Check the level after
parking the vehicle on a level spot and
turning off the engine. Wait more than 15
minutes for the oil to drain back into the
oil pan.
Exhaust system: Make sure there are no
loose supports, cracks or holes. If the
sound of the exhaust seems unusual or
there is a smell of exhaust fumes, im-
mediately have the exhaust system in- spected. It is recommended you visit a
NISSAN dealer for this service. (See “Pre-
cautions when starting and driving” (P.5-
4) for exhaust gas (carbon monoxide).)
Fluid leaks:
Check under the vehicle for
fuel, oil, water or other fluid leaks after the
vehicle has been parked for a while. Water
dripping from the air conditioner after use
is normal. If you should notice any leaks
or if gasoline fumes are evident, check for
the cause and have it corrected immedi-
ately.
Power steering fluid level* and lines:
Check the level when the fluid is cold, with
the engine off. Check the lines for proper
attachment, leaks, cracks, etc.
Radiator and hoses: Check the front of
the radiator and clean off any dirt, insects,
leaves, etc., that may have accumulated.
Make sure the hoses have no cracks,
deformation, rot or loose connections.
Underbody: The underbody is frequently
exposed to corrosive substances such as
those used on icy roads or to control
dust. It is very important to remove these
substances, otherwise rust will form on
the floor pan, frame, fuel lines and around
the exhaust system. At the end of winter,
the underbody should be thoroughly
flushed with plain water, being careful to
clean those areas where mud and dirt
may accumulate. For additional informa-
Page 523 of 603
To install the front license plate bracket
to your vehicle, it is recommended you
contact a NISSAN dealer.
WARNING
.It is extremely dangerous to
ride in a cargo area inside
the vehicle. In a collision,
people riding in these areas
are more likely to be ser-
iously injured or killed.
.Do not allow people to ride
in any area of vehicle that is
not equipped with seats and
seat belts.
.Be sure everyone in your
vehicle is in a seat and using
a seat belt properly.
TERMS
It is important to familiarize your-
self with the following terms before
loading your vehicle:
. Curb Weight (actual weight of
your vehicle) - vehicle weight
including: standard and optional
equipment, fluids, emergency
tools, and spare tire assembly.
This weight does notinclude passengers and cargo.
. GVW (Gross Vehicle Weight) -
curb weight plus the combined
weight of passengers and cargo.
. GVWR (Gross Vehicle Weight Rat-
ing) - maximum total combined
weight of the unloaded vehicle,
passengers, luggage, hitch, trai-
ler tongue load and any other
optional equipment. This infor-
mation is located on the F.M.V.S.
S./C.M.V.S.S. label.
. GAWR (Gross Axle Weight Rating)
- maximum weight (load) limit
specified for the front or rear
axle. This information is located
on the F.M.V.S.S./C.M.V.S.S. label.
. GCWR (Gross Combined Weight
Rating) - The maximum total
weight rating of the vehicle,
passengers, cargo, and trailer.
. Vehicle Capacity Weight, Load
limit, Total load capacity - max-
imum total weight limit specified
of the load (passengers and
cargo) for the vehicle. This is
the maximum combined weight
Technical and consumer information10-15
INSTALLING FRONT LICENSE PLATE VEHICLE LOADING INFORMATION
Page 526 of 603
10-18Technical and consumer information
SIC4446
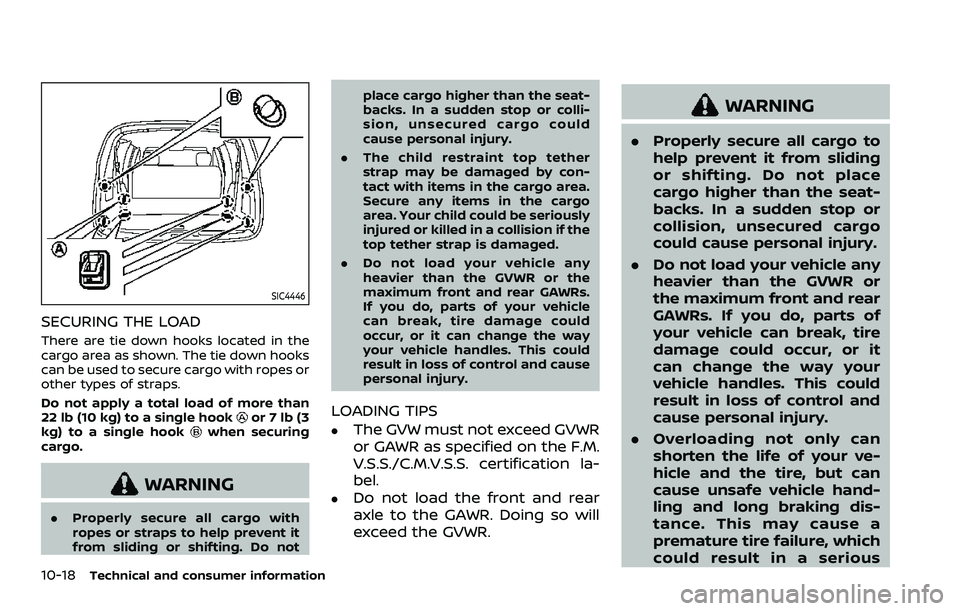
SECURING THE LOAD
There are tie down hooks located in the
cargo area as shown. The tie down hooks
can be used to secure cargo with ropes or
other types of straps.
Do not apply a total load of more than
22 lb (10 kg) to a single hook
or 7 lb (3
kg) to a single hookwhen securing
cargo.
WARNING
. Properly secure all cargo with
ropes or straps to help prevent it
from sliding or shifting. Do not place cargo higher than the seat-
backs. In a sudden stop or colli-
sion, unsecured cargo could
cause personal injury.
. The child restraint top tether
strap may be damaged by con-
tact with items in the cargo area.
Secure any items in the cargo
area. Your child could be seriously
injured or killed in a collision if the
top tether strap is damaged.
. Do not load your vehicle any
heavier than the GVWR or the
maximum front and rear GAWRs.
If you do, parts of your vehicle
can break, tire damage could
occur, or it can change the way
your vehicle handles. This could
result in loss of control and cause
personal injury.
LOADING TIPS
.The GVW must not exceed GVWR
or GAWR as specified on the F.M.
V.S.S./C.M.V.S.S. certification la-
bel.
.Do not load the front and rear
axle to the GAWR. Doing so will
exceed the GVWR.
WARNING
.Properly secure all cargo to
help prevent it from sliding
or shifting. Do not place
cargo higher than the seat-
backs. In a sudden stop or
collision, unsecured cargo
could cause personal injury.
. Do not load your vehicle any
heavier than the GVWR or
the maximum front and rear
GAWRs. If you do, parts of
your vehicle can break, tire
damage could occur, or it
can change the way your
vehicle handles. This could
result in loss of control and
cause personal injury.
. Overloading not only can
shorten the life of your ve-
hicle and the tire, but can
cause unsafe vehicle hand-
ling and long braking dis-
tance. This may cause a
premature tire failure, which
could result in a serious
Page 527 of 603
accident and personal in-
jury. Failures caused by
overloading are not covered
by the vehicle’s warranty.
MEASUREMENT OF WEIGHTS
Secure loose items to prevent
weight shifts that could affect the
balance of your vehicle. When the
vehicle is loaded, drive to a scale
and weigh the front and the rear
wheels separately to determine
axle loads. Individual axle loads
should not exceed either of the
gross axle weight ratings (GAWR).
The total of the axle loads should
not exceed the gross vehicle
weight rating (GVWR). These ratings
are given on the vehicle certifica-
tion label. If weight ratings are
exceeded, move or remove items
to bring all weights below the
ratings.WARNING
Overloading or improper loading of a
trailer and its cargo can adversely
affect vehicle handling, braking and
performance and may lead to acci-
dents.
CAUTION
. Do not tow a trailer or haul a
heavy load for the first 500 miles
(800 km). Your engine, axle or
other parts could be damaged.
. For the first 500 miles (800 km)
that you tow a trailer, do not drive
over 50 MPH (80 km/h) and do
not make starts at full throttle.
This helps the engine and other
parts of your vehicle wear in at
the heavier loads.
Your new vehicle was designed to be
used primarily to carry passengers and
cargo. Remember that towing a trailer
places additional loads on your vehicle’s
engine, drivetrain, steering, braking and
other systems.
A NISSAN Towing Guide (U.S. only) is available on the website at
www.nissanusa.com. This guide includes
information on trailer towing capability
and the special equipment required for
proper towing.
MAXIMUM LOAD LIMITS
Maximum trailer loads
Never allow the total trailer load to
exceed the value specified in the “Towing
load/specification” (P.10-23). The total
trailer load equals trailer weight plus its
cargo weight.
.
When towing a trailer load of 3,500
lbs (1,587 kg) or more, trailers with a
brake system MUST be used.
The maximum Gross Combined Weight
Rating (GCWR) should not exceed the
value specified in the following “Towing
Load/Specification” chart.
Technical and consumer information10-19
TOWING A TRAILER
Page 528 of 603
10-20Technical and consumer information
STI0541
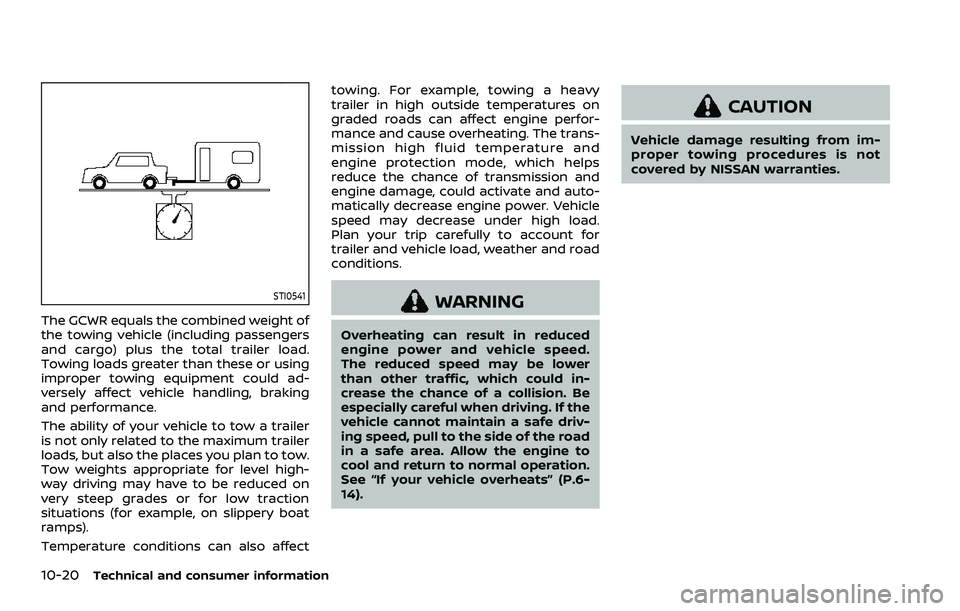
The GCWR equals the combined weight of
the towing vehicle (including passengers
and cargo) plus the total trailer load.
Towing loads greater than these or using
improper towing equipment could ad-
versely affect vehicle handling, braking
and performance.
The ability of your vehicle to tow a trailer
is not only related to the maximum trailer
loads, but also the places you plan to tow.
Tow weights appropriate for level high-
way driving may have to be reduced on
very steep grades or for low traction
situations (for example, on slippery boat
ramps).
Temperature conditions can also affecttowing. For example, towing a heavy
trailer in high outside temperatures on
graded roads can affect engine perfor-
mance and cause overheating. The trans-
mission high fluid temperature and
engine protection mode, which helps
reduce the chance of transmission and
engine damage, could activate and auto-
matically decrease engine power. Vehicle
speed may decrease under high load.
Plan your trip carefully to account for
trailer and vehicle load, weather and road
conditions.
WARNING
Overheating can result in reduced
engine power and vehicle speed.
The reduced speed may be lower
than other traffic, which could in-
crease the chance of a collision. Be
especially careful when driving. If the
vehicle cannot maintain a safe driv-
ing speed, pull to the side of the road
in a safe area. Allow the engine to
cool and return to normal operation.
See “If your vehicle overheats” (P.6-
14).
CAUTION
Vehicle damage resulting from im-
proper towing procedures is not
covered by NISSAN warranties.
Page 531 of 603
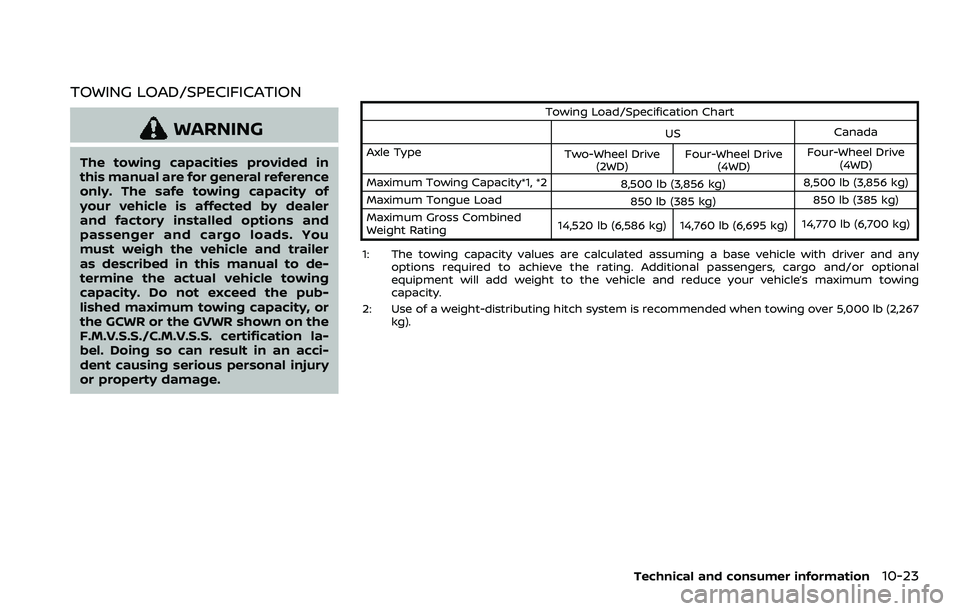
TOWING LOAD/SPECIFICATION
WARNING
The towing capacities provided in
this manual are for general reference
only. The safe towing capacity of
your vehicle is affected by dealer
and factory installed options and
passenger and cargo loads. You
must weigh the vehicle and trailer
as described in this manual to de-
termine the actual vehicle towing
capacity. Do not exceed the pub-
lished maximum towing capacity, or
the GCWR or the GVWR shown on the
F.M.V.S.S./C.M.V.S.S. certification la-
bel. Doing so can result in an acci-
dent causing serious personal injury
or property damage.
Towing Load/Specification ChartUS Canada
Axle Type Two-Wheel Drive
(2WD) Four-Wheel Drive
(4WD) Four-Wheel Drive
(4WD)
Maximum Towing Capacity*1, *2 8,500 lb (3,856 kg)8,500 lb (3,856 kg)
Maximum Tongue Load 850 lb (385 kg)850 lb (385 kg)
Maximum Gross Combined
Weight Rating 14,520 lb (6,586 kg) 14,760 lb (6,695 kg)
14,770 lb (6,700 kg)
1: The towing capacity values are calculated assuming a base vehicle with driver and any options required to achieve the rating. Additional passengers, cargo and/or optional
equipment will add weight to the vehicle and reduce your vehicle’s maximum towing
capacity.
2: Use of a weight-distributing hitch system is recommended when towing over 5,000 lb (2,267 kg).
Technical and consumer information10-23
Page 533 of 603

WAJ0219X
To install the trailer hitch cover:
1. Insert the upper clips to the recesses
, and then push in the cover to its
original position.
2. Install the 2 clips
.
WARNING
Trailer hitch components have spe-
cific weight ratings. Your vehicle may
be capable of towing a trailer heavier
than the weight rating of the hitch
components. Never exceed the
weight rating of the hitch compo-
nents. Doing so can cause serious personal injury or property damage.
Hitch ball
Choose a hitch ball of the proper size and
weight rating for your trailer:
.
The required hitch ball size is stamped
on most trailer couplers. Most hitch
balls also have the size printed on top
of the ball.
. Choose the proper class hitch ball
based on the trailer weight.
. The diameter of the threaded shank of
the hitch ball must be matched to the
ball mount hole diameter. The hitch
ball shank should be no more than
1/16″ smaller than the hole in the ball
mount.
. The threaded shank of the hitch ball
must be long enough to be properly
secured to the ball mount. There
should be at least 2 threads showing
beyond the lock washer and nut.
Ball mount
The hitch ball is attached to the ball
mount and the ball mount is inserted into
the hitch receiver. Choose a proper class
ball mount based on the trailer weight.
Additionally, the ball mount should be
chosen to keep the trailer tongue level
with the ground.
Weight carrying hitches
A weight carrying or “dead weight” ball
mount is one that is designed to carry the
whole amount of tongue weight and
gross weight directly on the ball mount
and on the receiver.
Weight distribution hitch
This type of hitch is also called a “load-
leveling” or “equalizing” hitch. A set of bars
attach to the ball mount and to the trailer
to distribute the tongue weight (hitch
weight) of your trailer. Many vehicles
cannot carry the full tongue weight of a
given trailer, and need some of the
tongue weight transferred through the
frame and pushing down on the front
wheels. This gives stability to the tow
vehicle.
A weight-distributing hitch system (Class
IV) is recommended if you plan to tow
trailers with a maximum weight over
5,000 lbs (2,267 kg). Check with the trailer
and towing equipment manufacturers to
determine if they recommend the use of a
weight-distributing hitch system.
NOTE:
A weight-distributing hitch system may
affect the operation of trailer surge
brakes. If you are considering use of a
weight-distributing hitch system with a
surge brake-equipped trailer, check
Technical and consumer information10-25
Page 534 of 603
10-26Technical and consumer information
with the surge brake, hitch or trailer
manufacturer to determine if and how
this can be done.
Follow the instructions provided by the
manufacturer for installing and using the
weight-distributing hitch system.
General set-up instructions are as follows:
1. Park unloaded vehicle on a level sur-face. With the ignition switch in the ON
position and the doors closed, allow
the vehicle to stand for several min-
utes so that it can level.
2. Measure the height of a reference point on the front and rear bumpers
at the center of the vehicle.
3. Attach the trailer to the vehicle and adjust the hitch equalizers so that the
front bumper height is within 0 - .5
inches (0 - 13 mm) of the reference
height measured in step 2. The rear
bumper should be no higher than the
reference height measured in step 2.
WARNING
Properly adjust the weight distribut-
ing hitch so the rear of the bumper is
no higher than the measured refer-
ence height when the trailer is at-
tached. If the rear bumper is higher than the measured reference height
when loaded, the vehicle may handle
unpredictably which could cause a
loss of vehicle control and cause
serious personal injury or property
damage.
Sway control device
Sudden maneuvers, wind gusts and buf-
feting caused by other vehicles can affect
trailer handling. Sway control devices
may be used to help control these affects.
If you choose to use one, contact a
reputable trailer hitch supplier to make
sure the sway control device will work
with the vehicle, hitch, trailer and the
trailer’s brake system. Follow the instruc-
tions provided by the manufacturer for
installing and using the sway control
device.
Class I hitch
Class I trailer hitch equipment (receiver,
ball mount and hitch ball) can be used to
tow trailers of a maximum weight of
2,000 lb (907 kg).
Class II hitch
Class II trailer hitch equipment (receiver,
ball mount and hitch ball) can be used to
tow trailers of a maximum weight of
3,500 lb (1,588 kg).
Class III hitch
Class III trailer hitch equipment (receiver,
ball mount and hitch ball) can be used to
tow trailers of a maximum weight of
5,000 lb (2,267 kg).
Class IV hitch
Class IV trailer hitch equipment (receiver,
ball mount and hitch ball) can be used to
tow trailers of a maximum weight of
10,000 lb (4,545 kg). A weight distributing
hitch should be used to tow trailers that
weigh over 5,000 lb (2,267 kg).
Your vehicle may be equipped with Class
IV trailer hitch equipment that has a
10,000 lb (4,545 kg) maximum weight
rating, but your vehicle is only capable of
towing the maximum trailer weights
shown in the “Towing Load/Specification”
chart earlier in this section.
CAUTION
.
Do not use axle-mounted hitches.