2021 NISSAN ARMADA parking brake
[x] Cancel search: parking brakePage 267 of 603
5 Starting and driving
Precautions when starting and driving ...................... 5-4Exhaust gas (carbon monoxide) ................................ 5-4
Three-way catalyst ............................................................... 5-4
Tire Pressure Monitoring System (TPMS) ........... 5-5
Avoiding collision and rollover .................................... 5-8
On-pavement and off-road
driving precautions .............................................................. 5-9
Off-road recovery .................................................................. 5-9
Rapid air pressure loss ...................................................... 5-9
About lowering of the rear of the vehicle ...... 5-10
Drinking alcohol/drugs and driving ..................... 5-10
Driving safety precautions .......................................... 5-10
Push-button ignition switch ............................................. 5-13
Operating range for engine start function ...... 5-13
Push-button ignition switch positions .............. 5-14
Emergency engine shut off ........................................ 5-15
Intelligent Key battery discharge ........................... 5-15
Before starting the engine ................................................. 5-16
Starting the engine .................................................................. 5-16 Remote engine start (if so equipped) ................. 5-17
Driving the vehicle .................................................................... 5-17 Engine protection mode ............................................... 5-17
Automatic transmission ................................................ 5-18
Parking brake ........................................................................\
....... 5-22 Traffic Sign Recognition (TSR) (if
so equipped) ........................................................................\
......... 5-23
System operation ............................................................. 5-23
How to enable/disable the TSR system ........ 5-25
System temporarily unavailable ........................... 5-26
System malfunction ....................................................... 5-26
System maintenance .................................................... 5-26
Lane Departure Warning (LDW) ..................................... 5-26 LDW system operation ................................................. 5-27
How to enable/disable the LDW system ....... 5-28
LDW system limitations ............................................... 5-29
System temporarily unavailable ........................... 5-30
System malfunction ....................................................... 5-30
System maintenance .................................................... 5-31
Intelligent Lane Intervention (I-LI) ............................... 5-31 I-LI system operation .................................................... 5-33
How to enable/disable the I-LI system .......... 5-34
I-LI system limitations .................................................. 5-34
System temporarily unavailable ........................... 5-36
System malfunction ....................................................... 5-37
System maintenance .................................................... 5-37
Blind Spot Warning (BSW) .................................................. 5-38 BSW system operation ................................................. 5-39
How to enable/disable the BSW system ....... 5-40
BSW system limitations ............................................... 5-40
Page 269 of 603

System malfunction ...................................................... 5-116
Rear Automatic Braking (RAB) .................................... 5-116 RAB system operation ................................................ 5-118
Turning the RAB system ON/OFF ...................... 5-119
RAB system limitations .............................................. 5-120
System malfunction ...................................................... 5-122
System maintenance ................................................... 5-122
Break-in schedule ................................................................. 5-123
Fuel efficient driving tips ................................................. 5-123
Increasing fuel economy ................................................. 5-124
NISSAN all-mode 4WD® (if so equipped) ............. 5-124
NISSAN all-mode 4WD® system ........................... 5-125
4WD shift switch .............................................................. 5-129
4WD shift indicator ........................................................ 5-130
4WD warning light ......................................................... 5-130
Hill Start Assist system ...................................................... 5-132
Parking/parking on hills ................................................... 5-133
TOW mode ........................................................................\
.......... 5-134
SNOW mode ........................................................................\
....... 5-135
Front and rear sonar system (if
so equipped) ........................................................................\
...... 5-135
System operation ........................................................... 5-136
Sonar function settings ............................................. 5-137 Turning on and off the sonar function ...... 5-139
Sonar limitations ........................................................... 5-140
System temporarily unavailable ....................... 5-141
System maintenance ................................................ 5-141
Power steering ........................................................................\
5-141
Brake system ........................................................................\
... 5-142 Braking precautions ................................................... 5-142
Parking brake break-in ............................................ 5-142
Brake assist ........................................................................\
....... 5-143 Brake assist ....................................................................... 5-143
Anti-lock Braking System (ABS) ........................ 5-143
Vehicle Dynamic Control (VDC) system .............. 5-144 Vehicle Dynamic Control (VDC)
OFF switch ........................................................................\
. 5-146
Cold weather driving ......................................................... 5-146 Freeing a frozen door lock ................................... 5-146
Antifreeze ........................................................................\
.... 5-146
Battery ........................................................................\
........... 5-146
Draining of coolant water ..................................... 5-146
Tire equipment ............................................................... 5-147
Special winter equipment ..................................... 5-147
Driving on snow or ice ............................................. 5-147
Engine block heater (if so equipped) ........... 5-148
Page 274 of 603
5-8Starting and driving
TPMS with Easy Fill Tire Alert
When adding air to an under-inflated tire,
the TPMS with Easy Fill Tire Alert provides
visual and audible signals outside the
vehicle to help you inflate the tires to
the recommended COLD tire pressure.
Vehicle set-up:
1. Park the vehicle in a safe and levelplace.
2. Apply the parking brake and place the shift lever in the P (Park) position.
3. Place the ignition switch in the ON position. Do not start the engine.
Operation:
1. Add air to the tire.
2. After a few seconds, the hazard in- dicators will start flashing.
3. When the designated pressure is reached, the horn beeps once and
the hazard indicators stop flashing.
4. Perform the above steps for each tire.
. If the tire is over-inflated more than
approximately 4 psi (30 kPa), the horn
beeps and the hazard indicators flash
3 times. To correct the pressure, push
the core of the valve stem on the tire
briefly to release pressure. When the
pressure reaches the designated
pressure, the horn beeps once. .
If the hazard indicator does not flash
within approximately 15 seconds after
starting to inflate the tire, it indicates
that the TPMS with Easy Fill Tire Alert
is not operating.
. The TPMS will not activate the Easy Fill
Tire Alert under the following condi-
tions:
— If there is interference from an
external device or transmitter
— The air pressure from the inflation device such as those using a power
socket is not sufficient to inflate the
tire
— If an electrical equipment is being used in or near the vehicle
— There is a malfunction in the TPMS system
— There is a malfunction in the horn or hazard indicators
. If the TPMS with Easy Fill Tire Alert
does not operate due to TPMS inter-
ference, move the vehicle about 3 ft
(1m) backward or forward and try
again.
If the TPMS with Easy Fill Tire Alert is not
working, use a tire pressure gauge.
AVOIDING COLLISION AND ROLL-
OVER
WARNING
Failure to operate this vehicle in a
safe and prudent manner may result
in loss of control or an accident.
Be alert and drive defensively at all times.
Obey all traffic regulations. Avoid exces-
sive speed, high speed cornering, or
sudden steering maneuvers, because
these driving practices could cause you
to lose control of your vehicle. As with
any vehicle, a loss of control could
result in a collision with other vehicles
or objects, or cause the vehicle to roll-
over, particularly if the loss of control
causes the vehicle to slide sideways. Be
attentive at all times, and avoid driving
when tired. Never drive when under the
influence of alcohol or drugs (including
prescription or over-the-counter drugs
which may cause drowsiness). Always
wear your seat belt as outlined in the
“Seat belts” (P.1-20), and also instruct your
passengers to do so.
Seat belts help reduce the risk of injury in
collisions and rollovers. In a rollover
crash, an unbelted or improperly belted
Page 278 of 603

5-12Starting and driving
result in serious vehicle damage
or personal injury.
. Do not attempt to test a 4WD
equipped vehicle on a 2-wheel
dynamometer (such as the dy-
namometers used by some
states for emissions testing), or
similar equipment even if the
other two wheels are raised off
the ground. Make sure you inform
test facility personnel that your
vehicle is equipped with 4WD
before it is placed on a dynam-
ometer. Using the wrong test
equipment may result in drive-
train damage or unexpected ve-
hicle movement which could
result in serious vehicle damage
or personal injury (4WD models).
. When a wheel is off the ground
due to an unlevel surface, do not
spin the wheel excessively.
. Accelerating quickly, sharp steer-
ing maneuvers or sudden braking
may cause loss of control.
. If at all possible, avoid sharp
turning maneuvers, particularly
at high speeds. Your vehicle has
a higher center of gravity than a
conventional passenger car. The
vehicle is not designed for cor- nering at the same speeds as
conventional passenger cars.
Failure to operate this vehicle
correctly could result in loss of
control and/or a rollover acci-
dent.
. Always use tires of the same type,
size, brand, construction (bias,
bias-belted or radial), and tread
pattern on all four wheels. Install
tire chains on the rear wheels
when driving on slippery roads
and drive carefully.
. Be sure to check the brakes im-
mediately after driving in mud or
water. See “Brake system” (P.5-
142) for wet brakes.
. Avoid parking your vehicle on
steep hills. If you get out of the
vehicle and it rolls forward, back-
ward or sideways, you could be
injured.
. Whenever you drive off-road
through sand, mud or water as
deep as the wheel hub, more
frequent maintenance may be
required. See the maintenance
schedule shown in the "9. Main-
tenance and schedules" section.
. Spinning the rear wheels on slip-
pery surfaces may cause the 4WD warning light to flash. The 4WD
system may also automatically
switch from the 4WD mode to
the 2WD mode. This could reduce
traction. Be especially careful
when towing a trailer (4WD mod-
els).
Page 280 of 603
5-14Starting and driving
moved to the P (Park) position.
When the ignition switch cannot be
pushed toward the LOCK position, pro-
ceed as follows:
1. Move the shift lever into the P (Park)position.
2. Push the ignition switch to the OFF position. The ignition switch position
indicator will not illuminate.
3. Open the door. The ignition switch will change to the LOCK position.
The shift lever can be moved from the P
(Park) position if the ignition switch is in
the ON position and the brake pedal is
depressed.
If the battery of the vehicle is dis-
charged, the push-button ignition
switch cannot be turned from the LOCK
position.
Some indicators and warnings for opera-
tion are displayed on the vehicle informa-
tion display between the speedometer
and tachometer. (See “Vehicle informa-
tion display” (P.2-19).)PUSH-BUTTON IGNITION SWITCH
POSITIONS
LOCK (Normal parking position)
The ignition switch can only be locked in
this position.
The ignition switch will be unlocked when
it is pushed to the ACC position while
carrying the Intelligent Key.
ACC (Accessories)
This position activates electrical acces-
sories such as the radio, when the engine
is not running.
ACC has a battery saver feature that will
turn the ignition switch to the OFF posi-
tion after a period of time under the
following conditions:
. all doors are closed.
. shift lever is in P (Park).
. turn signal/hazard indicator lights are
not flashing.
The battery saver feature will be can-
celled if any of the following occur:
. any door is opened.
. shift lever is moved out of P (Park).
. ignition switch changes position.
ON (Normal operating position)
This position turns on the ignition system
and electrical accessories.
ON has a battery saver feature that will
turn the ignition switch to the OFF posi-
tion, if the vehicle is not running, after
some time under the following condi-
tions:
. all doors are closed.
. shift lever is in P (Park).
. turn signal/hazard indicator lights are
not flashing.
The battery saver feature will be can-
celled if any of the following occur:
. any door is opened.
. shift lever is moved out of P (Park).
. ignition switch changes position.
OFF
The engine can be turned off in the
position.
The ignition lock is designed so that the
ignition switch cannot be switched to the
LOCK position until the shift lever is
moved to the P (Park) position.
Page 282 of 603

5-16Starting and driving
.Make sure the area around the vehicle
is clear.
. Check fluid levels such as engine oil,
coolant, brake fluid and window
washer fluid as frequently as possible,
or at least whenever you refuel.
. Check that all windows and lights are
clean.
. Visually inspect tires for their appear-
ance and condition. Also check tires
for proper inflation.
. Lock all doors.
. Position seat and adjust head re-
straints/headrests.
. Adjust inside and outside mirrors.
. Fasten seat belts and ask all passen-
gers to do likewise.
. Check the operation of warning lights
when the ignition switch is pushed to
the ON position. (See “Warning lights,
indicator lights and audible remin-
ders” (P.2-10).) 1. Apply the parking brake.
2. Move the shift lever to the P (Park) or N
(Neutral) position. (P is recommended.)
The starter is designed not to operate
unless the shift lever is in either of the
above positions.
3. Push the ignition switch to the ON position. Firmly depress the brake
pedal and push the ignition switch to
start the engine.
To start the engine immediately, push
and release the ignition switch while
depressing the brake pedal with the
ignition switch in any position.
.If the engine is very hard to start inextremely cold weather or when
restarting, depress the accelerator
pedal a little (approximately 1/3 to
the floor) and while holding, crank
the engine. Release the accelerator
pedal when the engine starts.
.If the engine is very hard to startbecause it is flooded, depress the
accelerator pedal all the way to the
floor and hold it. Push the ignition
switch to the ON position to start
cranking the engine. After 5 or 6
seconds, stop cranking by pushing
the ignition switch to OFF. After
cranking the engine, release the
accelerator pedal. Crank the engine
with your foot off the accelerator pedal
by depressing the brake
pedal and pushing the push-button
ignition switch to start the engine.
If the engine starts, but fails to run,
repeat the above procedure.
CAUTION
Do not operate the starter for more
than 15 seconds at a time. If the
engine does not start, push the
ignition switch to OFF and wait 10
seconds before cranking again,
otherwise the starter could be da-
maged.
4. Warm-up
Allow the engine to idle for at least 30
seconds after starting. Do not race the
engine while warming it up. Drive at
moderate speed for a short distance
first, especially in cold weather. In cold
weather, keep the engine running for
a minimum of 2 - 3 minutes before
shutting it off. Starting and stopping
the engine over a short period of time
may make the vehicle more difficult to
start.
When racing the engine up to 4,000
rpm or more under the no load
condition, the engine will enter the
BEFORE STARTING THE ENGINE STARTING THE ENGINE
Page 285 of 603
1. Keep the foot brake pedal depressedand push the shift lever button to shift
into a driving gear.
2. Release the parking brake and foot brake, then gradually start the vehicle
in motion.
WARNING
.Do not depress the accelerator
pedal while shifting from P (Park)
or N (Neutral) to R (Reverse), D
(Drive) or manual shift mode. Al-
ways depress the brake pedal
until shifting is completed. Failure
to do so could cause you to lose
control and have an accident.
. Cold engine idle speed is high, so
use caution when shifting into a
forward or reverse gear before
the engine has warmed up.
. Never shift to either the P (Park)
or R (Reverse) position while the
vehicle is moving forward and P
(Park), D (Drive) position or man-
ual shift mode while the vehicle is
moving rearward. This could
cause an accident or damage
the transmission. .
Do not downshift abruptly on
slippery roads. This may cause a
loss of control.
CAUTION
.Except in an emergency, do not
shift to the N (Neutral) position
while driving. Coasting with the
transmission in the N (Neutral)
position may cause serious da-
mage to the transmission.
. To avoid possible damage to your
vehicle; when stopping the vehi-
cle on an uphill grade, do not hold
the vehicle by depressing the
accelerator pedal. The foot brake
should be used for this purpose.
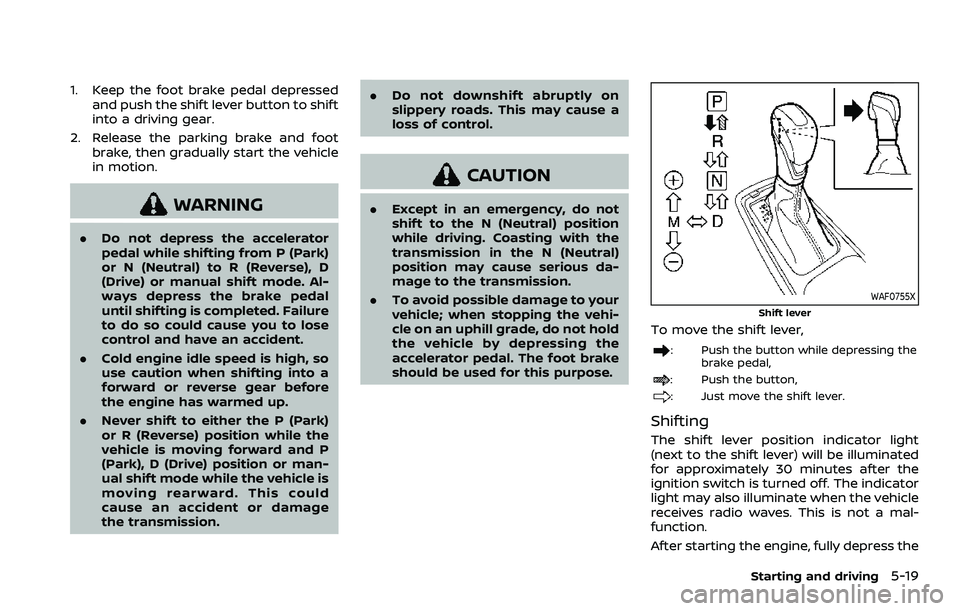
WAF0755X
Shift lever
To move the shift lever,
: Push the button while depressing the
brake pedal,
: Push the button,
: Just move the shift lever.
Shifting
The shift lever position indicator light
(next to the shift lever) will be illuminated
for approximately 30 minutes after the
ignition switch is turned off. The indicator
light may also illuminate when the vehicle
receives radio waves. This is not a mal-
function.
After starting the engine, fully depress the
Starting and driving5-19
Page 286 of 603
5-20Starting and driving
brake pedal and shift the shift lever from
P (Park) to R (Reverse), N (Neutral), D
(Drive) or Manual shift mode position.
Push the button to shift into P (Park) or R
(Reverse). All other positions can be
selected without pushing the button.
WARNING
Apply the parking brake if the shift
lever is in any position while the
engine is not running. Failure to do
so could cause the vehicle to move
unexpectedly or roll away and result
in serious personal injury or property
damage.
CAUTION
Make sure the vehicle is completely
stopped and the transmission is in
the P (Park) position.
P (Park) position:
Use this position when the vehicle is
parked or when starting the engine. Make
sure the vehicle is completely stopped.
The brake pedal must be depressed and
the shift lever button pushed in to move the shift lever from the N (Neutral)
position or any drive position to the P
(Park) position.
Apply the parking brake.
When parking on a hill, apply the parking
brake first, then move the shift lever to
the P (Park) position.
CAUTION
Use this position only when the
vehicle is completely stopped.
R (Reverse):
Use this position to back up. Always be
sure the vehicle is completely stopped
before selecting the R (Reverse) position.
The brake pedal must be depressed and
the shift lever button pushed in to move
the shift lever from the P (Park) posi-
tion, the N (Neutral) position or any
drive position to the R (Reverse) posi-
tion.
N (Neutral):
Neither forward nor reverse gear is en-
gaged. The engine can be started in this
position. You may shift to the N (Neutral)
position and restart a stalled engine while
the vehicle is moving. D (Drive):
Use this position for all normal forward
driving.
Manual shift mode
When the shift lever is in the manual shift
gate, the transmission is ready for the
manual shift mode. Shift ranges can be
selected manually by moving the shift
lever up or down.
When shifting up, move the shift lever to
the + (up) side. The transmission shifts to
the higher range.
When shifting down, move the shift lever
to the − (down) side. The transmission
shifts to the lower range.
When canceling the manual shift mode,
return the shift lever to the D (Drive)
position. The transmission returns to the
normal driving mode.
In the manual shift mode, the shift range
is displayed on the position indicator in
the meter.