2021 NISSAN ARMADA spare tire
[x] Cancel search: spare tirePage 316 of 603

5-50Starting and driving
standard lane markers; lane
markers covered with water,
dirt, snow, etc.
— On roads where discontinued lane markers are still detect-
able.
— On roads where there are sharp curves.
— On roads where there are sharply contrasting objects,
such as shadows, snow,
water, wheel ruts, seams or
lines remaining after road re-
pairs.
— On roads where the traveling lane merges or separates.
— When the vehicle’s traveling direction does not align with
the lane markers.
— When traveling close to the vehicle in front of you, which
obstructs the lane camera
unit detection range.
— When rain, snow or dirt ad- heres to the windshield in
front of a lane camera unit.
— When the headlights are not bright due to dirt on the lens
or if aiming is not adjusted properly.
— When strong light enters a lane camera unit. (For exam-
ple: light directly shines on the
front of the vehicle at sunrise
or sunset.)
— When a sudden change in brightness occurs. (For exam-
ple: when the vehicle enters or
exits a tunnel or under a
bridge.)
. Do not use the I-BSI system under
the following conditions because
the system may not function
properly.
— During bad weather. (For ex-
ample: rain, fog, snow, etc.)
— When driving on slippery roads, such as on ice or snow,
etc.
— When driving on winding or uneven roads.
— When there is a lane closure due to road repairs.
— When driving in a makeshift or temporary lane.
— When driving on roads where the lane width is too narrow. — When driving with a tire that is
not within normal tire condi-
tions (for example, tire wear,
low tire pressure, installation
of spare tire, tire chains, non-
standard wheels).
— When the vehicle is equipped with non-original steering
parts or suspension parts.
— When towing a trailer or other vehicle.
. Excessive noise (for example,
audio system volume, open vehi-
cle window) will interfere with the
chime sound, and it may not be
heard.
Page 337 of 603

.The radar sensors detect ap-
proaching (moving) vehicles. The
radar sensors cannot detect
every object such as:
— Pedestrians, bicycles, animals
or child operated toy vehicles
— A vehicle that passing at speeds greater than approxi-
mately 15 MPH (24 km/h)
. The radar sensors may not detect
approaching vehicles in certain
situations:
— Illustration a. When a vehicle
parked next to you obstructs
the beam of the radar sensor.
— Illustration b. When the vehicle is parked in an angled parking
space.
— Illustration c. When the vehicle is parked on inclined ground.
— Illustration d. When an ap- proaching vehicle turns into
your vehicle’s parking lot aisle.
— Illustration e. When the angle formed by your vehicle and
approaching vehicle is small.
. The following conditions may re-
duce the ability of the radar
sensors to detect other vehicles: — Severe weather
— Road spray
— Ice/frost/dirt build up on the
vehicle
. Do not attach stickers (including
transparent material), install ac-
cessories or apply additional
paint near the radar sensors.
These conditions may reduce the
ability of the radar sensors to
detect other vehicles.
. The sonar sensors detect station-
ary objects behind the vehicle.
The sonar sensor may not detect:
— Small or moving objects
— Wedge-shaped objects
— Object close to the bumper
(less than approximately 1 ft
(30 cm))
— Thin objects such as rope, wire and chain, etc.
. The brake engagement by the I-
BI system is not as effective on a
slope as it is on flat ground. When
on a steep slope the system may
not function properly.
. Do not use the I-BI system under
the following conditions because
the system may not function properly.
— When driving with a tire that is
not within normal tire condi-
tions (for example, tire wear,
low tire pressure, installation
of spare tire, tire chains, non-
standard wheels).
— When the vehicle is equipped with non-original brake parts
or suspension parts.
. When towing a trailer or other
vehicle, turn the I-BI system off to
prevent the occurrence of an un-
expected accident resulting from
sudden system operation. (See “I-
BI system operation” (P.5-65).)
. Excessive noise (for example,
audio system volume, open vehi-
cle window) will interfere with the
chime sound, and it may not be
heard.
Starting and driving5-71
Page 409 of 603

BRAKE ASSIST
When the force applied to the brake pedal
exceeds a certain level, the Brake Assist is
activated generating greater braking
force than a conventional brake booster
even with light pedal force.
WARNING
The Brake Assist is only an aid to
assist braking operation and is not a
collision warning or avoidance de-
vice. It is the driver’s responsibility to
stay alert, drive safely and be in
control of the vehicle at all times.
ANTI-LOCK BRAKING SYSTEM (ABS)
WARNING
.The Anti-lock Braking System
(ABS) is a sophisticated device,
but it cannot prevent accidents
resulting from careless or dan-
gerous driving techniques. It can
help maintain vehicle control dur-
ing braking on slippery surfaces.
Remember that stopping dis-
tances on slippery surfaces will
be longer than on normal sur- faces even with ABS. Stopping
distances may also be longer on
rough, gravel or snow covered
roads, or if you are using tire
chains. Always maintain a safe
distance from the vehicle in front
of you. Ultimately, the driver is
responsible for safety.
. Tire type and condition may also
affect braking effectiveness.
— When replacing tires, install
the specified size of tires on
all four wheels.
— When installing a spare tire, make sure that it is the proper
size and type as specified on
the Tire and Loading Informa-
tion label. See “Tire and load-
ing information label” (P.10-
13).
— For detailed information, see “Wheels and tires” (P.8-28).
The Anti-lock Braking System (ABS) con-
trols the brakes so the wheels do not lock
during hard braking or when braking on
slippery surfaces. The system detects the
rotation speed at each wheel and varies
the brake fluid pressure to prevent each
wheel from locking and sliding. By pre-
venting each wheel from locking, the system helps the driver maintain steering
control and helps to minimize swerving
and spinning on slippery surfaces.
Using the system
Depress the brake pedal and hold it down.
Depress the brake pedal with firm steady
pressure, but do not pump the brakes.
The ABS will operate to prevent the
wheels from locking up. Steer the vehicle
to avoid obstacles.
WARNING
Do not pump the brake pedal. Doing
so may result in increased stopping
distances.
Self-test feature
The ABS includes electronic sensors, elec-
tric pumps, hydraulic solenoids and a
computer. The computer has a built-in
diagnostic feature that tests the system
each time you start the engine and move
the vehicle at a low speed in forward or
reverse. When the self-test occurs, you
may hear a “clunk” noise and/or feel a
pulsation in the brake pedal. This is
normal and does not indicate a malfunc-
tion. If the computer senses a malfunc-
tion, it switches the ABS off and
Starting and driving5-143
BRAKE ASSIST
Page 417 of 603

To shut off the engine in an emergency
situation while driving, perform the fol-
lowing procedure:
.Rapidly push the push-button ignition
switch 3 consecutive times in less
than 1.5 seconds, or
. Push and hold the push-button igni-
tion switch for more than 2 seconds.TIRE PRESSURE MONITORING SYS-
TEM (TPMS)
This vehicle is equipped with the Tire
Pressure Monitoring System (TPMS). It
monitors tire pressure of all tires except
the spare. When the low tire pressure
warning light is lit and the “Tire Pressure
Low Add Air” warning appears in the
vehicle information display, one or more
of your tires is significantly under-inflated.
If the vehicle is being driven with low tire
pressure, the TPMS will activate and warn
you of it by the low tire pressure warning
light. This system will activate only when
the vehicle is driven at speeds above 16
MPH (25 km/h). For more details, see “Low
tire pressure warning light” (P.2-15) and
“Tire Pressure Monitoring System (TPMS)”
(P.5-5).
WARNING
.If the low tire pressure warning
light illuminates or Low Pressure
information is displayed on the
monitor screen while driving,
avoid sudden steering maneu-
vers or abrupt braking, reduce
vehicle speed, pull off the road
to a safe location and stop the
vehicle as soon as possible. Driv-
ing with under-inflated tires may permanently damage the tires
and increase the likelihood of tire
failure. Serious vehicle damage
could occur and may lead to an
accident and could result in ser-
ious personal injury. Check the
tire pressure for all four tires.
Adjust the tire pressure to the
recommended COLD tire pressure
shown on the Tire and Loading
Information label to turn the low
tire pressure warning light OFF. If
the light still illuminates while
driving after adjusting the tire
pressure, a tire may be flat. If
you have a flat tire, replace it with
a spare tire as soon as possible.
. Since the spare tire is not
equipped with the TPMS, when a
spare tire is mounted or a wheel
is replaced, the TPMS will not
function and the low tire pressure
warning light will flash for ap-
proximately 1 minute. The light
will remain on after 1 minute.
Have your tires replaced and/or
TPMS system reset as soon as
possible. It is recommended you
visit a NISSAN dealer for these
services.
. Replacing tires with those not
originally specified by NISSAN
In case of emergency6-3
EMERGENCY ENGINE SHUT OFF FLAT TIRE
Page 419 of 603

JVE0219X
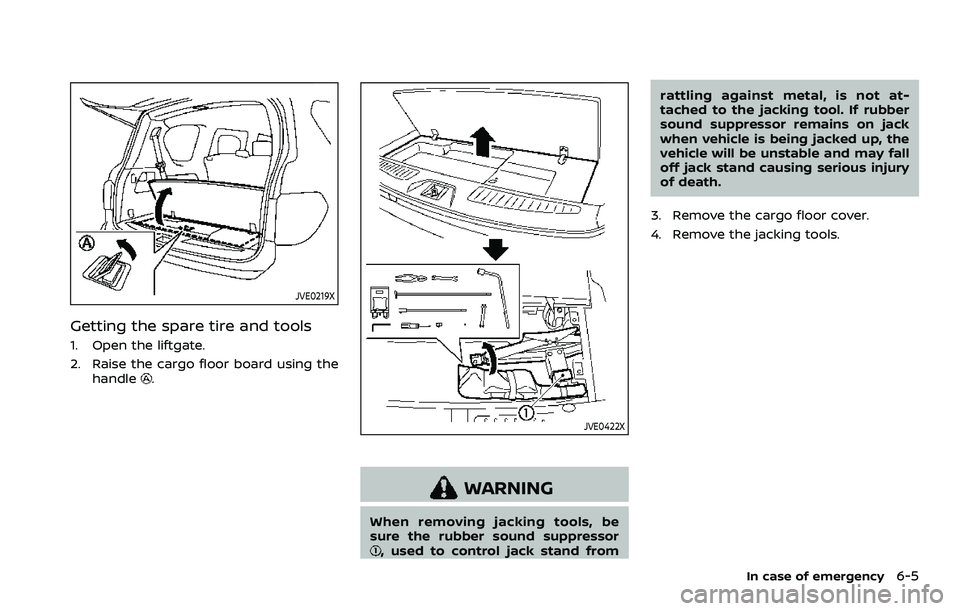
Getting the spare tire and tools
1. Open the liftgate.
2. Raise the cargo floor board using thehandle
.
JVE0422X
WARNING
When removing jacking tools, be
sure the rubber sound suppressor
, used to control jack stand from rattling against metal, is not at-
tached to the jacking tool. If rubber
sound suppressor remains on jack
when vehicle is being jacked up, the
vehicle will be unstable and may fall
off jack stand causing serious injury
of death.
3. Remove the cargo floor cover.
4. Remove the jacking tools.
In case of emergency6-5
Page 421 of 603

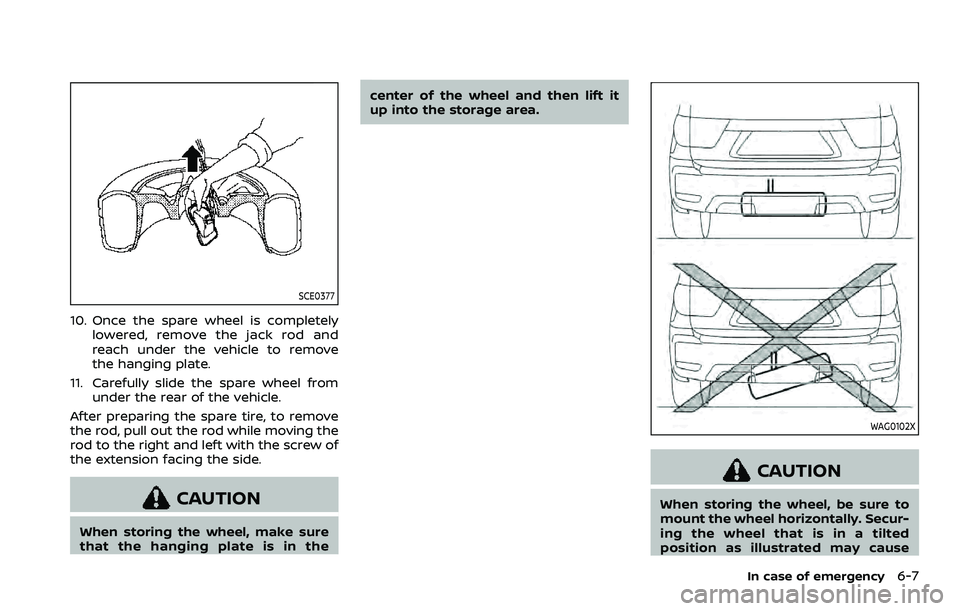
SCE0377
10. Once the spare wheel is completelylowered, remove the jack rod and
reach under the vehicle to remove
the hanging plate.
11. Carefully slide the spare wheel from under the rear of the vehicle.
After preparing the spare tire, to remove
the rod, pull out the rod while moving the
rod to the right and left with the screw of
the extension facing the side.
CAUTION
When storing the wheel, make sure
that the hanging plate is in the center of the wheel and then lift it
up into the storage area.
WAG0102X
CAUTION
When storing the wheel, be sure to
mount the wheel horizontally. Secur-
ing the wheel that is in a tilted
position as illustrated may cause
In case of emergency6-7
Page 424 of 603

6-10In case of emergency
ignition switch ON/OFF one time.
SCE0910
Installing the spare tire
The full-size temporary use only spare
tire (if so equipped) is designed for
emergency use. (See specific instruc-
tions under the heading “Wheels and
tires” (P.8-28).)
1. Clean any mud or dirt from the sur-face between the wheel and hub.
2. Carefully put the spare tire on and tighten the wheel nuts finger tight.
3. With the wheel nut wrench, tighten wheel nuts alternately and evenly in
the sequence illustrated (
,,,,,) until they are tight. 4. Lower the vehicle slowly until the tire
touches the ground. Then, with the
wheel nut wrench, tighten the wheel
nuts securely in the sequence as
illustrated. Lower the vehicle comple-
tely.
WARNING
.Incorrect wheel nuts or impro-
perly tightened wheel nuts can
cause the wheel to become loose
or come off. This could cause an
accident.
. Do not use oil or grease on the
wheel studs or nuts. This could
cause the nuts to become loose.
. Retighten the wheel nuts when
the vehicle has been driven for
600 miles (1,000 km) (also in
cases of a flat tire, etc.).
.As soon as possible, tighten the
wheel nuts to the specified torque
with a torque wrench.
Wheel nut tightening torque: 98 ft-lb (133 N·m)
The wheel nuts must be kept
tightened to specification at all
times. It is recommended that
wheel nuts be tightened to speci-
Page 425 of 603

fications at each lubrication inter-
val.
.Adjust tire pressure to the COLDpressure.
COLD pressure:
After the vehicle has been parked
for three hours or more or driven
less than 1 mile (1.6 km).
COLD tire pressures are shown on
the Tire and Loading Information
label affixed to the driver side
center pillar.
After adjusting tire pressure to the COLD
tire pressure, the display of the tire
pressure information may show higher
pressure than the COLD tire pressure
after the vehicle has been driven more
than 1 mile (1.6 km). This is because the
tire pressurizes as the tire temperature
rises. This does not indicate a system
malfunction.
Stowing the damaged tire and
tools
1. Securely store the damaged tire, jack and tools in the storage area.
2. Close the cargo floor cover.
3. Replace the cargo floor board.
4. Close the liftgate.
WARNING
. Always make sure that the spare
tire and jacking equipment are
properly secured after use. Such
items can become dangerous
projectiles in an accident or sud-
den stop.
. The full-size temporary use only
spare tire (if so equipped) is de-
signed for emergency use. (See
specific instructions under the
heading “Wheels and tires” (P.8-
28).)
In case of emergency6-11