2021 NISSAN ARMADA brake
[x] Cancel search: brakePage 418 of 603

6-4In case of emergency
could affect the proper operation
of the TPMS.
. Do not inject any tire liquid or
aerosol tire sealant into the tires,
as this may cause a malfunction
of the tire pressure sensors.
CHANGING A FLAT TIRE
If you have a flat tire, follow the instruc-
tions below.
Stopping the vehicle
1. Safely move the vehicle off the road
and away from traffic.
2. Turn on the hazard warning flashers.
3. Park on a level surface and apply the parking brake. Move the shift lever to
the P (Park) position.
4. Turn off the engine.
5. Raise the hood to warn other traffic, and to signal professional road assis-
tance personnel that you need assis-
tance.
6. Have all passengers get out of the vehicle and stand in a safe place, away
from traffic and clear of the vehicle.
WARNING
.Make sure the parking brake is
securely applied and the auto-
matic transmission is in the P
(Park) position.
. Never change tires when the ve-
hicle is on a slope, ice or slippery
areas. This is hazardous.
. Never change tires if oncoming
traffic is close to your vehicle.
Wait for professional road assis-
tance.
MCE0001A
Blocking wheels
Place suitable blocksat both the front
and back of the wheel diagonally oppo-
site the flat tire to prevent the vehicle
from moving when it is jacked up.
WARNING
Be sure to block the wheel as the
vehicle may move and result in
personal injury.
Page 427 of 603
WAG0119X
WARNING
Always follow the instructions below.
Failure to do so could result in
damage to the charging system and
cause personal injury.
1. Remove the engine compartment cover, if necessary. See “Engine com-
partment check locations” (P.8-3).
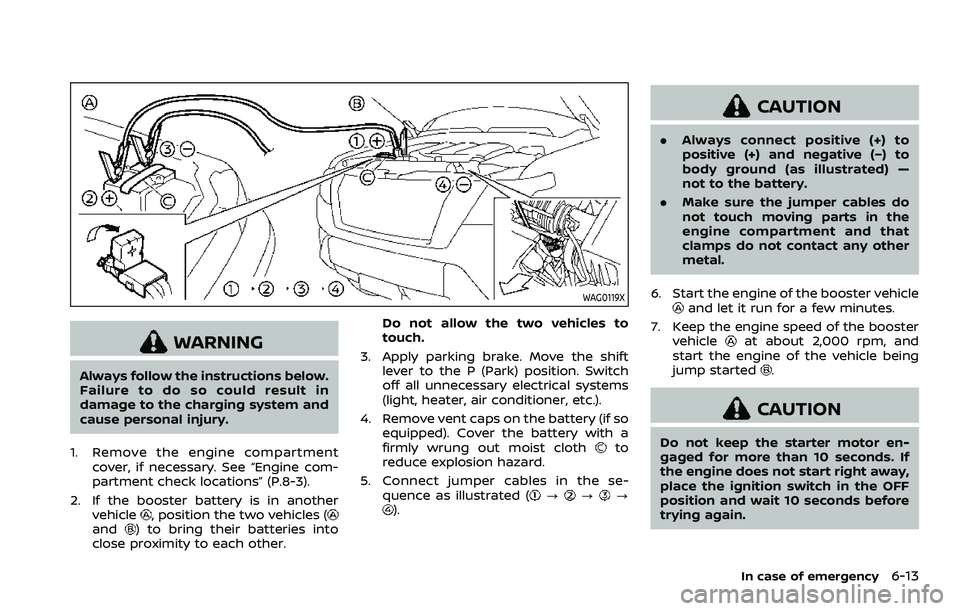
2. If the booster battery is in another vehicle
, position the two vehicles (and) to bring their batteries into
close proximity to each other. Do not allow the two vehicles to
touch.
3. Apply parking brake. Move the shift lever to the P (Park) position. Switch
off all unnecessary electrical systems
(light, heater, air conditioner, etc.).
4. Remove vent caps on the battery (if so equipped). Cover the battery with a
firmly wrung out moist cloth
to
reduce explosion hazard.
5. Connect jumper cables in the se- quence as illustrated (
???).
CAUTION
.Always connect positive (+) to
positive (+) and negative (−) to
body ground (as illustrated) —
not to the battery.
. Make sure the jumper cables do
not touch moving parts in the
engine compartment and that
clamps do not contact any other
metal.
6. Start the engine of the booster vehicle
and let it run for a few minutes.
7. Keep the engine speed of the booster vehicle
at about 2,000 rpm, and
start the engine of the vehicle being
jump started
.
CAUTION
Do not keep the starter motor en-
gaged for more than 10 seconds. If
the engine does not start right away,
place the ignition switch in the OFF
position and wait 10 seconds before
trying again.
In case of emergency6-13
Page 428 of 603

6-14In case of emergency
8. After starting your engine, carefullydisconnect the negative cable and
then the positive cable (
???).
9. Replace the vent caps (if so equipped). Be sure to dispose of the cloth used to
cover the vent holes as it may be
contaminated with corrosive acid.
10. Put the battery cover on. Do not attempt to start the engine by
pushing.CAUTION
.
Automatic transmission models
cannot be push-started or tow-
started. Attempting to do so may
cause transmission damage.
. Three way catalyst equipped
models should not be started by
pushing since the three way cat-
alyst may be damaged.
. Never try to start the vehicle by
towing it; when the engine starts,
the forward surge could cause
the vehicle to collide with the
tow vehicle.
CAUTION
.Do not continue to drive if your
vehicle overheats. Doing so could
cause engine damage or a vehicle
fire.
. To avoid the danger of being
scalded, never remove the radia-
tor cap or coolant reservoir cap
while the engine is still hot. When
the radiator cap or coolant reser-
voir cap is removed, pressurized
hot water will spurt out, possibly
causing serious injury.
. Do not open the hood if steam is
coming out.
If your vehicle is overheating (indicated by
an extremely high temperature gauge
reading), or if you feel a lack of engine
power, detect abnormal noise, etc., take
the following steps:
1. Move the vehicle safely off the road, apply the parking brake and move the
shift lever to the P (Park) position.
Do not stop the engine.
2. Turn off the heater and air condi- tioner. Open all the windows, move
the heater or air conditioner tempera-
ture control to maximum hot and fan
PUSH STARTING IF YOUR VEHICLE OVERHEATS
Page 433 of 603
VEHICLE RECOVERY (freeing a stuck
vehicle)
WARNING
.Stand clear of a stuck vehicle.
. Do not spin your tires at high
speed. This could cause them to
explode and result in serious in-
jury. Parts of your vehicle could
also overheat and be damaged.
Pulling a stuck vehicle
If your vehicle is stuck in sand, snow, mud,
etc., use a tow strap or other device
designed specifically for vehicle recovery.
Always follow the manufacturer’s instruc-
tions for the recovery device.
Attach the tow strap to the towing hook.
CAUTION
.Tow chains or cables must be
attached only to the main struc-
tural members of the vehicle or
the towing hooks. Otherwise, the
vehicle body will be damaged.
. Use the towing hook only to free
a vehicle stuck in sand, snow, mud, etc. Never tow the vehicle
for a long distance using only the
towing hook.
. The towing hook is under tre-
mendous force when used to free
a stuck vehicle. Never pull the
hook at an angle.
. Always pull the cable straight out
from the front or rear of the
vehicle.
. Pulling devices should be routed
so they do not touch any part of
the suspension, steering, brake or
cooling systems.
. Pulling devices such as ropes or
canvas straps are not recom-
mended for use in vehicle towing
or recovery.
Rocking a stuck vehicle
If your vehicle is stuck in sand, snow, mud,
etc., use the following procedure:
1. Turn off the Vehicle Dynamic Control
(VDC) system.
2. Make sure the area in front and behind the vehicle is clear of obstruc-
tions.
3. Turn the steering wheel right and left to clear an area around the front tires. 4. Slowly rock the vehicle forward and
backward.
.Shift back and forth between R(Reverse) and D (Drive).
.Apply the accelerator as little as possible to maintain the rocking
motion.
.Release the accelerator pedal be-
fore shifting between R and D.
.Do not spin the tires above 35 MPH(55 km/h).
5. If the vehicle cannot be freed after a few tries, contact a professional tow-
ing service to remove the vehicle.
In case of emergency6-19
Page 434 of 603
6-20In case of emergency
This section describes the procedure for
manually shifting the vehicle into the 4WD
mode (4L position) in case of an emer-
gency.
WHEN 4WD WARNING LIGHT ILLU-
MINATES
If the 4WD warning light illuminates while
driving, there may be a malfunction in the
4WD system. Stop the vehicle and have
the vehicle checked as soon as possible. It
is recommended you contact a NISSAN
dealer for this service. (See “NISSAN all-
mode 4WD®” (P.5-124).)
When the vehicle is stuck on an uneven
road (desert, mud, etc.) and the 4WD
warning light is illuminated, be sure to
place the 4WD shift switch in the 4L
position. If only the rear wheels are
spinning, this means that the transfer
has not switched to the 4L position
electrically.
If this situation occurs, contact a dealer or
road assistance service for help. If an
immediate service is not available, per-
form the following procedure to switch to
the 4L position manually and free the
vehicle.
CAUTION
Only perform this procedure in an
emergency.
If the vehicle is driven for a long
period of time over a long distance
with a component detached, foreign
material such as water, sand, etc.
may enter from the opening and this
may cause a malfunction in the
drivetrain system. After freeing a
vehicle that has become stuck, it is
recommended you contact a NISSAN
dealer for inspection and repair.
WARNING
.Ensure your safety before per-
forming the operations. The ve-
hicle may move unexpectedly.
. Place the ignition switch in the
OFF position, apply the parking
brake and let the vehicle cool
down.
. Do not perform the following
procedure immediately after
driving the vehicle. Parts such as
exhaust components, the trans- mission, etc. are very hot and
may cause a burn injury.
. Make sure that the parts that will
be operated as well as related
parts cool down before perform-
ing the operation.
. Burrs or projecting portions of
metal components may cause
unexpected injury to your fingers
or arms. Pay special attention in
regard to your safety while re-
moving and installing these
parts. Wear work gloves and pro-
tective arm covers.
CAUTION
While removing and installing the
parts, prevent the removed parts
from getting dirty with water, dirt or
sand. Protect the parts using a cover
such as a clean cloth, etc.
FOUR-WHEEL DRIVE (4WD)
MANUAL SHIFTING (4WD models)
Page 435 of 603
OPERATING PROCEDURE
Place the ignition switch in the OFF
position and apply the parking brake. Let
the vehicle cool down before performing
the following procedure.
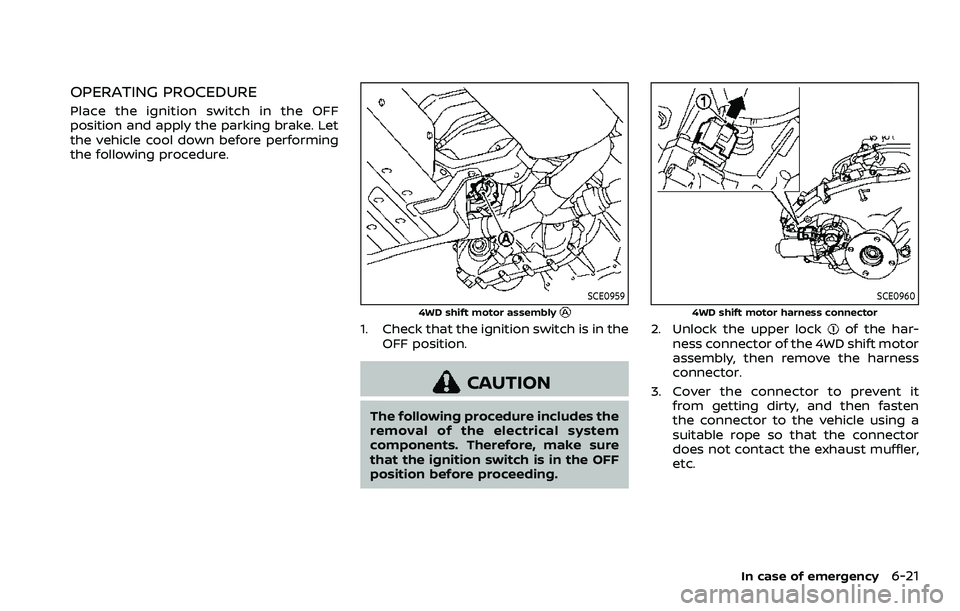
SCE0959
4WD shift motor assembly
1. Check that the ignition switch is in theOFF position.
CAUTION
The following procedure includes the
removal of the electrical system
components. Therefore, make sure
that the ignition switch is in the OFF
position before proceeding.
SCE0960
4WD shift motor harness connector
2. Unlock the upper lockof the har-
ness connector of the 4WD shift motor
assembly, then remove the harness
connector.
3. Cover the connector to prevent it from getting dirty, and then fasten
the connector to the vehicle using a
suitable rope so that the connector
does not contact the exhaust muffler,
etc.
In case of emergency6-21
Page 446 of 603
7-8Appearance and care
Temperature
A temperature increase will accelerate
the rate of corrosion to those parts which
are not well ventilated.
Air pollution
Industrial pollution, the presence of salt in
the air in coastal areas, or heavy road salt
use will accelerate the corrosion process.
Road salt will also accelerate the disin-
tegration of paint surfaces.
TO PROTECT YOUR VEHICLE FROM
CORROSION
.Wash and wax your vehicle often to
keep the vehicle clean.
. Always check for minor damage to the
paint and repair it as soon as possible.
. Keep drain holes at the bottom of the
doors open to avoid water accumula-
tion.
. Check the underbody for accumula-
tion of sand, dirt or salt. If present,
wash with water as soon as possible.
CAUTION
.NEVER remove dirt, sand or other
debris from the passenger com-
partment by washing it out with a
hose. Remove dirt with a vacuum cleaner.
. Never allow water or other liquids
to come in contact with electronic
components inside the vehicle as
this may damage them.
Chemicals used for road surface deicing
are extremely corrosive. They accelerate
corrosion and deterioration of underbody
components such as the exhaust system,
fuel and brake lines, brake cables, floor
pan and fenders.
In winter, the underbody must be
cleaned periodically.
For additional protection against rust and
corrosion, which may be required in some
areas, it is recommended you consult a
NISSAN dealer.
Page 447 of 603

8 Do-it-yourself
Maintenance precautions ...................................................... 8-2
Engine compartment check locations ........................ 8-3VK56VD engine ....................................................................... 8-3
Engine cooling system ............................................................. 8-4 Checking engine coolant level .................................... 8-5
Changing engine coolant ................................................ 8-5
Engine oil ........................................................................\
..................... 8-6 Checking engine oil level ................................................. 8-6
Changing engine oil and filter ..................................... 8-6
Automatic Transmission Fluid (ATF) ............................. 8-8
Power steering fluid ................................................................... 8-8
Brake fluid ........................................................................\
.................. 8-9
Window washer fluid .............................................................. 8-10
Battery ........................................................................\
........................ 8-11 Jump starting ........................................................................\
. 8-13
Variable voltage control system ................................... 8-13
Drive belts ........................................................................\
................ 8-13
Spark plugs ........................................................................\
............. 8-14 Replacing spark plugs ..................................................... 8-14
Air cleaner ........................................................................\
............... 8-15 Windshield wiper blades ..................................................... 8-16
Cleaning ........................................................................\
........... 8-16
Replacing ........................................................................\
........ 8-16
Rear window wiper blades ............................................... 8-17
Brakes ........................................................................\
........................ 8-17 Self-adjusting brakes ..................................................... 8-17
Brake pad wear warning ............................................ 8-17
Brake booster ...................................................................... 8-17
Fuses ........................................................................\
........................... 8-18 Engine compartment .................................................... 8-18
Passenger compartment ........................................... 8-20
Intelligent Key battery replacement .......................... 8-21
Lights ........................................................................\
.......................... 8-24
Headlights ........................................................................\
...... 8-26
Exterior and interior lights ........................................ 8-26
Wheels and tires ........................................................................\
8-28
Tire pressure ........................................................................\
8-28
Tire labeling ........................................................................\
.. 8-32
Types of tires ....................................................................... 8-34
Tire chains ........................................................................\
...... 8-35
Changing wheels and tires ...................................... 8-36