2021 NISSAN ARMADA belt
[x] Cancel search: beltPage 102 of 603

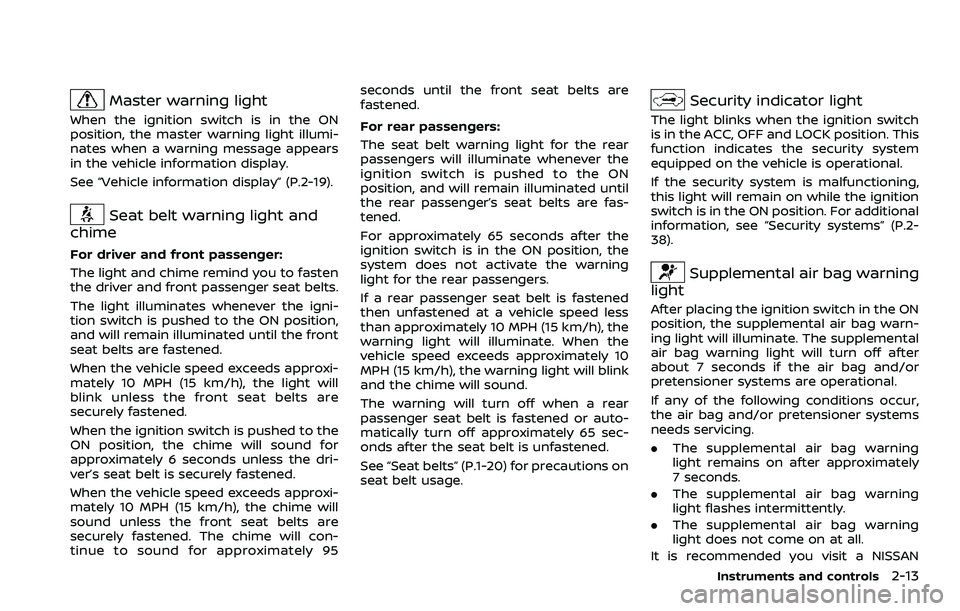
2-10Instruments and controls
Warning/indicator lights (red)Warning/indicator lights (yellow) Warning/indicator lights (other)
Automatic Transmission (AT) oil tem-
perature warning lightAnti-lock Braking System (ABS) warn-
ing lightExterior light indicator
Automatic Transmission (AT) park
warning lightAutomatic Emergency Braking (AEB)
system warning lightFront fog light indicator light (if so
equipped)
Brake warning light
Automatic transmission check warn-
ing lightHigh beam assist indicator light
Check suspension indicator lightHigh beam indicator light
Charge warning lightFront passenger air bag status lightTOW mode indicator light
Engine oil pressure warning lightFour-Wheel Drive (4WD) warning light
(4WD models)Turn signal/hazard indicator lights
Master warning lightLow tire pressure warning light
Seat belt warning lightMalfunction Indicator Light (MIL)
Security indicator lightMaster warning light
Supplemental air bag warning lightRear Automatic Braking (RAB) system
warning light
Vehicle Dynamic Control (VDC) off
indicator light
Vehicle Dynamic Control (VDC) warn-
ing light
WARNING LIGHTS, INDICATOR
LIGHTS AND AUDIBLE REMINDERS
Page 103 of 603

CHECKING LIGHTS
With all doors closed, apply the parking
brake, fasten the seat belts and place the
ignition switch in the ON position without
starting the engine. The following lights (if
so equipped) will come on:
,or,,,,,
The following lights (if so equipped) will
come on briefly and then go off:
,or,,,,,
If any light does not come on or operates
in a way other than described, it may
indicate a burned-out bulb and/or a
system malfunction. It is recommended
you have the system checked by a
NISSAN dealer.
Some indicators and warnings are also
displayed on the vehicle information dis-
play between the speedometer and tach-
ometer. (See “Vehicle information display”
(P.2-19).)
WARNING/INDICATOR LIGHTS (red)
Automatic Transmission (AT)
oil temperature warning light
This light illuminates when the Automatic
Transmission (AT) oil temperature is too
high. If the light illuminates while driving,
reduce the vehicle speed as soon as
safely possible until the light turns off.
CAUTION
Continued vehicle operation when
the AT oil temperature warning light
is on may damage the AT.
Automatic Transmission (AT)
park warning light (4WD models)
This light indicates that the Automatic
Transmission (AT) parking function is not
engaged. If the transfer control is not
secured in any driving position while the
AT shift lever is in the “P” (Park) position,
the transmission will disengage and the
wheels will not lock.
If the AT park warning light illuminates
with the shift lever in the P (Park)
position, shift the Four-Wheel Drive
(4WD) shift switch to the AUTO, 4H or 4L position again with the shift lever in
the N (Neutral) position.
(See “NISSAN all-
mode 4WD®” (P.5-124).)
orBrake warning light
This light functions for both the parking
brake and the foot brake systems.
Parking brake indicator:
When the ignition switch is in the ON
position, the light comes on when the
parking brake is applied.
Low brake fluid warning light:
When the ignition switch is in the ON
position, the light warns of a low brake
fluid level. If the light comes on while the
engine is running with the parking brake
not applied, stop the vehicle and perform
the following:
1. Check the brake fluid level. If brake fluid is low, add fluid and have the
system checked. It is recommended
you have this service performed by a
NISSAN dealer. (See “Brake fluid” (P.8-
9).)
2. If the brake fluid level is correct, have the warning system checked. It is
recommended you have this service
performed by a NISSAN dealer.
Instruments and controls2-11
Page 104 of 603

2-12Instruments and controls
Low hydraulic pressure warning indica-
tor:
If the brake warning light illuminates
when the engine is running, or while
driving with the parking brake is released,
check the brake fluid level. If the brake
fluid level is sufficient, it may indicate low
hydraulic pressure in the brake booster. It
is recommended that you have the brake
system checked by a NISSAN dealer
promptly.
Anti-lock Braking System (ABS) warning
indicator:
When the parking brake is released and
the brake fluid level is sufficient, if both
the brake warning light and the Anti-lock
Braking System (ABS) warning light illu-
minate, it may indicate the ABS is not
functioning properly. Have the brake
system checked, and if necessary re-
paired. It is recommended you visit a
NISSAN dealer for this service. (See “Anti-
lock Braking System (ABS) warning light”
(P.2-14).)
WARNING
.Your brake system may not be
working properly if the warning
light is on. Driving could be dan-
gerous. If you judge it to be safe, drive carefully to the nearest
service station for repairs. Other-
wise, have your vehicle towed
because driving it could be dan-
gerous.
. Pressing the brake pedal with the
engine stopped and/or low brake
fluid level may increase your
stopping distance and braking
will require greater pedal effort
as well as pedal travel.
. If the brake fluid level is below the
minimum or MIN mark on the
brake fluid reservoir, do not drive
until the brake system has been
checked. It is recommended you
visit a NISSAN dealer for this
service.
Charge warning light
If the light comes on while the engine is
running, it may indicate the charging
system is not functioning properly. Turn
the engine off and check the alternator
belt. If the belt is loose, broken, missing or
if the light remains on, have your vehicle
serviced immediately. It is recommended
you visit a NISSAN dealer for this service.
CAUTION
Do not continue driving if the alter-
nator belt is loose, broken or miss-
ing.
Engine oil pressure warning
light
This light warns of low engine oil pres-
sure. If the light flickers or comes on
during normal driving, pull off the road in
a safe area, stop the engine immediately
and call a NISSAN dealer or other author-
ized repair shop.
The engine oil pressure warning light is
not designed to indicate a low oil level.
Use the dipstick to check the oil level.
(See “Engine oil” (P.8-6).)
CAUTION
Running the engine with the engine
oil pressure warning light on could
cause serious damage to the engine
almost immediately. Such damage is
not covered by warranty. Turn off the
engine as soon as it is safe to do so.
Page 105 of 603

Master warning light
When the ignition switch is in the ON
position, the master warning light illumi-
nates when a warning message appears
in the vehicle information display.
See “Vehicle information display” (P.2-19).
Seat belt warning light and
chime
For driver and front passenger:
The light and chime remind you to fasten
the driver and front passenger seat belts.
The light illuminates whenever the igni-
tion switch is pushed to the ON position,
and will remain illuminated until the front
seat belts are fastened.
When the vehicle speed exceeds approxi-
mately 10 MPH (15 km/h), the light will
blink unless the front seat belts are
securely fastened.
When the ignition switch is pushed to the
ON position, the chime will sound for
approximately 6 seconds unless the dri-
ver’s seat belt is securely fastened.
When the vehicle speed exceeds approxi-
mately 10 MPH (15 km/h), the chime will
sound unless the front seat belts are
securely fastened. The chime will con-
tinue to sound for approximately 95 seconds until the front seat belts are
fastened.
For rear passengers:
The seat belt warning light for the rear
passengers will illuminate whenever the
ignition switch is pushed to the ON
position, and will remain illuminated until
the rear passenger’s seat belts are fas-
tened.
For approximately 65 seconds after the
ignition switch is in the ON position, the
system does not activate the warning
light for the rear passengers.
If a rear passenger seat belt is fastened
then unfastened at a vehicle speed less
than approximately 10 MPH (15 km/h), the
warning light will illuminate. When the
vehicle speed exceeds approximately 10
MPH (15 km/h), the warning light will blink
and the chime will sound.
The warning will turn off when a rear
passenger seat belt is fastened or auto-
matically turn off approximately 65 sec-
onds after the seat belt is unfastened.
See “Seat belts” (P.1-20) for precautions on
seat belt usage.
Security indicator light
The light blinks when the ignition switch
is in the ACC, OFF and LOCK position. This
function indicates the security system
equipped on the vehicle is operational.
If the security system is malfunctioning,
this light will remain on while the ignition
switch is in the ON position. For additional
information, see “Security systems” (P.2-
38).
Supplemental air bag warning
light
After placing the ignition switch in the ON
position, the supplemental air bag warn-
ing light will illuminate. The supplemental
air bag warning light will turn off after
about 7 seconds if the air bag and/or
pretensioner systems are operational.
If any of the following conditions occur,
the air bag and/or pretensioner systems
needs servicing.
. The supplemental air bag warning
light remains on after approximately
7 seconds.
. The supplemental air bag warning
light flashes intermittently.
. The supplemental air bag warning
light does not come on at all.
It is recommended you visit a NISSAN
Instruments and controls2-13
Page 126 of 603

2-34Instruments and controls
able Alert” turns off the Rear Door
Alert system for the remainder of a
trip and no audible alert will be
provided.
NOTE:
This system is disabled until the driver
enables it using the settings menu. See
“Vehicle settings” (P.2-23).
43. Check Rear Seat for all articles
When the rear door alert system is
enabled, this message appears when the
vehicle comes to a complete stop, the
shift lever is moved from the D (Drive) or R
(Reverse) position to P (Park) position, and
the driver exits the vehicle. This message
alerts the driver, after a period of time, to
check for items in the rear seat after the
audible alert has been provided.
NOTE:
This rear door alert system is disabled
until a driver enables it using the rear
door alert switch.
For more details, see “Rear door alert”
(P.2-58).
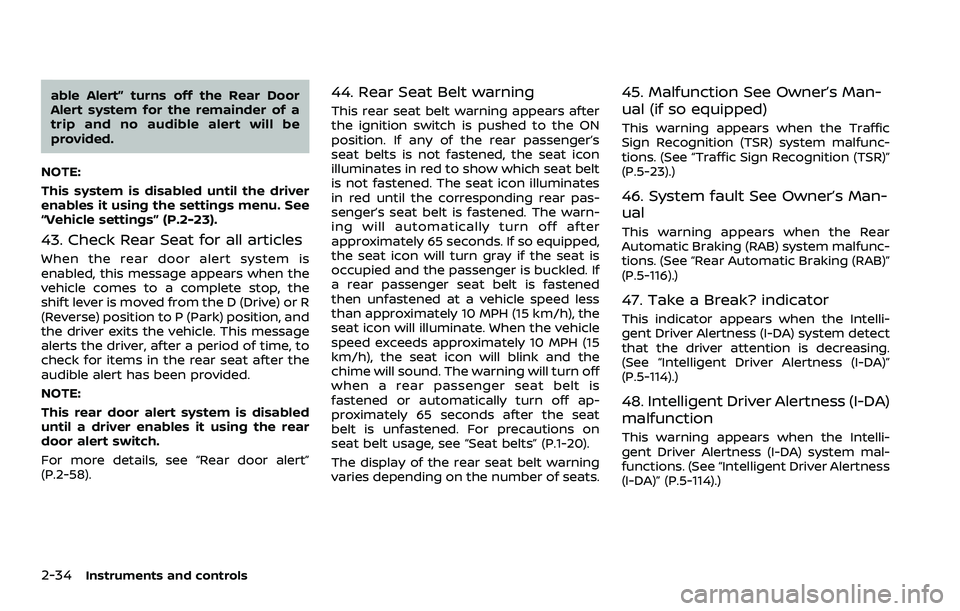
44. Rear Seat Belt warning
This rear seat belt warning appears after
the ignition switch is pushed to the ON
position. If any of the rear passenger’s
seat belts is not fastened, the seat icon
illuminates in red to show which seat belt
is not fastened. The seat icon illuminates
in red until the corresponding rear pas-
senger’s seat belt is fastened. The warn-
ing will automatically turn off after
approximately 65 seconds. If so equipped,
the seat icon will turn gray if the seat is
occupied and the passenger is buckled. If
a rear passenger seat belt is fastened
then unfastened at a vehicle speed less
than approximately 10 MPH (15 km/h), the
seat icon will illuminate. When the vehicle
speed exceeds approximately 10 MPH (15
km/h), the seat icon will blink and the
chime will sound. The warning will turn off
when a rear passenger seat belt is
fastened or automatically turn off ap-
proximately 65 seconds after the seat
belt is unfastened. For precautions on
seat belt usage, see “Seat belts” (P.1-20).
The display of the rear seat belt warning
varies depending on the number of seats.
45. Malfunction See Owner’s Man-
ual (if so equipped)
This warning appears when the Traffic
Sign Recognition (TSR) system malfunc-
tions. (See “Traffic Sign Recognition (TSR)”
(P.5-23).)
46. System fault See Owner’s Man-
ual
This warning appears when the Rear
Automatic Braking (RAB) system malfunc-
tions. (See “Rear Automatic Braking (RAB)”
(P.5-116).)
47. Take a Break? indicator
This indicator appears when the Intelli-
gent Driver Alertness (I-DA) system detect
that the driver attention is decreasing.
(See “Intelligent Driver Alertness (I-DA)”
(P.5-114).)
48. Intelligent Driver Alertness (I-DA)
malfunction
This warning appears when the Intelli-
gent Driver Alertness (I-DA) system mal-
functions. (See “Intelligent Driver Alertness
(I-DA)” (P.5-114).)
Page 163 of 603

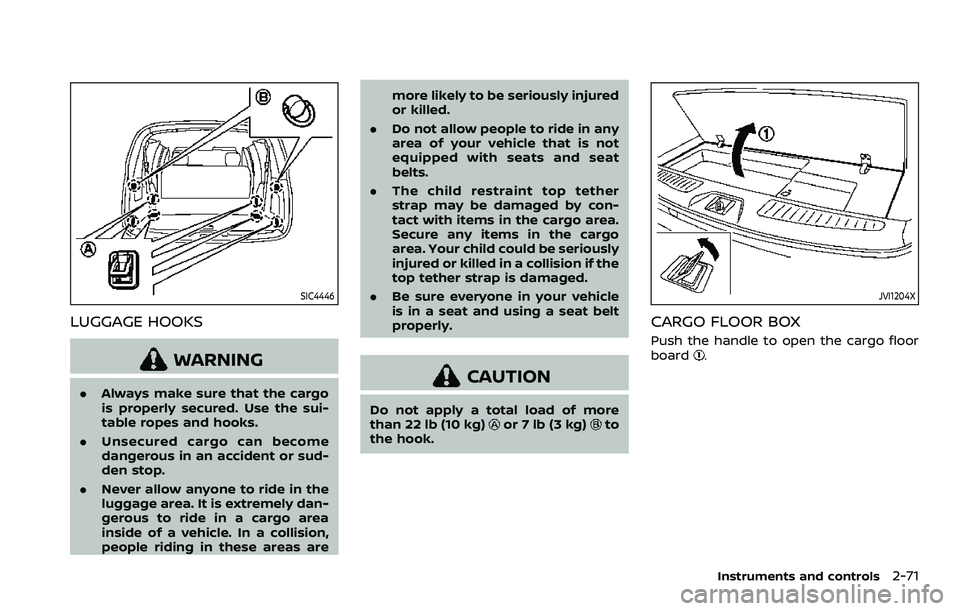
SIC4446
LUGGAGE HOOKS
WARNING
.Always make sure that the cargo
is properly secured. Use the sui-
table ropes and hooks.
. Unsecured cargo can become
dangerous in an accident or sud-
den stop.
. Never allow anyone to ride in the
luggage area. It is extremely dan-
gerous to ride in a cargo area
inside of a vehicle. In a collision,
people riding in these areas are more likely to be seriously injured
or killed.
. Do not allow people to ride in any
area of your vehicle that is not
equipped with seats and seat
belts.
. The child restraint top tether
strap may be damaged by con-
tact with items in the cargo area.
Secure any items in the cargo
area. Your child could be seriously
injured or killed in a collision if the
top tether strap is damaged.
. Be sure everyone in your vehicle
is in a seat and using a seat belt
properly.CAUTION
Do not apply a total load of more
than 22 lb (10 kg)or 7 lb (3 kg)to
the hook.
JVI1204X
CARGO FLOOR BOX
Push the handle to open the cargo floor
board.
Instruments and controls2-71
Page 168 of 603

2-76Instruments and controls
WARNING
.In an accident you could be
thrown from the vehicle through
an open moonroof. Always use
seat belts and child restraints.
. Do not allow anyone to stand up
or extend any portion of their
body out of the moonroof open-
ing while the vehicle is in motion
or while the moonroof is closing.
CAUTION
.Remove water drops, snow, ice or
sand from the moonroof before
opening.
. Do not place any heavy object on
the moonroof or surrounding
area.
POWER MOONROOF
The moonroof only operates when the
ignition switch is in the ON position.
The moonroof is operational for about 45
seconds, even if the ignition switch is
pushed to the OFF position. If the driver’s
door or the passenger’s door is opened during this period of about 45 seconds,
power to the moonroof is canceled.
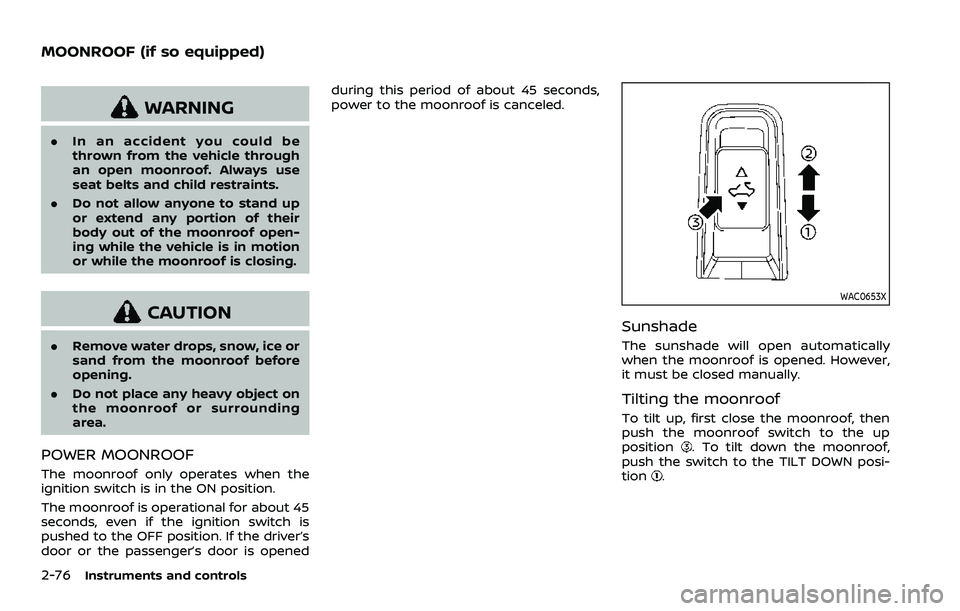
WAC0653X
Sunshade
The sunshade will open automatically
when the moonroof is opened. However,
it must be closed manually.
Tilting the moonroof
To tilt up, first close the moonroof, then
push the moonroof switch to the up
position
. To tilt down the moonroof,
push the switch to the TILT DOWN posi-
tion
.
MOONROOF (if so equipped)
Page 186 of 603

3-4Pre-driving checks and adjustments
CAUTION
Always carry the mechanical key
installed in the Intelligent Key.
VALET HAND-OFF
When you have to leave a key with a valet,
give them the Intelligent Key itself and
keep the mechanical key with you to
protect your belongings.
To prevent the glove box from being
opened during valet hand-off, follow the
procedures below.
1. Remove the mechanical key from theIntelligent Key.
2. Lock the glove box with the mechan- ical key.
3. Hand the Intelligent Key to the valet, keeping the mechanical key in your
pocket or bag for insertion into the
Intelligent Key when you retrieve your
vehicle.
See “Storage” (P.2-66).
WARNING
. Always have the doors locked
while driving. Along with the use
of seat belts, this provides great-
er safety in the event of an
accident by helping to prevent
persons from being thrown from
the vehicle. This also helps keep
children and others from unin-
tentionally opening the doors,
and will help keep out intruders.
. Before opening any door, always
look for and avoid oncoming
traffic.
. To help avoid risk of injury or
death through unintended opera-
tion of the vehicle and or its
systems, including entrapment
in windows or inadvertent door
lock activation, do not leave chil-
dren, people who require the
assistance of others or pets un-
attended in your vehicle. Addi-
tionally, the temperature inside a
closed vehicle on a warm day can
quickly become high enough to
cause a significant risk of injury
or death to people and pets.
SPA2457B
LOCKING WITH MECHANICAL KEY
The power door lock system allows you to
lock or unlock all doors simultaneously
using the mechanical key.
.Turning the driver’s door key cylinder
to the front of the vehicle
will lock all
doors.
. Turning the driver’s door key cylinder
once to the rear of the vehicle
will
unlock the driver’s door. After return-
ing the key to the neutral position
,
turning it to the rear again within 5
seconds will unlock all doors.
. You can switch the lock system to the
mode that allows you to open all the
doors when the key is turned once.
DOORS