Page 27 of 559

WARNING
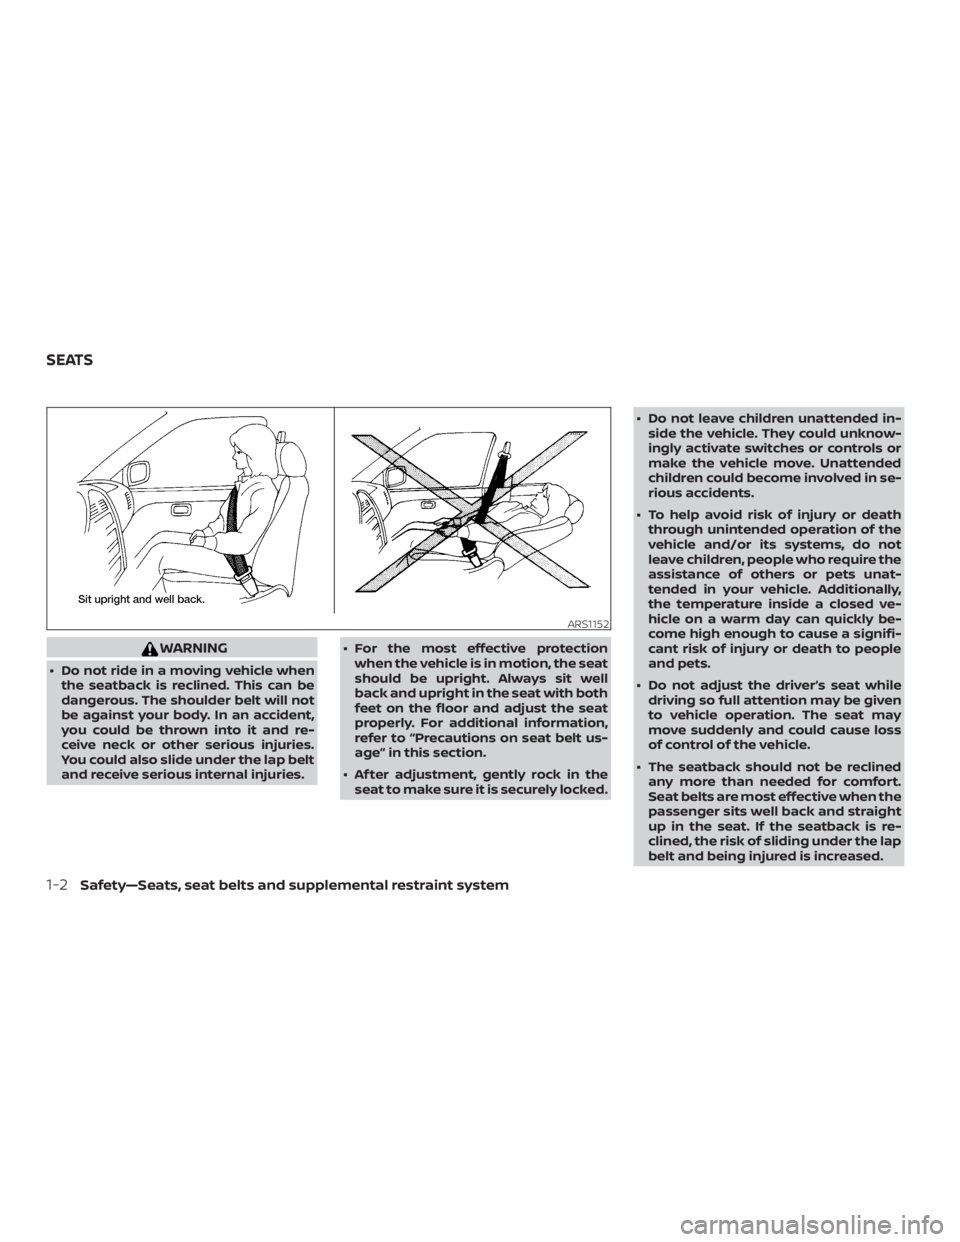
∙ Do not ride in a moving vehicle whenthe seatback is reclined. This can be
dangerous. The shoulder belt will not
be against your body. In an accident,
you could be thrown into it and re-
ceive neck or other serious injuries.
You could also slide under the lap belt
and receive serious internal injuries. ∙ For the most effective protection
when the vehicle is in motion, the seat
should be upright. Always sit well
back and upright in the seat with both
feet on the floor and adjust the seat
properly. For additional information,
refer to “Precautions on seat belt us-
age” in this section.
∙ Af ter adjustment, gently rock in the seat to make sure it is securely locked. ∙ Do not leave children unattended in-
side the vehicle. They could unknow-
ingly activate switches or controls or
make the vehicle move. Unattended
children could become involved in se-
rious accidents.
∙ To help avoid risk of injury or death through unintended operation of the
vehicle and/or its systems, do not
leave children, people who require the
assistance of others or pets unat-
tended in your vehicle. Additionally,
the temperature inside a closed ve-
hicle on a warm day can quickly be-
come high enough to cause a signifi-
cant risk of injury or death to people
and pets.
∙ Do not adjust the driver’s seat while driving so full attention may be given
to vehicle operation. The seat may
move suddenly and could cause loss
of control of the vehicle.
∙ The seatback should not be reclined any more than needed for comfort.
Seat belts are most effective when the
passenger sits well back and straight
up in the seat. If the seatback is re-
clined, the risk of sliding under the lap
belt and being injured is increased.
Page 40 of 559

∙ The front passenger’s seat belt is notfastened and the seat is occupied by a
passenger for 7 seconds af ter the igni-
tion switch is placed in the ON position.
∙ The front passenger’s seat belt is not fastened and objects or external force
on the passenger seat change the seat
belt reminder classification to Occu-
pied.
The seat belt warning light will flash under
the conditions shown above until the nec-
essary seat belt is securely fastened.
A warning chime will sound for approxi-
mately 90 seconds or until one of the fol-
lowing conditions is met: ∙ The unbuckled front occupant’s seat belt is securely fastened.
∙ The seat belt reminder function in the front passenger seat no longer detects
that the front passenger seat is occu-
pied.
∙ The ignition is turned off or the vehicle is placed in P (Park). The below situations could result in the
seat belt reminder light being illuminated
and the chime sounding, even with no oc-
cupant present in the passenger seat:
∙ Heavy objects placed on the seat.
∙ Someone pushing or pulling on the front passenger seat.
∙ An object placed under the front pas- senger seat.
∙ An object placed between the seat cushion and center console or between
the seat cushion and the door.
∙ An object hanging on the seat or placed in the seatback pocket.
∙ A child restraint or other object pressing against the rear of the seatback.
PREGNANT WOMEN
NISSAN recommends that pregnant
women use seat belts. The seat belt should
be worn snug and always position the lap
belt as low as possible around the hips, not
the waist. Place the shoulder belt over your
shoulder and across your chest. Never run
the lap/shoulder belt over your abdominal
area. Contact your doctor for specific rec-
ommendations.
INJURED PERSONS
NISSAN recommends that injured persons
use seat belts. Check with your doctor for
specific recommendations.
THREE-POINT TYPE SEAT BELT
WITH RETRACTOR
Page 45 of 559
WARNING
∙ Af ter adjustment, release the adjust-ment button and try to move the
shoulder belt anchor up and down to
make sure it is securely fixed in
position.
∙ The shoulder belt anchor height should be adjusted to the position
best for you. Failure to do so may re-
duce the effectiveness of the entire
restraint system and increase the
chance or severity of injury in an
accident.
SEAT BELT EXTENDERS
If, because of body size or driving position, it
is not possible to properly fit the
lap/shoulder belt and fasten it, an extender
that is compatible with the installed seat
belts is available for purchase. The ex-
tender adds approximately 8 in (200 mm)
of length and may be used for either the
driver or front passenger seating position.
It is recommended that you visit a NISSAN
dealer for assistance with purchasing an
extender if an extender is required.
Page 50 of 559
∙ When the child restraint is not in use,keep it secured with the LATCH system
or a seat belt. In a sudden stop or col-
lision, loose objects can injure occu-
pants or damage the vehicle.
Page 51 of 559
LATCH (Lower Anchors and
Tethers for CHildren) SYSTEM
Your vehicle is equipped with special an-
chor points that are used with LATCH sys-
tem compatible child restraints. This sys-
tem may also be referred to as the ISOFIX
or ISOFIX compatible system. With this sys-
tem, you do not have to use a vehicle seat
belt to secure the child restraint unless the
combined weight of the child and child re-
straint exceeds 65 lbs. (29.5 kg). If the com-
bined weight of the child and child restraint
is greater than 65 lbs. (29.5 kg), use the ve-
hicle’s seat belt (not the lower anchors) toinstall the child restraint. Be sure to follow
the child restraint manufacturer’s instruc-
tions for installation.
The LATCH anchor points are provided to
install child restraints in the rear outboard
seating positions only. Do not attempt to
install a child restraint in the center position
using the LATCH anchors.
LATCH lower anchor
Page 56 of 559
the vehicle seat belt (if applicable). Not
all child restraints fit in all types of ve-
hicles.
7. Check to make sure the child restraint is properly secured prior to each use. If
the child restraint is loose, repeat
steps 2 through 6.
8. Type A (if so equipped):
If you remove the child restraint, rein-
stall the plastic LATCH anchor covers
af ter use by pushing the covers
straight onto the LATCH anchors.
Type B (if so equipped):
If you remove the child restraint, se-
curely replace the flap by pressing the
material firmly against the seat.REAR-FACING CHILD RESTRAINT
INSTALLATION USING THE SEAT
BELTS
Page 62 of 559
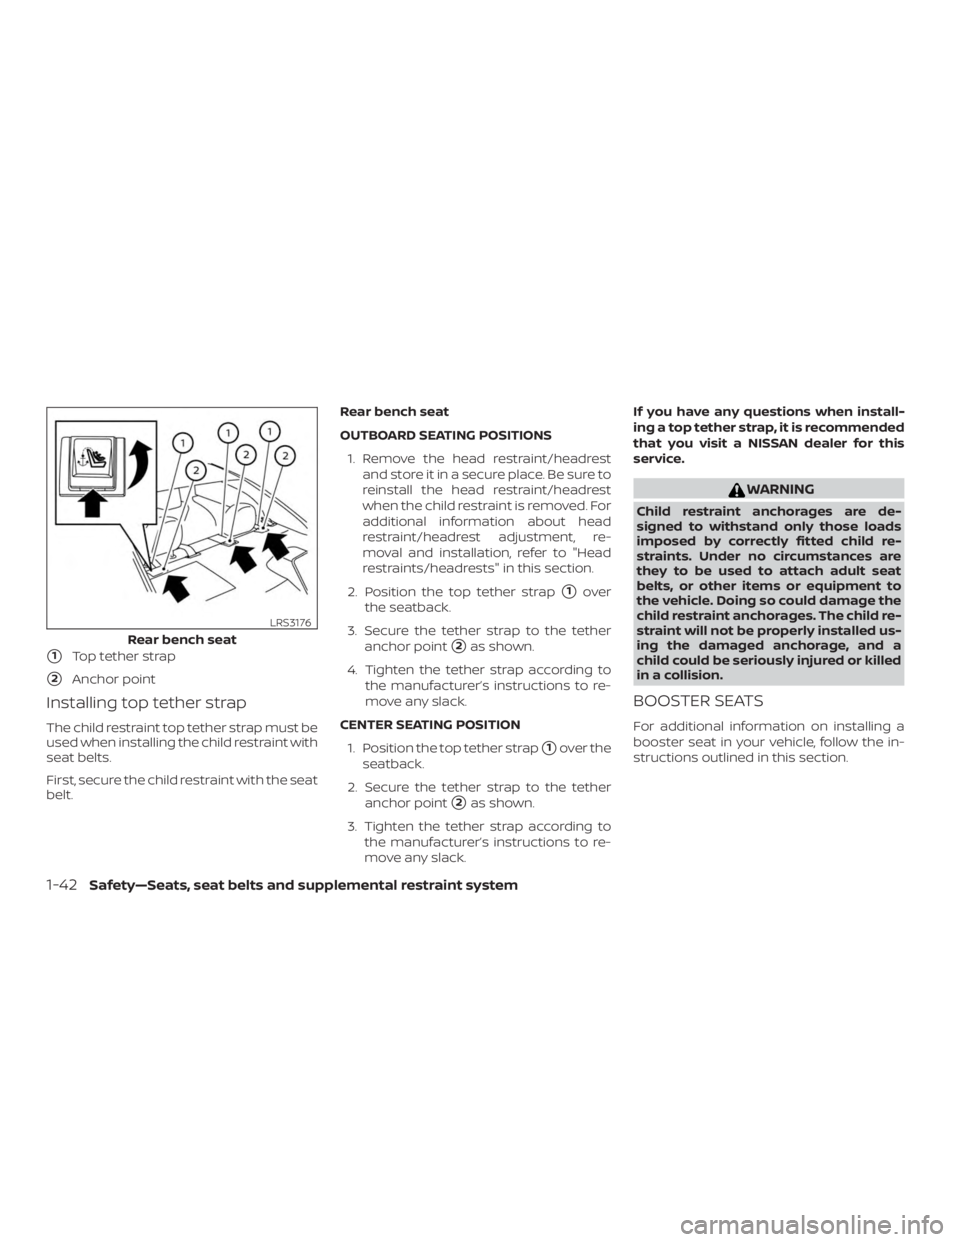
�1Top tether strap
�2Anchor point
Installing top tether strap
The child restraint top tether strap must be
used when installing the child restraint with
the LATCH lower anchor attachments.
First, secure the child restraint with the
LATCH lower anchors (rear outboard posi-
tions only).Rear bench seat
OUTBOARD SEATING POSITIONS
1. Remove the head restraint/headrest and store it in a secure place. Be sure to
reinstall the head restraint/headrest
when the child restraint is removed. For
additional information about head
restraint/headrest adjustment, re-
moval and installation, refer to "Head
restraints/headrests" in this section.
2. Position the top tether strap
�1over
the seatback.
3. Secure the tether strap to the tether anchor point
�2as shown.
4. Tighten the tether strap according to the manufacturer’s instructions to re-
move any slack.
If you have any questions when install-
ing a top tether strap, it is recommended
that you visit a NISSAN dealer for this
service.
Page 67 of 559

�1Top tether strap
�2Anchor point
Installing top tether strap
The child restraint top tether strap must be
used when installing the child restraint with
seat belts.
First, secure the child restraint with the seat
belt.Rear bench seat
OUTBOARD SEATING POSITIONS
1. Remove the head restraint/headrest and store it in a secure place. Be sure to
reinstall the head restraint/headrest
when the child restraint is removed. For
additional information about head
restraint/headrest adjustment, re-
moval and installation, refer to "Head
restraints/headrests" in this section.
2. Position the top tether strap
�1over
the seatback.
3. Secure the tether strap to the tether anchor point
�2as shown.
4. Tighten the tether strap according to the manufacturer’s instructions to re-
move any slack.
CENTER SEATING POSITION 1. Position the top tether strap
�1over the
seatback.
2. Secure the tether strap to the tether anchor point
�2as shown.
3. Tighten the tether strap according to the manufacturer’s instructions to re-
move any slack. If you have any questions when install-
ing a top tether strap, it is recommended
that you visit a NISSAN dealer for this
service.