2021 MERCEDES-BENZ GLE COUPE light
[x] Cancel search: lightPage 148 of 525
Re
moving the wiper blades #
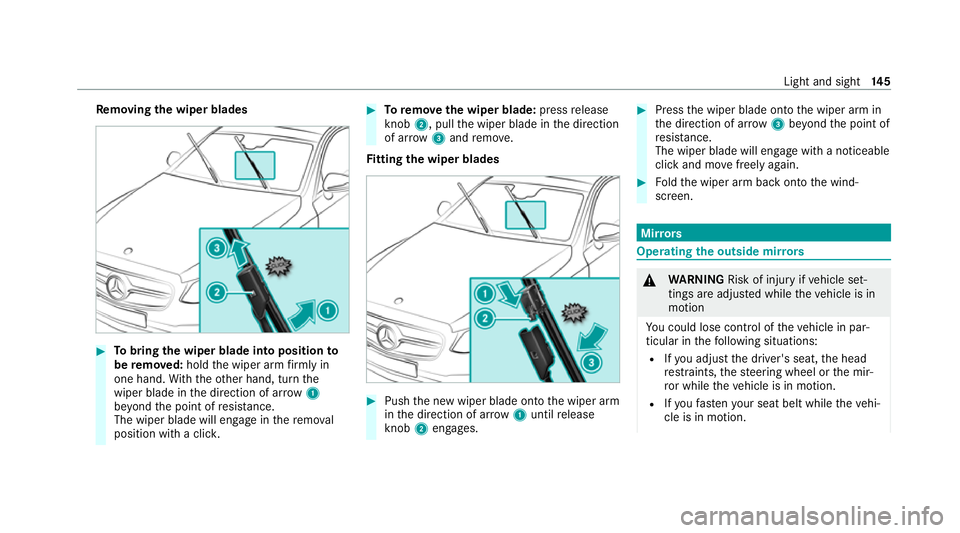
Tobring the wiper blade into position to
be remo ved: hold the wiper arm firm ly in
one hand. With th eot her hand, turn the
wiper blade in the direction of ar row1
be yond the point of resis tance.
The wiper blade will engage in there mo val
position with a clic k. #
Toremo vethe wiper blade: pressrelease
knob 2, pull the wiper blade in the direction
of ar row3and remo ve.
Fi tting the wiper blades #
Push the new wiper blade onto the wiper arm
in the direction of ar row1until release
knob 2engages. #
Press the wiper blade onto the wiper arm in
th e direction of ar row3beyond the point of
re sis tance.
The wiper blade will engage wi tha noticeable
click and mo vefreely again. #
Foldthe wiper arm back onto the wind‐
screen. Mir
rors Operating
the outside mir rors &
WARNING Risk of injury ifve hicle set‐
tings are adjus ted while theve hicle is in
motion
Yo u could lose cont rol of theve hicle in par‐
ticular in thefo llowing situations:
R Ifyo u adjust the driver's seat, the head
re stra ints, thesteering wheel or the mir‐
ro r while theve hicle is in motion.
R Ifyo ufast enyour seat belt while theve hi‐
cle is in motion. Light and sight
14 5
Page 149 of 525
#
Before starting the engine: adjust the
driver's seat, head restra ints, steering
wheel and mir ror in particular and fas‐
te nyo ur seat belt. &
WARNING Risk of accident due tomis‐
judgement of dis tance when using the
outside mir ror
The outside mir rors reflect objects on a
smaller scale. The objects in view are in fact
closer than they appear. #
Therefore, alw ays look over your shoul‐
der in order toensure that you are
aw are of the actual dis tance between
yo u and thero ad users driving behind
yo u. Fo
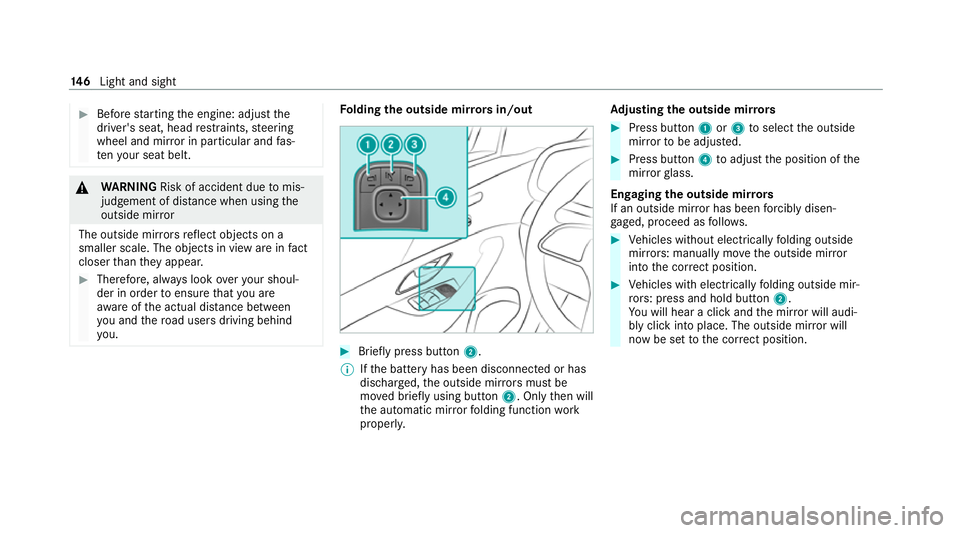
lding the outside mir rors in/out #
Brief lypress button 2.
% Ifth e battery has been disconnected or has
dischar ged, the outside mir rors must be
mo ved briefly using button 2. Onlythen will
th e automatic mir rorfo lding function work
proper ly. Ad
justing the outside mir rors #
Press button 1or3 toselect the outside
mir rorto be adjus ted. #
Press button 4toadjust the position of the
mir rorgl ass.
Engaging the outside mir rors
If an outside mir ror has been forc ibly disen‐
ga ge d, proceed as follo ws. #
Vehicles without electrically folding outside
mir rors: manually mo vethe outside mir ror
into the cor rect position. #
Vehicles with electrically folding outside mir‐
ro rs: press and hold button 2.
Yo u will hear a click and the mir ror will audi‐
bly click into place. The outside mir ror will
now be set tothe cor rect position. 14 6
Light and sight
Page 150 of 525
Au
tomatic anti-dazzle mir rors function &
WARNING Risk of acid burn s and poi‐
soning due tothe anti-dazzle mir ror elec‐
trolyte
Electrolyte may escape if theglass in an
automatic anti-dazzle mir ror breaks.
The electrolyte is hazardous tohealth and
causes ir rita tion. It mu stnot come into con‐
ta ct with your skin, eyes,respiratory or gans
or clo thing or be swallo wed. #
Ifyo u come into contact with electro‐
ly te , obser vethefo llowing:
R Immediately rinse the electrolyte
from your skin with water and seek
medical attention.
R If electrolyte comes into contact
with your eyes, immediately rinse
th em thoroughly with clean water
and seek medical attention.
R Ifth e electrolyte is swallo wed,
immediately rinse your mouth out
th oroughl y.Do not induce vomiting.
Seek medical attention immediately. R
Immedia tely ch ange out of clo thing
which has been con taminated with
electrolyte.
R If an allergic reaction occurs, seek
medical attention immediatel y. The inside
rear-view mir ror and the outside mir‐
ro r on the driver's side will automatically go into
anti-dazzle mode if light from a headlamp hits
th e sensor on the inside rear-view mir ror.
Sy stem limits
The sy stem will not go into anti-dazzle mode if:
R The engine is switched off.
R Reversege ar is engaged.
R The interior lighting is swit ched on. Fr
ont-passenger outside mir ror parking posi‐
tion function %
The pa rking position is available on ly invehi‐
cles with a memory function.
The parking position makes parking easier. In
thefo llowing situations, the front-passen ger
outside mir ror will swive l downwards in the
direction of there ar wheel on the front passeng‐
er's side:
R the parking position is stored (/ page148)
R The front-passenger mir ror is selected
R Reversege ar is engaged.
The front-passenger outside mir ror will mo ve
back toits original position in thefo llowing sit‐
uations:
R You shift the transmission toano ther trans‐
mission position
R You are tra velling at speeds greaterth an
15 km/h
R You press the button forth e outside mir ror
on the driver's side Light and sight
147
Page 151 of 525
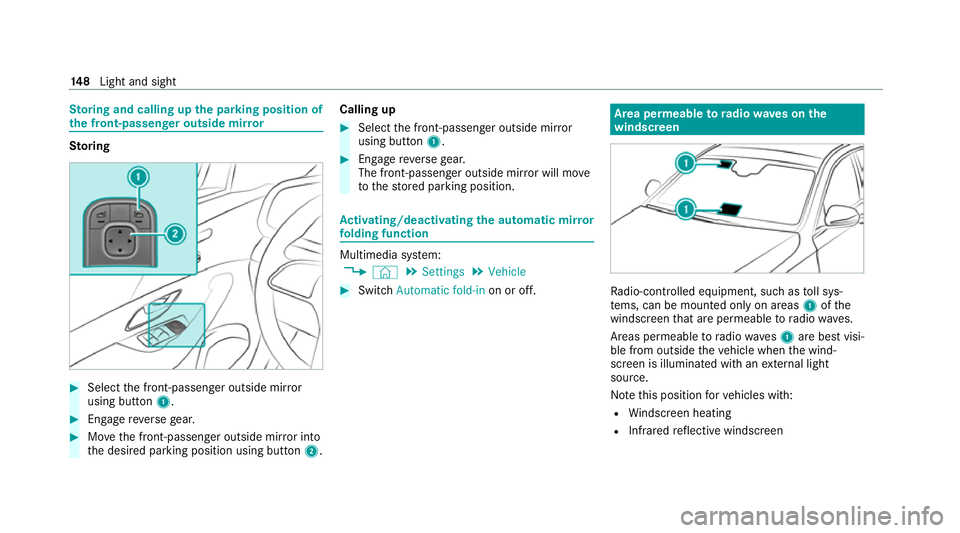
St
oring and calling up the pa rking position of
th e front-passenger outside mir rorSto
ring #
Select the front-passen ger outside mir ror
using but ton1. #
Engage reve rsege ar. #
Movethe front-passen ger outside mir ror into
th e desired parking position using button 2.Calling up #
Select the front-passen ger outside mir ror
using but ton1. #
Engage reve rsege ar.
The front-passenger outside mir ror will mo ve
to thestored parking position. Ac
tivating/deactivating the automatic mir ror
fo lding function Multimedia sy
stem:
4 © 5
Settings 5
Vehicle #
Switch Automatic fold-in on or off. Area permeable
to radiowav es on the
windscreen Ra
dio-contro lled equipment, such as toll sys‐
te ms, can be mounted only on areas 1ofthe
windscreen that are permeable toradio wav es.
Areas permeable toradio wav es1 are best visi‐
ble from outside theve hicle when the wind‐
screen is illuminated with an extern al light
source.
No tethis position forve hicles with:
R Windsc reen heating
R Infra redre flective windscreen 14 8
Light and sight
Page 152 of 525
Infrared-
reflective windscreen function
The inf rare d-reflective windscreen is coated and
re duces the build-up of heat in theve hicle inte‐
ri or.
The coating shields theve hicle interior from
ra dio waves. Light and sight
14 9
Page 159 of 525
#
Alw ays switch thest ationary heater off
in enclosed spaces without an air
ex traction sy stems, e.g. in garage s. #
Keep theta ilpipe and the area around
th eve hicle free from snow when the
engine or thest ationary heater are run‐
ning. #
Open a window on the windward side of
th eve hicle toensure an adequate sup‐
ply of fresh air. &
WARNING Risk offire due tohot station‐
ary heater components and exhaust
ga ses
Flammable materials such as lea ves, grass or
twigs may ignite. #
When thest ationary heater is swit ched
on, make sure that:
R hot vehicle parts do not come into
contact with flammable materials.
R theex haust gas can flow out of the
st ationary heater exhaust pipe
unhindered. R
theex haust gas does not come into
contact with flammable materials. *
NO
TEBattery discharge caused bysta‐
tionary heater or stationary ventilation
operation Ope
rating thest ationary heater or stationary
ve ntilation drains the batter y. #
After heating or ventilating theve hicle
twice, drive for a longer period of time. Re
quirements:
R The fuel tank is su fficiently full.
% Please no tethat if theta nk fill le vel is too
lo w, it can result in function restrictions dur‐
ing auxiliary heating operation. #
Set the desired temp erature using the0082
button. #
Press the003B button.
The red or blue indicator lamp on the003B
button will light up or go out. Indicator lamp colours:
R Blue: stationary ventilation is switched on.
R Red:thest ationary heater is swit ched on.
R Yello w: the departure time has been prese‐
lected.
The stationary heater/ ventilation will switch off
au tomatically af ter 50 minutes.
Operation using the app: thest ationary
heater/ ventilation can also be operated via the
Mercedes me connect app. You can find fur ther
information in the separate Owner's Manual at
https://moba.i.daimler.com/mar kets/ece-r ow/
baix/cars/connectme/en_GB/#emotions/
St artseite.html.
Setting thest ationary heater/ventilation via
th e multimedia sy stem #
Tocall up the air conditioning menu
(/ page 151). #
Select Auxiliary heating.
Selecting the departure time #
Select the time TIME A: XX, TIME B: XXor
TIME C: XX. 15 6
Climate cont rol
Page 168 of 525
Ensu
rethefo llowing before starting the engine:
R the legal stipulations in the area where your
ve hicle is par ked allow engine starting via
smartphone.
R it is safe tostart and runth e engine where
yo ur vehicle is par ked.
R the fuel tank is su fficiently full.
St arting theve hicle (Remo teOnline) &
WARNING Risk of crushing or entrap‐
ment due tounin tentional starting of the
engine
Limbs could be crushed or trapped if the
engine is star ted unintentionally during
service or maintenance work. #
Alw ays secure the engine against unin‐
te ntional starting before car rying out
maintenance or repair work. Re
quirements:
R Park position 005Dis selected.
R The anti- theft alarm sy stem is not activated.
R The panic alarm is not activated. R
The hazard warning light sy stem is switched
off.
R The bonn etis closed.
R The doors are closed and loc ked.
R The windo wsand sliding sun roof are closed. #
Start theve hicle using the smartphone.
Af tereve ryengine start, the engine runs for
te n minu tes.
Yo u can car ryout a maximum of two consecu‐
tive starting attem pts. Yo u must start the engine
with theke y before trying tostart the engine
again with the smartphone.
Yo u can swit choff the engine at any time as fol‐
lo ws:
R Viath e Smartphone App
R By pressing theÜ orß button on the
key
% Further information can be found in the
smartphone app. Securing
the engine against starting before
car rying out maintenance or repair work: #
Switch on the hazard warning light sy stem.
or #
Unlock the doors.
or #
Open a side window or the sliding sunroof. Ru
nning-in no tes To
preser vethe engine during thefirs t1, 500 km:
R Drive at varying road speeds and engine
speeds.
R Do not drive at speeds greater than
14 0 km/h.
R Drive theve hicle in drive program A
or ;.
R Shift tothe next highest gear at theve ry lat‐
est when the needle reaches the last third
before there d area in there v counter.
R Do not shift down a gear manually in order to
brake. Driving and parking
16 5
Page 172 of 525
*
NO
TEDama getothe driv etra in and
engine when pulling away #
Do not warm upthe engine while the
ve hicle is stationar y.Pull away immedi‐
atel y. #
Avoid high engine speeds and driving at
full thro ttle until the engine has reached
its operating temp erature. *
NO
TEDama getothe catalytic con verter
due tonon-combu sted fuel The engine is not
running smo othly and is
misfiring.
Non-combus ted fuel may get into the cata‐
lytic con verter. #
Only depress the accelera tor pedal
slightl y. #
Have the cause rectified immediately at
a qu alified specialist workshop. *
NO
TEReduced battery life due tofre‐
qu ent short-dis tance trips The
12V battery may not be suf ficiently
ch arge d when theve hicle is used only for
short-dis tance trips. This reduces the life of
th e batter y. #
Drive longer di stances regular lyto
ch arge the batter y. Note
s on driving with a roof load, trailer or
fully laden vehicle
When driving with a loaded roof luggage rack or
trailer as well as with a fully laden or fully occu‐
pied vehicle, theve hicle's driving and steering
ch aracteristics change.
Yo u should bear thefo llowing in mind:
R Do not exceed the permissible roof load and
to wing capacity. Also obser vethete ch nical
da ta inthe printed Owner's Manual.
R Evenly distribute thero of load, and place
heavy objects at the bottom. Also comply
with the no tes on loading theve hicle
(/ page 114). R
Drive attenti vely, and avoid sudden lypulling
aw ay, braking and steering as well as rapid
cornering.
Note s on driving on salt-treated roads
The braking ef fect is limited on salt-trea ted
ro ads.
Therefore, obse rveth efo llowing no tes:
R due tosalt build-up on the brake disks and
brakepads, the braking dis tance can increase
conside rably or result in braking only on one
side
R maintain a much greater safe dis tance tothe
ve hicle in front
To remo vesalt build-up:
R brake occasionally while paying attention to
th e tra ffic conditions
R carefully depress the brake pedal at the end
of the journey and when starting the next
journey Driving and parking
16 9