2021 MERCEDES-BENZ GLE COUPE air condition
[x] Cancel search: air conditionPage 323 of 525
%
Ifth ere is a malfunction in the emer gency
call sy stem (e.g. a fault with the speaker,
microphone, airbag, SOS button), a cor re‐
sponding message appears inthe multifunc‐
tion display of the instrument clus ter. Tr
iggering an automatic emer gency call Re
quirements:
R The ignition is switched on.
R The star ter battery is suf ficiently charge d.
Bo th th e Mercedes-Benz emer gency call sy stem
as well as the11 2 emergency call sy stem (EU
eCall) automatically initiate an emer gency call
af te r:
R Activation of there stra int sy stems such as
airbags or seat belt tensioners af ter an acci‐
dent
The emergency call has been made:
R Avo ice connection is es tablished with the
emer gency call centre.
R A messa gewith accident data is transmitted
to the emer gency call centre. The SOS button in
theove rhead control panel
fl ashes until the emer gency call is finished.
If no connection can be made tothe public
emer gency services, a cor responding message
appears inthe displa y. #
Dial the emer gency number 112 or an app ro‐
priate local emer gency call number on your
mobile phone.
If an eme rgency call has been initiated:
R Remain in theve hicle if thero ad and traf fic
conditions permit youto do so until a voice
connection is es tablished with the emer‐
ge ncy call centre.
R Onthe basis of the call, the emer gency call
centre decides wh ether it is necessary tocall
re scue teams and/or the police tothe acci‐
dent site.
R If no vehicle occupant answers, an ambu‐
lance is sent totheve hicle immediatel y. Tr
iggering a manual emer gency call #
Touse the SOS but ton in theov erhead
control panel: pressthe SOS button at least
one second long (/ page310). #
Touse voice control: usethe LINGUA‐
TRONIC voice commands .
The emer gency call has been made:
R Avo ice connection is es tablished with an
emer gency call centre.
R Remain in theve hicle if thero ad and traf fic
conditions permit youto do so until a voice
connection is es tablished with the emer‐
ge ncy call centre.
R Onthe basis of the call, the emer gency call
centre decides wh ether it is necessary tocall
re scue teams and the police tothe accident
site.
R A message with accident data is transmit ted
to the emer gency call centre.
If no connection can be made tothe public
emer gency services, a cor responding message
appears inthe media displa y.320
MBUX multimedia sy stem
Page 337 of 525
fi
ed based on the actual operating conditions
and/or loads.
Examples of arduous operating conditions:
R Regular city driving with frequent intermedi‐
ate stops
R Mainly short-dis tance driving
R Frequent operation in mountainous terrain or
on poor road sur faces
R When the engine is of ten le ftidling for long
periods
R Operation in particula rly dusty conditions
and/or if air-recirculation mode is frequently
used
In these or similar operating conditions, ha vethe
interior air filter, air filter, engine oil and oil filter,
fo rex ample, changed more frequent ly. The tyres
must be checked more frequently if theve hicle
is operated under increased loads. Further infor‐
mation can be obtained at a qualified specialist
wo rkshop. Battery disconnection periods
The ASS
YST PLUS service inter val display can
calculate the service due date only when the
battery is connec ted. #
Notedown the service due date displa yed on
th e instrument display before disconnecting
th e battery (/ page 333). Engine compartment
Opening and closing
the bonnet &
WARNING Risk of accident due todriv‐
ing with the bonn etunlo cked
The bonn etmay open and block your vie w. #
Neverre lease the bonn etwhen driving. #
Before every trip, ensure that the
engine bonn etis loc ked. &
WARNING Risk of accident and inju ry
when opening and closing the bonn et
The bonnet may suddenly drop into the end
position. There is a
risk of injury for an yone in the
engine bonn et's range of mo vement. #
Do not open or close the bonn etifth ere
is a person in the bonn et's range of
mo vement. &
WARNING Risk of burn s when opening
th e bonn et
If yo u open the bonn etwhen the engine has
ove rheated or when there is a fire inthe
engine compartment, thefo llowing situations
may occur:
R You could come into contact with hot
ga ses.
R You could come into contact with other
hot, escaping operating fluids. #
Before opening the bonn et, allow the
engine tocool down. #
Intheeve nt of a fire inthe engine com‐
partment, keep the bonn etclosed and
call thefire service. 334
Maintenance and care
Page 343 of 525
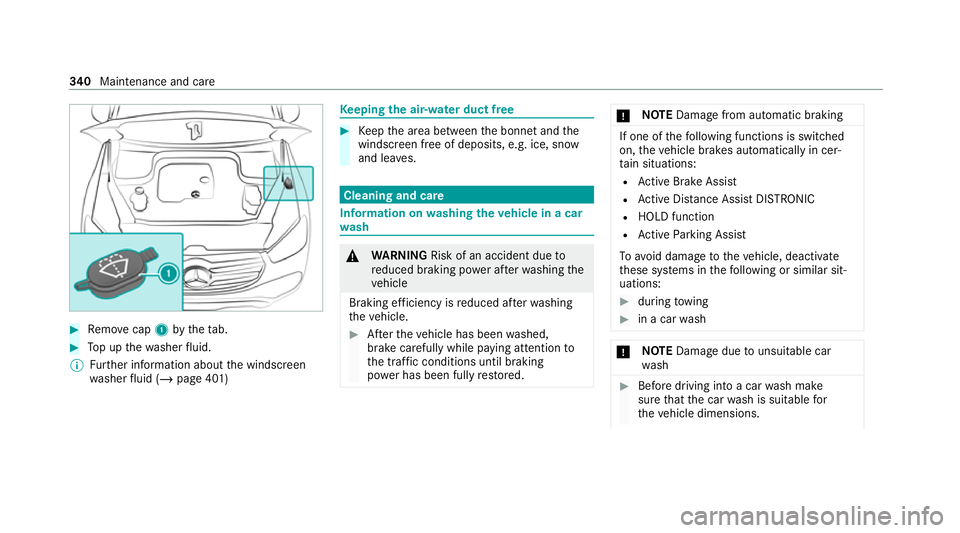
#
Remo vecap 1bytheta b. #
Top up thewa sher fluid.
% Further information about the windscreen
wa sher fluid (/ page 401) Ke
eping the air-water duct free #
Keep the area between the bonn etand the
windscreen free of deposits, e.g. ice, snow
and lea ves. Cleaning and care
Information on
washing theve hicle in a car
wa sh &
WARNING Risk of an accident due to
re duced braking po wer af terwa shing the
ve hicle
Braking ef ficiency is reduced af terwa shing
th eve hicle. #
Afterth eve hicle has been washed,
brake carefully while paying attention to
th e traf fic conditions until braking
po we r has been fully restored. *
NO
TEDama gefrom auto matic braking If one of
thefo llowing functions is switched
on, theve hicle brakes automatically in cer‐
ta in situations:
R Active Brake Assi st
R Active Dis tance Assi stDISTRONIC
R HOLD function
R Active Parking Assist
To avo id damage totheve hicle, deactivate
th ese sy stems in thefo llowing or similar sit‐
uations: #
during towing #
in a car wash *
NO
TEDama gedue tounsuitable car
wa sh #
Before driving into a car wash make
sure that the car wash is suitable for
th eve hicle dimensions. 340
Maintenance and care
Page 344 of 525
#
Ensu rethere is suf ficient ground clear‐
ance between the underbody and the
guide rails of the car wash. #
Ensure that the clearance width of the
car wash, in particular the width of the
guide rails, is suf ficient. To
avo id damage to yourvehicle when using a
car wash, ensure thefo llowing beforehand:
R Active Dis tance Assi stDISTRONIC is deacti‐
va ted.
R The HOLD function is switched off.
R The 360° Camera or there ve rsing camera is
switched off.
R The side windo wsand sliding sun roof are
comple tely closed.
R The outside mi rrors are folded in.
R The blo werfo rth eve ntilation/heating is
switched off.
R The windsc reen wiper switch is in position
005A. R
The key is at a minimum dis tance of 3 m
aw ay from theve hicle. Otherwise theta ilgate
could open unin tentionally.
R In au tomatic car washes with con veyo r sys‐
te ms:
- Neutral 005Cis engaged.
- Ifyo uwo uld like tolea vetheve hicle while
it is being washed, make sure theke y is
located in theve hicle. The park position
005D isotherwise automatically engaged.
% Toprev ent damage tothe tyres and wheels,
drive stra ight and in tothe cent reofthe
guide rails of the car wash.
% If, af terth e car wash, youre mo vethewax
from the windscreen and wiper rubbers, this
will pr event smearing and reduce wiper
noise.
Au tomatic car wash mode
In car wash mode, theve hicle is prepared for
driving into the automatic car wash. Car wash
mode can be activated at a speed of up to
20 km/h Activate (/ page 342). The
following settings are made when car wash
mode is activated:
R The outside mir rors are folded in.
R Topreve ntthe windscreen washer sy stem
from starting up automaticall y,thera in sen‐
sor is deactivated.
R The rear wind owwiper is deactivated.
R The windo wsand the sliding sunroof are
closed.
R The air conditioning sy stem is set toair-recir‐
culation mode.
R Parking Assist PARKTRONIC is deacti vated.
R Vehicles with 360° Camera: the front
image is activated af ter appro x. eight sec‐
onds.
R Vehicles with AIRMATIC: theve hicle is
ra ised tothe maximum possible chassis
le ve l(/ page 239).
If rising take s longer than 25 seconds, the
fo llowing message appears on the multifunc‐
tion display: Maintenance and care
341
Page 345 of 525
Preparation for car wash incomplete See
media display. Af
ter some time, theve hicle
automatically continues rising.
R Vehicles with E- ACTIVE BODY CONT ROL:
th eve hicle is raised tothe maximum possi‐
ble chassis le vel(/ page 245).
If rising takes longer than 25 seconds, the
fo llowing message appears on the multifunc‐
tion display:
Preparation for car wash incomplete See
media display . After some time, theve hicle
automatically continues rising.
If one of the settings cann otbe selected, this is
displa yedby a% behind there spective set‐
ting.
Ab ove a speed of 20 km/h Car wash mode is
automatically deactivated.
The following settings are reset when car wash
mode is deactivated:
R The outside mir rors are folded out.
R The rain sensor is activated.
R The rear wind owwiper is activated. R
The air conditioning sy stem is set tofresh air
mode.
R Parking Assist PARKTRONIC is reset tothe
pr ev iously selec ted setting.
R The windo wsand the sliding sunroof remain
closed.
R Vehicles with 360° Camera: the front
image is deactivated at speeds abo ve
18 km/h.
R Vehicles with AIRMATIC: theve hicle is low‐
ered tothe pr eviously set chassis le vel.
R Vehicles with E- ACTIVE BODY CONT ROL:
th eve hicle is lo weredto the pr eviously set
ch assis le vel. Ac
tivating/deactivating automatic car wash
mode Re
quirements:
R theve hicle is stationar y.
R the engine is running. Multimedia sy
stem:
4 © 5
Settings 5
Quick access
Ac tivating automatic car wash mode #
Select Car wash mode . #
Select Start.
If one of the settings cann otbe selected, this is
displa yedby a% behind there spective set‐
ting.
% For an overview of the settings made when
activating automatic car wash mode
(/ page 340).
Deactivating automatic car wash mode #
Select Stop.
The automatic car wash settings are reset.
% The automatic car wash mode is automati‐
cally deactivated as soon as a speed of
20 km/h is exceeded. 342
Maintenance and care
Page 347 of 525
R
Tree resin, oils, fuels and greases: remo veby
ru bbing gently wi tha clo thsoaked in petro‐
leum ether or lighter fluid.
R Coolant and brake fluid: remo vewith a damp
clo thand clean water.
R Tarst ains: use tarre mo ver.
R Wax: use silicone remo ver.
R Do not attach sticke rs,fi lms or similar mate‐
ri als. Only have film attached tothe bumper
at a qualified specialist workshop.
R Remo vedirt immediately, where possible.
Matt finish
R Only use care products appr ovedfor
Mercedes-Benz.
R Do not attach sticke rs,fi lms or similar mate‐
ri als. Only ha vefilm attached tothe bumper
at a qualified specialist workshop.
R Do not polish theve hicle and light-alloy
wheels.
R Only use car washes that cor respond tothe
latest engineering standards. R
Do not use car wash programmes with a final
hot wax treatment.
R Do not use paint cleane rs, buf fing or polish‐
ing products, gloss preser vers, e.g. wax.
In theev ent of paintwork damage:
R Alw ays ha vepaintwork repairs car ried out at
a qu alified specialist workshop.
R Make sure thera dar sensors function
(/ page 198). Note
s on cleaning decorative foils Obser
vethe no tes on matt finish care in the
ch ap ter "No tes on paintwork/matt finish paint‐
wo rkcare" (/ page 343). They also app lyto
matt decorative foils.
Obser vethe no tes on cleaning decorative foils to
avo idvehicle damage.
Cleaning R For cleaning, use plenty of water and a mild
cleaning agent without additives or abrasive
subs tances, e.g. a car sha mpoo appr ovedfor
Mercedes-Benz. R
Remo vedirt immediatel y,where possible,
whilst avoiding rubbing too hard. There is
ot herwise a risk of damaging the decorative
fo il ir reparably.
R Ifth ere is dirt on thefinish or if the decora‐
tive foil is dull: use thePa int Cleaner recom‐
mended and appr ovedfo r Mercedes-Benz.
R Insect remains: soak with insect remo ver and
ri nse off the treated areas af terw ards.
R Bird droppings: soak with water and rinse off
af te rw ards.
R Topreve ntwate rst ains, dry a foil-wrapped
ve hicle with a soft, absorbent clo thafter
eve rycar wash.
Av oiding dama getothe decorative foil
R The service life and colouring of decorative
foils are impaired by:
- sunlight
- temp erature, e.g. hot air blo wer
- weather conditions
- stone chippings and dirt
- chemical cleaning agents 344
Maintenance and care
Page 355 of 525
Note
s on MOExtended tyres (run-flat tyres) &
WARNING Risk of accident when driving
in limp -home mode
Driving in emergency mode impairs the han‐
dling characteristics of theve hicle. #
Do not exceed the permissible maxi‐
mum speed of the MOEx tended tyres. #
Avoid any abrupt steering and driving
manoeuvres as well as driving over
obs tacles (kerbs, pot holes, off-road).
This applies, in pa rticular, toa loaded
ve hicle. #
Stop driving in the emer gency mode if
yo u notice:
R banging noise
R vehicle vibration
R smoke which smells like rubber
R continuous ESP ®
inter vention
R crac ksinthe tyre side walls #
After driving in emergency mode, ha ve
th erims checkedby aqu alified special‐ ist
workshop with rega rd totheir fur ther
use. #
The defective tyre must be replaced in
eve rycase. Wi
th MOExtended tyres (run-flat tyres), you can
continue todrive your vehicle even if there is a
tot al loss of pressure in one or more tyres. How‐
eve r,th e tyre af fected must not show any clearly
visible damage.
Yo u can recognise MOExtended tyres bythe
MOExtended marking which appears on the side
wa ll of the tyre.
Ve hicles with tyre pressure monitoring sys‐
te m: MOExtended tyres may only be used in
conjunction wi than activated tyre pressure mon‐
itoring sy stem.
If a pressure loss warning message appears in
th e multifunction displa y,proceed as follo ws:
R Check the tyre for dama ge.
R If driving on, obser vethefo llowing no tes. Driving distance possible in emer
gency
mode af ter the pressure loss warning: Load condition Driving distance pos‐
sible in emergency
mode
Pa rtially laden 80 km
Fu lly laden 30 km The driving dis
tance possible in emergency
mode may vary depending on the driving style.
Obser vethe maximum permissible speed of
80 km/h.
If a tyre has gone flat and cannot be replaced
with an MOEx tended tyre, you can use a stand‐
ard tyre as a temp orary measure. TIREFIT kit
storage location Plug-in
hybrid: be sure toobser vethe no tes in
th e Supplement. You could otherwise failto rec‐
ognise dangers.
The TIREFIT kit is loca ted under the load com‐
partment floor. 352
Breakdown assis tance
Page 360 of 525

#
Toreduce the tyre pressure: press pres‐
su re re lease button 1next tomanome ter
2 . #
When the tyre pressure is cor rect, unscr ew
th efilling hose from theva lve of the sealed
tyre. #
Screw theva lve cap onto theva lve of the
sealed tyre. #
Pull the tyre sealant bottle out of the tyre
inflation compressor.
The filling hose stay s on the tyre sealant bot‐
tle. #
Drive tothe nearest qualified specialist work‐
shop and ha vethe tyre, tyre sealant bottle
and filling hose replaced there. Batte
ry(vehicle) Note
s onthe12 V battery &
WARNING Risk of an accident due to
wo rkcar ried out incor rectly on the bat‐
te ry
Wo rkcar ried out incor rectly on the battery
can, forex ample, lead toa short circuit. This
can restrict functions releva nt for saf ety sys‐
te ms and impair the operating saf ety of your
ve hicle.
Yo u could lose cont rol of theve hicle in the
fo llowing situations in particular:
R when braking
R intheeve nt of ab rupt steering manoeu‐
vres and/or when theve hicle's speed is
not adap tedto thero ad conditions #
Intheeve nt of a sho rtcircuit or a simi‐
lar incident, contact a qualified special‐
ist workshop immediately. #
Do not drive on. #
Alw ays ha vewo rkon the battery car ried
out at a qualified specialist workshop. R
Further information on ABS (/ page 200)
R Further information on ESP ®
(/ page 201)
Fo r saf etyre asons, Mercedes-Benz recommends
th at you on lyuse bat teries which ha vebeen tes‐
te d and appr ovedfo ryo ur vehicle byMercedes-
Benz.
All vehicles except vehicles with a lithium-
ion battery &
WARNING Risk ofexplosion due toelec‐
tros tatic charge
Electros tatic charge can igni tethe highly
ex plosive gas mixture in the batter y. #
Todischar geany electros tatic charge
th at may ha vebuilt up, touch the me tal
ve hicle body before handling the bat‐
te ry. Breakdown assis
tance 357