Page 128 of 525
#
Open the load compartment floor . #
Attach the holders 1inthe desired position
to the side of the load compartment floor. #
Close the load compartment floor. #
Turn the mounting elements 2to006E . #
Insert the mounting elements 2into the
holders 1. #
Extend thete lescopic rod3. #
Insert thete lescopic rod3 into the mount‐
ing elements 2. #
Turn both mounting elements 2to0037
until youfe el them engage. Locking and unlocking
the load compa rt‐
ment floor #
Turn the emer gency key a quarter turn clock‐
wise 0048(to lock) or anti-clockwise 0047(to
unlock). Seats and
stowing 12 5
Page 164 of 525
#
Toopen or close: turn controller1of air
ve nt 2 clockwise or anticlockwise. Climate control
161
Page 191 of 525
#
Consult a qualified specialist workshop. *
NO
TEFuel may spr ayout when you
re mo vethe fuel pump nozzle #
Only fill th e fuel tank until the pump
nozzle switches off. *
NO
TEPlug-in hybrid #
Forve hicles with petrol engines,
obser vethe no tes in the Supplement.
Yo u could otherwise failto recognise
dangers. Re
quirements:
R The vehicle is unloc ked.
% Do not get into theve hicle again during the
re fuelling process. Otherwise, electros tatic
ch arge could build up again.
Obser vethe no tes on operating fluids and fuel.
The recommended octane number foryo ur vehi‐
cle can be found on the information label in the
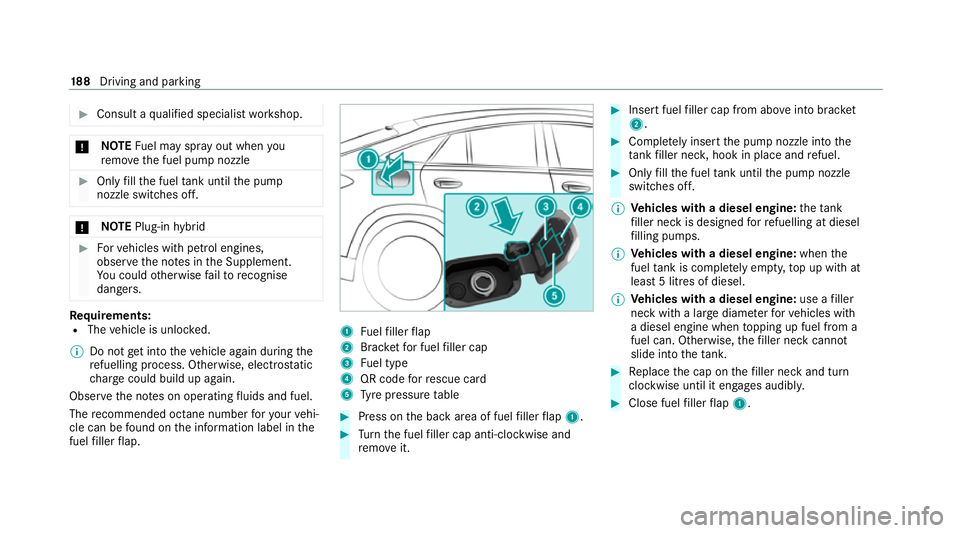
fuel filler flap. 1
Fuelfiller flap
2 Brac ketfo r fuel filler cap
3 Fuel type
4 QR code forre scue card
5 Tyre pressure table #
Press on the back area of fuel filler flap 1. #
Turn the fuel filler cap anti-clockwise and
re mo veit. #
Insert fuel filler cap from abo veinto brac ket
2 . #
Comple tely inse rtthe pump nozzle into the
ta nk filler nec k,hook in place and refuel. #
Only fill th e fuel tank until the pump nozzle
switches off.
% Vehicles with a diesel engine: theta nk
fi ller neck is designed forre fuelling at diesel
fi lling pumps.
% Vehicles with a diesel engine: whenthe
fuel tank is compl etely em pty, top up with at
least 5 litres of diesel.
% Vehicles with a diesel engine: use afiller
neck with a lar gediame terfo rve hicles with
a diesel engine when topping up fuel from a
fuel can. Otherwise, thefiller neck cannot
slide into theta nk. #
Replace the cap on thefiller neck and turn
clockwise until it engages audibl y. #
Close fuel filler flap 1. 18 8
Driving and pa rking
Page 193 of 525
The
following messages appear in order in the
multifunction display when theAd Blue ®
tank
re qu ires topping up:
R Refill AdBlue See Owner’s Manual The
Ad Blue ®
leve l has fallen below there ser ve
ra nge. Top up AdBlue ®
immediately.
R Top up AdBlue Emergency op. in XXX miles
See Owner's ManualThe low AdBlue ®
level
will lead tolimited per form ance af terthe
re maining dis tance displ ayed has been
driven. Top up AdBlue ®
immediately.
R XX,X l Top up AdBlue Emer. op.: max. XXX
km/h Start not poss. in XXX kmThe low
AdBlue ®
leve l will lead tolimited per form‐
ance from the speed displa yed. Af terthe
re maining dis tance display ed has been cov‐
ered, it will no longer be possible tostart the
engine. Top up with at least the amount of
Ad Blue ®
displ ayed.
R XX,X l Top up AdBlue Switch on ignition, wait
60 sec. or eng. start not poss. TheAdBlue ®
ta nk is em pty. Yo u can no lon gerst art the
engine. Top up with at least the amount of Ad
Blue ®
displ ayed. Switch on the ignition
and waitfor appro ximately 60 seconds. Start
th e engine.
Yo u can see theAd Blue ®
ra nge and le vel in the
Service menu in the multifunction displa y.
% The AdBlue ®
ra nge shown depends strongly
on the driving style and operating condi‐
tions. The actual range can therefore deviate
from the calculated range. Opening the
AdBlue ®
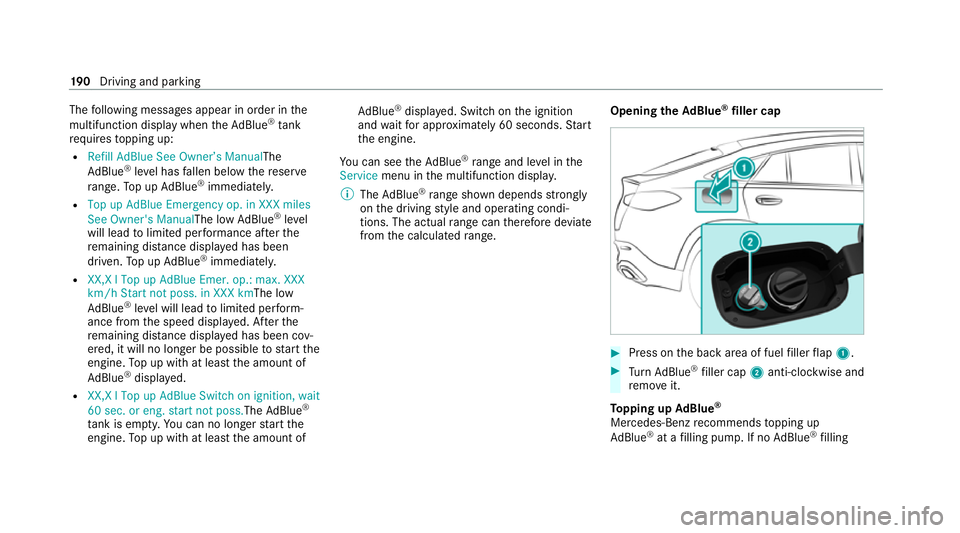
filler cap #
Press on the back area of fuel filler flap 1. #
Turn AdBlue ®
filler cap 2anti-clockwise and
re mo veit.
To pping up AdBlue ®
Mercedes-Benz recommends topping up
Ad Blue ®
at a filling pump. If no AdBlue ®
filling 19 0
Driving and pa rking
Page 194 of 525
pump is
available, you can also top up AdBlue ®
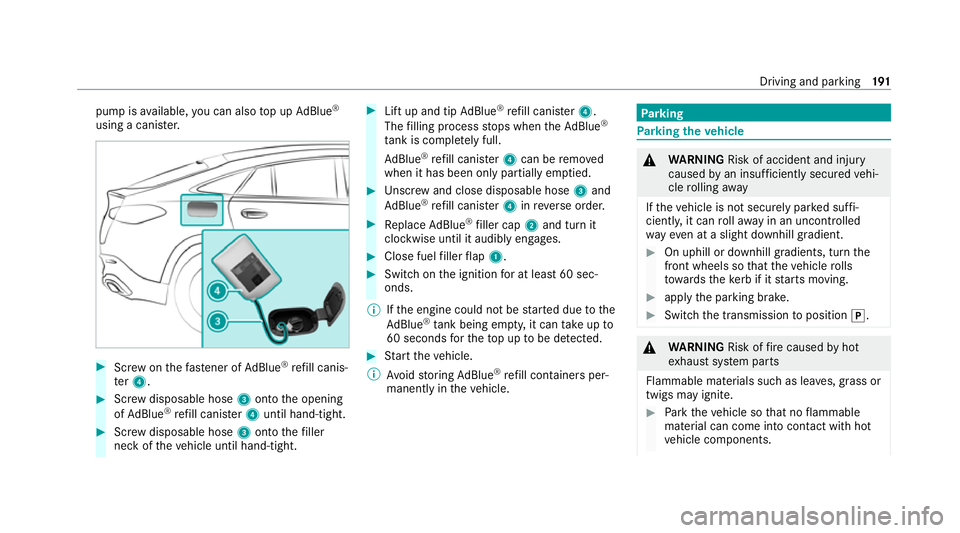
using a cani ster. #
Screw onthefast ener of AdBlue ®
re fill canis‐
te r4. #
Screw disposable hose 3onto the opening
of Ad Blue ®
re fill canis ter4 until hand-tight. #
Screw disposable hose 3onto thefiller
neck of theve hicle until hand-tight. #
Lift up and tip AdBlue ®
re fill canis ter4.
The filling process stops when theAd Blue ®
ta nk is compl etely full.
Ad Blue ®
re fill canis ter4 can be remo ved
when it has been only partially em ptied. #
Unscr ew and close disposable hose 3and
Ad Blue ®
re fill canis ter4 inreve rse order. #
Replace AdBlue ®
filler cap 2and turn it
clockwise until it audibly engages. #
Close fuel filler flap 1. #
Swit chon the ignition for at least 60 sec‐
onds.
% Ifth e engine could not be star ted due tothe
Ad Blue ®
tan k being empty, it can take up to
60 seconds forth eto p up tobe de tected. #
Start theve hicle.
% Avoid storing AdBlue ®
re fill conta iners per‐
manently in theve hicle. Pa
rking Pa
rking theve hicle &
WARNING Risk of accident and inju ry
caused byan insuf ficiently secu redve hi‐
cle rolling away
If th eve hicle is not securely par ked suf fi‐
ciently, it can rollaw ay in an uncontro lled
wa yev en at a slight downhill gradient. #
On uphill or downhill gradients, turn the
front wheels so that theve hicle rolls
to wa rdsth eke rb if it starts moving. #
apply the parking brake. #
Switch the transmission toposition 005D. &
WARNING Risk offire caused byhot
ex haust sy stem parts
Flammable materials such as lea ves, grass or
twigs may ignite. #
Park theve hicle so that no flammable
material can come into con tact with hot
ve hicle components. Driving and parking
191
Page 341 of 525
#
Do not use additives. *
NO
TEDama gecaused bytopping up too
much engine oil To
o much engine oil can damage the engine
or the catalytic con verter. #
Have excess engine oil remo ved at a
qu alified specialist workshop. %
Depending on driving style, theve hicle con‐
sumes up to0.8 litr e of oil pe r10 00 km. The
oil consum ption may be higher than this
when theve hicle is new or if you frequently
drive at high engine speeds.
% Depending on the engine, the cap may be
ins talled in the engine compartment in dif‐
fe re nt locations. #
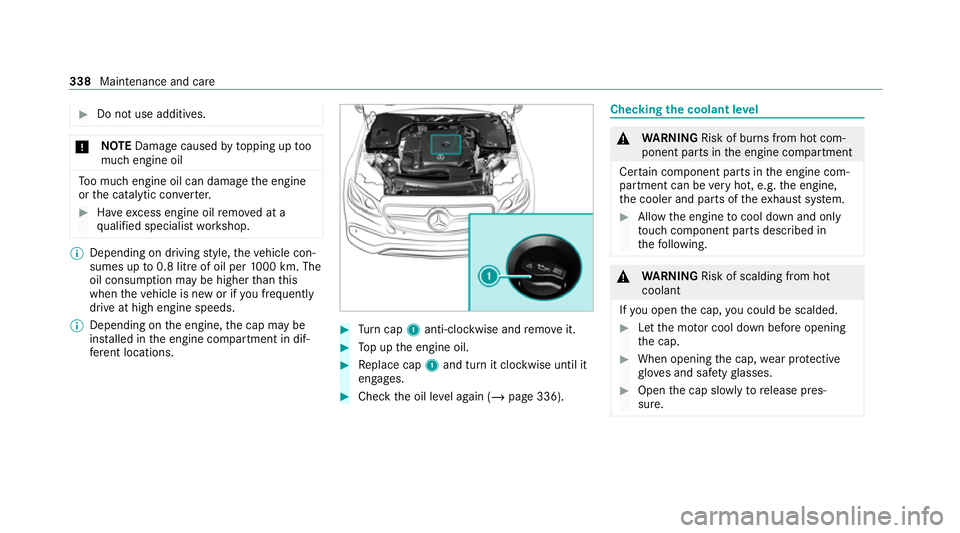
Turn cap 1anti-clockwise and remo veit. #
Top up the engine oil. #
Replace cap 1and turn it clockwise until it
engages. #
Check the oil le vel again (/ page 336). Checking
the coolant le vel &
WARNING Risk of burn s from hot com‐
ponent parts in the engine compartment
Cer tain component parts in the engine com‐
partment can be very hot, e.g. the engine,
th e cooler and parts of theex haust sy stem. #
Allow the engine tocool down and only
to uch co mponent parts described in
th efo llowing. &
WARNING Risk of scalding from hot
coolant
If yo u open the cap, you could be scalded. #
Let the mo tor cool down before opening
th e cap. #
When opening the cap, wear pr otective
gl ove s and saf etygl asses. #
Open the cap slowly torelease pres‐
sure. 338
Maintenance and care
Page 342 of 525
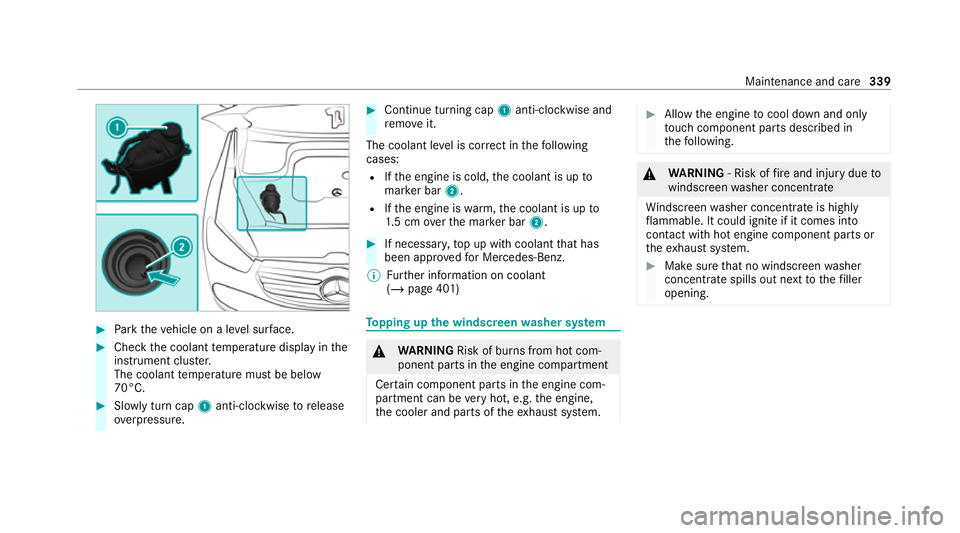
#
Park theve hicle on a le vel sur face. #
Check the coolant temp erature display in the
instrument clus ter.
The coolant temp erature must be below
70°C. #
Slowly turn cap 1anti-clockwise torelease
ove rpressure. #
Continue turning cap 1anti-clockwise and
re mo veit.
The coolant le vel is cor rect in thefo llowing
cases:
R Ifth e engine is cold, the coolant is up to
mar ker bar 2.
R Ifth e engine is warm,th e coolant is up to
1. 5 cm overth e mar ker bar 2. #
If necessar y,top up with coolant that has
been appr ovedfo r Mercedes-Benz.
% Further information on coolant
(/ page 401) To
pping up the windsc reen washer sy stem &
WARNING Risk of burn s from hot com‐
ponent parts in the engine compartment
Cer tain component parts in the engine com‐
partment can be very hot, e.g. the engine,
th e cooler and parts of theex haust sy stem. #
Allow the engine tocool down and only
to uch co mponent parts described in
th efo llowing. &
WARNING ‑ Risk of fire and injury due to
windscreen washer concentrate
Wi ndsc reen washer concentrate is highly
fl ammable. It could ignite if it comes into
con tact with hot engine component parts or
th eex haust sy stem. #
Make sure that no windscre enwasher
concentrate spills out next tothefiller
opening. Maintenance and care
339
Page 369 of 525
#
Secu retheve hicle on all four wheels af ter
loading.
4MATIC vehicles/ve hicles with automatic
transmission #
Make sure that the front and rear axles come
to rest on the same transpor tation vehicle.
* NO
TEDama getothe driv etra in due to
incor rect positioning #
Do not position theve hicle abo vethe
connection point of the transport vehi‐
cle. To
wing eyesto rage location To
wing eye1 is located under the load com‐
partment floor bythe tyre-change tool kit. Installing
theto wing eye #
Press the mark on co ver1 inwa rds and
re mo ve. #
Screw intheto wing eyeclockwise as far as it
will go and tighten.
Ve hicles with a trailer hitch: vehicles with a
trailer hitch do not ha veare ar brac ketfo rthe 366
Breakdown assis tance