2021 MERCEDES-BENZ GLC SUV change time
[x] Cancel search: change timePage 4 of 481
Thank
youfo r pur chasing a Mercedes-Benz
Before youfirs t drive off, read this Owner's Man‐
ual carefully and familiarise yourself with your
ve hicle. Foryo ur ow n sa fety and a longer operat‐
ing li fespan of theve hicle, follow the instructions
and warning notices in this Owner's Manual. Dis‐
re ga rding them may lead todamage totheve hi‐
cle or injury topeople.
The standard equipment and product desc ript ion
of your vehicle may vary and depends on thefo l‐
lowing factors:
R Model
R order
R national version
R availability
The illustrations in this Owner's Manual show a
left-hand drive vehicle. On right-hand-drive vehi‐
cles, the la yout of car parts and cont rol ele‐
ments dif fers accordin gly.
Mercedes-Benz is cons tantly de veloping its vehi‐
cles fur ther. Mercedes-Benz
therefore reser vesth eright to
int roduce changes in thefo llowing areas:
R design
R equipment
R tech nical features
The equipment in your vehicle may therefore dif‐
fe r from that shown in the descriptions and illus‐
trations.
The following documents are integral parts of
th eve hicle:
R Digital Owner's Manual
R printed Owner's Manual
R service booklet
R equipment-dependent Supplements
Ke ep these documents in theve hicle at all
times. If you sell theve hicle, alw ays pass all of
th e documents on tothe new owner.
2535847514Z102
2535847514Z102
Page 6 of 481
Climate control
........................................ 14 2
Overview of climate contro l systems ..........1 42
Operating the climate control sy stem ......... 14 3 Driving and pa
rking ................................. 15 2
Driving ........................................................ 15 2
DY NA MIC SELECT switch ............................1 64
Au tomatic transmission .............................. 16 6
Fu nction of the 4MATIC .............................. 171
Re fuelling .................................................... 171
Pa rking ...................................................... .177
Driving and driving sa fety sy stems .............1 84
Tr ailer hit ch................................................ 239
Bicycle rack function .................................. 24 5
Ve hicle towing instructions ........................ .247 Instrument display and on-board
compu
ter.................................................. 248
No tes on the instrument display and on-
board computer .......................................... 24 8
Instrument display overview ...................... .249
Overview of buttons on thesteering
wheel ..........................................................2 50
Operating the on-board computer .............. 250 Overview of displa
yson the multifunc‐
tion display .................................................2 51
Head-up display .......................................... 252 MBUX multimedia sy
stem ...................... 254
Overview and operation .............................. 254
Sy stem settings .......................................... 262
Na vigation .................................................. 266
Te lephone .................................................. .273
Mercedes me and apps ...............................2 76
Mercedes-Benz emer gency call sy stem ...... 285
Ra dio, media & TV...................................... 289
Sound settings ........................................... 296 Main
tenance and care ............................. 297
ASS YST PLUS service inter val display ........ 297
Engine compartment .................................. 298
Cleaning and care ...................................... .305 Breakdown assi
stance ............................. 313
Emergency .................................................. 313
Flat tyre ...................................................... 315
Battery (vehicle) .......................................... 321 To
w- starting or towing away ....................... 326
Electrical fuses ........................................... 331 Wheels and tyres
..................................... 335
No tes on noise or unusual handling char‐
acteristics .................................................. .335
No tes on regular lyinspecting wheels and
tyres .......................................................... .335
No tes on snow chains ................................ 335
Ty re pressure .............................................. 336
Wheel change ............................................ .340
Emergency spare wheel .............................. 350 Te
ch nical data .......................................... 353
No tes on tech nical da ta.............................. 353
On-board electronics .................................. 353
Re gulatory radio identification of small
components ...............................................3 55
Ve hicle identification plate, VIN and
engine number overview ............................ 355
Operating fluids .......................................... 357
Ve hicle data ................................................ 366
Tr ailer hit ch................................................. 367 Contents
3
Page 25 of 481
Pr
otection of the environment
* NO
TEPlug-in hybrid #
Obser vethe no tes in the Supplement.
Yo u could otherwise failto recognise
dangers. +
ENVI
RONMENTAL NOTEEnvironmental
dama gedue tooperating conditions and
personal driving style The pollutant emission of
theve hicle is
directly related tothewa yyo u operate the
ve hicle.
Operate your vehicle in an environmentally
re sponsible manner tohelp pr otect the envi‐
ro nment. Please obser vethefo llowing rec‐
ommendations on ope rating conditions and
pe rsonal driving style.
Operating conditions: #
Make sure that the tyre pressure is cor‐
re ct. #
Do not car ryany unnecessary weight
(e.g. roof luggage rack s once you no
lon ger need them). #
Adhere tothe service inter vals.
A regularly serviced vehicle will contri b‐
ute toenvironmen tal pr otection. #
Alw ays ha vemaintenance workcar ried
out at a qualified specialist workshop.
Pe rsonal driving style: #
Do not depress the accelera tor pedal
when starting the engine. #
Do not warm upthe engine while the
ve hicle is stationar y. #
Drive carefully and maintain a suitable
dist ance from theve hicle in front. #
Avoid frequent, sudden acceleration
and braking. #
Change gear in good time and use each
ge ar on lyup toÔ of its maximum
engine speed. #
Switch off the engine in stationary traf‐
fi c, e.g. byusing the ECO start/ stop
function. #
Drive fuel-ef ficiently. Obser vethe ECO
display for a fuel-ef ficient driving style. Ta
ke -back of end-of-life vehicles
EU countries onl y:
Mercedes-Benz will take back your end-of-life
ve hicle for environment-friendly disposal in
accordance with the European Union(EU) End-
of-Life Vehicles Directive.
A network of vehicle take -ba ckpoints and dis‐
mantlers has been es tablished foryo uto return
yo ur vehicle. You can lea veit at any of these
points free of charge . This makes an impor tant
contribution toclosing there cycling circle and
conse rving resources.
Fo r fur ther information about there cycling and
disposal of end-of-life vehicles, and theta ke-
back conditions, please visit the national
Mercedes-Benz website foryo ur count ry. 22
General no tes
Page 38 of 481

ve
hicle itself. Control units of ten contain da ta
memories forve hicle keys,fo rex ample. Their
use permits thete mp orary or permanent docu‐
mentation of tech nical information about the
ve hicle's operating state, component loads,
main tenance requirements and tech nical events
or faults.
Depending on theve hicle equipment, thefo llow‐
ing data are stored:
R operating status of sy stem components,
such as fill le vels, tyre pressure or battery
st atus
R malfunctions or faults in impor tant sy stem
components, such as lights or brakes
R system reactions in special driving situations,
such as airbag deployment or the inter ven‐
tion of stability control sy stems
R information on events leading tovehicle
damage
In cer tain cases, it may be requiredtostore data
th at wo uld ha veotherwise been used only tem‐
porarily. This may be the case if theve hicle has
de tected a malfunction, forex ample. If
yo u use services, such as repair services and
maintenance work,st ored operational data as
we ll as theve hicle identification number can be
re ad out and used. They can be read out by
service network emplo yees, such as workshops
and manufacturers or third parties, such as
breakdown services. The same is true in the
case of warranty claims and quality assurance
measures.
In general, there adout is per form ed via the
legally prescribed port forth e diagnostics con‐
nection in theve hicle. The operational data that
are read out document tech nical states of the
ve hicle or of individual components and assist in
th e diagnosis of malfunctions, compliance with
wa rranty obligations and quality impr ovement.
To that end, these data, in particular information
about component loads, tech nical events, mal‐
functions and other faults may be transmit ted
along with theve hicle identification number to
th e manufacturer. Furthermore, the manufac‐
turer is subject toproduct liability. Forth is rea‐
son the manufacturer also uses operational data
from theve hicle, forex ample, forre calls. These da
ta can also be used toexamine the cus tom‐
er's warranty and guarantee claims.
Fa ult memories in theve hicle can be reset by a
service outlet or at your requ est as part of repair
or maintenance work.
Con venience and inf otainment functions
Yo u can store con venience settings and individ‐
ual settings in theve hicle and change or reset
th em at any time.
Depending on theve hicle equipment, this
includes thefo llowing settings, forex ample:
R seat and steering wheel positions
R suspension and climate control settings
R individual settings, such as interior lighting
Depending on the selected equipment, you can
import data into vehicle inf otainment functions
yo urself.
Depending on theve hicle equipment, this
includes thefo llowing data, forex ample:
R multimedia data, such as music, films or pho‐
to sfo r playback in an integrated multimedia
sy stem General no
tes35
Page 39 of 481

R
address book data for use in connection with
an integrated hands-free sy stem or an inte‐
grated navigation sy stem
R entered navigation destinations
R data about the use of Internet services
These data for con venience and inf otainment
functions may be sa ved locally in theve hicle or
th ey may be located on a device which you ha ve
connected totheve hicle, such as a smartphone,
USB flash drive or MP3 pla yer.If yo u ha ve
entered these data yourself, you can dele tethem
at any time.
This data is transmit ted from theve hicle tothird
parties only at your requ est. This applies, in par‐
ticular, when you use online services in accord‐
ance with the settings that you ha veselected.
Smartphone integ ration (e.g. Android Autoor
Apple CarPlay ®
)
If yo ur vehicle is accordingly equipped, you can
connect your smartphone or ano ther mobile end
device totheve hicle. You can then control them
by means of the control elements integrated in
th eve hicle. Images and audio from the smart‐ phone can be output via
the multimedia sy stem.
Cer tain information is simultaneously transfer‐
re dto your smartphone. Depending on the type
and integration, this includes position data, day/
night mode and other general vehicle statuses.
Fo r more information please consult the Owner's
Manual of theve hicle/inf otainment sy stem.
This integration allo wsthe use of selected
smartphone apps, such as navigation or music
pla yer apps. There is no fur ther interaction
between the smartphone and theve hicle; in par‐
ticular, vehicle data is not directly accessible.
The type of additional data processing is de ter‐
mined bythe pr ovider of the app being used.
Which settings you can make, if an y,depends on
th e specific app and the operating sy stem of
yo ur smartphone. Online services
Wi
reless network connection
If yo ur vehicle has a wireless network connec‐
tion, it enables data tobe exch anged between
yo ur vehicle and additional sy stems. The wire‐
less network connection is made possible bythe ve
hicle's own transmitter and recei ver or by a
mobile end device that you ha vebrought into the
ve hicle, forex ample, a smartphone. Online func‐
tions can be used via the wireless network con‐
nection. This includes online services and appli‐
cations/apps pr ovided to yo uby the manufac‐
turer or by other pr oviders.
Manu factu rer's se rvices
Re garding the manufacturer's online services,
th e individual functions are described bythe
manufacturer in a suita ble place,forex ample, in
th e Owner's Manual or on the manufacturer's
we bsite, where there leva nt da taprotection
information is also given. Personal data may be
used forth e pr ovision of online services. Data
are exchanged via a secure connection, such as
th e manufacturer's designated IT sy stems. Any
personal data which are collected, processed
and used, other than forth e pr ovision of serv‐
ices, is done so exclusively on the basis of legal
permission. This is the case, forex ample, for a
legally prescribed emergency call sy stem, a con‐
tractual agreement or when consent has been
given. 36
General no tes
Page 139 of 481
Ad
justing the brightness #
Select Brightness . #
Adjust the brightness.
Ac tivating the brightness for zones #
Select Brightness . #
Select Brightness zones .#
Switch the function on or off.
or #
Set the brightness forth e desired zones.
Ac tivating multi-coloured lighting #
Select Colour. #
Select Multi-colour. #
Select a colour combination.
Ac tivating multi-coloured animation #
Select Colour. #
Select Multi-colour animat..
The chosen colour combination will change
at predefined inter vals. Ac
tivating welcome lighting #
Select Colour. #
Select Welcome.
When theve hicle is unloc ked, a special ambi‐
ent lighting sequence will run.
Ac tivating dependency on air conditioning
settings #
Select Colour. #
Select Climate.
If ch anges are made tothete mp erature set‐
ting in theve hicle, the colour of the ambient
lighting will change brief ly. Switching
the interior lighting switch-off
delay time on/off Multimedia sy
stem:
4 © 5
Settings 5
Lights
5 Int. light. del. sw. off #
Switch the switch-off delay time on or off.
When this function is active, the interior light‐
ing lights up for a short time af terth eve hicle
is loc ked. Wi
ndscreen wipers and windscreen washer
sy stem Switching
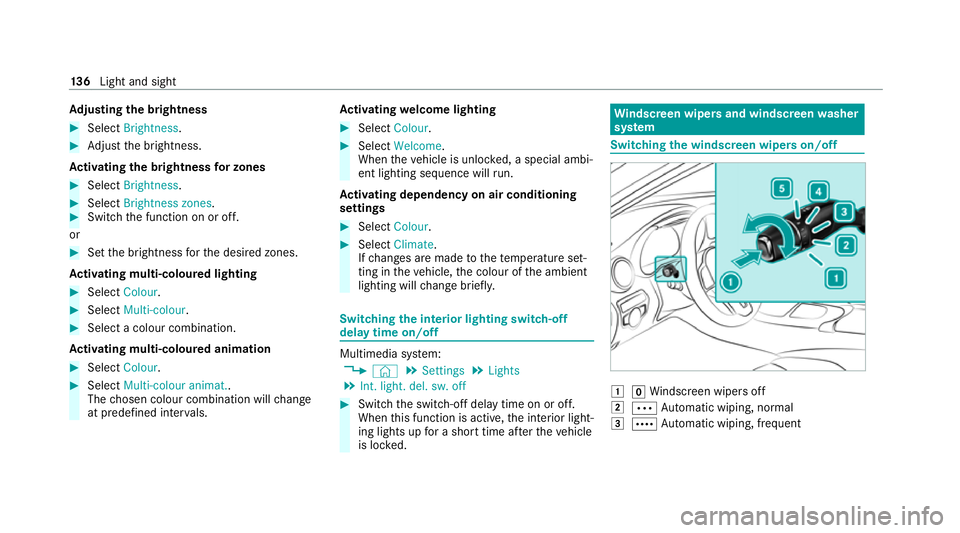
the windscreen wipers on/off 1
gWindsc reen wipers off
2 Ä Automatic wiping, normal
3 Å Automatic wiping, frequent 13 6
Light and sight
Page 147 of 481
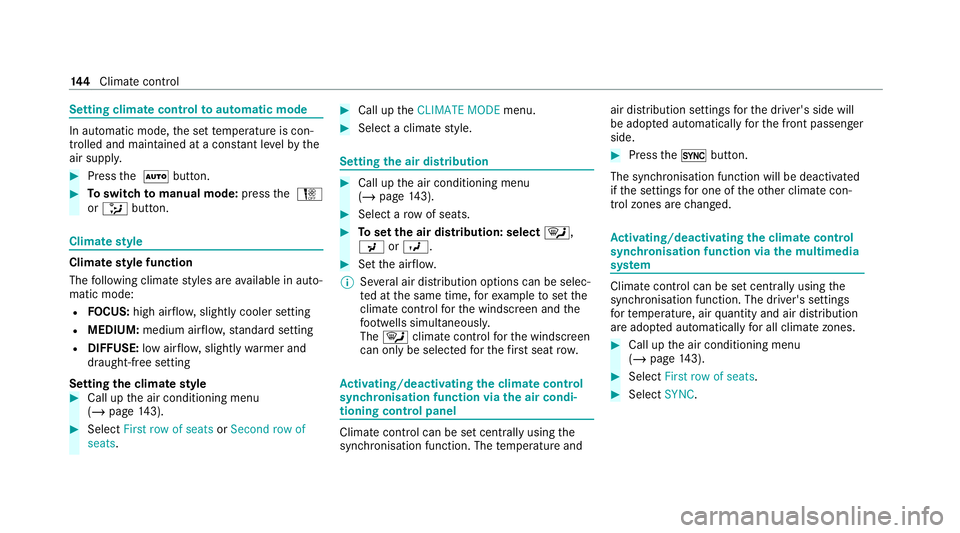
Setting climate control
toautomatic mode In auto
matic mode, the set temp erature is con‐
trolled and maintained at a const ant levelby the
air suppl y. #
Press the à button. #
Toswitch tomanual mode: pressthe H
or _ button. Climate
style Climate
style function
The following climate styles are available in auto‐
matic mode:
R FOCUS: high air flow , slightly cooler setting
R MEDIUM: medium air flow ,st andard setting
R DIFFUSE: low airflow , slightly warmer and
draught-f ree setting
Setting the clima testyle #
Call up the air conditioning menu
(/ page 143). #
Select First row of seats orSecond row of
seats. #
Call up theCLIMATE MODE menu. #
Select a climate style. Setting
the air distribution #
Call up the air conditioning menu
(/ page 143). #
Select a rowof seats. #
Toset the air distribution: select ¯,
P orO. #
Set the air flow.
% Several air distribution options can be selec‐
te d at the same time, forex ample toset the
climate control forth e windscreen and the
fo ot we lls simultaneousl y.
The ¯ climate contro lfo rth e windscreen
can only be selected forth efirs t seat row. Ac
tivating/deactivating the climate control
syn chro nisation function via the air condi‐
tioning control panel Climate control can be set centrally using
the
synchronisation function. The temp erature and air distribution settings
forth e driver's side will
be adop ted automatically forth e front passenger
side. #
Press the0 button.
The synchronisation function will be deactivated
if th e settings for one of theot her climate con‐
trol zones are changed. Ac
tivating/deactivating the climate control
syn chro nisation function via the multimedia
sy stem Climate control can be set centrally using
the
synchronisation function. The driver's settings
fo rte mp erature, air quantity and air distribution
are adop ted automatically for all clima tezones. #
Call up the air conditioning menu
(/ page 143). #
Select First row of seats. #
Select SYNC. 14 4
Climate cont rol
Page 152 of 481
Setting
the departu retime #
Brie fly press theu button. #
Press the, or. button repeatedly
until the time tobe changed appears on the
displa y. #
Press theu and^ buttons simultane‐
ousl y.
The Îsymbol on there mo tecontrol display
will flash. #
Use the, and. buttons toset the
desired departure time. #
Press theu and^ buttons simultane‐
ousl y.
The new departure time will be stored.
Up tothre e departure times can be stored. #
Toactivate the departu retime: select the
desired departure time and press and hold
th eu button.
The Ísymbol, the departure time and,
depending on the selected departure time,
th e letter A, BorCwill appear on the displa y. #
Todeactivate the departure time: select
th e desired departure time and press and
hold the^ button.
OFF will appear on the displa y. #
Tocheck thest atus of the active station‐
ary heater: briefly press theu button.
Switching off immediately #
Press and hold the^ button.
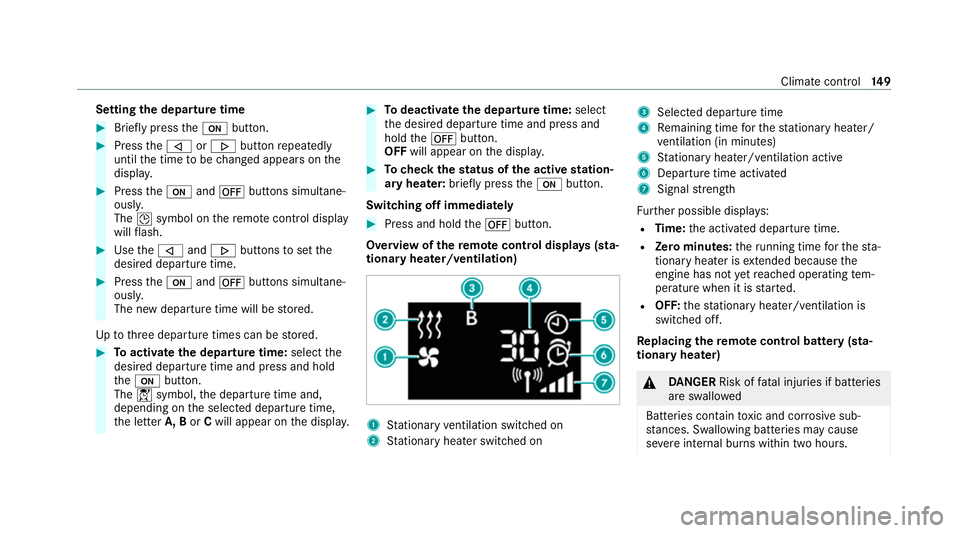
Overview of there mo tecont rol displa ys(sta‐
tiona ryheater/ventilation) 1
Stationary ventilation switched on
2 Stationary heater swit ched on 3
Selected departure time
4 Remaining time forth est ationary heater/
ve ntilation (in minu tes)
5 Stationary heater/ ventilation acti ve
6 Departure time acti vated
7 Signal stre ngth
Fu rther possible displa ys:
R Time: the activated departure time.
R Zero minutes: theru nning time forth est a‐
tionary heater is extended because the
engine has not yetre ached operating tem‐
perature when it is star ted.
R OFF: thest ationary heater/ ventilation is
switched off.
Re placing the remo tecont rol bat tery (sta‐
tiona ryheater) &
DANG ER Risk of fata l injuries if batteries
are swallo wed
Batteries contain toxic and cor rosive sub‐
st ances. Swallowing bat teries may cause
se vere internal burns within two hours. Climate control
14 9