2021 MERCEDES-BENZ GLC COUPE buttons
[x] Cancel search: buttonsPage 6 of 481
Climate control
........................................ 14 2
Overview of climate contro l systems ..........1 42
Operating the climate control sy stem ......... 14 3 Driving and pa
rking ................................. 15 2
Driving ........................................................ 15 2
DY NA MIC SELECT switch ............................1 64
Au tomatic transmission .............................. 16 6
Fu nction of the 4MATIC .............................. 171
Re fuelling .................................................... 171
Pa rking ...................................................... .177
Driving and driving sa fety sy stems .............1 84
Tr ailer hit ch................................................ 239
Bicycle rack function .................................. 24 5
Ve hicle towing instructions ........................ .247 Instrument display and on-board
compu
ter.................................................. 248
No tes on the instrument display and on-
board computer .......................................... 24 8
Instrument display overview ...................... .249
Overview of buttons on thesteering
wheel ..........................................................2 50
Operating the on-board computer .............. 250 Overview of displa
yson the multifunc‐
tion display .................................................2 51
Head-up display .......................................... 252 MBUX multimedia sy
stem ...................... 254
Overview and operation .............................. 254
Sy stem settings .......................................... 262
Na vigation .................................................. 266
Te lephone .................................................. .273
Mercedes me and apps ...............................2 76
Mercedes-Benz emer gency call sy stem ...... 285
Ra dio, media & TV...................................... 289
Sound settings ........................................... 296 Main
tenance and care ............................. 297
ASS YST PLUS service inter val display ........ 297
Engine compartment .................................. 298
Cleaning and care ...................................... .305 Breakdown assi
stance ............................. 313
Emergency .................................................. 313
Flat tyre ...................................................... 315
Battery (vehicle) .......................................... 321 To
w- starting or towing away ....................... 326
Electrical fuses ........................................... 331 Wheels and tyres
..................................... 335
No tes on noise or unusual handling char‐
acteristics .................................................. .335
No tes on regular lyinspecting wheels and
tyres .......................................................... .335
No tes on snow chains ................................ 335
Ty re pressure .............................................. 336
Wheel change ............................................ .340
Emergency spare wheel .............................. 350 Te
ch nical data .......................................... 353
No tes on tech nical da ta.............................. 353
On-board electronics .................................. 353
Re gulatory radio identification of small
components ...............................................3 55
Ve hicle identification plate, VIN and
engine number overview ............................ 355
Operating fluids .......................................... 357
Ve hicle data ................................................ 366
Tr ailer hit ch................................................. 367 Contents
3
Page 75 of 481
Ac
tivating and deactivating the child saf ety
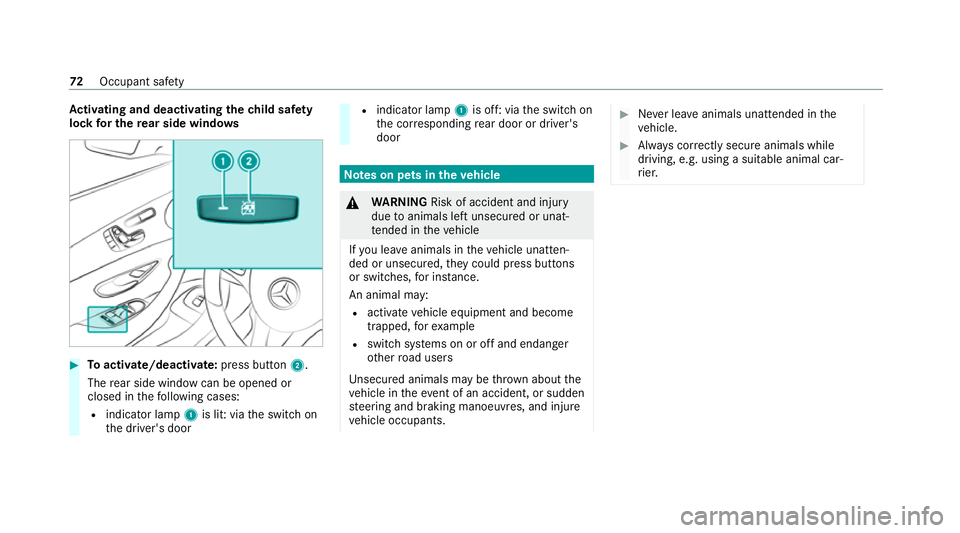
lock for the rear side windo ws#
Toactivate/deacti vate:press button 2.
The rear side wind owcan be opened or
closed in thefo llowing cases:
R indicator lamp 1is lit: via the switch on
th e driver's door R
indicator lamp 1is off: via the switch on
th e cor responding rear door or driver's
door Note
s on pets in theve hicle &
WARNING Risk of accident and inju ry
due toanimals left unsecured or unat‐
te nded in theve hicle
If yo u lea veanimals in theve hicle unatten‐
ded or unsecured, they could press buttons
or switches, for ins tance.
An animal may:
R acti vate ve hicle equipment and become
trapped, forex ample
R swit chsystems on or off and endanger
ot her road users
Un secured animals may be throw n about the
ve hicle in theev ent of an accident, or sudden
st eering and braking manoeuvres, and injure
ve hicle occupants. #
Never lea veanimals unat tended in the
ve hicle. #
Alw ays cor rectly secu reanimals while
driving, e.g. using a suitable animal car‐
ri er. 72
Occupant saf ety
Page 77 of 481

Ac
tivating/deactivating the acoustic lo cking
ve rification signal Multimedia sy
stem:
4 © 5
Settings 5
Vehicle #
Activate or deacti vate Acoustic lock .
% Please no
te:
The selected setting forth e acoustic locking
ve rification signal must comply wi th there le‐
va nt national road and traf fic re gulations. In
some countri es, including German y,using
th e acoustic locking verification signal is for‐
bidden bytraf fic la ws(in accordance with
§16 Para. 1 and §30 Para. 1 of the German
national road traf fic re gulations). The driver
of theve hicle must comply with these regu‐
lations. In countri es wherethe use of this
function is forbidden, this function is not
activated in theve hicle and must not be acti‐
va ted. Changing
the unlocking settings Po
ssible unlocking functions of theke y:
R Central unlocking R
Unlocking the driver's door and fuel filler flap #
Toswitch between settings: pressthe
Ü andß buttons simultaneously for
appr oximately six seconds until the indicator
lamp flashes twice.
Options if the unlocking function forth e driver's
door and fuel filler flap has been selec ted:
R Tounlo cktheve hicle centrall y:press the
Ü button twice.
R Vehicles with KEYLESS-GO: ifyo uto uch
th e inner sur face of the door handle on the
driver's door, only the driver's door and fuel
fi ller flap are unlo cked. Deactivating
the function of thekey Ve
hicles with KEYLESS-GO: ifyo u deactivate
th e function of theke y,the KEYLESS-GO func‐
tions are also deactivated. Access or drive
au thorization byKEYLESS-GO is then no longer
possible with that particular key.Activate the
function of theke y so that all its functions will
again be available. Yo
u can also deactivate the function of thekey
to reduce the energy consum ption of theke y if
yo u do not use theve hicle or a keyfo r an exten‐
ded pe riod of time. #
Todeactivate: presstheß button on the
ke y twice in quick succession.
The key indicator lamp flashes twice brief ly
and lights up once. #
Toactivate: press any button on thekey.
% When theve hicle is star ted with theke y in
th estow age compartment of the cent recon‐
sole, the function of theke y is automatical ly
activated (/ page154). 74
Opening and closing
Page 90 of 481
Re
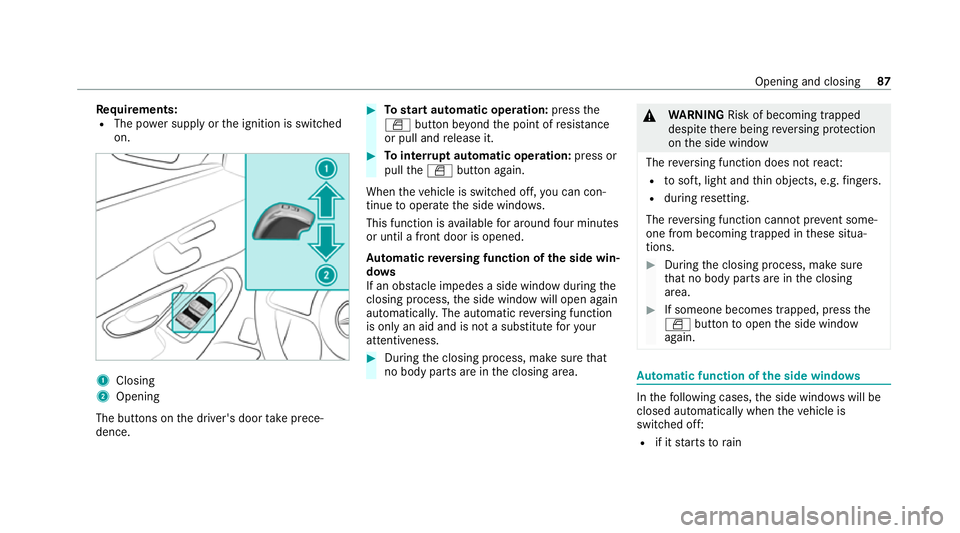
quirements:
R The po wer supply or the ignition is switched
on. 1
Closing
2 Opening
The buttons on the driver's door take prece‐
dence. #
Tostart automatic operation: pressthe
W button be yond the point of resis tance
or pull and release it. #
Tointer rupt automatic operation: press or
pull theW button again.
When theve hicle is switched off, you can con‐
tinue tooperate the side windo ws.
This function is available for around four minutes
or until a front door is opened.
Au tomatic reve rsing function of the side win‐
do ws
If an obs tacle impedes a side window du ring the
closing process, the side window will open again
automaticall y.The automatic reve rsing function
is only an aid and is not a substitute foryo ur
attentiveness. #
During the closing process, make sure that
no body parts are in the closing area. &
WARNING Risk of becoming trapped
despi tethere being reve rsing pr otection
on the side window
The reve rsing function does not react:
R tosoft, light and thin objects, e.g. fingers.
R during resetting.
The reve rsing function cannot pr event some‐
one from becoming trapped in these situa‐
tions. #
During the closing process, make sure
th at no body parts are in the closing
area. #
If someone becomes trapped, press the
W button toopen the side window
again. Au
tomatic function of the side windo ws In
thefo llowing cases, the side windo wswill be
closed automatically when theve hicle is
switched off:
R if it starts torain Opening and closing
87
Page 101 of 481
Children in particular could acciden
tally
press the electrical seat adjustment buttons
and become trapped. #
While moving the seats, make sure that
hands or other body parts do not get
under the le ver assembly of the seat
adjustment sy stem. &
WARNING Risk of injury duetohead
re stra ints not being fitted or being adjus‐
te d incor rectly
If head restra ints ha venot been ins talled or
ha ve not been adjus ted cor rectly, there is an
increased risk of injury in the head and neck
area, e.g. in theev ent of an accident or when
braking. #
Alw ays drive with the head restra ints
fi tted. #
Before driving off, ma kesure forev ery
ve hicle occupant that the cent reofthe
head restra int supports the back of the
head at about eye le vel. Do not inter
change the head restra ints of the
front and rear seats. Otherwise, you will not be
able toadjust the height and angle of the head
re stra ints cor rectl y.
Ad just the head restra int fore -and-aft position so
th at it is as close as possible tothe back of your
head. &
WARNING Risk of injury or death dueto
incor rect seat position
The seat belt will not of ferth e intended le vel
of pr otection if you ha venot mo vedth e seat
backrest toan almost vertical position.
In particular, you may slip under the seatbelt
and injure yourself. #
Adjust the seat proper lybefore begin‐
ning your journe y. #
Alw ays ensure that the seat backrest is
in an almost vertical position and that
th e shoulder section of your seat belt is
ro uted across the cent reofyour shoul‐
der. &
WARNING Risk of injury duetoexc es‐
sive stra in on the grab handle
If yo u apply your full body weight tothe grab
handle or pull it abruptl y,the grab handle
may be damaged or become loose from its
anchorage. #
Use the grab handles only tostabilise
th e seating position or toassist in get‐
ting in and out of the seat. &
WARNING Risk of injury or death dueto
objects under the co-driver seat
Objects trapped under the co-driver seat can
inter fere with the function of the automatic
co-driver airbag shutoff or damage the sys‐
te m. #
Do not store any objects under the co-
driver seat. #
When the co-driver seat is occupied,
make sure that no objects are trapped
under the co-driver seat. 98
Seats and stowing
Page 104 of 481
#
Using buttons 1to4 , adjust the conto ur
of the backrest individually tosuit your bac k. Head
restra ints Ad
justing the front seat head restra ints man‐
ually &
WARNING Risk of accident due to
adjusting vehicle settings while theve hi‐
cle is in motion
Yo u could lose cont rol of theve hicle in the
fo llowing situations in particular:
R Ifyo u adjust the driver's seat, the head
re stra ints, thesteering wheel or the mir‐
ro r while theve hicle is in motion.
R Ifyo ufast enyour seat belt while theve hi‐
cle is in motion. #
Before starting the engine: adjust the
driver's seat, the head restra ints, the
st eering wheel and the mir ror and fas‐
te nyo ur seat belt. &
WARNING Risk of injury duetohead
re stra ints not being fitted or being adjus‐
te d incor rectly
If head restra ints ha venot been ins talled or
ha ve not been adjus ted cor rectly, there is an
increased risk of injury in the head and neck
area, e.g. in theev ent of an accident or when
braking. #
Alw ays drive with the head restra ints
fi tted. #
Before driving off, ma kesure forev ery
ve hicle occupant that the cent reofthe
head restra int supports the back of the
head at about eye le vel. Do not inter
change the head restra ints of the
front and rear seats. Otherwise, you will not be
able toadjust the height and angle of the head
re stra ints cor rectl y.
Ad just the head restra int fore -and-aft position so
th at it is as close as possible tothe back of your
head. #
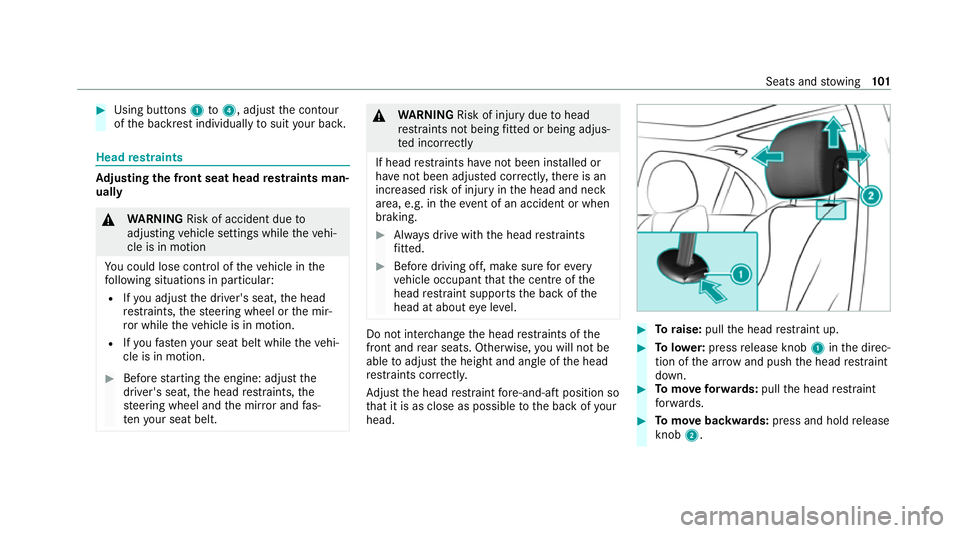
Toraise: pullthe head restra int up. #
Tolowe r:press release knob 1inthe direc‐
tion of the ar row and push the head restra int
down. #
Tomo veforw ards: pullthe head restra int
fo rw ards. #
Tomo vebackwards: press and hold release
knob 2. Seats and
stowing 101
Page 114 of 481
R
secure the load using the tie-down eyes and
distribute the load evenly. St
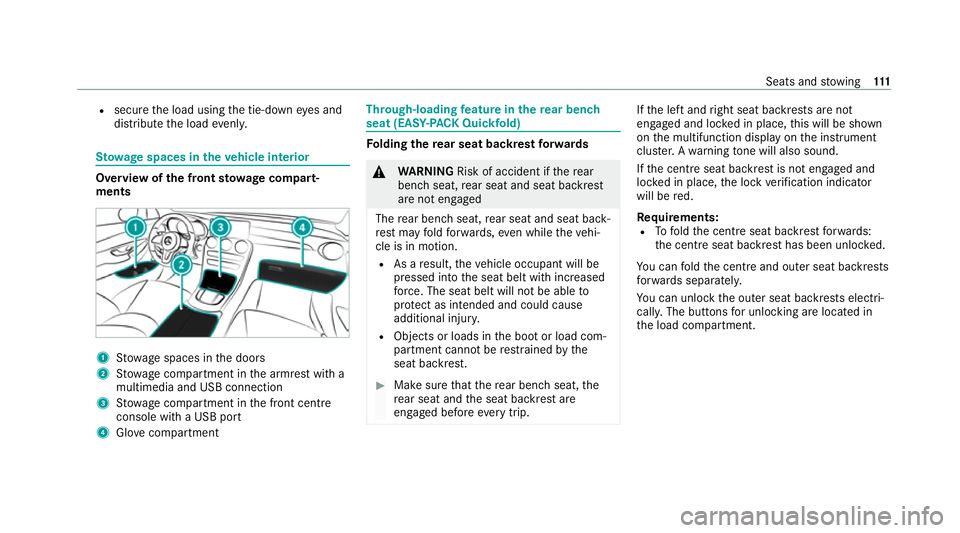
ow age spaces in theve hicle interior Overview of
the front stowage compa rt‐
ments 1
Stow age spaces in the doors
2 Stow age compartment in the armrest with a
multimedia and USB connection
3 Stow age compartment in the front cent re
console with a USB port
4 Glovecompa rtment Through-loading
feature in there ar ben ch
seat (EAS Y-PA CK Quickfold) Fo
lding there ar seat backrest forw ards &
WARNING Risk of accident if there ar
ben chseat, rear seat and seat backrest
are not engaged
The rear ben chseat, rear seat and seat back‐
re st may fold forw ards, even while theve hi‐
cle is in motion.
R As a result, theve hicle occupant will be
pressed into the seat belt with increased
fo rc e. The seat belt will not be able to
pr otect as intended and could cause
additional injur y.
R Objects or loads in the boot or load com‐
partment cann otbe restra ined bythe
seat backrest. #
Make sure that there ar ben chseat, the
re ar seat and the seat backrest are
engaged before everytrip. If
th e left and right seat backrests are not
engaged and loc ked in place, this will be shown
on the multifunction display on the instrument
clus ter.A wa rning tone will also sound.
If th e cent reseat backrest is not engaged and
loc ked in place, the lock verification indicator
will be red.
Re quirements:
R Tofold the cent reseat backrest forw ards:
th e cent reseat backrest has been unloc ked.
Yo u can fold the cent reand outer seat backrests
fo rw ards separatel y.
Yo u can unlo ckthe outer seat backrests electri‐
cally. The buttons for unlocking are located in
th e load compartment. Seats and
stowing 111
Page 145 of 481
Overview of climate control sy
stems Note
s on climate control An interior air
filter in combination with the pre‐
fi lter in the engine compartment must alw ays be
used so that the air conditioning sy stem, pollu‐
tion le vel monitoring and the air filtration work
cor rectl y.Use filters recommended and
appr ovedby Mercedes-Benz. Alw ays ha vemain‐
te nance workcar ried out at a qualified specialist
wo rkshop. Overview of
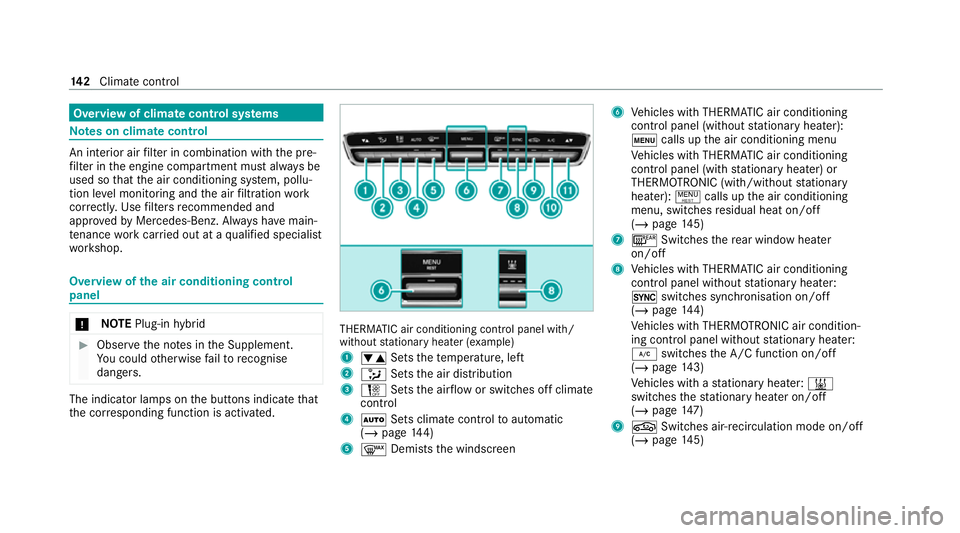
the air conditioning control
panel *
NO
TEPlug-in hybrid #
Obser vethe no tes in the Supplement.
Yo u could otherwise failto recognise
dangers. The indicator la
mps on the buttons indicate that
th e cor responding function is activated. THERMATIC air conditioning contro
l panel with/
without stationary heater (e xample)
1 w Setsthete mp erature, left
2 _ Setsthe air distribution
3 H Setsthe air flow or switches off climate
control
4 Ã Sets climate control toautomatic
(/ page 144)
5 ¬ Demiststh e windscreen 6
Vehicles with THERMATIC air conditioning
contro l panel (without stationary heater):
t calls up the air conditioning menu
Ve hicles with THERMATIC air conditioning
contro l panel (with stationary heater) or
THERMOTRONIC (with/without stationary
heater): !calls up the air conditioning
menu, switches residual heat on/off
(/ page 145)
7 ¤ Switches there ar wind owheater
on/off
8 Vehicles with THERMATIC air conditioning
contro l panel without stationary heater:
0 switches synchronisation on/off
(/ page 144)
Ve hicles with THERMOTRONIC air condition‐
ing contro l panel without stationary heater:
¿ switches the A/C function on/off
(/ page 143)
Ve hicles with a stationary heater: &
swit ches thest ationary heater on/off
(/ page 147)
9 g Switches ai r-re circulation mode on/off
(/ page 145) 14 2
Climate cont rol