2021 MERCEDES-BENZ GLC COUPE warning
[x] Cancel search: warningPage 309 of 481
*
NO
TEDama gefrom auto matic braking If one of
thefo llowing functions is switched
on, theve hicle brakes automatically in cer‐
ta in situations:
R Active Brake Assi st
R Active Dis tance Assi stDISTRONIC
R HOLD function
R Active Parking Assist
To avo id damage totheve hicle, deactivate
th ese sy stems in thefo llowing or similar sit‐
uations: #
during towing #
in a car wash *
NO
TEDama gedue tounsuitable car
wa sh #
Before driving into a car wash make
sure that the car wash is suitable for
th eve hicle dimensions. #
Ensure there is suf ficient ground clear‐
ance between the underbody and the
guide rails of the car wash. #
Ensure that the clearance width of the
car wash, in particular the width of the
guide rails, is suf ficient. To
avo id damage to yourvehicle when using a
car wash, ensure thefo llowing beforehand:
R Active Dis tance Assi stDISTRONIC is deacti‐
va ted.
R The HOLD function is switched off.
R The 360° Camera or there ve rsing camera is
switched off.
R The side windo wsand sliding sun roof are
comple tely closed.
R The bl owerfo rth eve ntilation/heating is
switched off.
R The windsc reen wiper switch is in position
g.
R The key is at a minimum dis tance of 3 m
aw ay from theve hicle. Otherwise theta ilgate
could open unin tentional ly. R
In automatic car washes with con veyo r sys‐
te ms:
- Neutral iis engaged.
- Ifyo uwo uld like tolea vetheve hicle while
it is being washed, make sure theke y is
located in theve hicle. The park position
j isotherwise automatically engaged.
% If, af terth e car wash, youre mo vethewax
from the windscreen and wiper rubbers, this
will pr event smearing and reduce wiper
noise. Information on using a high-p
ressure cleaner &
WARNING Risk of an accident when
using high-pressure cleane rswith round-
spray nozzles
The wate r jet can cause extern ally invisible
damage.
Components damaged in this wa y may unex‐
pec tedly fail. 306
Maintenance and care
Page 312 of 481
%
Have wo rkor repairs todecorative foils car‐
ri ed out at a qualified specialist workshop,
e.g. in a Mercedes-Benz Service Centre. Note
s on care of car parts &
WARNING Risk of entrapment if the
windscreen wipers are swit ched on while
th e windscreen is being cleaned
If th e windscreen wipers are set in motion
while you are cleaning the windscreen or
wiper blades, you can be trapped bythe
wiper arm. #
Alw ays switch off the windscreen wip‐
ers and the ignition before cleaning the
windscreen or wiper blades. &
WARNING Risk of burn s fromtheta il‐
pipe and tailpipe trims
The exhaust tailpipe and tailpipe trims can
become very hot. If you come into contact
with these parts of theve hicle, you could
burn yourself. #
Alw ays be particular lycareful around
th eta ilpipe and theta ilpipe trims and
supervise children especially closely in
th is area. #
Allow vehicle parts tocool down before
to uching them. To
avo id damage totheve hicle, obser vethe
no tes on cleaning and care of thefo llowing vehi‐
cle parts:
Wheels and rims
R Use wate r and acid-free alloy wheel cleaners.
R Do not use acidic alloy wheel cleaners to
re mo vebrake dust. This could damage wheel
bolts and brake components.
R Toavo id cor rosion of the brake disks and
brakepads, drive theve hicle for a few
minutes af ter cleaning before parking it. The
brake disks and brakepads warm up and dry
out. Wi
ndo ws
R Clean the windo wsinside and outside with a
damp clo thand with a cleaning agent recom‐
mended for Mercedes-Benz.
R Do not use dry clo ths or abrasive or sol vent-
based cleaning agents toclean the inside of
windo ws.
% Remo veextern al fogging or dirt on the wind‐
screen in front of the multifunction camera.
Otherwise, driving sy stems and driving
saf ety sy stems may be impaired or not avail‐
able (/ page184).
Wi per blades
R Movethe wiper arms into there placement
position (/ page137).
R With th e wiper arms folded out, clean the
wiper blades with a damp clo th.
R Do not clean the wiper blades too of ten.
Ex terior lighting
R Clean the lenses with a wet sponge and mild
cleaning agent, e.g. car sha mpoo.
R Only use cleaning agents or cleaning clo ths
th at are suitable for plast ic lenses. Maintenance and care
309
Page 313 of 481
Sensors
R
Clean the sensors in the front and rear
bumpers with a soft clo thand car shampoo
(/ page 184).
R When using a high -pressure cleaner,maintain
a minimum dis tance of 30 cm.
Ru nning boards
R Use wate r and acid-free cleaning agents.
R Do not clean the aluminium trim insert of the
ru nning board wi thalkaline or acidic cleaning
agents such as wheel cleaners. Do not use
acidic alloy wheel cleaners toremo vebrake
dust. The aluminium trim inserts could other‐
wise be damaged.
Re versing camera and 360° Camera
R Open the camera co ver with the multimedia
sy stem (/ page 228).
R Use clean water and a soft clo thtoclean the
came ralens.
R Do not use a high-pressure cleaner. Ta
ilpipes
R Clean with a cleaning agent recommended
fo r Mercedes-Benz, especially inthe winter
and af terwa shing theve hicle.
R Do not use acidic cleaning agents.
Tr ailer hitch
R Obse rveth e no tes on care in the trailer hitch
manufacturer's operating instructions.
R Do not clean the ball neck with a high-pres‐
sure cleaner or solvent.
R Remo vetraces of rust on the ball, forex am‐
ple, with a wire brush.
R Remo vedirt with a lint-free clo th.
R After cleaning, lightly oil or grease the ball
head.
% Before using trailers with anti- torsional cou‐
pling, obser vethe manufacturer's operating
instructions. Note
s on care of the interior &
WARNING Risk of injury from plastic
parts breaking off af terth e use of sol‐
ve nt-based care products
Ca reand cleaning products con taining sol‐
ve nts can cause su rfaces in the cockpit to
become porous. When the airbags are
deplo yed, plastic parts may break away. #
Do not use any care or cleaning prod‐
ucts containing sol vents toclean the
cockpit. &
WARNING Risk of injury or death from
bleached seat belts
Bleaching or dyeing seat belts can se verely
we aken them.
This can, forex ample, cause seat belts to
te ar or fail in an accident. #
Never blea chor dye seat belts. To
avo id damage totheve hicle, obser vethefo l‐
lowing no tes on cleaning and care: 310
Maintenance and care
Page 316 of 481
Emer
gency Re
moving the saf etyve st The saf
etyve sts are located in thestow age com‐
partments in the driver's and front passenger
door. #
Pull out the saf etyve st bag bythe loop. #
Open the saf etyve st bag and pull out the
saf etyve st.
% There are also saf etyve st compa rtments in
th ere ar door stowage compartments in
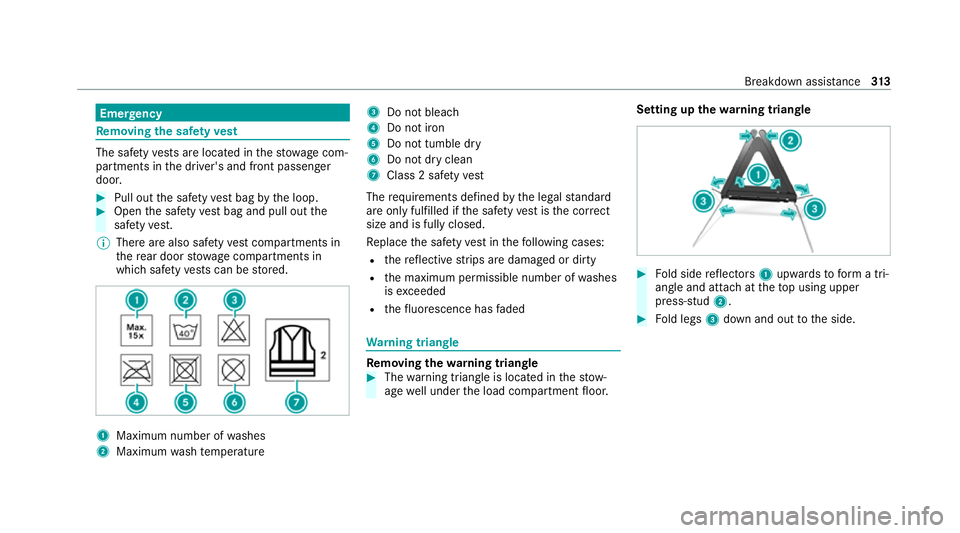
which saf etyve sts can be stored. 1
Maximum number of washes
2 Maximum wash temp erature 3
Do not bleach
4 Do not iron
5 Do not tumble dry
6 Do not dry clean
7 Class 2 saf etyve st
The requ irements defined bythe legal standard
are on ly fulfilled if the saf etyve st isthe cor rect
size and is fully closed.
Re place the saf etyve st inthefo llowing cases:
R there flective strips are damaged or dirty
R the maximum permissible number of washes
is exceeded
R thefluorescence has faded Wa
rning triangle Re
moving the warning triangle #
The warning triangle is located in thestow‐
age well under the load compartment floor. Setting up
thewa rning triangle #
Fold side reflectors 1upwards toform a tri‐
angle and attach at theto p using upper
press-stud 2. #
Fold legs 3down and out tothe side. Breakdown assis
tance 313
Page 317 of 481
Fi
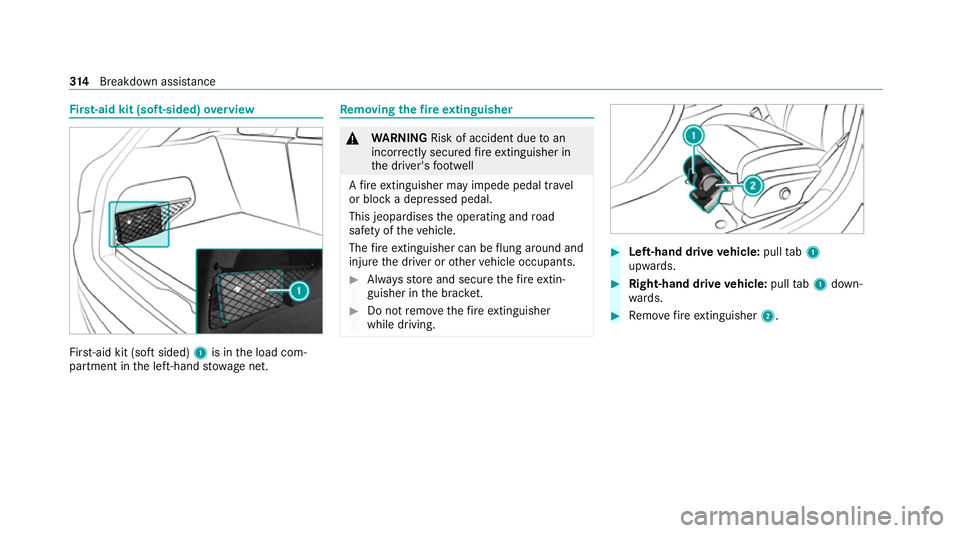
rs t-aid kit (soft-sided) overview Fir
st-aid kit (so ftsided) 1is in the load com‐
partment in the left-hand stowage net. Re
moving the fire extinguisher &
WARNING Risk of accident due toan
incor rectly secu redfire extinguisher in
th e driver's foot we ll
A fire extinguisher may impede pedal tr avel
or block a depressed pedal.
This jeopardises the operating and road
saf ety of theve hicle.
The fire extinguisher can be flung around and
injure the driver or other vehicle occupants. #
Alw aysst ore and secure thefire extin‐
guisher in the brac ket. #
Do not remo vethefire extinguisher
while driving. #
Left-hand drive vehicle: pulltab1
upwards. #
Right-hand drive vehicle: pulltab1 down‐
wa rds. #
Remo vefire extinguisher 2. 314
Breakdown assis tance
Page 318 of 481
Flat ty
re Note
s onflat tyres &
WARNING Risk of accident due toaflat
tyre
A flat tyre se verely affects the driving charac‐
te rist ics as well as thesteering and braking
of theve hicle.
Ty res without run-flat characteristics: #
Do not drive with a flat tyre. #
Chan getheflat tyre immediately with
an emer gency spa rewheel or spare
wheel. Alternativel y,consult a qualified
specialist workshop.
Ty res with run-flat characteristics: #
Obse rveth e information and warning
no tes on MOExtended tyres (run-flat
tyres). In
theeve nt of a flat tyre, thefo llowing options
are available depending on your vehicle's equip‐
ment:
R Vehicles with MOExtended tyres: it is pos‐
sible tocontinue the journey for a short
period of time. Make sure you obse rvethe
no tes on MOExtended tyres (run-flat tyres)
(/ page 315).
R Vehicles with a TIREFIT kit: you can repair
th e tyre so that it is possible tocontinue the
jou rney for a short period of time. Todo this,
use the TIREFIT kit (/ page317).
R Vehicles with Mercedes me connect: you
can make a call for breakdown assi stance via
th eov erhead control panel in the case of a
breakdown (/ page278).
R Allvehicles: change the wheel
(/ page 345). Note
s on MOExtended tyres (run-flat tyres) &
WARNING Risk of accident when driving
in limp -home mode
Driving in emergency mode impairs the han‐
dling characteristics of theve hicle. #
Do not exceed the permissible maxi‐
mum speed of the MOEx tended tyres. #
Avoid any abrupt steering and driving
manoeuvres as well as driving over
obs tacles (kerbs, pot holes, off-road).
This applies, in pa rticular, toa loaded
ve hicle. #
Stop driving in the emer gency mode if
yo u notice:
R banging noise
R vehicle vibration
R smoke which smells like rubber
R continuous ESP ®
inter vention
R crac ksinthe tyre side walls #
After driving in emergency mode, ha ve
th erims checkedby aqu alified special‐ Breakdown assis
tance 315
Page 319 of 481
ist
workshop with rega rd totheir fur ther
use. #
The defective tyre must be replaced in
eve rycase. Wi
th MOExtended tyres (run-flat tyres), you can
continue todrive your vehicle even if there is a
tot al loss of pressure in one or more tyres. How‐
eve r,th e tyre af fected must not show any clearly
visible damage.
Yo u can recognise MOExtended tyres bythe
MOExtended marking which appears on the side
wa ll of the tyre.
Ve hicles with tyre pressure loss warning sys‐
te m: MOExtended tyres may only be used in
conjunction wi than activated tyre pressure loss
wa rning sy stem.
Ve hicles with tyre pressure monitoring sys‐
te m: MOExtended tyres may only be used in
conjunction wi than activated tyre pressure mon‐
itoring sy stem. If a pressure loss
warning message appears in
th e multifunction displa y,proceed as follo ws:
R Check the tyre for dama ge.
R If driving on, obser vethefo llowing no tes.
Driving distance possible in emer gency
mode af ter the pressure loss warning: Load condition Driving distance pos‐
sible in emergency
mode
Pa rtially laden 80 km
Fu lly laden 30 km The driving dis
tance possible in emergency
mode may vary depending on the driving style.
Obser vethe maximum permissible speed of
80 km/h.
If a tyre has gone flat and cannot be replaced
with an MOEx tended tyre, you can use a stand‐
ard tyre as a temp orary measure. TIREFIT kit
storage location Plug-in
hybrid: be sure toobser vethe no tes in
th e Supplement. Otherwise, you may failto rec‐
ognise dangers.
The TIREFIT kit is loca ted under the load com‐
partment floor, under a co ver on the left-hand
side. Push
retaining clamps 1onthe co ver down‐
wa rdsto release them and fold out the co ver in
th e direction of ar row2. 316
Breakdown assis tance
Page 320 of 481
%
You can find information on the po wer cate‐
gory (LK) and/or electrical data on the back
of the tyre inflation compressor:
R LK3 – 12V/20 A,240W, 1kg
At a dis tance of appr oximately 1 m tothe
tyre inflation compressor and appr oximately
1. 6 m abo vethe ground, thefo llowing sound
pressure le vels apply:
R Emission sound pressure le vel L
PA
84 dB (A)
R Sound po wer le vel L
WA 92 dB (A)
The tyre inflation compressor is mainte‐
nance-free. If there is a malfunction, please
conta ct aqualified specialist workshop. Using
the TIREFIT kit Re
quirements:
R Tyre sealant bottle and tyre inflation com‐
pressor (/ page316).
R TIREFIT sticker
R Gloves (depending on theve hicle equipment) Yo
u can use TIREFIT tyre sealant toseal per fora‐
tion dama geof up to4 mm, particularly those in
th e tyre conta ct surface.You can use TIREFIT in
outside temp eratures down to-20°C. &
WARNING Risk of accident when using
tyre sealant
The tyre sealant may be unable toseal the
tyre properly, especially in thefo llowing
cases:
R there are lar gecuts or punctures in the
tyre (larger than damage pr eviously men‐
tioned)
R the wheel rims ha vebeen damaged
R afte r journe yswith very low tyre pressure
or with flat tyres #
Do not continue driving. #
Consult a qualified specialist workshop. &
WARNING Risk of injury and poisoning
from tyre sealant
Ty re sealant is hazardous tohealth and cau‐
ses ir rita tion. Do not allow it tocome into
contact wi thyour skin, eyes or clo thing, and
do not swallow it. Do not inhale any vapours.
Ke ep the tyre sealant away from children.
Obser vethefo llowing if you come into con‐
ta ct with th e tyre sealant: #
Rinse off the tyre sealant from your skin
using water immediatel y. #
If tyre sealant gets into your eyes, thor‐
oughly rinse them using clean water
immediatel y. #
If tyre sealant has been swallowe d,
th oroughly rinse out your mouth imme‐
diately and drink plenty of water.Do not
induce vomiting and seek medical
attention immediately. #
Change out of clo thing which has come
into con tact with tyre sealant immedi‐
ately. Breakdown assi
stance 317