2021 MERCEDES-BENZ GLC COUPE tow bar
[x] Cancel search: tow barPage 23 of 481
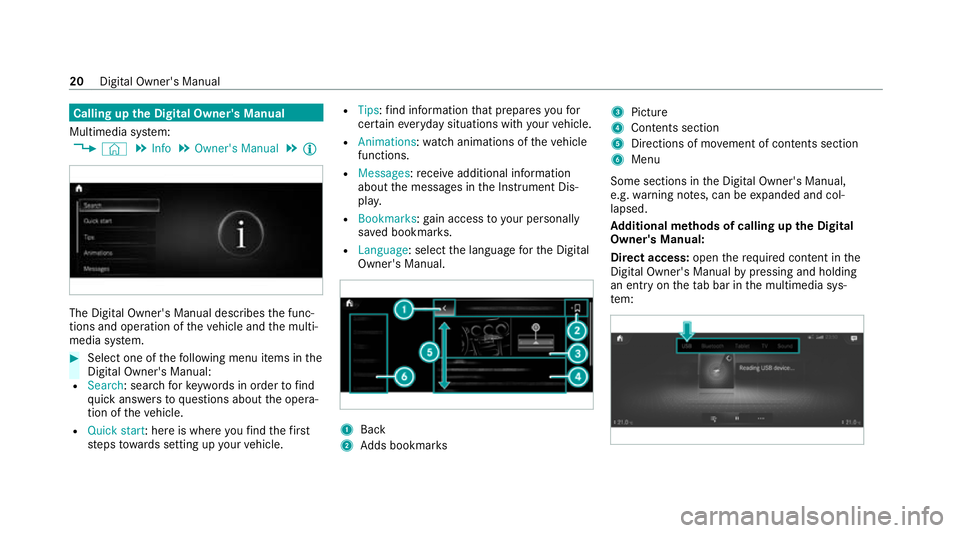
Calling up
the Digital Owner's Manual
Multimedia sy stem:
4 © 5
Info 5
Owner's Manual 5
Õ The Digital Owner's Manual describes
the func‐
tions and operation of theve hicle and the multi‐
media sy stem. #
Select one of thefo llowing menu items in the
Digital Owner's Manual:
R Search: sea rchfo rke ywords in order tofind
qu ick answers toquestions about the opera‐
tion of theve hicle.
R Quick start: here is where youfind thefirst
st eps towa rds setting up your vehicle. R
Tips: find information that prepares youfor
cer tain eve ryday situations with your vehicle.
R Animations: watch animations of theve hicle
functions.
R Messages: recei veadditional information
about the messages in the Instrument Dis‐
pla y.
R Bookmarks: gain access to your personally
sa ve d bookmar ks.
R Language: select the language forth e Digital
Owner's Manual. 1
Back
2 Adds bookmar ks 3
Picture
4 Contents section
5 Directions of mo vement of contents section
6 Menu
Some sections in the Digital Owner's Manual,
e.g. warning no tes, can be expanded and col‐
lapsed.
Ad ditional methods of calling up the Digital
Owner's Manual:
Di rect access: openthere qu ired conte nt inthe
Digital Owner's Manual bypressing and holding
an ent ryon theta b bar in the multimedia sys‐
te m: 20
Digital Owner's Manual
Page 103 of 481
#
Toadjust the seat fore -and-aft position:
lift le ver4 and slide the seat into the
desired position. #
Make sure that the seat is engaged. #
Toadjust the seat cushion length: lift lever
5 and slide the front section of the seat
cushion forw ards or backwards. Ad
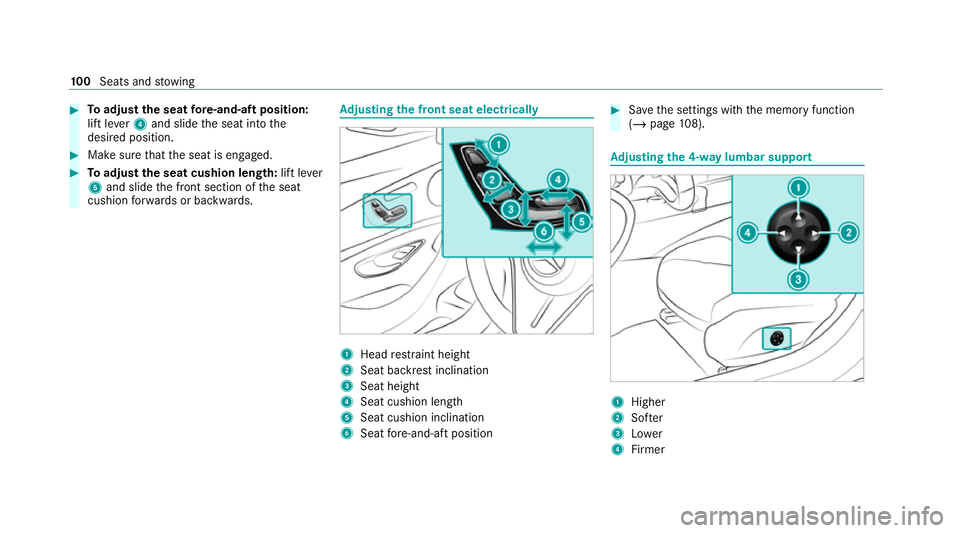
justing the front seat electrically 1
Head restra int height
2 Seat backrest inclination
3 Seat height
4 Seat cushion length
5 Seat cushion inclination
6 Seat fore -and-aft position #
Save the settings with the memory function
(/ page 108). Ad
justing the 4-w aylumbar support 1
Higher
2 Softer
3 Lower
4 Firmer 100
Seats and stowing
Page 105 of 481
#
Push the head restra int backwards and let go
of release knob 2.
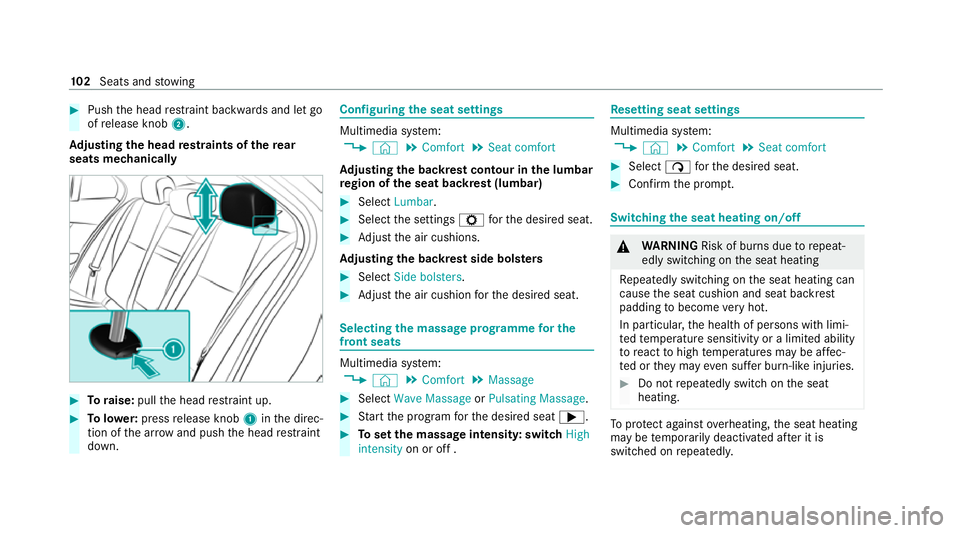
Ad justing the head restra ints of there ar
seats mechanically #
Toraise: pullthe head restra int up. #
Tolowe r:press release knob 1inthe direc‐
tion of the ar row and push the head restra int
down. Configuring
the seat settings Multimedia sy
stem:
4 © 5
Comfort 5
Seat comfort
Ad justing the backrest contour in the lumbar
re gion of the seat backrest (lumbar) #
Select Lumbar . #
Select the settings Zforth e desired seat. #
Adjust the air cushions.
Ad justing the backrest side bols ters #
Select Side bolsters . #
Adjust the air cushion forth e desired seat. Selecting
the massage prog ramme for the
front seats Multimedia sy
stem:
4 © 5
Comfort 5
Massage #
Select Wave Massage orPulsating Massage . #
Start the program forth e desired seat ;. #
Toset the massage intensit y:switch High
intensity on or off . Re
setting seat settings Multimedia sy
stem:
4 © 5
Comfort 5
Seat comfort #
Select ßforth e desired seat. #
Confirm the prom pt. Switching
the seat heating on/off &
WARNING Risk of burn s duetorepeat‐
edly switching on the seat heating
Re peatedly switching on the seat heating can
cause the seat cushion and seat backrest
padding tobecome very hot.
In particular, the health of persons with limi‐
te dte mp erature sensitivity or a limited ability
to react tohigh temp eratures may be af fec‐
te d or they may even suf fer burn-like injuries. #
Do not repeatedly switch on the seat
heating. To
protect against overheating, the seat heating
may be temp orarily deactivated af ter it is
switched on repeatedly. 102
Seats and stowing
Page 241 of 481
Tr
ailer Manoeuvring Assist Fu
nction of Trailer Manoeuvring Assist &
WARNING Risk of accident due to
unsuitable trailers
Tr ailers with a steered axle or a fift h wheel
cannot be used with Trailer Manoeuv ring
Assi st.
Due tothis, the trailer cann otbe man‐
oeuvred in the desired direction and you can
cause a collision or the trailer can overturn.
On lyuse Trailer Manoeuv ring Assi stwith
trailers with fixe d dr awbars and axles. *
NO
TEDama getotraile rswith a stabilisa‐
tion device against swerving In
the case of trailers with a stabilisation
device against swerving, the trailer or trailer
to w hit chcould be damaged. #
If a trailer coupling with Trailer Manoeu‐
vring Assist is used, on lyuse trailers without a
stabilisation device against
swerving. *
NO
TEDama gedue to ov erhanging loads
in front or draw bar installations The
vehicle and the trailer may be damaged
during manoeuvring due toove rhanging
loads at the front of the trailer or dr awbar
ins tallations. #
Pay attention to overhanging loads or
dr aw bar ins tallations while manoeu‐
vring. Tr
ailer Manoeuv ring Assi stassists you when
re ve rsing with a trailer. By means of a turning
angle sensor in the trailer coupling, Trailer
Manoeuv ring Assi stmonitors the articulation
angle between theve hicle and trailer and
adjusts it toa specified value.
Tr ailer Manoeuv ring Assi stis only an aid. It is not
a substitute foryo ur attention tothe sur round‐
ings. The responsibility for safe manoeuvring and
parking remains with you. Make sure that there
are no persons, animals or objects in themanoeuvring area while manoeuvring and park‐
ing in/exiting parking spaces.
Yo
u can either en terth e articulation angle value
directly via the multimedia sy stem or use a
st ra ightening manoeuvre. When car rying out a
st ra ightening manoeuvre, the sy stem calculates
th e articulation angle automatically and stra ight‐
ens theve hicle/trailer combination tothe trail‐
er's cur rent di rection.
Tr ailer Manoeuv ring Assi stmust be taught-in
before it can adjust the articulation angle
(/ page 239).
Obser vethe no tes on towing a trailer
(/ page 239).
Sy stem limits
Obser vethe sy stem limits of thefo llowing func‐
tions:
R Active Parking Assist (/ page 232)
R 360° Camera (/ page 224)
R Reversing camera (/ page 221)238
Driving and parking
Page 250 of 481
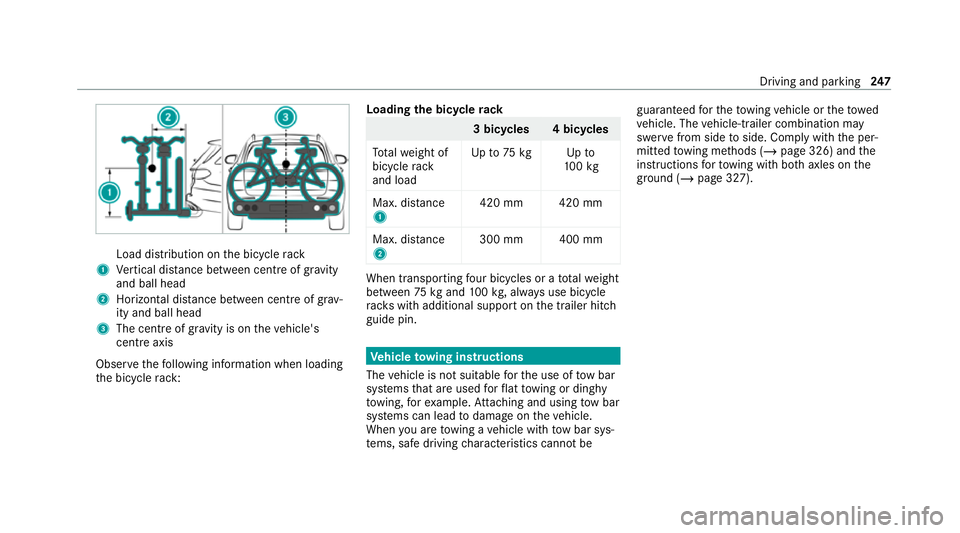
Load distribution on
the bicycle rack
1 Vertical dis tance between centre of gr avity
and ball head
2 Horizon tal dis tance between centre of gr av‐
ity and ball head
3 The centre of gr avity is on theve hicle's
centre axis
Obse rveth efo llowing information when loading
th e bicycle rack: Loading
the bicycle rack 3 bicycles 4 bicycles
To talwe ight of
bicycle rack
and load Up
to75 kg Up to
10 0kg
Max. dis tance
1 420 mm 420 mm
Max. di stance
2 300 mm 400 mm When transpo
rting four bic ycles or a totalwe ight
between 75kgand 100kg , alw ays use bicycle
ra ck s with additional support on the trailer hitch
guide pin. Ve
hicle towing instructions
The vehicle is not suitable forth e use of tow bar
sy stems that are used forflat towing or ding hy
to wing, forex ample. Attach ing and using tow bar
sy stems can lead todamage on theve hicle.
When you are towing a vehicle with tow bar sys‐
te ms, safe driving characteristics cannot be guaranteed
forth eto wing vehicle or theto wed
ve hicle. The vehicle-trailer combination may
swer vefrom side toside. Comply with the per‐
mitted towing me thods (/ page 326) and the
instructions forto wing with bo thaxles on the
ground (/ page 327). Driving and parking
247
Page 323 of 481
&
WARNING Risk of accident from driving
wi th sealed tyres
A tyre temp orarily sealed with tyre sealant
impairs the handling characteristics and is
not suitable for higher speeds. #
Adapt your driving style according lyand
drive carefull y. #
Do not exceed the maximum speed
limit with a tyre that has been repaired
using tyre sealant. #
Obser vethe maximum permissible speed for
a tyre sealed with tyre sealant 80 km/h.
* NO
TEStaining from leaking tyre sealant Af
ter use, excess tyre sealant may leak out
from thefilling hose. #
Therefore, place thefilling hose in the
plastic bag that con tained the TIREFIT
kit. +
ENVIRONMEN
TALNO TEEnvironmental
pollution caused byenvironmen tally ir re‐
sponsible disposal Ty
re sealant contains polluta nts. #
Have the tyre sealant bottle disposed of
professionall y,e.g. at a Mercedes-Benz
Service Centre. #
Stow th e tyre sealant bottle and the tyre
inflation compressor. #
Pull away immediatel y. #
Stop driving af ter appro ximately ten minu tes
and check the tyre pressure using the tyre
inflation compressor.
The tyre pressure must now be at least
13 0 kPa (1.3 bar/19 psi). &
WARNING Risk of accident due tothe
specified tyre pressure not being
attained
If th e specified tyre pressure is not reached,
th e tyre is too badly damaged. The tyre seal‐
ant cannot repair the tyre in this ins tance. The braking and driving
characteristics may
be great lyimpaired. #
Do not continue driving. #
Consult a qualified specialist workshop. Countries
that ha veMercedes-Benz
Service24h: you will find a sticke r with thete le‐
phone number, e.g. on the B‑pillar on the driver's
side. #
Cor rect the tyre pressure if it is still at least
13 0 kPa (1.3 bar/19 psi). See the tyre pres‐
sure table on the fuel filler flap forva lues. #
Toincrease the ty repressure: switch on
th e tyre inflation compressor. 320
Breakdown assis tance
Page 330 of 481
Mercedes-Benz
recommends transporting your
ve hicle in the case of a breakdown, rath er than
to wing it away.
Fo rto wing, use a tow rope or tow bar with bo th
axles on the ground. Do not use tow bar sys‐
te ms.
* NO
TEDama getotheve hicle due to tow‐
ing away incor rectly #
Obser vethe instructions and no tes on
to wing away. Ve
hicles with automatic transmission Pe
rm itted towing me thods
Bo th axles on
th e ground Ye
s, maximum 50 km at
50 km/h
Fr ont axle
ra ised No
Re ar axle
ra ised Ye
s, if thesteering wheel is
fi xe d in the cent reposition
with a steering wheel lock 4MATIC
vehicles Pe
rm itted towing me thods
Bo th axles on
th e ground Ye
s, maximum 50 km at
50 km/h
Fr ont axle
ra ised No
Re ar axle
ra ised No To
wing with a raised axle: towing should be
per form ed byato wing compan y. To
wing theve hicle with bo thaxles on the
gr ound #
Obser vethe no tes on the permitted towing
me thods (/ page 326). #
Make sure that the battery is connected and
ch arge d.
Obser vethefo llowing points when the battery is
dischar ged:
R the engine cann otbe star ted R
the electric parking brake cann otbe released
or applied
R vehicles with automatic transmission: the
automatic transmission cannot be shif tedto
position iorj
% Vehicles with automatic transmission: if
th e automatic transmission cann otbe shif‐
te dto position i, orthe multifunction dis‐
play in the instrument clus ter does not show
anything, ha vetheve hicle transpor tedaw ay
( / page 329). A towing vehicle with lifting
equipment is requiredforve hicle transpor ta‐
tion.
* NO
TEDama gedue to to wing away at
exc essively high speeds or over long dis‐
ta nces The driv
etra in could be damaged when tow‐
ing at excessively high speeds or over long
dis tances. #
Atowing speed of 50 km/h must not
be exc eeded. Breakdown assis
tance 327
Page 331 of 481
#
Atowing dis tance of 50 km must not be
exc eeded. &
WARNING Risk of accident when towing
a ve hicle which is too heavy
If ano ther vehicle is tow- star ted or towed
aw ay, its weight must not exceed the permis‐
sible gross mass of your ow nve hicle, other‐
wise thefo llowing could occur:
R theto wing eye may become de tach ed.
R theve hicle/trailer combination may
swer veoreve nov erturn. #
If ano ther vehicle is tow- star ted or
to we daw ay, its weight must not exceed
th e permissible gross mass of your own
ve hicle. If a
vehicle must be tow- star ted or towe daw ay,
its permissible gross weight must not exceed the
permissible gross weight of theto wing vehicle. #
Information on the permissible gross mass of
th eve hicle can be found on theve hicle iden‐
tification plate (/ page 355). #
Vehicles with automatic transmission: do
not open the driver's door or front passenger
door, otherwise the automatic transmission
automatically shifts toposition j. #
Fittheto wing eye (/ page 330). #
Fasten theto w bar.
* NO
TEDama gedue toincor rect connec‐
tion of theto w bar #
Onlyconnect theto w rope or tow bar to
th eto wing eyes. #
Deactivate the automatic locking mechanism
(/ page 79). #
Do not activate the HOLD function. #
Deactivate tow- aw ay protection
(/ page 94). #
Deactivate Active Brake Assi st
( / page 210). #
Vehicles with automatic transmission:
shift the automatic transmission toposition
i. #
Release the electric parking brake. &
WARNING Risk of accident due tolimi‐
te d saf ety-re lated functions during the
to wing process
Saf ety-re lated functions are limited or no lon‐
ge rav ailable in thefo llowing situations:
R the ignition is switched off.
R the brake sy stem or po werst eering sys‐
te m is malfunctioning.
R the energy supply or the on-board electri‐
cal sy stem is malfunctioning.
When your vehicle is then towe daw ay, signif‐
icantly more ef fort may be requ ired tosteer
and brake than is norm allyrequ ired. #
Use a tow bar. #
Make sure that thesteering wheel can
mo vefreely before towing theve hicle
aw ay. 328
Breakdown assis tance