2021 MERCEDES-BENZ GLC COUPE radio
[x] Cancel search: radioPage 6 of 481
Climate control
........................................ 14 2
Overview of climate contro l systems ..........1 42
Operating the climate control sy stem ......... 14 3 Driving and pa
rking ................................. 15 2
Driving ........................................................ 15 2
DY NA MIC SELECT switch ............................1 64
Au tomatic transmission .............................. 16 6
Fu nction of the 4MATIC .............................. 171
Re fuelling .................................................... 171
Pa rking ...................................................... .177
Driving and driving sa fety sy stems .............1 84
Tr ailer hit ch................................................ 239
Bicycle rack function .................................. 24 5
Ve hicle towing instructions ........................ .247 Instrument display and on-board
compu
ter.................................................. 248
No tes on the instrument display and on-
board computer .......................................... 24 8
Instrument display overview ...................... .249
Overview of buttons on thesteering
wheel ..........................................................2 50
Operating the on-board computer .............. 250 Overview of displa
yson the multifunc‐
tion display .................................................2 51
Head-up display .......................................... 252 MBUX multimedia sy
stem ...................... 254
Overview and operation .............................. 254
Sy stem settings .......................................... 262
Na vigation .................................................. 266
Te lephone .................................................. .273
Mercedes me and apps ...............................2 76
Mercedes-Benz emer gency call sy stem ...... 285
Ra dio, media & TV...................................... 289
Sound settings ........................................... 296 Main
tenance and care ............................. 297
ASS YST PLUS service inter val display ........ 297
Engine compartment .................................. 298
Cleaning and care ...................................... .305 Breakdown assi
stance ............................. 313
Emergency .................................................. 313
Flat tyre ...................................................... 315
Battery (vehicle) .......................................... 321 To
w- starting or towing away ....................... 326
Electrical fuses ........................................... 331 Wheels and tyres
..................................... 335
No tes on noise or unusual handling char‐
acteristics .................................................. .335
No tes on regular lyinspecting wheels and
tyres .......................................................... .335
No tes on snow chains ................................ 335
Ty re pressure .............................................. 336
Wheel change ............................................ .340
Emergency spare wheel .............................. 350 Te
ch nical data .......................................... 353
No tes on tech nical da ta.............................. 353
On-board electronics .................................. 353
Re gulatory radio identification of small
components ...............................................3 55
Ve hicle identification plate, VIN and
engine number overview ............................ 355
Operating fluids .......................................... 357
Ve hicle data ................................................ 366
Tr ailer hit ch................................................. 367 Contents
3
Page 29 of 481
Ve
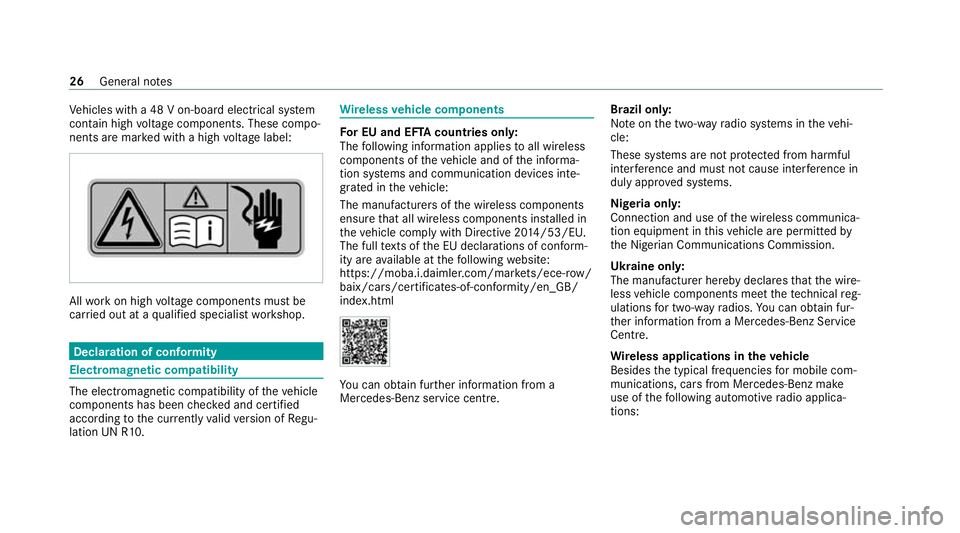
hicles with a 48 V on-board electrical sy stem
conta in high voltage components. These compo‐
nents are mar ked with a high voltage label: All
workon high voltage components must be
car ried out at a qualified specialist workshop. Declaration of conformity
Electromagnetic compatibility
The electromagnetic compatibility of
theve hicle
components has been checked and certified
according tothe cur rently valid version of Regu‐
lation UN R10. Wire
lessvehicle comp onents Fo
r EU and EF TAcount ries onl y:
The following information applies toall wireless
components of theve hicle and of the informa‐
tion sy stems and communication devices inte‐
grated in theve hicle:
The manufacturers of the wireless components
ensure that all wireless components ins talled in
th eve hicle comply with Directive 20 14/53/EU.
The full texts of the EU declarations of confo rm‐
ity are available at thefo llowing website:
https://moba.i.daimler.com/mar kets/ece-r ow/
baix/cars/certificates-of-conformity/en_GB/
index.html Yo
u can obtain fur ther information from a
Mercedes-Benz service cent re.Brazil only:
No
teon the two-w ayradio sy stems in theve hi‐
cle:
These sy stems are not pr otected from harmful
inter fere nce and mu stnot cause inter fere nce in
duly appr oved sy stems.
Nigeria onl y:
Connection and use of the wireless communica‐
tion equipment in this vehicle are permitted by
th e Nigerian Communications Commission.
Ukraine onl y:
The manufacturer hereby declares that the wire‐
less vehicle components meet thete ch nical reg‐
ulations for two-w ayradios. You can obtain fur‐
th er information from a Mercedes-Benz Service
Centre.
Wire less applications in theve hicle
Besides the typical frequencies for mobile com‐
munications, cars from Mercedes-Benz make
use of thefo llowing automotive radio applica‐
tions: 26
General no tes
Page 79 of 481

#
Remo vethe emer gency key ( / page 75). #
Press release knob 2down fully and slide
co ver1 inthe direction of the ar row. #
Fold out co ver1 inthe direction of the
ar row and remo ve. #
Remo vebattery compartment 3and take
out the dischar ged batter y. #
Insert the new battery into battery compart‐
ment 3. Obser vethe positive pole marking
in the battery compartment and on the bat‐
te ry when doing this. #
Push in battery compartment 3. #
Re-attach co ver1 and push it until it
engages. Problems with
theke y,troublesho oting Yo
u can no lon ger lo ckor unlock theve hicle
Po ssible causes:
R The key bat tery iswe ak or dischar ged. #
Check the battery using the indicator lamp
(/ page 73). #
Replace theke y bat tery, if necessary
(/ page 75). #
Use there placement key. #
Use the emer gency keyto lock or unlock
(/ page 80). #
Have theke ych ecked at a qualified specialist
wo rkshop.
There is inter fere nce from a po werful radio
signal source
Po ssible causes if the function of theke y is
impaired:
R high voltage po wer lines R
mobile phones
R electronic devices (no tebooks, tablets)
R shielding due tome tal objects or induction
loops for electrical gatesystems or auto‐
matic bar riers #
Make sure that there is suf ficient dist ance
between theke y and the po tential sou rce of
inter fere nce.
Yo u ha velost a key #
Have theke y deactiva ted at a qualified spe‐
cialist workshop. #
If necessar y,ha ve the mechanical lock
re placed as well. Doors
Note
s onthe additional door lock The additional door lock is only
available for
ve hicles forth eUni ted Kingdom. 76
Opening and closing
Page 82 of 481
If
yo u open theta ilgate from outside, it is auto‐
matically unloc ked. Problems with KEYLESS-GO, troubleshooting
Yo
u can no lon ger lo ckor unlock theve hicle
using KEYLESS-GO
Po ssible causes:
R The function of theke y has been deactiva ted.
R The key bat tery iswe ak or dischar ged. #
Activate the function of theke y ( / page 74). #
Check the battery using the indicator lamp
(/ page 73). #
Replace theke y bat tery, if necessary
(/ page 75). #
Use there placement key. #
Use the emer gency keyto lock or unlock
(/ page 80). #
Have theve hicle and keych ecked at a quali‐
fi ed specialist workshop. There is inter
fere nce from a po werful radio
signal source
Po ssible causes if the function of KEYLESS-GO is
impaired:
R high voltage po wer lines
R mobile phones
R electronic devices (no tebooks, tablets)
R shielding due tome tal objects or induction
loops for electrical gatesystems or auto‐
matic bar riers #
Make sure that there is suf ficient dist ance
between theke y and the po tential sou rce of
inter fere nce. Ac
tivating/deactivating the automatic lo ck‐
ing feature The
vehicle is loc ked automatically when the
ignition is switched on and the wheels are turn‐
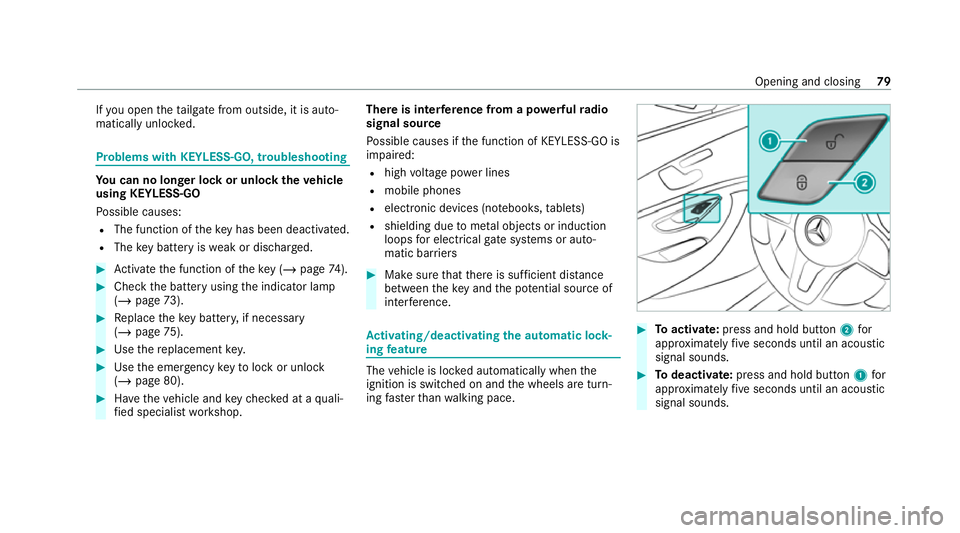
ing fast erthan walking pace. #
Toactivate: press and hold button 2for
appr oximately five seconds until an acoustic
signal sounds. #
Todeactivate: press and hold button 1for
appr oximately five seconds until an acoustic
signal sounds. Opening and closing
79
Page 128 of 481
#
Place the mobile phone as close tothe
centre of mat 1as possible with th e display
fa cing up wards.
When a message is shown in the multimedia
sy stem, the mobile phone is being charge d.
Malfunctions during thech arging process are
shown in the media displa y.
% The mat can be remo vedby theta bfor
cleaning, e.g. using clean, lu kewa rm wate r.
Ra dio equipment appr oval numbers for Brazil
This device operates on a secondary basis, that
is to say it has no pr otection against harmful
inter fere nce, not even from the same type of
st ations, and must not cause inter fere nce wi th
sy stems operating on a primary basis.
This product is permitted in accordance with the
procedure defined in Directive 242/2000 bythe
Brazilian telecommunications agency AN ATEL
and meets the applicable tech nical requ ire‐
ments.
Fu rther information is available on the AN ATEL
we bsite. www.anatel.go v.br #
Further information on the declaration of
confo rmity forve hicle components which
re cei veand/or transmit radio wav es. Fi
tting/ removing the floormats &
WARNING Risk of accident due to
objects in the driver's foot we ll
Objects in the driver's foot we ll may impede
pedal tr avel or block a depressed pedal.
This jeopardises the operating and road
saf ety of theve hicle. #
Stow all objects in theve hicle securely
so that they cannot getinto the driver's
fo ot we ll. #
Alw aysfit th efloor mats securely and
as prescribed in order toensure that
th ere is alw ays suf ficient room forthe
pedals. #
Do not use loose floor mats and do not
place floor mats on top of one ano ther. Fi
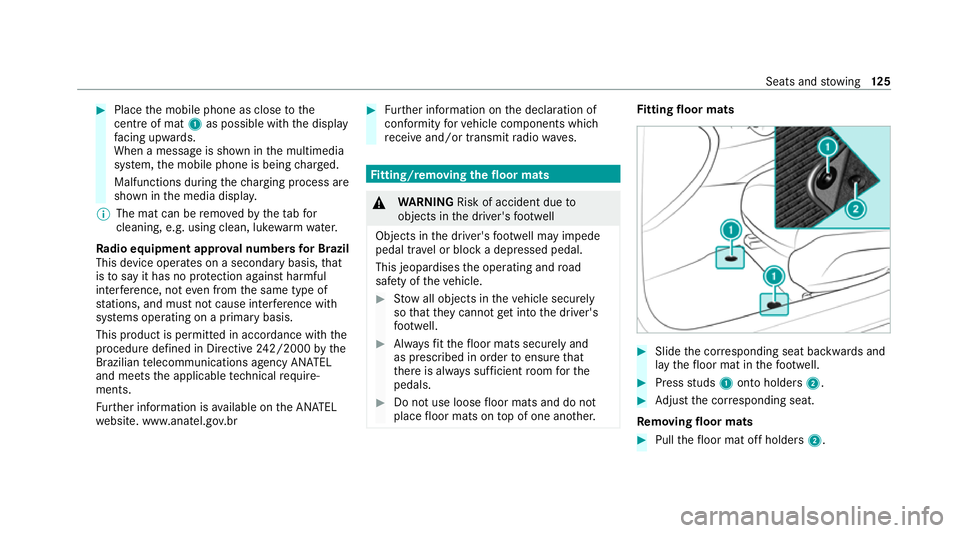
tting floor mats #
Slide the cor responding seat backwards and
lay thefloor mat in thefo ot we ll. #
Press studs 1onto holders 2. #
Adjust the cor responding seat.
Re moving floormats #
Pull thefloor mat off holders 2. Seats and
stowing 12 5
Page 253 of 481
7
Selected transmission position
8 Multifunction displ ay(exa mp le:standard dis‐
play for a trip): assi stance / telephone /
navigation / trip / media / radio / styles
and displa ys/ service / possible settings
fo r head-up display
9 Fuel le vel and fuel filler flap location indica‐
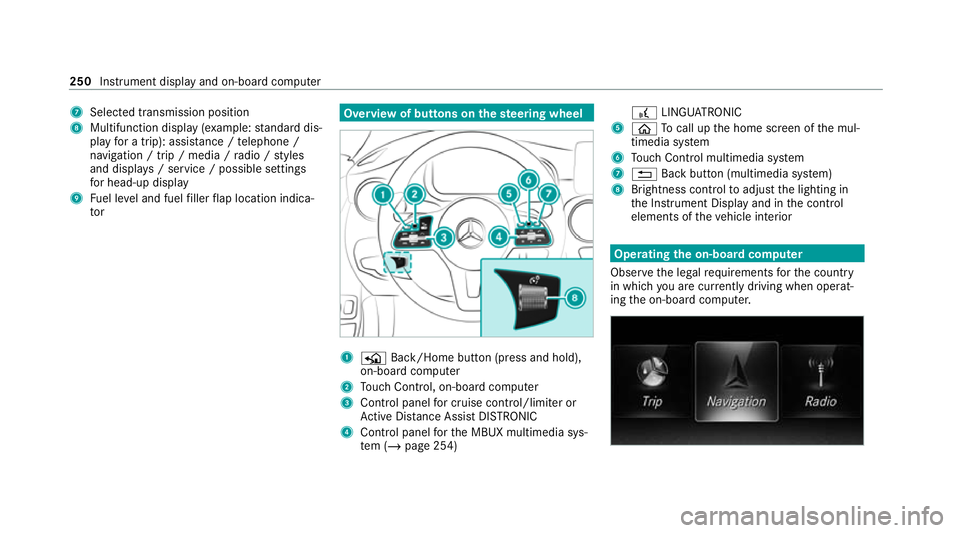
tor Overview of buttons on
thest eering wheel 1
P Back/Home button (press and hold),
on-board computer
2 Touch Control, on-board co mputer
3 Control panel for cruise control/limiter or
Ac tive Dis tance Assi stDISTRONIC
4 Control panel forth e MBUX multimedia sys‐
te m (/ page 254) £
LINGU ATRO NIC
5 ò Tocall up the home screen of the mul‐
timedia sy stem
6 Touch Control multimedia sy stem
7 % Back button (multimedia sy stem)
8 Brightness control toadjust the lighting in
th e Instrument Display and in the control
elements of theve hicle interior Operating
the on-boa rdcompu ter
Obser vethe legal requ irements forth e count ry
in which you are cur rently driving when operat‐
ing the on-board computer. 250
Instrument display and on-board computer
Page 254 of 481

The on-board computer is operated using
the
left-hand Touch Control and the left-hand back/
home button.
When the on-board computer is being operated,
dif fere nt acoustic signals will sound as operating
fe edbac k,e.g. when the end of a list is reached
or when you are sc rolling thro ugh a list.
The following menus are available:
R Service
R Assistance
R Trip
R Navigation
R Radio
R Media
R Telephone
R HUD
R Vehicles with an instrument display in
th e widescreen cockpit: Design
% You can find information about the possible
settings and selections on the menus in the
Digital Owner's Manual. #
Tocall up the menu bar: pressthe left-hand
back button until the menu bar is displa yed.
% Press theò button tocall up the menu
bar of the on-board computer. #
Toscroll on the menu bar: swipe left or
ri ght on the left-hand Touch Control. #
Tocall up a menu, submenu or possible
settings on the menu, or confirm a selec‐
tion or setting: pressthe left-hand Touch
Control. #
Toscroll through displa ysor lists on the
menu, or select display content, a func‐
tion, an entry or a displa y:swipe upwards
or down wards on the left-hand Touch Con‐
trol. #
Toswitch between displa ys:swipe
upwards or down wards on the left-hand
To uch Control. #
Toexit a submenu: pressthe left-hand back
button. Overview of displa
yson the multifunction
display
Displa yson the multifunction display:
ë Active Parking Assist activated
(/ page 234)
é Parking Assist PARKTRONIC deacti vated
( / page 231)
¯ Cruise control (/
page193)
È Limi
ter (/ page194)
ç Active Dis tance Assi stDISTRONIC
(/ page 196)
æ Ac
tive Brake Assi st (/ page 210)
è Active Steering Assist (/ page 203)
à Ac
tive Lane Keeping Assist (/ page215)
è ECO
start/ stop function (/ page160)
ë HOLD fu
nction (/ page 190)
_ Ad
aptive Highbeam Assist (/ page132)
Ad aptive Highbeam Assist Plus
(/ page 133)
ð Maximum pe rmissible speed exceeded
(for cer tain countries only) Instrument display and on-board computer
251
Page 260 of 481
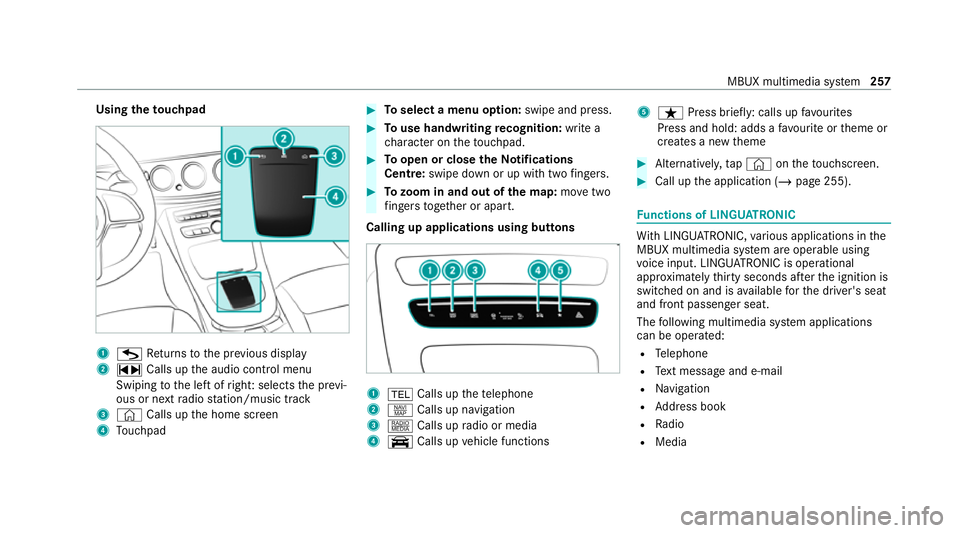
Using
theto uchpad 1
G Returns tothe pr evious display
2 ~ Calls up the audio control menu
Swiping tothe left of right: selects the pr evi‐
ous or next radio station/music track
3 © Calls up the home screen
4 Touchpad #
Toselect a menu option: swipe and press. #
Touse handwriting recognition: write a
ch aracter on theto uchpad. #
Toopen or close theNo tifications
Centre: swipe down or up with twofingers. #
Tozoom in and out of the map: movetwo
fi ngers toget her or apart.
Calling up applications using buttons 1
% Calls up thete lephone
2 z Calls up navigation
3 | Calls up radio or media
4 y Calls up vehicle functions 5
ß Press brief ly: calls up favo urites
Press and hold: adds a favo urite or theme or
creates a new theme #
Alternatively, tap© ontheto uchsc reen. #
Call up the application (/ page 255). Fu
nctions of LINGU ATRO NIC Wi
th LINGU ATRO NIC, various applications in the
MBUX multimedia sy stem are operable using
vo ice input. LINGU ATRO NIC is operational
appr oximately thirty seconds af terth e ignition is
switched on and is available forth e driver's seat
and front passenger seat.
The following multimedia sy stem applications
can be operated:
R Telephone
R Text messa geand e-mail
R Navigation
R Address book
R Radio
R Media MBUX multimedia sy
stem 257