Page 114 of 577
Low
Low
er
ering t
ing t he r
he r ear seat head r
ear seat head r es
estrtraints fr
aints fr om t
om t he
he
fr
fr ont
ont #
Press button 1. A
A
djus
djusting t ting t he head r
he head r es
estrtraints of t
aints of t he r
he rear seats
ear seats
mec
mec hanically
hanically #
T
To r
o r aise:
aise: pullthe head restraint up. #
T
To low
o low er
er:
:press release knob 1inthe direc-
tion of the ar row and push the head restraint
down. F
F
itting/r
itting/r emo
emo ving t
ving t he out
he out er r
er rear seat head
ear seat head
r
r es
estr traints
aints
R
R emo
emo ving
ving #
Release there ar seat backrest and fold it for-
wa rds slightly (/ page 127). #
Pull the head restraint up wards as far as it will
go. Seats and st
owing
111
111
Page 118 of 577
#
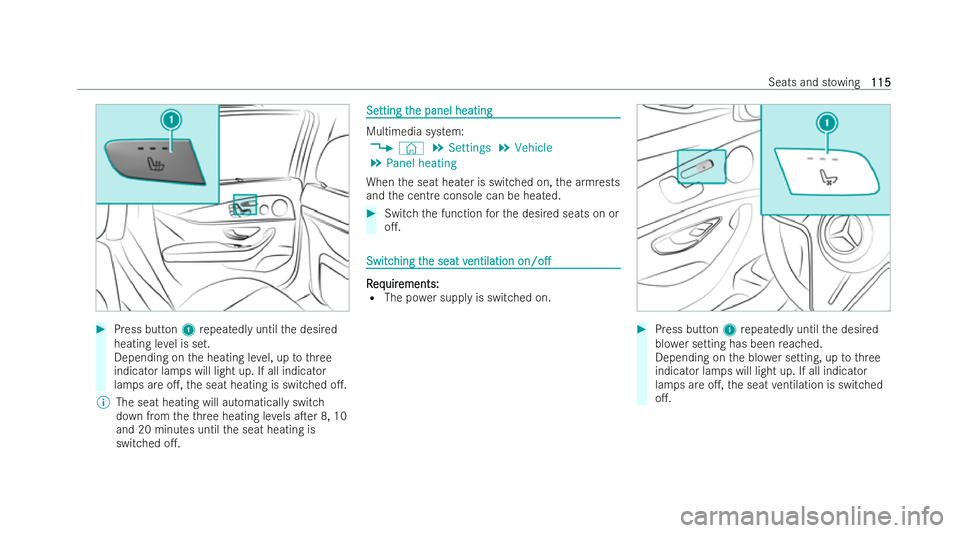
Press button 1repeatedly until the desired
heating le vel is set.
Depending on the heating le vel, up tothree
indicator lamps will light up. If all indicator
lamps are o�., the seat heating is switched o�..
% The seat heating will automatically switch
down from theth re e heating le vels a�Ter 8, 10
and 20 minutes until the seat heating is
switched o�.. Se Se
tting t
tting t he panel heating
he panel heating Multimedia system:
4 © 5
Settings 5
Vehicle
5 Panel heating
When the seat heater is switched on, the armrests
and the centre console can be heated. #
Switch the function forth e desired seats on or
o�.. Switc
Switc
hing t
hing t he seat v
he seat v entilation
entilation on/o�.
on/o�. R
R
eq
eq uir
uir ements:
ements:
R The po wer supply is switched on. #
Press button 1repeatedly until the desired
blo wer setting has been reached.
Depending on the blo wer setting, up tothree
indicator lamps will light up. If all indicator
lamps are o�., the seat ventilation is switched
o�.. Seats and st
owing
115 115
Page 122 of 577
F
F
itting
itting #
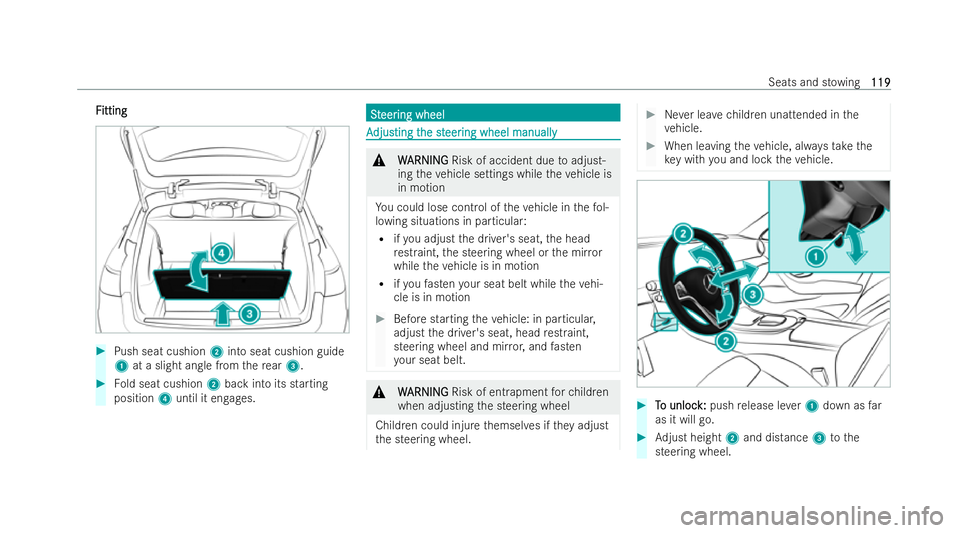
Push seat cushion 2into seat cushion guide
1 at a slight angle from there ar 3. #
Fold seat cushion 2back into its starting
position 4until it engages. S
S
t
teer
eer ing wheel
ing wheel A
A
djus
djusting t ting t he st
he steer
eering wheel manually
ing wheel manually &
W
WARNING
ARNING Risk of accident due toadjust-
ing theve hicle settings while theve hicle is
in motion
Yo u could lose control of theve hicle in thefo l-
lowing situations in particular:
R ifyo u adjust the driver's seat, the head
re straint, the steering wheel or the mir ror
while theve hicle is in motion
R ifyo ufa sten your seat belt while theve hi-
cle is in motion #
Before starting theve hicle: in particular,
adjust the driver's seat, head restraint,
stee ring wheel and mir ror,and fasten
yo ur seat belt. &
W
WARNING
ARNING Risk of entrapment forch ildren
when adjusting the steering wheel
Children could injure themsel ves if they adjust
th e steering wheel. #
Never lea vechildren unattended in the
ve hicle. #
When leaving theve hicle, alw aysta ke the
ke y with you and lock theve hicle. #
T
To unloc
o unloc k:
k:push release le ver1 down as far
as it will go. #
Adjust height 2and distance 3tothe
stee ring wheel. Seats and st
owing
119
119
Page 123 of 577
Loc
Loc
king
king #
Foldrelease le ver1 up as far as it will go. #
Check and make sure that the steering col-
umn is loc kedby moving the steering wheel. A
A
djus
djus ting t
ting t he st
he steer
eering wheel electr
ing wheel electr ically
icallyThe steering wheel can be adjusted when
the
po we r supply is disconnected. 1
Toadjust the distance tothe steering wheel
2 Toadjust the height #
Save the settings with the memory function
(/ page 123). Switc
Switc
hing t
hing t he st
he steer
eering wheel heat
ing wheel heat er
eron/o�.
on/o�. R R
eq eq uir
uir ements:
ements:
R The po wer supply or theve hicle has been
switched on. #
Turn the le ver in the direction of ar row 1 or
2.
If indicator lamp 3lights up, the steering
wheel heater is switched on. 120 120
Seats and st
owing
Page 128 of 577
pants may come into contact with
the liquid
and if it is hot, they could be scalded. Yo u
could be distracted from tra�1c conditions and
yo u may lose control of theve hicle. #
Only use the cup holder when theve hicle
is stationar y. #
Only use the cup holder for containers of
th eright size. #
Always close the container, particular lyif
th e liquid is hot. *
N
NO OTE
TE Damage tothe cup holder When
there ar armrest is folded back the cup
holder could become damaged. #
Only fold there ar armrest back when the
cup holder is closed. &
W
W ARNING
ARNING Risk of injury due toan open
load compartment �0oor
If yo u drive with the load compartment �0oor
open, objects could be �0ung around and hit
ve hicle occupants as a result. There is a risk of injur
y,particular lyin theev ent of sudden
braking or a sudden change in direction. #
Always close the load compartment �0oor
before a journe y. *
N
NO
OTE
TE Damage tothe st owage compart-
ment under the ashtr aydue tointense
heat The st
owage compartment under the ashtr ay
is not heat resis tant and could be damaged if
yo ure st a lit ci garette on it. #
Make sure that the ashtr ayis fully
engaged. &
W
WARNING
ARNING ‑ Risk of �/re and injury from the
hot cigar ette lighter
Yo u can burn yourself if youto uch the hot
heating element or the soc ket of the cigar ette
lighter.
In addition, �0ammable materials may ignite if:
R you drop the hot cigar ette lighter R
ach ild holds the hot cigar ette lighter to
objects, forex ample #
Always hold the cigar ette lighter bythe
knob. #
Always make sure that the cigar ette
lighter is out of reach of children. #
Never lea vechildren unattended in the
ve hicle. &
W WARNING
ARNING Risk of burns from theta ilpipe
and tailpipe trims
The exhaust tailpipe and tailpipe trims can
become very hot. If you come into contact
with these parts of theve hicle, you could burn
yo urself. #
Always be particular lycareful around the
ta ilpipe and theta ilpipe trims and super-
vise children especially closely in this
area. #
Allow vehicle parts tocool down before
to uching them. Seats and st
owing
125
125
Page 130 of 577
Thr
Through-loading f
ough-loading f eatur
eature in t
e in the r
he rear benc
ear benc h seat
h seat
(EASY
(EASY -PAC
-P AC K Quic
K Quic kf
kfold)
old) F
F
olding t
olding t he r
he rear seat bac
ear seat bac kr
kres
est f t forw
orw ar
ards
ds &
W
WARNI NG
ARNI NGRisk of accident if there ar
ben chseat, rear seat and seat backrest
are not engaged
The rear ben chseat, rear seat and seat bac k-
re st ma yfo ld forw ards, even while theve hicle
is in motion.
R As a result, theve hicle occupant will be
pressed into the seat belt with increased
fo rc e. The seat belt will not be able topro-
te ct as intended and could cause addi-
tional injur y.
R Objects or loads in the boot or load com-
partment cannot be restrained bythe seat
backrest. #
Make sure that there ar ben chseat, the
re ar seat and the seat backrest are
engaged before every trip. If
th e seat backrest is not engaged and loc ked,
th is will be shown on the driver's displa y.
R
R eq
eq uir
uir ements:
ements:
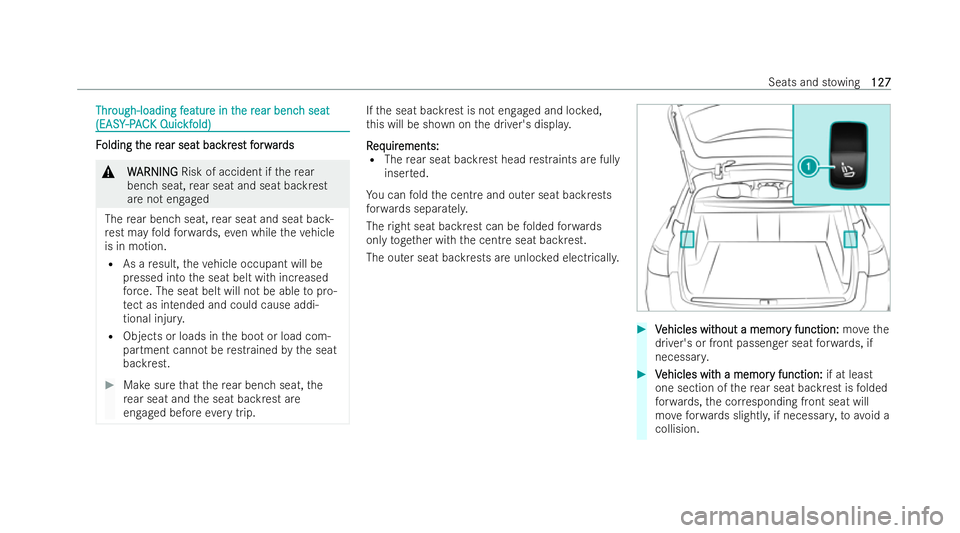
R The rear seat backrest head restraints are ful ly
inser ted.
Yo u can fold the centre and outer seat backrests
fo rw ards separatel y.
The right seat backrest can be folded forw ards
only toget her with the centre seat backrest.
The outer seat backrests are unloc ked electricall y. #
V Vehicles wit ehicles wit hout a memor
hout a memor y function:
y function:movethe
driver's or front passenger seat forw ards, if
necessar y. #
V Vehicles wit ehicles wit h a memor
h a memor y function:
y function: if at least
one section of there ar seat backrest is folded
fo rw ards, the cor responding front seat will
mo veforw ards slightl y,if necessar y,to avo id a
collision. Seats and st
owing
127
127
Page 136 of 577
P
P
ar
ar titioning ne
titioning ne t wit
t with load com
h load com par
par tment enlarg
tment enlarg e-
e-
ment
ment #
Guide the partitioning net upwards using tab
1 . #
Hook the partitioning net into eyelets 2. Ov
Ov
er
ervie
vie w of t
w of t he tie-do
he tie-do wney
wn eyes
es Obser
vethe no tes on loading theve hicle
(/ page 123). 1
Tie-down eyes Ov
Ov
er
er vie
vie w of bag hooks
w of bag hooks &
W
WARNING
ARNING Risk of injury when using bag
hooks with heavy objects
The bag hooks cannot restrain he avy objects
or items of lug gage.
Objects or items of luggage may be �0ung
around and hit vehicle occupants. #
Only hang light objects on the bag
hooks. #
Never hang hard, sharp-edged or fragile
objects on the bag hooks. Obser
vethe no tes on loading theve hicle
(/ page 123).
Subject the bag hooks toa maximum load of 3 kg
and do not attach any goods tothem. Seats and st
owing
133 133
Page 139 of 577
#
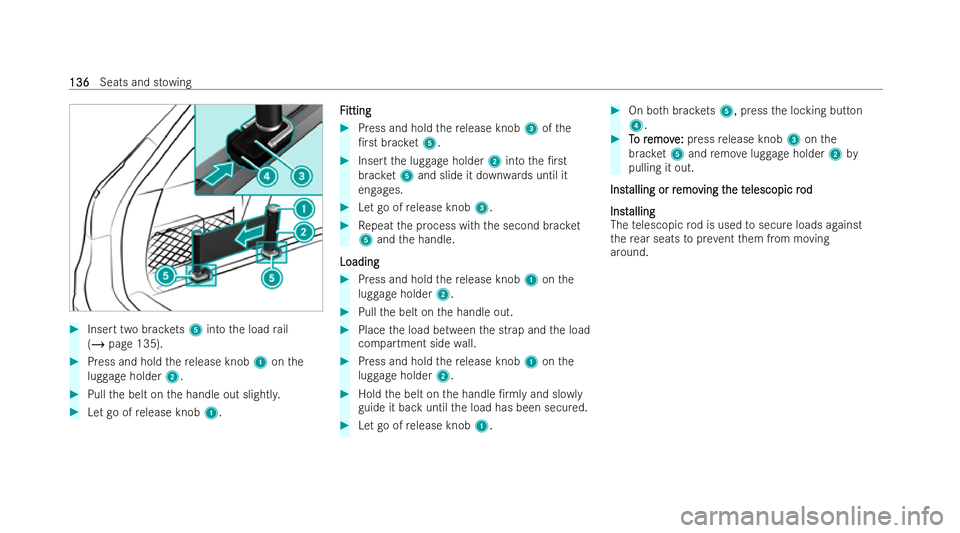
Insert two brac kets 5 into the load rail
(/ page 135). #
Press and hold there lease knob 1onthe
luggage holder 2.#
Pull the belt on the handle out slightl y.#
Let go of release knob 1. F
F
itting
itting #
Press and hold there lease knob 3ofthe
�/r st brac ket5. #
Inse rtthe luggage holder 2into the �/r st
brac ket5 and slide it down wards until it
engages. #
Let go of release knob 3. #
Repeat the process with the second brac ket
5 and the handle.
Loading
Loading #
Press and hold there lease knob 1onthe
luggage holder 2. #
Pull the belt on the handle out. #
Place the load between the strap and the load
compartment side wall. #
Press and hold there lease knob 1onthe
luggage holder 2. #
Hold the belt on the handle �/rmly and slo wly
guide it back until the load has been secured. #
Let go of release knob 1. #
On bo thbrac kets 5, press the locking button
4. #
T
To r
o r emov
emov e:
e:press release knob 3onthe
brac ket5 and remo veluggage holder 2by
pulling it out.
Inst
Inst alling or r
alling or r emo
emoving t
ving t he t
he telescopic r
elescopic r od
od
Inst Inst alling alling
The telescopic rod is used tosecure loads against
th ere ar seats toprev ent them from moving
around. 136
136
Seats and st
owing