Page 144 of 618

the ignition is switched ON. We
recommend keeping the tank over 1/4 full.
Full
1/4 Full
Empty
If the low fuel warning light illuminates or
the fuel level is very low, refuel as soon as
possible.
If inconsistency in engine performance or
stalling occurs due to low fuel level
conditions, refuel the vehicle as soon as
possible and add at least 10 L (2.7 US gal,
2.2 Imp gal) of fuel.
Refer to Taking Action on page 7-33.
NOTE
After refueling, it may require some time
for the indicator to stabilize. In addition,
the indicator may deviate while driving
on a slope or curve since the fuel moves
in the tank.
The display indicating a quarter or less
remaining fuel has more segments to
show the remaining fuel level in greater
detail.
The direction of the arrow () indicates
that the fuel-filler lid is on the left side
of the vehicle.
▼ Dashboard Illumination
(Without auto-light control)
When the position lights are turned on
with the ignition
switched ON, the
brightness of the dashboard illumination is
dimmed.
(With auto-light control)
When the position lights are turned on
with the ignition switched ON, the
brightness of the dashboard illumination is
dimmed. However, when the light sensor
detects that the surrounding area is bright
such as when the position lights are turned
on in the daytime, the dashboard
illumination does not dim.
NOTE
(With auto-light control)
When the ignition is switched ON in the
early evening or at dusk, the dashboard
illumination is dimmed for several
seconds until the light sensor detects the
brightness of the surrounding area,
however, the dimmer may cancel after
the brightness is detected.
When the position lights are turned on,
the position lights i ndicator light in the
instrument cluster turns on.
Refer to Headlights on page 4-40.
The brightness of the instrument cluster
and dashboard illuminations can be
adjusted by ro tating the knob.
The brightness decreases by rotating the
knob to the left. A beep sound will be
heard when the knob has been rotated to
the maximum dim position.
When Driving
Instrument Cluster and Display
4-14
CX-3_8JL1-EA-20G_Edition1_old 2020-5-22 15:31:00
Page 145 of 618

The brightness increases by rotating the
knob to the right.
DimBright
Function for cancelling illumination
dimmer
The illumination dimmer can be canceled
by rotating the dashboard illumination
knob to the right until a beep sound is
heard while the instrument cluster is
dimmed with the ign ition switched ON. If
the instrument cluster's visibility is
reduced due to glare from surrounding
brightness, cancel the illumination
dimmer.
NOTE
When the illumina tion dimmer is
canceled, the instrument cluster cannot
be dimmed even if the position lights are
turned on.
When the illumina tion dimmer is
canceled, the screen in the center
display switches to constant display of
the daytime screen.
▼ Outside Temperature Display
When the ignition is
switched ON, the
outside temperature is displayed.
NOTE
Under the following conditions, the
outside temperature display may differ
from the actual outside temperature
depending on the surroundings and
vehicle conditions:
Significantly cold or hot temperatures.
Sudden changes in outside
temperature.
The vehicle is parked.
The vehicle is driven at low speeds.
Changing the Temperature Unit of the
Outside Temperature Display (Vehicles
with Type B audio)
The outside temperature unit can be
switched between Celsius and Fahrenheit.
Settings can be changed by operating the
center display screen.
Refer to Personalization Features on page
9-9.
NOTE
When the temperature unit indicated in the
outside temperature display is changed,
the temperature unit indicated in the
engine coolant gauge display changes in
conjunction with it.
When Driving
Instrument Cluster and Display
4-15
CX-3_8JL1-EA-20G_Edition1_old 2020-5-22 15:31:00
Page 151 of 618
Warning/Indicator Lights
Instrument Cluster varies depending on model and specifications.
Warning/Indicator lights will appear in any of the highlighted areas
Type A
Type B
Center of Dashboard (Digital Speed Meter Type)
(Analog Speed Meter Type)
Instrument Cluster
▼
Warning Lights
These lights turn on or flash to notify the us
er of the system operation status or a system
malfunction.
Signal Warning Lights Page
Brake System Warning Light*1*27-26
ABS Warning Light*1
Electronic Brake Force
Distribution System Wa r n i n g7-26
ABS warning 7-29
Charging System Warning Light*17-26
When Driving
Instrument Cluster and Display
4-21
CX-3_8JL1-EA-20G_Edition1_old 2020-5-22 15:31:00
Page 152 of 618

SignalWarning Lights Page
Engine Oil Warning Light*17-26
(Red)High Engine Coolant Temperature Warning Light
*17-26
Power Steering Malfunction Indicator Light*17-26
Master Warning Light*17-29
Electric Parking Brake (EPB) Warning Light*17-29
(Red)Brake Pedal Operation Demand Warning Light
*1
Flashing
4-59
Buzzer & Flashing 7-29
Check Engine Light*17-29
*Automatic Transaxle Warning Light*17-29
Air Bag/Front Seat Belt Preten sioner System Warning Light*17-29
*AWD Warning Light*17-29
*Tire Pressure Monitoring System Warning Light*1
Flashing
7-29
Turns on 7-33
(Red) KEY Warning Light
*1
Turns on
7-29
Flashing 7-33
(Amber)
*High Beam Control System (HBC) Warning Light*17-29
*Lane Departure Warning System (LDWS) Warning Light*1
Flashing4-85
Turns on 7-29
(Amber)
*Mazda Radar Cruise Control with Stop & Go function
(MRCC with Stop & Go function) Warning Indication 7-29
*LED Headlight Warning Light*17-29
When Driving
Instrument Cluster and Display
4-22*Some models.
CX-3_8JL1-EA-20G_Edition1_old
2020-5-22 15:31:00
Page 153 of 618

SignalWarning Lights Page
Low Fuel Warning Light 7-33
Check Fuel Cap Warning Light*17-33
Seat Belt Warning Light (Front seat) 7-33
Door-Ajar Warning Light7-33
*Low Washer Fluid Level Warning Light7-33
(Amber)
*Smart Brake Support/Smart C
ity Brake Support (SBS/SCBS)
Wa r n i n g L i g h t 7-33
*1 The light turns on when the ignition is switched on for an operation check, and turns off a few seconds later or
when the engine is started. If the light does not turn on or remains turned on, have the vehicle inspected at an
Authorized Mazda Dealer.
*2 The light turns on continuously when the parking brake is applied.
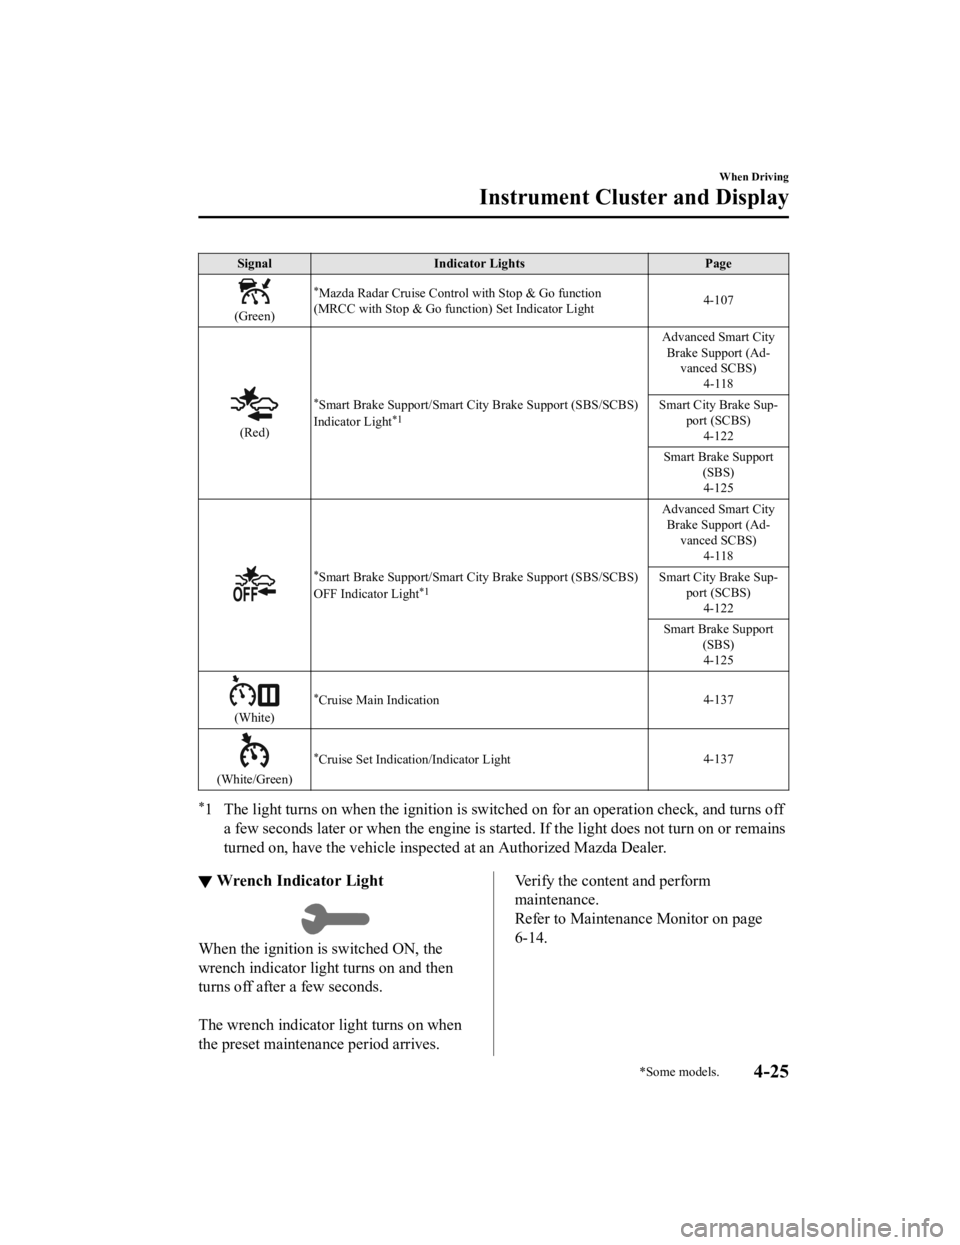
▼ Indicator Lights
These lights turn on or flash to notify the us
er of the system operation status or a system
malfunction.
Signal Indicator Lights Page
*Front Passenger Air Bag Deactivation Indicator Light*12-66
(Green)KEY Indicator Light 3-9
Security Indicator Light*13-37
Wrench Indicator Light*14-25
(Blue)
Low Engine Coolant Temperature Indicator Light 4-26
*Shift Position Indication
4-31
Lights-On Indicator Light
4-40
When Driving
Instrument Cluster and Display
*Some models.4-23
CX-3_8JL1-EA-20G_Edition1_old 2020-5-22 15:31:00
Page 154 of 618
SignalIndicator Lights Page
Headlight High-Beam Indicator Light Headlight High-Low
Beam4-44
Flashing the Headlights 4-44
Turn Signal/Hazard Warning Indicator Lights Turn and Lane-Change
Signals4-47
Hazard Warning Flasher 4-54
(Green)
*Brake Pedal Operation demand Indicator Light 4-55
AUTOHOLD Active Indicator Light*14-60
*Mazda Radar Cruise Control with Stop & Go function
(MRCC with Stop & Go function) indicator Light 4-112
*Front Fog Light Indicator Light
4-46
TCS/DSC Indicator Light*1
Traction Control System
(TCS)4-66
Dynamic Stability Con ‐
trol (DSC) 4-68
Turns on 7-29
TCS OFF Indicator Light*14-67
*Select Mode Indicator Light 4-72
(Green)
*High Beam Control System (HBC) Indicator Light4-80
*Blind Spot Monitoring (BSM) OFF Indicator Light*1
Malfunction
7-29
Except malfunction 4-91
*Lane Departure Warning System (LDWS) OFF Indicator
Light*14-85
When Driving
Instrument Cluster and Display
4-24*Some models.
CX-3_8JL1-EA-20G_Edition1_old 2020-5-22 15:31:00
Page 155 of 618

SignalIndicator Lights Page
(Green)
*Mazda Radar Cruise Control with Stop & Go function
(MRCC with Stop & Go function) Set Indicator Light 4-107
(Red)
*Smart Brake Support/Smart C
ity Brake Support (SBS/SCBS)
Indicator Light*1
Advanced Smart City Brake Support (Ad ‐
vanced SCBS)
4-118
Smart City Brake Sup ‐
port (SCBS) 4-122
Smart Brake Support (SBS)4-125
*Smart Brake Support/Smart C ity Brake Support (SBS/SCBS)
OFF Indicator Light*1
Advanced Smart City Brake Support (Ad ‐
vanced SCBS)
4-118
Smart City Brake Sup ‐
port (SCBS) 4-122
Smart Brake Support (SBS)4-125
(White)
*Cruise Main Indication 4-137
(White/Green)
*Cruise Set Indication/Indicator Light4-137
*1 The light turns on when the ignition is switched on for an operatio
n check, and turns off
a few seconds later or when the engine is star ted. If the light does not turn on or remains
turned on, have the vehicle inspected at an Authorized Mazda Dealer.
▼ Wrench Indicator Light
When the ignition is switched ON, the
wrench indicator light turns on and then
turns off after a few seconds.
The wrench indicator light turns on when
the preset maintenance period arrives.
Verify the content and perform
maintenance.
Refer to Maintenance Monitor on page
6-14.
When Driving
Instrument Cluster and Display
*Some models.4-25
CX-3_8JL1-EA-20G_Edition1_old
2020-5-22 15:31:00
Page 160 of 618

Shift-Lock System
The shift-lock system prevents shifting out
of P unless the brake pedal is depressed.
To shift from P:
1. Depress and hold the brake pedal.
2. Start the engine.
3. Press and hold the lock-release button.
4. Move the selector lever.
NOTE
When the ignition is switched to ACC or
the ignition is switched off, the selector
lever cannot be shifted from P position.
The ignition cannot be switched to OFF
if the selector lever is not in P position.
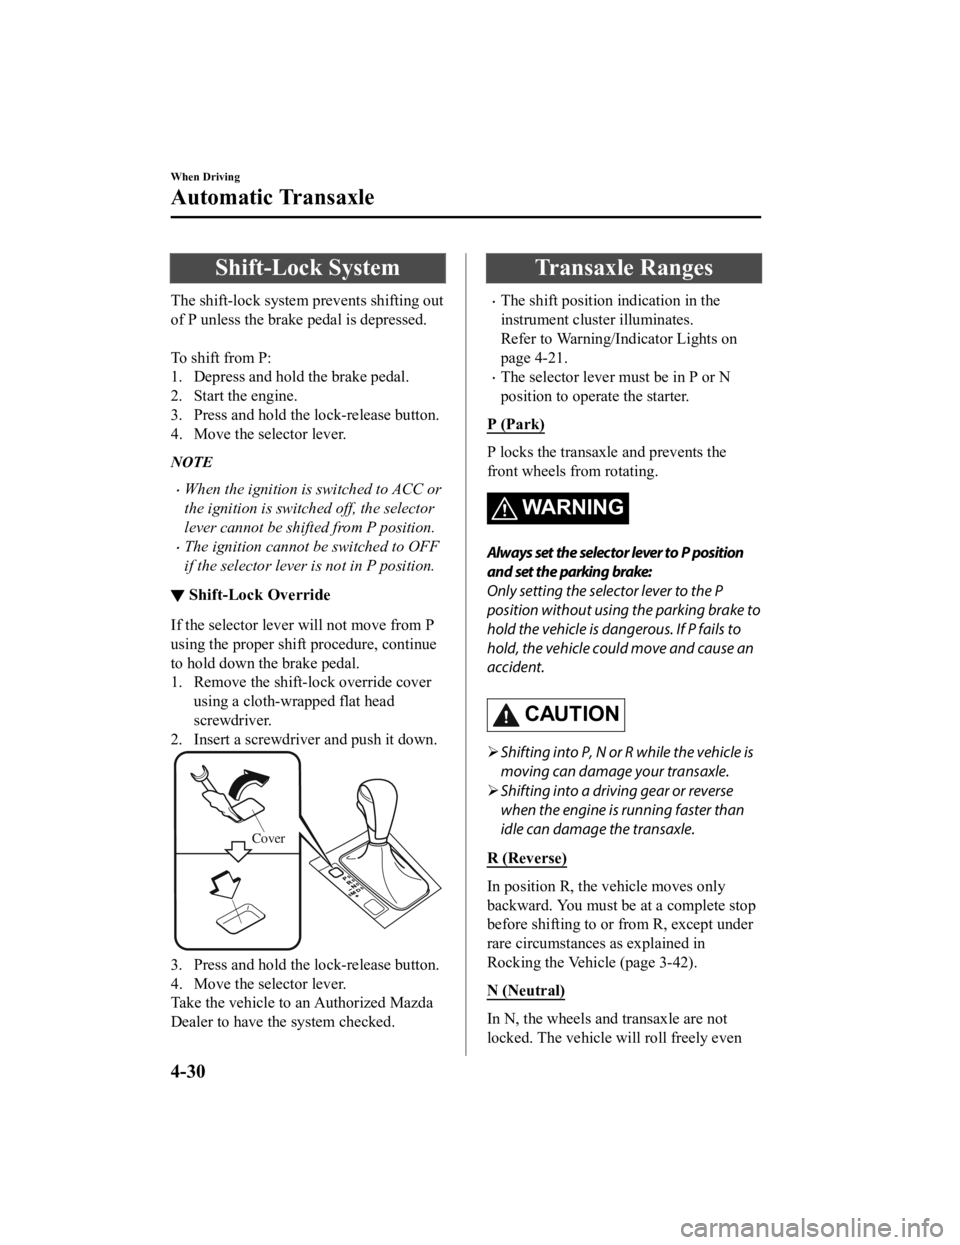
▼ Shift-Lock Override
If the selector lever will not move from P
using the proper shift procedure, continue
to hold down the brake pedal.
1. Remove the shift-lock override cover
using a cloth-wr apped flat head
screwdriver.
2. Insert a screwdriver and push it down.
Cover
3. Press and hold the lock-release button.
4. Move the selector lever.
Take the vehicle to an Authorized Mazda
Dealer to have the system checked.
Transaxle Ranges
The shift position indication in the
instrument cluster illuminates.
Refer to Warning/Indicator Lights on
page 4-21.
The selector lever must be in P or N
position to operate the starter.
P (Park)
P locks the transaxle and prevents the
front wheels from rotating.
WA R N I N G
Always set the selector lever to P position
and set the parking brake:
Only setting the selector lever to the P
position without using the parking brake to
hold the vehicle is dangerous. If P fails to
hold, the vehicle could move and cause an
accident.
CAUTION
Shifting into P, N or R while the vehicle is
moving can damage your transaxle.
Shifting into a driving gear or reverse
when the engine is running faster than
idle can damage the transaxle.
R (Reverse)
In position R, the vehicle moves only
backward. You must be at a complete stop
before shifting to or from R, except under
rare circumstances as explained in
Rocking the Vehicle (page 3-42).
N (Neutral)
In N, the wheels and transaxle are not
locked. The vehicle will roll freely even
When Driving
Automatic Transaxle
4-30
CX-3_8JL1-EA-20G_Edition1_old 2020-5-22 15:31:00