2021 LINCOLN CORSAIR manual transmission
[x] Cancel search: manual transmissionPage 107 of 638
HEADLAMP EXIT DELAY
After you switch the ignition off, you can
switch the headlamps on by pulling the
direction indicator lever toward you. You will
hear a short tone. The headlamps will switch
off automatically after three minutes with any
door open or 30 seconds after the last door
has been closed. You can cancel this feature
by pulling the direction indicator lever toward
you again or switching the ignition on.
DAYTIME RUNNING LAMPS -
VEHICLES WITH: CONFIGURABLE
DAYTIME RUNNING LAMPS
WARNING: The daytime running
lamps system does not activate the rear
lamps and may not provide adequate
lighting during low visibility driving
conditions. Make sure you switch the
headlamps on, as appropriate, during all
low visibility conditions. Failure to do so
may result in a crash. Switch the daytime running lamps on or off
using the touchscreen:
1.
Select Settings. See Settings
(page 526).
2. Select
Vehicle.
3. Select
Lighting.
The daytime running lamps turn on when:
1. The lamps are on in the information display.
2. You switch the ignition on.
3. The transmission is not in park (P) for vehicles with automatic transmissions or
you release the parking brake for
vehicles with manual transmissions.
4. The lighting control is in the autolamps position.
5. The headlamps are off.
The other lighting control switch positions
do not turn on the daytime running lamps.
If the daytime running lamps are off in the
information display, the lamps stay off in all
switch positions. DAYTIME RUNNING LAMPS -
VEHICLES WITH: DAYTIME
RUNNING LAMPS (DRL) WARNING:
The daytime running
lamps system does not activate the rear
lamps and may not provide adequate
lighting during low visibility driving
conditions. Make sure you switch the
headlamps on, as appropriate, during all
low visibility conditions. Failure to do so
may result in a crash.
The system turns the lamps on in daylight
conditions.
To switch the system on, switch the lighting
control to any position except headlamps.
FRONT FOG LAMPS
(IF EQUIPPED)
Switching the Front Fog Lamps On or
Off
Only switch the front fog lamps on during
reduced visibility.
104
Corsair (CTF) Canada/United States of America, enUSA, Edition date: 202007, First-Printing Lighting
Page 117 of 638
To adjust your mirrors, switch your vehicle
on - with the ignition in accessory mode or
the engine running and then:
1.
Select the mirror you want to adjust. The
control light turns on.
2. Use the adjustment control to adjust the
position of the mirror.
3. Press the mirror control again. The control light turns off.
Fold-Away Exterior Mirrors
Push the mirror toward the door window
glass. Make sure that you fully engage the
mirror in its support when returning it to its
original position.
Auto-Folding Mirrors
The exterior mirrors fold in toward the glass
after you place the transmission into park (P),
turn off the vehicle, open and close the driver
side door and lock the vehicle. The exterior
mirrors unfold and return to their driving
position after you unlock the vehicle and
open and close the driver side door. You can switch this feature on and off
through the information display. See General
Information (page 131).
Note: If you switch this feature off through
the information display, the welcome lighting
also switches off.
You can fold the mirrors on demand by
pressing the power-folding mirror control
located on the door. The control lights and
the mirrors fold in toward the glass. Press
the control again to unfold the mirrors. The
control light turns off.
Note: If you use the power-folding control to
fold the mirrors on demand and the auto fold
feature is switched on, the auto-folding
feature becomes disabled. To re-enable the
auto-folding feature, press the control again
to unfold the mirrors. Loose Mirror
If your auto-folding mirrors are manually
folded or unfolded, they may not work
properly even after you re-position them.
You need to reset them if:
•
The mirrors vibrate when you drive.
• The mirrors feel loose.
• The mirrors do not stay in the folded or
unfolded position.
• One of the mirrors is not in its normal
driving position.
To reset the auto-fold feature, use the
power-folding mirror control to fold and
unfold the mirrors. You may hear a loud noise
as you reset the mirrors. This sound is
normal. Repeat this process as needed each
time the mirrors are manually folded or
unfolded.
Heated Exterior Mirrors
See
Heated Exterior Mirrors (page 168).
114
Corsair (CTF) Canada/United States of America, enUSA, Edition date: 202007, First-Printing Windows and Mirrors
Page 159 of 638
Transmission
Action
Message
You switched the engine off and the gear selector is in any position othe\
r than park (P).
Shift to Park
The transmission is too cold. Wait for it to warm up before you drive.
Transmission Warming Up Please Wait
Displays when you need to press the brake pedal.
Press Brake Pedal
The transmission is overheating and needs to cool. Stop in a safe place as soon as possible.
Transmission Over Temperature Stop
Safely
Have the system checked as soon as possible.
Transmission Service Required
The transmission is overheating and needs to cool. Stop in a safe place as soon as possible.
Transmission Too Hot Press Brake
The transmission has limited functionality. Have the system checked as soon as possible.
Transmission Limited Function See Manual
A reminder to shift into park. In addition, this message is typical afte\
r reconnecting or rechargingthe battery until you cycle the ignition to the on mode. See Changing the 12V Battery (page
380).
Transmission Not in Park
Displays when there is a system fault and the park brake needs to be depressed before exitingthe vehicle. Have the system checked as soon as possible.
SHIFT SYS FAULT Confirm Park Brake
Apply Before Exiting the Vehicle
Have the system checked as soon as possible.
SHIFT SYS FAULT Service Required
Displays when there is a system fault while the vehicle is shifting to p\
ark. Have the systemchecked as soon as possible.
SHIFT SYS FAULT Vehicle is Shifting to
Park
156
Corsair (CTF) Canada/United States of America, enUSA, Edition date: 202007, First-Printing Information Displays
Page 218 of 638

6. When the nozzle shuts off, wait at least
5 seconds, then slightly raise the fuel
pump nozzle and slowly remove it.
7. Fully close the fuel filler door.
Note: To close the fuel filler door, press the
center rear edge of the fuel filler door and
then release.
Complete the refueling process within 20
minutes. If 20 minutes elapses, press the
button on the dashboard again. Fuel pump
nozzle automatic shut off could occur if you
do not press the button on the dashboard.
System Warnings
If the fuel filler door fails to open, an
information message appears in the
information display. Description and Action
Message
A warning message appears
in the information display
when the fuel system fails to
depressurize or the fuel filler
door fails to open. You may
have to use the fuel filler door
manual override lever.
Refuel Error
See Manual
If the information message appears, do the
following:
1. Check the fuel filler door for anything that
may be obstructing its movement, for
example ice or snow.
2. Remove any obstruction from the fuel filler door.
3. Press the button on the dashboard to open the fuel filler door.
4. If the fuel filler door fails to open and the
information message remains in the
information display, use the fuel filler
door manual override lever. Fuel Filler Door Manual Override Lever
When using the manual override lever do
the following:
Note:
The transmission must be in park (P)
or neutral (N).
1. Switch the ignition on.
215
Corsair (CTF) Canada/United States of America, enUSA, Edition date: 202007, First-Printing Fuel and RefuelingE119081
Page 237 of 638
To exit stay in neutral mode, press the brake
pedal and shift into park (P).
Drive (D)
Drive (D) is the normal driving position for
the best fuel economy.
SelectShift™ Automatic Transmission
About SelectShift™
Use this feature to upshift or downshift using
the paddle shifters.
Note:
SelectShift™ could upshift automatically
if you fully press the accelerator pedal.
Note: Engine damage may occur if you
maintain excessive engine revving without
shifting.
Note: SelectShift™ downshifts automatically
to avoid engine stall, or if you fully press the
accelerator pedal.
Using SelectShift™
You can only use this feature in drive (D). Note:
Selectshift™ in drive (D) provides
temporary manual control of the gear
selection.
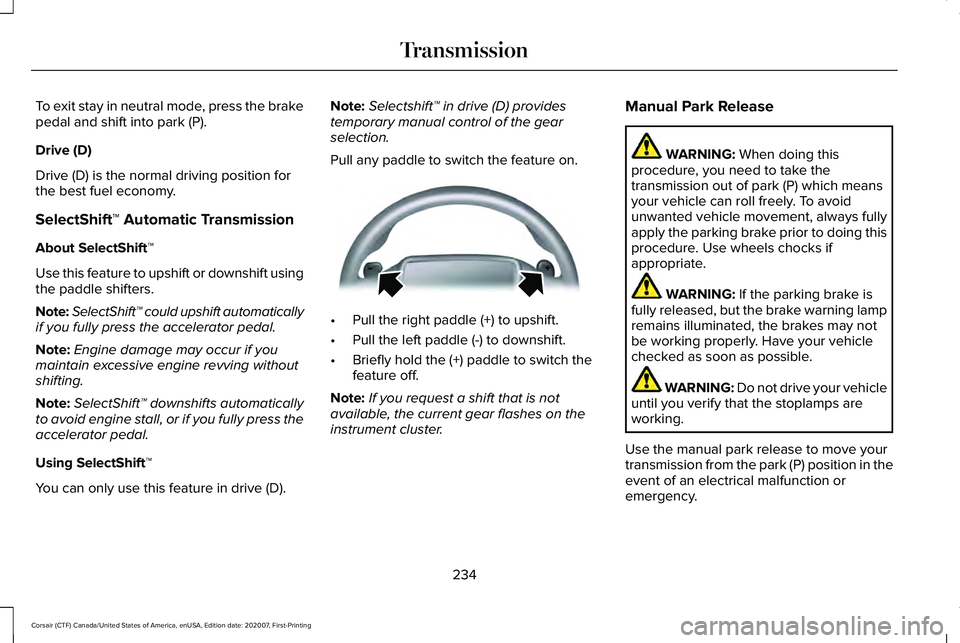
Pull any paddle to switch the feature on. •
Pull the right paddle (+) to upshift.
• Pull the left paddle (-) to downshift.
• Briefly hold the (+) paddle to switch the
feature off.
Note: If you request a shift that is not
available, the current gear flashes on the
instrument cluster. Manual Park Release WARNING: When doing this
procedure, you need to take the
transmission out of park (P) which means
your vehicle can roll freely. To avoid
unwanted vehicle movement, always fully
apply the parking brake prior to doing this
procedure. Use wheels chocks if
appropriate. WARNING:
If the parking brake is
fully released, but the brake warning lamp
remains illuminated, the brakes may not
be working properly. Have your vehicle
checked as soon as possible. WARNING: Do not drive your vehicle
until you verify that the stoplamps are
working.
Use the manual park release to move your
transmission from the park (P) position in the
event of an electrical malfunction or
emergency.
234
Corsair (CTF) Canada/United States of America, enUSA, Edition date: 202007, First-Printing TransmissionE144821
Page 238 of 638
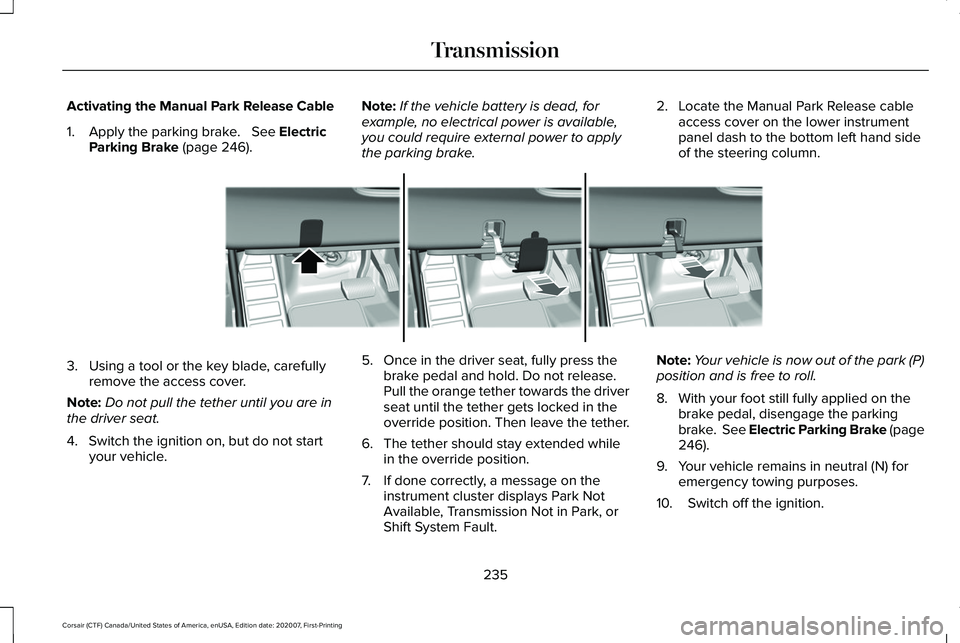
Activating the Manual Park Release Cable
1. Apply the parking brake. See Electric
Parking Brake (page 246). Note:
If the vehicle battery is dead, for
example, no electrical power is available,
you could require external power to apply
the parking brake. 2. Locate the Manual Park Release cable
access cover on the lower instrument
panel dash to the bottom left hand side
of the steering column. 3. Using a tool or the key blade, carefully
remove the access cover.
Note: Do not pull the tether until you are in
the driver seat.
4. Switch the ignition on, but do not start your vehicle. 5. Once in the driver seat, fully press the
brake pedal and hold. Do not release.
Pull the orange tether towards the driver
seat until the tether gets locked in the
override position. Then leave the tether.
6. The tether should stay extended while in the override position.
7. If done correctly, a message on the instrument cluster displays Park Not
Available, Transmission Not in Park, or
Shift System Fault. Note:
Your vehicle is now out of the park (P)
position and is free to roll.
8. With your foot still fully applied on the brake pedal, disengage the parking
brake. See Electric Parking Brake (page
246
).
9. Your vehicle remains in neutral (N) for emergency towing purposes.
10. Switch off the ignition.
235
Corsair (CTF) Canada/United States of America, enUSA, Edition date: 202007, First-Printing TransmissionE307867
Page 239 of 638
11.
Once it is safe to do so, and there is no
risk that your vehicle will roll,
disconnect the negative, black, battery
cable from the battery. If the vehicle
rolls before the battery is disconnected,
the electric parking brake may
automatically apply. The operator may
need to release the parking brake
again. See Electric Parking Brake
(page 246).
Returning Your Vehicle to Normal Mode
1. Once it is safe to do so, reconnect the negative, black, battery cable to the
battery.
2. Apply the parking brake.
See Electric
Parking Brake (page 246).
Note: If the vehicle battery is dead, for
example, no electrical power is available,
you could require external power to apply
the parking brake.
3. Fully apply the brake pedal and hold, do
not release. Pull the orange tether
outward toward the driver seat to remove
it from the override position. 4. The cable releases and retracts back to
its original rest position.
5. Stow the manual park release cable tether back inside the instrument panel
dash hole, and install the access cover
by pressing it back in position.
6. With your foot fully applied on the brake
pedal, start your vehicle. Confirm that
your vehicle is in the park (P) position and
that the instrument cluster indicates park
(P).
7. If the instrument cluster is not displaying
the park (P) position or there is a
message stating Park Not Available,
Transmission Not In Park, or Shift System
Fault, apply the parking brake before
exiting your vehicle. Contact an
authorized dealer for service. Automatic Transmission Adaptive
Learning
This feature may increase durability and
provide consistent shift feel over the life of
your vehicle. A new vehicle or transmission
may have firm shifts, soft shifts or both. This
is normal and does not affect the operation
or durability of the transmission. Over time,
the adaptive learning process fully updates
transmission operation.
If Your Vehicle Gets Stuck in Mud or
Snow
If your vehicle gets stuck in mud or snow,
you can rock it out by shifting between
forward and reverse gears, stopping
between shifts in a steady pattern. Press
lightly on the accelerator in each gear.
Note:
Do not rock your vehicle if the engine
is not at normal operating temperature or
damage to the transmission could occur.
Note: Do not rock your vehicle for more than
a minute or damage to the transmission and
tires could occur, or the engine may
overheat.
236
Corsair (CTF) Canada/United States of America, enUSA, Edition date: 202007, First-Printing Transmission
Page 251 of 638

HILL START ASSIST (IF EQUIPPED)
WARNING:
The system does not
replace the parking brake. When you leave
your vehicle, always apply the parking
brake. WARNING: You must remain in your
vehicle when the system turns on. At all
times, you are responsible for controlling
your vehicle, supervising the system and
intervening, if required. Failure to take care
may result in the loss of control of your
vehicle, serious personal injury or death.
Note: If the engine is revved excessively, or
if a malfunction is detected, the system will
be deactivated.
The system makes it easier to pull away
when your vehicle is on a slope without the
need to use the parking brake. When the system is active, your vehicle will
remain stationary on the slope for two to
three seconds after you release the brake
pedal. This allows you time to move your
foot from the brake to the accelerator pedal.
The brakes release automatically when the
engine has sufficient torque to prevent your
vehicle from rolling down the grade. This is
an advantage when pulling away on a slope,
for example from a car park ramp, traffic
lights or when reversing uphill into a parking
space.
The system will activate automatically on any
slope that will cause significant vehicle
rollback. For vehicles with a manual
transmission, you can switch this feature off
using the information display.
See
Information Displays (page 131). The system
will remain on or off depending on how it
was last set.
Note: There is no warning lamp to indicate
the system is either on or off.
Note: If your vehicle is equipped with Auto
Hold, Hill Start Assist is not available while
Auto Hold is active. Using Hill Start Assist
1. Bring your vehicle to a complete
standstill. Keep the brake pedal pressed
and select a forward gear, for example,
drive (D) or first (1) when facing uphill or
reverse (R) when facing downhill.
2. If the sensors detect that your vehicle is on a slope, the system will activate
automatically.
3. When you remove your foot from the brake pedal, your vehicle will remain on
the slope without rolling away for about
two or three seconds. This hold time will
automatically be extended if you are in
the process of driving off.
4. Drive off in the normal manner. The brakes will release automatically.
Switching the System On and Off
When you switch the ignition on, the system
automatically turns on. You cannot switch
the system on or off.
248
Corsair (CTF) Canada/United States of America, enUSA, Edition date: 202007, First-Printing Brakes