2021 LINCOLN CORSAIR lock
[x] Cancel search: lockPage 174 of 638
HEAD RESTRAINTS
WARNING: Fully adjust the head
restraint before you sit in or operate your
vehicle. This will help minimize the risk of
neck injury in the event of a crash. Do not
adjust the head restraint when your vehicle
is moving. WARNING:
The head restraint is a
safety device. Whenever possible it should
be installed and properly adjusted when
the seat is occupied. Failure to adjust the
head restraint properly could reduce its
effectiveness during certain impacts. WARNING: Adjust the head restraints
for all passengers before you drive your
vehicle. This will help minimize the risk of
neck injury in the event of a crash. Do not
adjust the head restraints when your
vehicle is moving. Note:
Adjust the seat backrest to an upright
driving position before adjusting the head
restraint. Adjust the head restraint so that
the top of it is level with the top of your head
and as far forward as possible. Make sure
that you remain comfortable. If you are
extremely tall, adjust the head restraint to
its highest position.
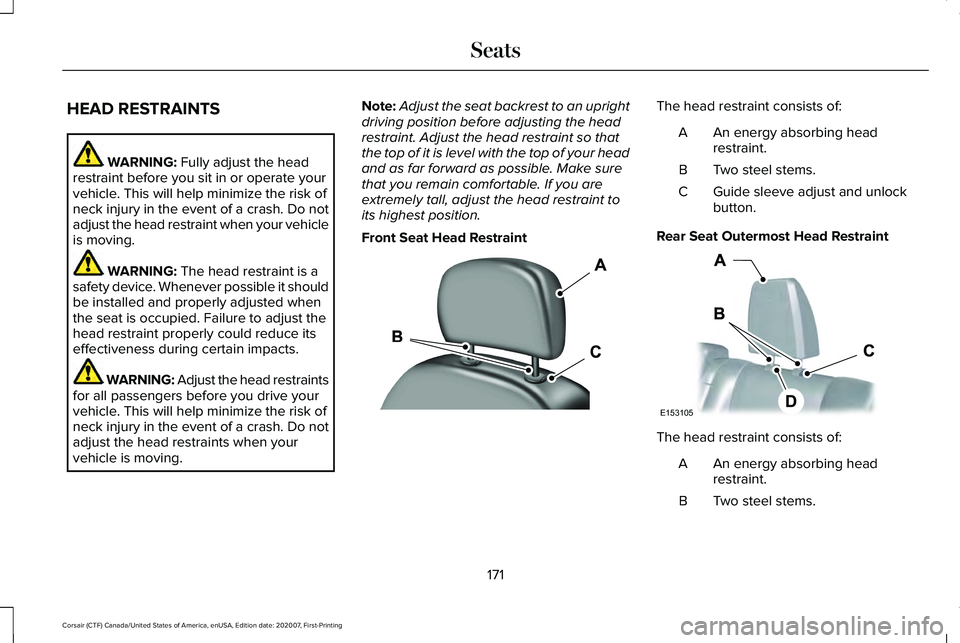
Front Seat Head Restraint The head restraint consists of:
An energy absorbing head
restraint.
A
Two steel stems.
B
Guide sleeve adjust and unlock
button.
C
Rear Seat Outermost Head Restraint The head restraint consists of:
An energy absorbing head
restraint.
A
Two steel stems.
B
171
Corsair (CTF) Canada/United States of America, enUSA, Edition date: 202007, First-Printing SeatsE308781 E153105
Page 175 of 638
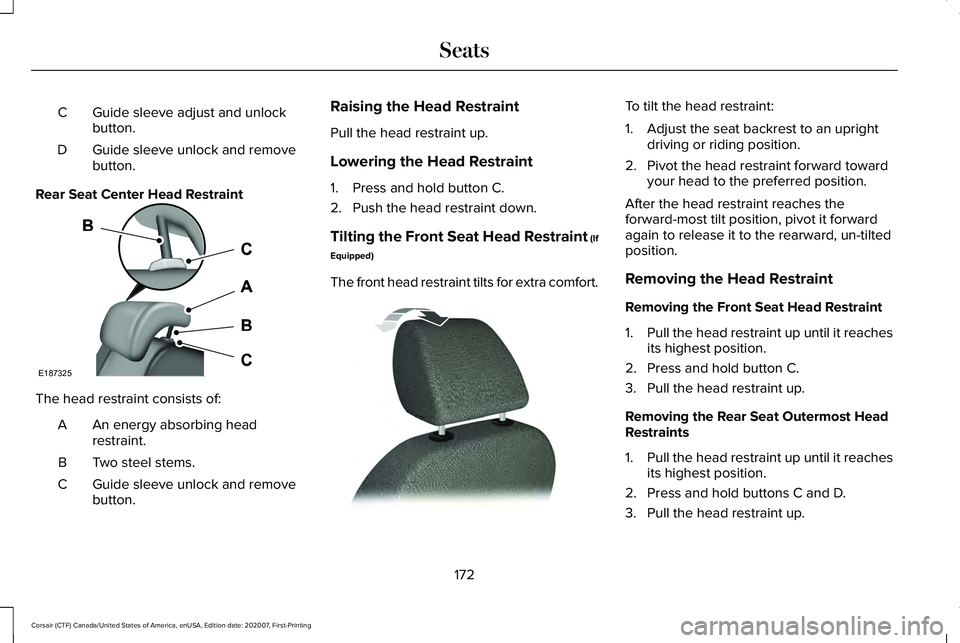
Guide sleeve adjust and unlock
button.
C
Guide sleeve unlock and remove
button.
D
Rear Seat Center Head Restraint The head restraint consists of:
An energy absorbing head
restraint.
A
Two steel stems.
B
Guide sleeve unlock and remove
button.
C Raising the Head Restraint
Pull the head restraint up.
Lowering the Head Restraint
1. Press and hold button C.
2. Push the head restraint down.
Tilting the Front Seat Head Restraint (If
Equipped)
The front head restraint tilts for extra comfort. To tilt the head restraint:
1. Adjust the seat backrest to an upright
driving or riding position.
2. Pivot the head restraint forward toward your head to the preferred position.
After the head restraint reaches the
forward-most tilt position, pivot it forward
again to release it to the rearward, un-tilted
position.
Removing the Head Restraint
Removing the Front Seat Head Restraint
1. Pull the head restraint up until it reaches
its highest position.
2. Press and hold button C.
3. Pull the head restraint up.
Removing the Rear Seat Outermost Head
Restraints
1. Pull the head restraint up until it reaches
its highest position.
2. Press and hold buttons C and D.
3. Pull the head restraint up.
172
Corsair (CTF) Canada/United States of America, enUSA, Edition date: 202007, First-Printing SeatsE187325 E144727
Page 176 of 638
Removing the Rear Seat Center Head
Restraint
1.
Pull the head restraint up until it reaches
its highest position.
2. Press and hold button C.
3. Pull the head restraint up.
Installing the Head Restraint
Align the steel stems into the guide sleeves
and push the head restraint down until it
locks. POWER SEATS WARNING: Do not adjust the driver
seat or seat backrest when your vehicle is
moving. This may result in sudden seat
movement, causing the loss of control of
your vehicle. WARNING:
Do not place cargo or
any objects behind the seat backrest
before returning it to the original position.
Pull on the seat backrest to make sure that
it has fully latched after returning the seat
backrest to its original position. An
unlatched seat may become dangerous if
you stop suddenly or have a crash.
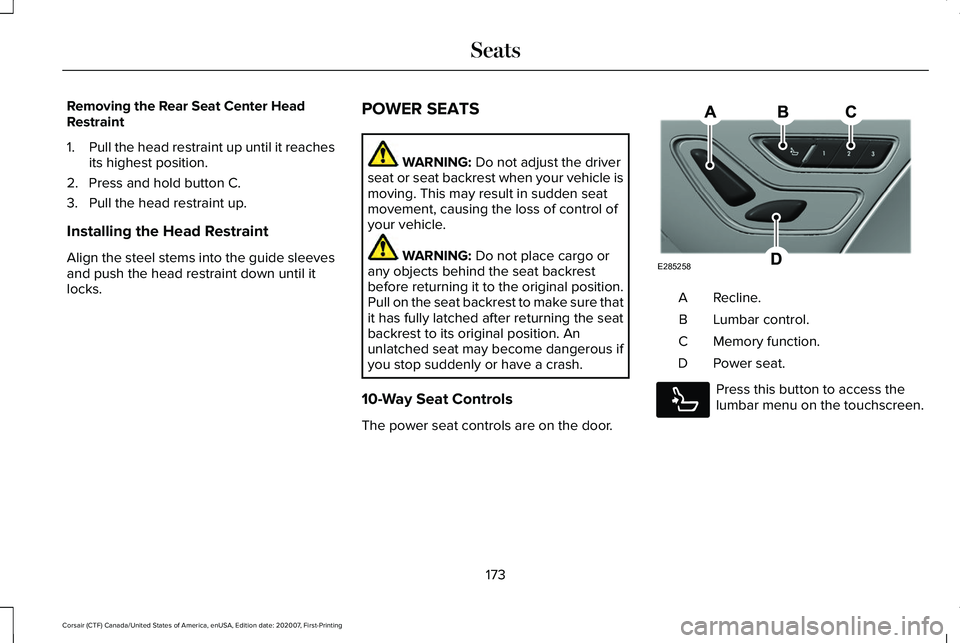
10-Way Seat Controls
The power seat controls are on the door. Recline.
A
Lumbar control.
B
Memory function.
C
Power seat.
D Press this button to access the
lumbar menu on the touchscreen.
173
Corsair (CTF) Canada/United States of America, enUSA, Edition date: 202007, First-Printing SeatsE285258 E285278
Page 181 of 638
Recalling a PreSet Position
Press and release the preset button
associated with your preferred driving
position. The memory features move to the
position stored for that preset.
Note:
You can only recall a preset memory
position when the ignition is off, or when the
transmission is in park (P) or neutral (N) and
the ignition is on.
Note: Press any seat or mirror adjustment
switch, or any memory button during a
memory recall, to cancel the operation.
You can also recall a preset memory position
by:
• Pressing the unlock button on your
remote control if you linked it to a preset
position.
• Unlocking the driver door if a linked
remote control is present.
Note: Using a linked remote control to recall
your memory position when the ignition is
off moves the seat and steering column to
the Easy Entry position. Linking a PreSet Position to Your
Remote Control
For information on linking a preset position
to your remote control, see the Personal
Profiles section.
Easy Entry and Exit Feature
If you enable the easy entry and exit feature,
it moves the driver seat position rearward up
to 2 in (5 cm) when you switch the ignition
off. The driver seat returns to the previous
position when you switch the ignition on.
You can enable or disable this feature
through the information display.
See
Information Displays (page 131). Personal Profiles
This feature allows you to create multiple
personal profiles enabling users to
personalize vehicle
’s settings. You can
create one profile for each preset memory
seat button along with a guest profile. You
can recall a profile using the touchscreen or
the preset button you selected when you
created your profile. You can also link a
remote control and a mobile device to your
profile, which are used to recall it.
Creating a Personal Profile
Use the touchscreen to create a personal
profile.
1. Switch the ignition on and leave the vehicle in park (P).
2. Select the Personal Profiles button under
Settings.
3. Follow the instructions on the display.
178
Corsair (CTF) Canada/United States of America, enUSA, Edition date: 202007, First-Printing Seats
Page 182 of 638
Linking a Personal Profile to Your Remote
Control or Mobile Device
You can save preset memory positions for
up to three remote controls by assigning a
remote control to a personal profile using
the touchscreen. You can assign three
additional remote controls set up as Phone
as a Key.
Use the touchscreen to link a remote control,
mobile device or both to a personal profile.
1. Switch the ignition on and leave the
vehicle in park (P).
2. Select the Personal Profiles button under
Settings.
3. Touch the arrow for the profile you wish to link to a remote control or mobile
device.
4. Select remote control, mobile device, or
both.
5. Follow the instructions on the display.
Note: To successfully link a mobile device,
the mobile device must be in your vehicle,
and must have previously been setup as a
remote control for your vehicle. Note:
If more than one linked remote control
is in range, the memory function moves to
the settings of the first key to initiate a
memory recall.
Note: The guest profile consists of existing
settings when there is no driver profile
created. After you create a driver profile, the
guest profile serves as an additional driver
profile.
Note: You cannot link a personalized name,
a memory seat button or a remote control
to a guest profile.
Personal Settings
Personal Profiles allow you to personalize
positional settings such as seats and mirrors,
as well as non-positional settings such as
radio, navigation, driver assist and system
settings. See SYNC™ 3 (page 478). You
cannot change the menu locations and
settings of those personalized features with
Personal Profiles.
Note: Non-positional settings save to the
active driver profile whenever you change
a setting. Note:
You can save positional settings if you
press and hold a memory seat button.
Recalling and Changing a Profile
You can recall a profile by:
• Using a remote control or mobile device
linked to a driver profile to access the
remote start feature, press an unlock
button or open the door with the exterior
door handle.
• Pressing a memory seat button linked to
a driver profile.
• Using the Personal Profiles menu on the
touchscreen.
Note: The recalled profile replaces the
previously active profile. If the active profile
is not your preferred profile, you can change
it using any of the three methods listed.
179
Corsair (CTF) Canada/United States of America, enUSA, Edition date: 202007, First-Printing Seats
Page 183 of 638
When you switch on the Personal Profiles
feature:
•
Unlocking a door with a remote control
or mobile device that is not linked to a
driver profile recalls non-positional
settings from the guest profile. It does
not change the positional settings.
• Pressing a memory seat button that is
not linked to a driver profile or saved to
a preset setting recalls non-positional
settings from the guest profile. It does
not change the positional settings.
• Pressing a memory seat button that is
not linked to a driver profile but is saved
to a preset setting recalls non-positional
settings from the guest profile. It recalls
the positional settings that you saved to
that memory seat button.
See SYNC™ 3 (page 478). When you switch off a Personal Profiles
feature:
•
Unlocking a door with a remote control
or mobile device recalls non-positional
settings from the guest profile and still
recalls positional settings from the driver
profile which the remote control or
mobile device is linked to.
• Pressing a memory seat button that is
not linked to a driver profile or saved to
a preset setting recalls non-positional
settings from the guest profile. It does
not change the positional settings.
• Pressing a memory seat button that is
linked to a driver profile or has saved to
a preset setting recalls non-positional
settings from the guest profile. It recalls
the positional settings that you saved to
that memory seat button. REAR SEATS
Moving the Seats Backward and
Forward WARNING:
Make sure the seat fully
locks into place by rocking it backward and
forward.
180
Corsair (CTF) Canada/United States of America, enUSA, Edition date: 202007, First-Printing Seats
Page 186 of 638
Note:
Depending on your remote start
settings, the heated seats may remain on
after you remote start your vehicle. The
heated seats may also turn on when you
start your vehicle if they were on when your
vehicle was turned off.
Rear Seats (If Equipped) WARNING:
Persons who are unable
to feel pain to the skin because of
advanced age, chronic illness, diabetes,
spinal cord injury, medication, alcohol use,
exhaustion, or other physical conditions,
must exercise care when using the seat
heater. The seat heater may cause burns
even at low temperatures, especially if
used for long periods of time. Do not place
anything on the seat that insulates against
heat, such as a blanket or cushion,
because this may cause the seat heater to overheat. Do not puncture the seat with
pins, needles, or other pointed objects
because this may damage the heating
element which may cause the seat heater
to overheat. An overheated seat may
cause serious personal injury.
Do not do the following:
• Place heavy objects on the seat.
• Operate the seat heater if water or any
other liquid spills on the seat. Allow the
seat to dry thoroughly.
Note: The heated seats will only function
when the engine is running.
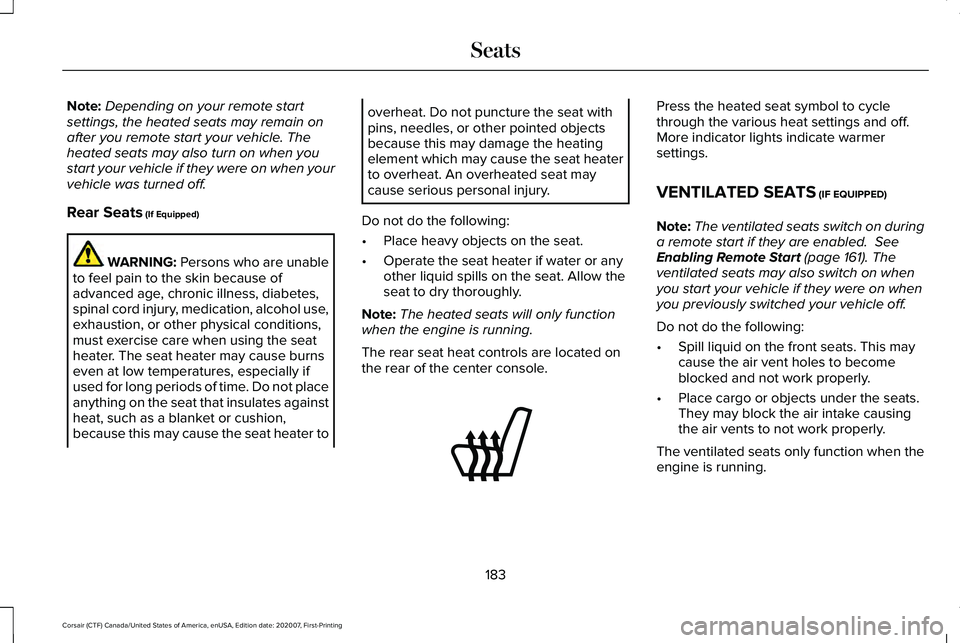
The rear seat heat controls are located on
the rear of the center console. Press the heated seat symbol to cycle
through the various heat settings and off.
More indicator lights indicate warmer
settings.
VENTILATED SEATS
(IF EQUIPPED)
Note: The ventilated seats switch on during
a remote start if they are enabled.
See
Enabling Remote Start (page 161). The
ventilated seats may also switch on when
you start your vehicle if they were on when
you previously switched your vehicle off.
Do not do the following:
• Spill liquid on the front seats. This may
cause the air vent holes to become
blocked and not work properly.
• Place cargo or objects under the seats.
They may block the air intake causing
the air vents to not work properly.
The ventilated seats only function when the
engine is running.
183
Corsair (CTF) Canada/United States of America, enUSA, Edition date: 202007, First-Printing SeatsE146322
Page 190 of 638
WHAT IS THE GARAGE DOOR
OPENER
Universal Garage Door Opener: HomeLink
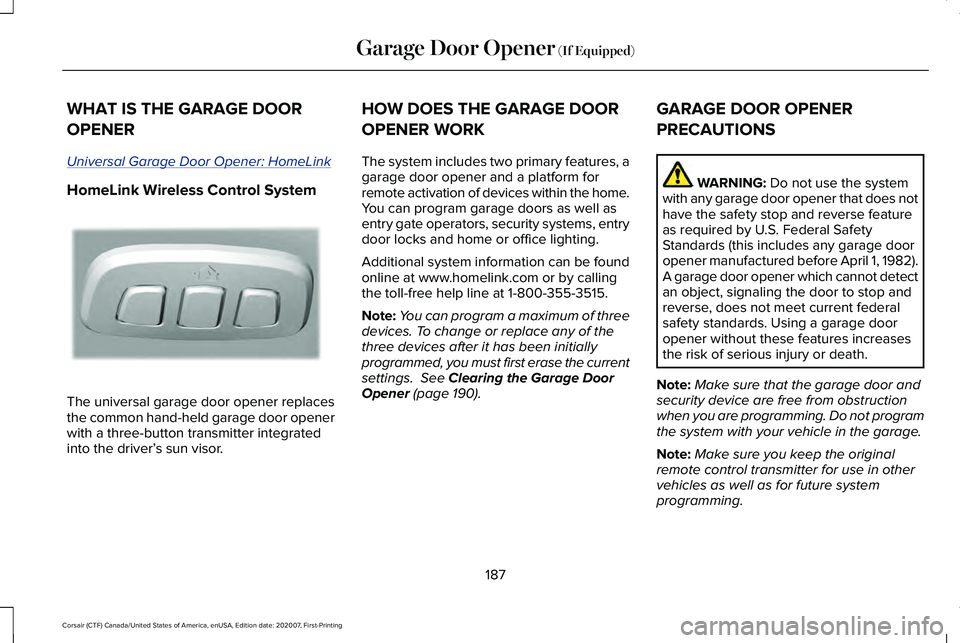
HomeLink Wireless Control System
The universal garage door opener replaces
the common hand-held garage door opener
with a three-button transmitter integrated
into the driver’
s sun visor. HOW DOES THE GARAGE DOOR
OPENER WORK
The system includes two primary features, a
garage door opener and a platform for
remote activation of devices within the home.
You can program garage doors as well as
entry gate operators, security systems, entry
door locks and home or office lighting.
Additional system information can be found
online at www.homelink.com or by calling
the toll-free help line at 1-800-355-3515.
Note:
You can program a maximum of three
devices. To change or replace any of the
three devices after it has been initially
programmed, you must first erase the current
settings. See Clearing the Garage Door
Opener (page 190). GARAGE DOOR OPENER
PRECAUTIONS WARNING:
Do not use the system
with any garage door opener that does not
have the safety stop and reverse feature
as required by U.S. Federal Safety
Standards (this includes any garage door
opener manufactured before April 1, 1982).
A garage door opener which cannot detect
an object, signaling the door to stop and
reverse, does not meet current federal
safety standards. Using a garage door
opener without these features increases
the risk of serious injury or death.
Note: Make sure that the garage door and
security device are free from obstruction
when you are programming. Do not program
the system with your vehicle in the garage.
Note: Make sure you keep the original
remote control transmitter for use in other
vehicles as well as for future system
programming.
187
Corsair (CTF) Canada/United States of America, enUSA, Edition date: 202007, First-Printing Garage Door Opener
(If Equipped)E188211