2021 LINCOLN CORSAIR stop start
[x] Cancel search: stop startPage 290 of 638
The cruise control indicator
replaces the adaptive cruise
control indicator if you select
normal cruise control. The gap setting does
not display, and the system does not respond
to lead vehicles. Automatic braking remains
active to maintain set speed. The system
remembers the last setting when you start
your vehicle.
SWITCHING LANE CENTERING ON
AND OFF
The cruise controls are on the steering
wheel. See What Is Cruise Control (page
276). Press the button.
The indicator appears in the information
display. When the system is on, the color of
the indicator changes to indicate the system
status.
See Adaptive Cruise Control
Indicators (page 285).
Note: Adaptive cruise control must be on
before you can switch lane centering on. Activating Lane Centering
The system only activates when all of the
following occur:
•
You have adaptive cruise control with
stop-and-go on.
• Your hands are on the steering wheel.
• The system detects both lane markings.
Note: If it does not detect valid lane
markings, the system stays inactive until
valid markings are available.
You can override the system at any time by
steering your vehicle.
System Alerts and Automatic
Cancellation
You must keep your hands on the steering
wheel at all times.
When the system is active and detects no
steering activity for a certain period of time,
the system alerts you to put your hands on
the steering wheel. If you do not react to the
warnings the system cancels and slows your
vehicle down to idle speeds while
maintaining steering control. The system also alerts you if your vehicle
crosses lane markings without detected
steering activity.
Note:
The system may detect a light grip or
touch on the steering wheel as hands-off
driving.
When an external condition cancels the
system, for example, no lane markings
available, a tone sounds as the icon turns
amber then gray, and a message appears in
the information display. If your vehicle starts to slow down,
you must provide steering input to
the wheel and press and release
the button to regain full system performance.
Automatic cancellation can also occur if:
• The lane becomes too wide or too
narrow.
• The system cannot detect valid lane
markings.
• Lane markings are crossed.
Note: The system disables until the next key
cycle if your vehicle slows down due to driver
inactivity twice within a key cycle.
287
Corsair (CTF) Canada/United States of America, enUSA, Edition date: 202007, First-Printing Adaptive Cruise Control
(If Equipped)E71340 E297977 E281472
Page 293 of 638

Adaptive Cruise Control – Information
Messages - Vehicles With: Adaptive
Cruise Control With Stop and Go
Note:
Depending on your vehicle options
and instrument cluster type, not all messages
display or are available. Note:
The system could abbreviate or
shorten certain messages depending upon
which cluster type you have. Action
Message
A malfunction is preventing the adaptive cruise from engaging.
Adaptive Cruise Malfunction
Front Sensor Not Aligned Contact an authorized dealer to have the radar checked for proper coverage and operation. Conditions exist preventing the system from being available.
Adaptive Cruise Not Available
You have a blocked radar because of poor radar visibility due to inclement weather or ic\
e, mud,or water in front of the radar. You can typically clean the sensor to resolve this.
Adaptive Cruise Not Available Sensor
Blocked See Manual Due to the nature of radar technology, it is possible to get a blockage warning with no actual
block. This happens, for example, when driving in sparse rural or desert environments. A false blocked condition either self clears, or clears after you restart your vehicl\
e.
You have selected normal cruise control. The system does not brake or react to traffic.
Normal Cruise Active Adaptive Braking Off
Displays when the adaptive cruise control is going to cancel and you mus\
t take control.
Adaptive Cruise - Driver Resume Control
Displays when the vehicle speed is too slow to activate the adaptive cru\
ise control and there isno lead vehicle in range.
Adaptive Cruise Speed Too Low to
Activate
290
Corsair (CTF) Canada/United States of America, enUSA, Edition date: 202007, First-Printing Adaptive Cruise Control (If Equipped)
Page 332 of 638

Trailer Lamps
WARNING: Never connect any trailer
lamp wiring to the vehicle's tail lamp wiring;
this may damage the electrical system
resulting in fire. Contact your authorized
dealer as soon as possible for assistance
in proper trailer tow wiring installation.
Additional electrical equipment may be
required.
Trailer lamps are required on most towed
vehicles. Make sure all running lights, brake
lights, turn signals and hazard lights are
working.
Before Towing a Trailer
Practice turning, stopping and backing up to
get the feel of your vehicle-trailer
combination before starting on a trip. When
turning, make wider turns so the trailer
wheels clear curbs and other obstacles. When Towing a Trailer
•
Do not drive faster than 70 mph
(113 km/h) during the first 500 mi
(800 km).
• Do not make full-throttle starts.
• Check your hitch, electrical connections
and trailer wheel lug nuts thoroughly after
you have traveled
50 mi (80 km).
• When stopped in congested or heavy
traffic during hot weather, place the
transmission in park (P) to aid engine and
transmission cooling and to help A/C
performance.
• Turn off the speed control with heavy
loads or in hilly terrain. The speed control
may turn off automatically when you are
towing on long, steep grades.
• Shift to a lower gear when driving down
a long or steep hill. Do not apply the
brakes continuously, as they may
overheat and become less effective. •
If your transmission is equipped with a
Grade Assist or Tow/Haul feature, use
this feature when towing. This provides
engine braking and helps eliminate
excessive transmission shifting for
optimum fuel economy and transmission
cooling.
• Allow more distance for stopping with a
trailer attached. Anticipate stops and
brake gradually.
• Avoid parking on a grade. However, if
you must park on a grade:
1. Turn the steering wheel to point your vehicle tires away from traffic flow.
2. Set your vehicle parking brake.
3. Place the transmission in park (P).
4. Place wheel chocks in front and back of the trailer wheels. Chocks are not
included with your vehicle.
Launching or Retrieving a Boat or
Personal Watercraft (PWC)
Note: Disconnect the wiring to the trailer
before
backing the trailer into the water.
329
Corsair (CTF) Canada/United States of America, enUSA, Edition date: 202007, First-Printing Towing
Page 341 of 638
The fuel pump shutoff stops the flow of fuel
to the engine in the event of a moderate to
severe crash. Not every impact causes a
shutoff.
Should your vehicle shut off after a crash,
you may restart your vehicle.
If your vehicle has a key system:
1. Switch off the ignition.
2. Switch to start position.
3. Switch off the ignition.
4. Switch on the ignition to re-enable the
fuel pump.
5. If the vehicle does not start, repeat steps
1 through 4.
If your vehicle has a push button start
system:
1. Press START/STOP to switch off your
vehicle.
2. Press the brake pedal and
START/STOP
to switch on your vehicle.
3. Remove your foot from the brake pedal and press
START/STOP to switch off
your vehicle. 4. You can attempt to start the vehicle by
pressing the brake pedal and
START/STOP
, or press START/STOP
without pressing the brake pedal.
5. If the vehicle does not start, repeat steps
1 through 4.
JUMP STARTING THE VEHICLE WARNING:
Batteries normally
produce explosive gases which can cause
personal injury. Therefore, do not allow
flames, sparks or lighted substances to
come near the battery. When working near
the battery, always shield your face and
protect your eyes. Always provide correct
ventilation. WARNING:
Keep batteries out of
reach of children. Batteries contain sulfuric
acid. Avoid contact with skin, eyes or
clothing. Shield your eyes when working
near the battery to protect against possible
splashing of acid solution. In case of acid
contact with skin or eyes, flush immediately
with water for a minimum of 15 minutes and
get prompt medical attention. If acid is
swallowed, call a physician immediately. WARNING:
Use only adequately
sized cables with insulated clamps. WARNING: Make sure that the cables
are clear of any moving parts and fuel
delivery system parts.
Note: Do not attempt to push-start your
automatic transmission vehicle. Attempting
to push-start a vehicle with an automatic
transmission may cause transmission
damage.
Note: Do not disconnect the battery of the
disabled vehicle as this could damage the
vehicle electrical system.
338
Corsair (CTF) Canada/United States of America, enUSA, Edition date: 202007, First-Printing Roadside Emergencies
Page 381 of 638
Your vehicle has limited engine power when
in the fail-safe mode, drive your vehicle with
caution. Your vehicle does not maintain
high-speed operation and the engine may
operate poorly.
Remember that the engine is capable of
automatically shutting down to prevent
engine damage. In this situation:
1. Pull off the road as soon as safely
possible and switch the engine off.
2. If you are a member of a roadside assistance program, we recommend that
you contact your roadside assistance
service provider.
3. If this is not possible, wait a short period
for the engine to cool.
4. Check the coolant level. If the coolant level is at or below the minimum mark,
add prediluted coolant immediately.
5. When the engine temperature cools, you
can re-start the engine. Have your vehicle
checked as soon as possible to minimize
engine damage.
Note: Driving your vehicle without repair
increases the chance of engine damage. Engine Coolant Temperature
Management (If Equipped) WARNING:
To reduce the risk of
crash and injury, be prepared that the
vehicle speed may reduce and the vehicle
may not be able to accelerate with full
power until the coolant temperature
reduces.
If you tow a trailer with your vehicle, the
engine may temporarily reach a higher
temperature during severe operating
conditions, for example ascending a long or
steep grade in high ambient temperatures.
At this time, you may notice the coolant
temperature gauge moves toward the red
zone and a message may appear in the
information display. You may notice a reduction in vehicle speed
caused by reduced engine power in order
to manage the engine coolant temperature.
Your vehicle may enter this mode if certain
high-temperature and high-load conditions
take place. The amount of speed reduction
depends on vehicle loading, grade and
ambient temperature. If this occurs, there is
no need to stop your vehicle. You can
continue to drive.
The air conditioning may automatically turn
on and off during severe operating
conditions to protect the engine from
overheating. When the coolant temperature
decreases to the normal operating
temperature, the air conditioning turns on.
If the coolant temperature gauge moves fully
into the red zone, or if the coolant
temperature warning or service engine soon
messages appear in your information display,
do the following:
1.
Stop your vehicle as soon as it is safe to
do so. Fully apply the parking brake, shift
into park (P) or neutral (N).
378
Corsair (CTF) Canada/United States of America, enUSA, Edition date: 202007, First-Printing Maintenance
Page 384 of 638
WARNING: Keep batteries out of
reach of children. Batteries contain sulfuric
acid. Avoid contact with skin, eyes or
clothing. Shield your eyes when working
near the battery to protect against possible
splashing of acid solution. In case of acid
contact with skin or eyes, flush immediately
with water for a minimum of 15 minutes and
get prompt medical attention. If acid is
swallowed, call a physician immediately. WARNING:
Battery posts, terminals
and related accessories contain lead and
lead compounds, chemicals known to the
State of California to cause cancer and
reproductive harm. Wash your hands after
handling
. WARNING:
For vehicles with
Auto-Start-Stop the battery requirement is
different. You must replace the battery with
one of exactly the same specification.
The battery is in the engine compartment.
See
Under Hood Overview (page 367). Your vehicle has a maintenance-free battery.
It does not require additional water during
service.
If the vehicle battery has a cover, make sure
you correctly install it after cleaning or
replacing the battery.
For longer, trouble-free operation, keep the
top of the battery clean and dry and the
battery cables tightly fastened to the battery
terminals. If any corrosion is present on the
battery or terminals, remove the cables from
the terminals and clean with a wire brush.
You can neutralize the acid with a solution
of baking soda and water.
We recommend that you disconnect the
negative battery cable terminal from the
battery if you plan to store your vehicle for
an extended period.
Note:
If you only disconnect the negative
battery cable terminal, make sure it is
isolated or placed away from the battery
terminal to avoid unintended connection or
arcing. To maintain correct operation of the battery
management system, if you add any
electrical devices to your vehicle, do not
connect the ground connection directly to
the negative battery terminal. A connection
at the negative battery terminal can cause
inaccurate measurements of the battery
condition and potential incorrect system
operation.
Note:
If you add electrical accessories or
components to your vehicle this may
adversely affect battery performance,
durability and the performance of other
electrical systems on your vehicle.
If you replace the battery make sure it
matches the electrical requirements of your
vehicle.
If you disconnect or replace the battery and
your vehicle has an automatic transmission,
it must relearn its adaptive strategy. Because
of this, the transmission may shift firmly when
first driven. This is normal operation while
the transmission fully updates its operation
to optimum shift feel.
381
Corsair (CTF) Canada/United States of America, enUSA, Edition date: 202007, First-Printing Maintenance
Page 419 of 638

WARNING: When inflating the
tire for mounting pressures up to
20 psi (1.38 bar)
greater than the
maximum pressure on the tire sidewall,
the following precautions must be
taken to protect the person mounting
the tire:
• Make sure that you have the correct
tire and wheel size.
• Lubricate the tire bead and wheel
bead seat area again.
• Stand at a minimum of 12.0 ft (3.66 m)
away from the wheel and tire
assembly.
• Use both eye and ear protection. WARNING:
Always inflate steel
carcass tires with a remote air fill with
the person inflating standing at a
minimum of
12 ft (3.66 m) away from
the wheel and tire assembly. Important:
Remember to replace the
wheel valve stems when the road tires
are replaced on your vehicle.
It is recommended that the two front
tires or two rear tires generally be
replaced as a pair.
The tire pressure sensors mounted in
the wheels (originally installed on your
vehicle) are not designed to be used in
aftermarket wheels.
The use of wheels or tires not
recommended by us, may affect the
operation of your tire pressure
monitoring system.
If the tire pressure monitoring system
indicator is flashing, your system is
malfunctioning. Your replacement tire
might be incompatible with your tire
pressure monitoring system, or some
component of the system may be
damaged. Safety Practices WARNING:
If your vehicle is
stuck in snow, mud or sand, do not
rapidly spin the tires; spinning the tires
can tear the tire and cause an
explosion. A tire can explode in as little
as three to five seconds. WARNING:
Do not spin the
wheels at over 34 mph (55 km/h). The
tires may fail and injure a passenger
or bystander.
Driving habits have a great deal to do
with your tire mileage and safety.
*Observe posted speed limits
*Avoid fast starts, stops and turns
*Avoid potholes and objects on the road
*Do not run over curbs or hit the tire
against a curb when parking
416
Corsair (CTF) Canada/United States of America, enUSA, Edition date: 202007, First-Printing Wheels and Tires
Page 525 of 638
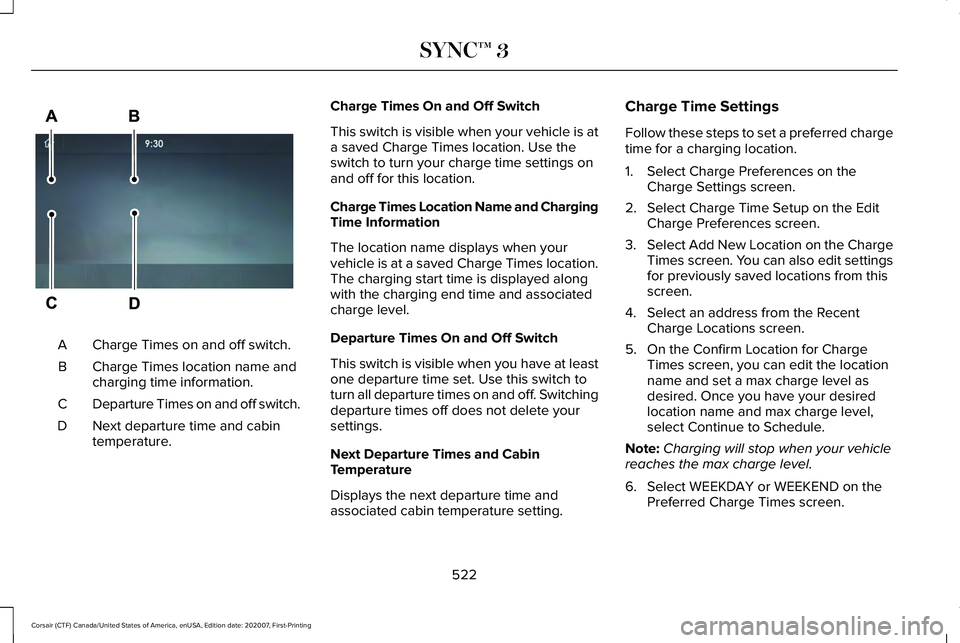
Charge Times on and off switch.
A
Charge Times location name and
charging time information.
B
Departure Times on and off switch.
C
Next departure time and cabin
temperature.
D Charge Times On and Off Switch
This switch is visible when your vehicle is at
a saved Charge Times location. Use the
switch to turn your charge time settings on
and off for this location.
Charge Times Location Name and Charging
Time Information
The location name displays when your
vehicle is at a saved Charge Times location.
The charging start time is displayed along
with the charging end time and associated
charge level.
Departure Times On and Off Switch
This switch is visible when you have at least
one departure time set. Use this switch to
turn all departure times on and off. Switching
departure times off does not delete your
settings.
Next Departure Times and Cabin
Temperature
Displays the next departure time and
associated cabin temperature setting. Charge Time Settings
Follow these steps to set a preferred charge
time for a charging location.
1. Select Charge Preferences on the
Charge Settings screen.
2. Select Charge Time Setup on the Edit Charge Preferences screen.
3. Select Add New Location on the Charge
Times screen. You can also edit settings
for previously saved locations from this
screen.
4. Select an address from the Recent Charge Locations screen.
5. On the Confirm Location for Charge Times screen, you can edit the location
name and set a max charge level as
desired. Once you have your desired
location name and max charge level,
select Continue to Schedule.
Note: Charging will stop when your vehicle
reaches the max charge level.
6. Select WEEKDAY or WEEKEND on the Preferred Charge Times screen.
522
Corsair (CTF) Canada/United States of America, enUSA, Edition date: 202007, First-Printing SYNC™ 3E304454