Page 311 of 508
3115-4. Using the interior lights
5
Interior features
impact and conditions of the collision.)
■Customization
Some functions can be customized.
( P.461)
NOTICE
■Removing light lenses
Never remove the lens for the front inte-
rior light and front personal lights. Other-
wise, the lights will be damaged. If the
lens need to remove , contact your Lexus
dealer.
■To prevent battery discharge
Do not leave the lights on longer than
necessary when the engine is not run-
ning.
Page 314 of 508
3145-5. Using the storage features
1Open (press the button)
2 Unlock with the mechanical key
3 Lock with the mechanical key
■Glove box light
The glove box light turns on when the tail
lights are on.
■When cleaning the interior
Remove to clean it.
When installing , engage the left and
right claws and then engage the center
claw.
Push the knob.
Lift by hand to fully open the console box.
■Console box light
The console box light turns on when the tail
lights are on.
■Pen holder
A pen can be stored in the pen holder on
the underside of the lid.
WARNING
■When storage compartments are not
in use
When driving or when the storage com-
partments are not in use, keep the lids
closed.
In the event of sudden braking or sudden
swerving, an accident may occur due to
an occupant being struck by an open lid
or the items stored inside.
Glove box
Smartphone holder
Console box
A
A
Page 324 of 508

3245-6. Using the other interior features
memorized.
2Place a portable device on the
charging area with its charging sur-
face facing down.
While charging, the operation indicator
light (orange) will be illuminated.
If charging does not begin, move the porta-
ble device as close to the center of the
charging area as possible.
When charging is complete, the operation
indicator light (green) will illuminate.
■Recharging function
If a certain amount of time has
elapsed since charging completed
and the portable device has not
been moved, the wireless charger
will restart charging.
If the portable device is moved
within the charging area, charging
will stop temporarily then restart.
■Operation indicator light status
*: Depending on the portable device, the
operation indicator light may stay illumi-
nated (orange) afte r charging has com-
pleted.
■If the operation indicator light
blinks
If an error is dete cted, the operation
indicator light will blink (orange). Take
the appropriate measures according to
the table below.
Blinks (orange) at a one second
interval continuously
Blinks (orange) 3 times repeatedly
Operation indica-
tor lightState
OffThe Wireless charger
is off
Green (illumi-
nated)
Standby (charging is
possible)
Charging is complete*
Orange (illumi-
nated)
A portable device has
been placed on the
charging area (identi-
fying the portable
device)
Charging in progress
Suspected causesMeasure
Vehicle to char-
ger communica-
tion failure.Contact your Lexus
dealer.
Page 333 of 508

3335-6. Using the other interior features
5
Interior features
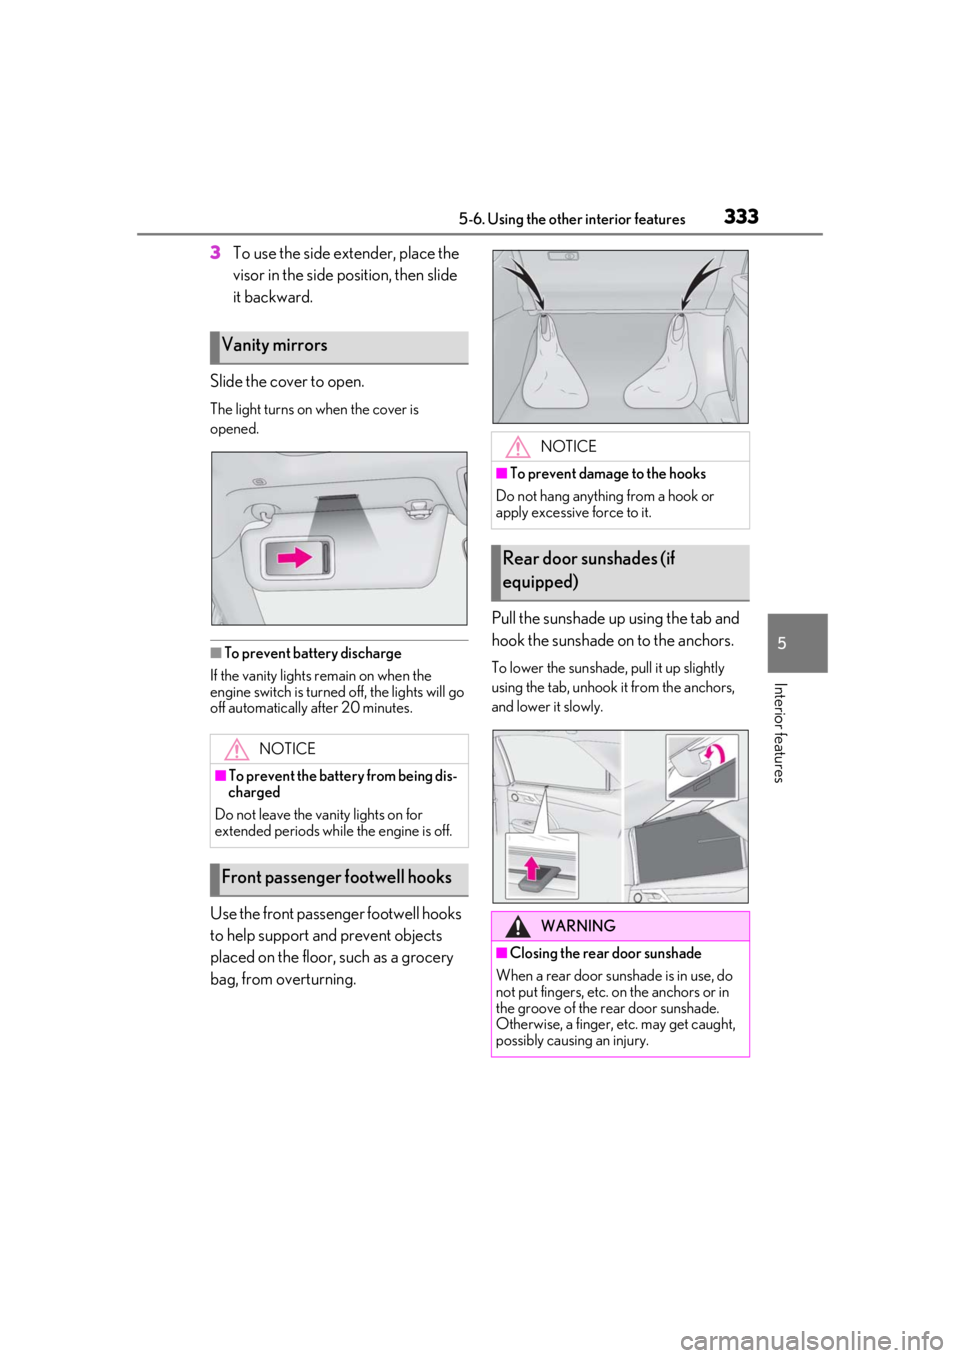
3To use the side extender, place the
visor in the side position, then slide
it backward.
Slide the cover to open.
The light turns on when the cover is
opened.
■To prevent battery discharge
If the vanity lights remain on when the
engine switch is turned off, the lights will go
off automatically after 20 minutes.
Use the front passenger footwell hooks
to help support and prevent objects
placed on the floor, such as a grocery
bag, from overturning. Pull the sunshade up using the tab and
hook the sunshade on to the anchors.
To lower the sunshade, pull it up slightly
using the tab, unhook it from the anchors,
and lower it slowly.
Vanity mirrors
NOTICE
■To prevent the battery from being dis-
charged
Do not leave the vanity lights on for
extended periods while the engine is off.
Front passenger footwell hooks
NOTICE
■To prevent damage to the hooks
Do not hang anything from a hook or
apply excessive force to it.
Rear door sunshades (if
equipped)
WARNING
■Closing the rear door sunshade
When a rear door sunshade is in use, do
not put fingers, etc. on the anchors or in
the groove of the rear door sunshade.
Otherwise, a finger, etc. may get caught,
possibly causing an injury.
Page 346 of 508

3466-1. Maintenance and care
WARNING
●Lexus Safety System + 2.0
●BSM (if equipped)
●RCTA (if equipped)
●PKSB (if equipped)
NOTICE
■To prevent paint deterioration and
corrosion on the body and compo-
nents (aluminum wheels, etc.)
●Wash the vehicle immediately in the
following cases:
• After driving near the sea coast
• After driving on salted roads
• If coal tar or tree sap is present on the paint surface
• If dead insects, in sect droppings or
bird droppings are present on the
paint surface
• After driving in an area contaminated with soot, oily smoke, mine dust, iron
powder or chemical substances
• If the vehicle becomes heavily soiled with dust or mud
• If liquids such as benzene and gasoline are spilled on the paint surface
●If the paint is chip ped or scratched,
have it repaired immediately.
●To prevent the wheels from corroding,
remove any dirt and store in a place
with low humidity when storing the
wheels.
■Cleaning the exterior lights
●Wash carefully. Do not use organic
substances or scrub with a hard brush.
This may damage the surfaces of the
lights.
●Do not apply wax to the surfaces of the
lights.
Wax may cause damage to the lenses.
■When using an automatic car wash
(vehicles with rain-sensing windshield
wipers)
Set the wiper switch to the off position.
If the wiper switch is in “AUTO”, the wip-
ers may operate and the wiper blades
may be damaged.
■When using a high pressure car wash
●When washing the vehicle, do not let
water of the high pressure washer hit
directly or the vicinity of the camera.
Due to the shock from the high pres-
sure water, it is possible the device may
not operate as normal.
●Do not bring the nozzle tip close to
boots (rubber or resin manufactured
cover), connectors or the following
parts. The parts may be damaged if
they come into contact with high-pres-
sure water.
• Traction related parts
•Steering parts
• Suspension parts
• Brake parts
●Keep the cleaning nozzle at least 11.9
in. (30 cm) away from the vehicle
body. Otherwise resin section, such as
moldings and bumpers, may be
deformed and damaged.
Also, do not continuously hold the nozzle
in the same place.
●Do not spray the lower part of the
windshield continuously.
If water enters the air conditioning sys-
tem intake located near the lower part of
the windshield, the air conditioning sys-
tem may not operate correctly.
●Do not wash the underside of the vehi-
cle using a high pressure car washer.
Page 352 of 508

3526-2. Maintenance
Radiator/con-
denser
The radiator and con-
denser should be free
from foreign objects.
( P.362)
Washer fluid
Is there sufficient
washer fluid?
( P.364)
Vehicle interior
ItemsCheck points
Accelerator
pedal
• The accelerator
pedal should move
smoothly (without
uneven pedal effort
or catching).
Automatic trans-
mission “Park”
mechanism
•When parked on a slope and the shift
lever is in P, is the
vehicle securely
stopped?
Brake pedal
• Does the brake pedal move
smoothly?
• Does the brake pedal have appro-
priate clearance
from the floor?
• Does the brake pedal have the cor-
rect amount of free
play?
ItemsCheck points
Brakes
• The vehicle should not pull to one side
when the brakes are
applied.
•The brakes should work effectively.
• The brake pedal should not feel
spongy.
• The brake pedal should not get too
close to the floor
when the brakes are
applied.
Head restraints
•Do the head restraints move
smoothly and lock
securely?
Indicators/buzz-
ers•Do the indicators and buzzers function
properly?
Lights
• Do all the lights come on?
• Are the headlights aimed correctly?
( P.382)
Parking brake
• Does the parking
brake switch oper-
ate normally?
• When parked on a slope and the park-
ing brake is on, is the
vehicle securely
stopped?
Seat belts
• Do the seat belts operate smoothly?
• The seat belts should not be damaged.
ItemsCheck points
Page 381 of 508

3816-3. Do-it-yourself maintenance
6
Maintenance and care
1Turn the engine switch off.
2 Open the fuse box cover.
Engine compartment
Push the tab in and lift the lid off.
Driver’s side instrument panel
Remove the lid.
3Remove the fuse with the pullout
tool. Only some fuses can be removed
using the pullout tool.
4 Check if the fuse is blown.
Normal fuse
Blown fuse
Replace the blown fuse with a new fuse of
an appropriate amperage rating. The
amperage rating can be found on the fuse
box lid.
Many types of fuse are used on this vehicle.
This illustration shows a common type of
fuse used on this vehicle.
■After a fuse is replaced
●If the lights do not turn on even after the
fuse has been replaced, a bulb may need
replacement. ( P.384)
●If the replaced fuse blows again, have the
vehicle inspected by your Lexus dealer.
■If there is an overload in a circuit
The fuses are designed to blow, protecting
the wiring harness from damage.
Checking and replacing
fuses
If any of the electrical components
do not operate, a fuse may have
blown. If this happens, check and
replace the fuses as necessary.
Checking and replacing fuses
A
B
Page 382 of 508

3826-3. Do-it-yourself maintenance
■When replacing light bulbs
Lexus recommends that you use genuine
Lexus products designed for this vehicle.
Because certain bulbs are connected to cir-
cuits designed to prevent overload,
non-genuine parts or parts not designed for
this vehicle may be unusable.
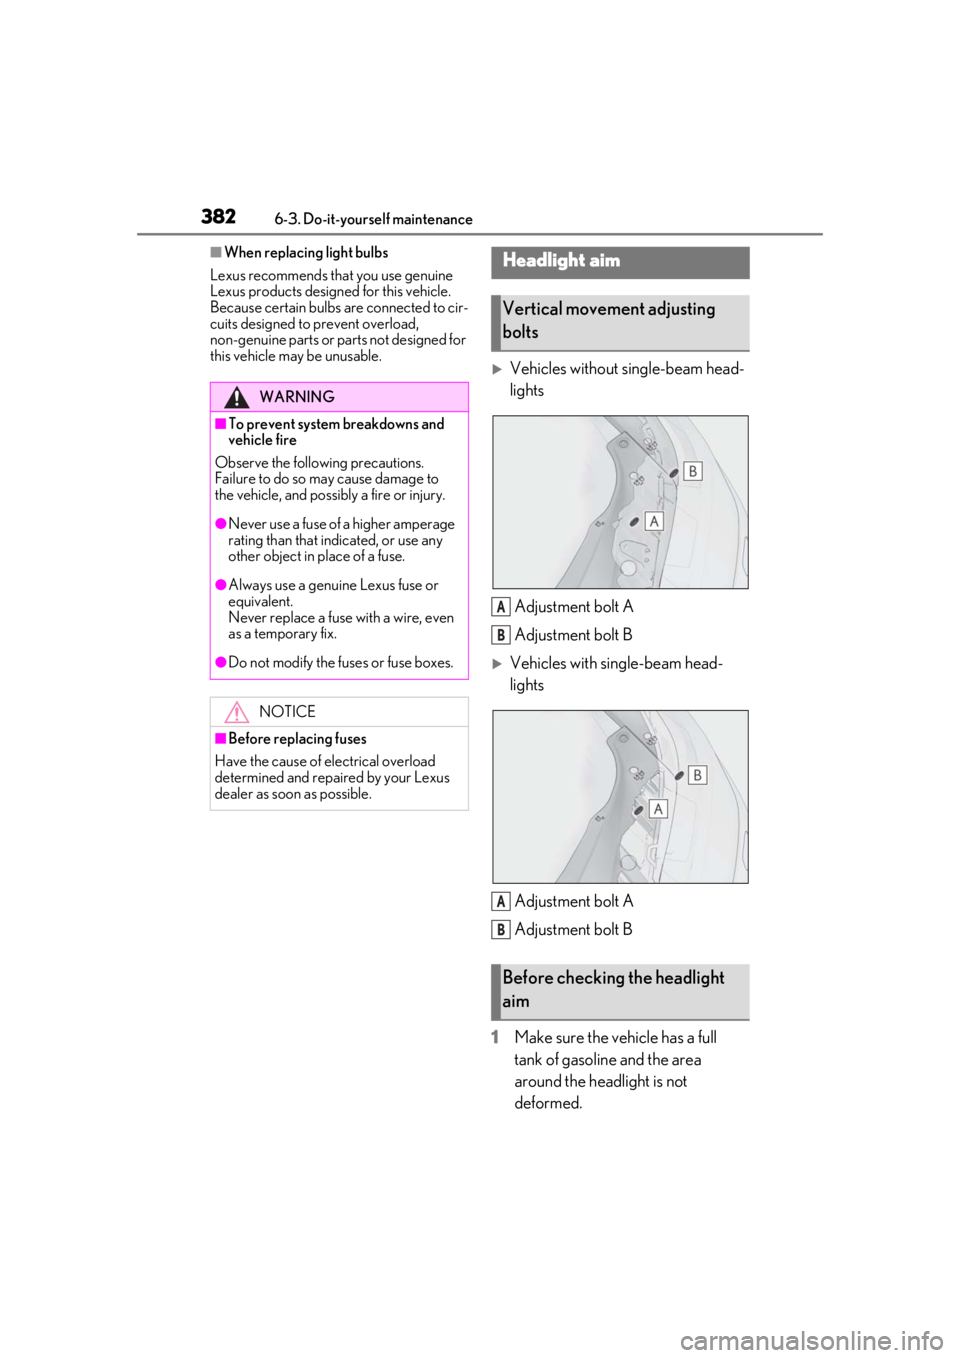
Vehicles without single-beam head-
lights
Adjustment bolt A
Adjustment bolt B
Vehicles with single-beam head-
lightsAdjustment bolt A
Adjustment bolt B
1 Make sure the vehicle has a full
tank of gasoline and the area
around the headlight is not
deformed.
WARNING
■To prevent system breakdowns and
vehicle fire
Observe the following precautions.
Failure to do so may cause damage to
the vehicle, and possibly a fire or injury.
●Never use a fuse of a higher amperage
rating than that indicated, or use any
other object in place of a fuse.
●Always use a genuine Lexus fuse or
equivalent.
Never replace a fuse with a wire, even
as a temporary fix.
●Do not modify the fuses or fuse boxes.
NOTICE
■Before replacing fuses
Have the cause of electrical overload
determined and repaired by your Lexus
dealer as soon as possible.
Headlight aim
Vertical movement adjusting
bolts
Before checking the headlight
aim
A
B
A
B